Attention: Here be dragons
This is the latest
(unstable) version of this documentation, which may document features
not available in or compatible with released stable versions of Godot.
Checking the stable version of the documentation...
WebRTC
HTML5, WebSocket, WebRTC
Una de las grandes características de Godot es su capacidad de exportar a la plataforma HTML5/WebAssembly, lo que permite que el juego se ejecute directamente en el navegador cuando un usuario visita su página web.
Esta es una gran oportunidad tanto para las demostraciones como para los juegos completos, pero solía venir con algunas limitaciones. En el área de redes, los navegadores solían soportar sólo HTTPRequests hasta hace poco, cuando primero se propusieron como estándares WebSocket y luego WebRTC.
Web Socket
When the WebSocket protocol was standardized in December 2011, it allowed browsers to create stable and bidirectional connections to a WebSocket server. The protocol is a very powerful tool to send push notifications to browsers, and has been used to implement chats, turn-based games, etc.
Los WebSockets, sin embargo, siguen usando una conexión TCP, lo que es bueno para la fiabilidad pero no para la latencia, por lo que no es bueno para aplicaciones en tiempo real como VoIP y juegos de ritmo rápido.
WebRTC
Por esta razón, desde 2010, Google comenzó a trabajar en una nueva tecnología llamada WebRTC, que más tarde, en 2017, se convirtió en una recomendación de candidato del W3C. WebRTC es un conjunto de especificaciones mucho más complejo, y se basa en muchas otras tecnologías entre bastidores (ICE, DTLS, SDP) para proporcionar una comunicación rápida, en tiempo real y segura entre dos pares.
La idea es encontrar la ruta más rápida entre los dos pares y establecer siempre que sea posible una comunicación directa (es decir, tratar de evitar un servidor de retransmisión).
Sin embargo, esto tiene un precio, que es que cierta información de los medios de comunicación debe ser intercambiada entre los dos pares antes de que la comunicación pueda comenzar (en forma de Protocolo de Descripción de Sesión - strings SDP). Esto normalmente toma la forma de un llamado Servidor de Señalización WebRTC.
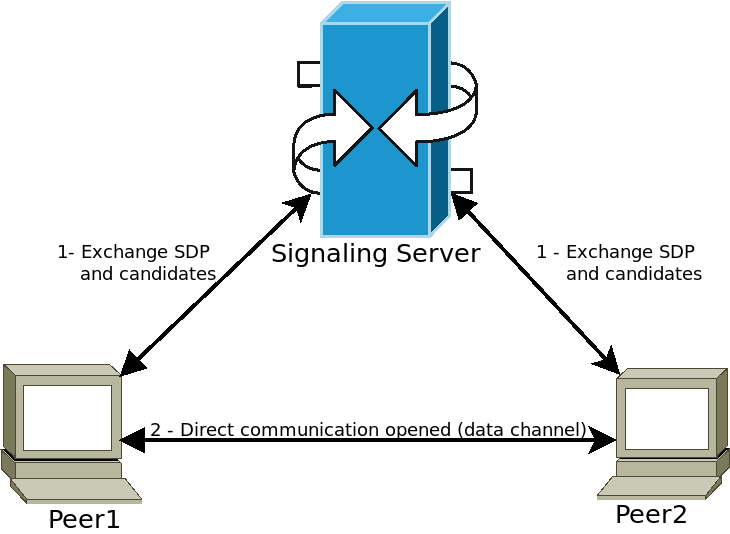
Los pares se conectan a un servidor de señales (por ejemplo, un servidor WebSocket) y envían su información de medios. El servidor luego transmite esta información a otros pares, permitiéndoles establecer la comunicación directa deseada. Una vez realizado este paso, los pares pueden desconectarse del servidor de señalización y mantener abierta la conexión directa Peer-to-Peer (P2P).
Usar WebRTC en Godot
WebRTC is implemented in Godot via two main classes WebRTCPeerConnection and WebRTCDataChannel, plus the multiplayer API implementation WebRTCMultiplayerPeer. See section on high-level multiplayer for more details.
Nota
These classes are available automatically in HTML5, but require an external GDExtension plugin on native (non-HTML5) platforms. Check out the webrtc-native plugin repository for instructions and to get the latest release.
Advertencia
Cuando exportes a Android, asegúrate de habilitar el permiso INTERNET en la configuración de exportación de Android antes de exportar el proyecto o utilizar el despliegue de un solo clic. De lo contrario, la comunicación de red de cualquier tipo será bloqueada por Android.
Ejemplo mínimo de conexión
Este ejemplo le mostrará cómo crear una conexión WebRTC entre dos pares en la misma aplicación. Esto no es muy útil en la vida real, pero te dará una buena visión general de cómo se establece una conexión WebRTC.
extends Node

# Create the two peers
var p1 = WebRTCPeerConnection.new()
var p2 = WebRTCPeerConnection.new()
# And a negotiated channel for each each peer
var ch1 = p1.create_data_channel("chat", {"id": 1, "negotiated": true})
var ch2 = p2.create_data_channel("chat", {"id": 1, "negotiated": true})

func _ready():
    # Connect P1 session created to itself to set local description.
    p1.session_description_created.connect(p1.set_local_description)
    # Connect P1 session and ICE created to p2 set remote description and candidates.
    p1.session_description_created.connect(p2.set_remote_description)
    p1.ice_candidate_created.connect(p2.add_ice_candidate)

    # Same for P2
    p2.session_description_created.connect(p2.set_local_description)
    p2.session_description_created.connect(p1.set_remote_description)
    p2.ice_candidate_created.connect(p1.add_ice_candidate)

    # Let P1 create the offer
    p1.create_offer()

    # Wait a second and send message from P1.
    await get_tree().create_timer(1).timeout
    ch1.put_packet("Hi from P1".to_utf8_buffer())

    # Wait a second and send message from P2.
    await get_tree().create_timer(1).timeout
    ch2.put_packet("Hi from P2".to_utf8_buffer())

func _process(_delta):
    # Poll connections
    p1.poll()
    p2.poll()

    # Check for messages
    if ch1.get_ready_state() == ch1.STATE_OPEN and ch1.get_available_packet_count() > 0:
        print("P1 received: ", ch1.get_packet().get_string_from_utf8())
    if ch2.get_ready_state() == ch2.STATE_OPEN and ch2.get_available_packet_count() > 0:
        print("P2 received: ", ch2.get_packet().get_string_from_utf8())
Esto imprimirá:
P1 received: Hi from P1
P2 received: Hi from P2
Ejemplo de señales locales
Este ejemplo se expande sobre el anterior, separando los pares en dos escenas diferentes, y usando un singleton como servidor de señales.
extends Node
# An example p2p chat client.

var peer = WebRTCPeerConnection.new()

# Create negotiated data channel.
var channel = peer.create_data_channel("chat", {"negotiated": true, "id": 1})

func _ready():
    # Connect all functions.
    peer.ice_candidate_created.connect(self._on_ice_candidate)
    peer.session_description_created.connect(self._on_session)

    # Register to the local signaling server (see below for the implementation).
    Signaling.register(String(get_path()))


func _on_ice_candidate(mid, index, sdp):
    # Send the ICE candidate to the other peer via signaling server.
    Signaling.send_candidate(String(get_path()), mid, index, sdp)


func _on_session(type, sdp):
    # Send the session to other peer via signaling server.
    Signaling.send_session(String(get_path()), type, sdp)
    # Set generated description as local.
    peer.set_local_description(type, sdp)


func _process(delta):
    # Always poll the connection frequently.
    peer.poll()
    if channel.get_ready_state() == WebRTCDataChannel.STATE_OPEN:
        while channel.get_available_packet_count() > 0:
            print(String(get_path()), " received: ", channel.get_packet().get_string_from_utf8())


func send_message(message):
    channel.put_packet(message.to_utf8_buffer())
Y ahora para el servidor de señales locales:
Nota
Este servidor local de señales se supone que debe ser usado como un singleton para conectar dos pares en la misma escena.
# A local signaling server. Add this to autoloads with name "Signaling" (/root/Signaling)
extends Node

# We will store the two peers here
var peers = []

func register(path):
    assert(peers.size() < 2)
    peers.append(path)
    if peers.size() == 2:
        get_node(peers[0]).peer.create_offer()


func _find_other(path):
    # Find the other registered peer.
    for p in peers:
        if p != path:
            return p
    return ""


func send_session(path, type, sdp):
    var other = _find_other(path)
    assert(other != "")
    get_node(other).peer.set_remote_description(type, sdp)


func send_candidate(path, mid, index, sdp):
    var other = _find_other(path)
    assert(other != "")
    get_node(other).peer.add_ice_candidate(mid, index, sdp)
Luego puedes usarlas así:
# Main scene (main.gd)
extends Node

const Chat = preload("res://chat.gd")

func _ready():
    var p1 = Chat.new()
    var p2 = Chat.new()
    add_child(p1)
    add_child(p2)

    # Wait a second and send message from P1
    await get_tree().create_timer(1).timeout
    p1.send_message("Hi from %s" % String(p1.get_path()))

    # Wait a second and send message from P2
    await get_tree().create_timer(1).timeout
    p2.send_message("Hi from %s" % String(p2.get_path()))
Esto imprimirá algo similar a esto:
/root/main/@@3 received: Hi from /root/main/@@2
/root/main/@@2 received: Hi from /root/main/@@3
Señalización remota con WebSocket
Una demostración más avanzada que utiliza WebSocket para señalar pares y WebRTCMultiplayerPeer está disponible en los proyectos de demostración de godot en networking/webrtc_signaling.