Attention: Here be dragons
This is the latest
(unstable) version of this documentation, which may document features
not available in or compatible with released stable versions of Godot.
Checking the stable version of the documentation...
Introducción al 3D
Crear un juego en 3D puede ser todo un reto. Esa coordenada Z extra hace que muchas de las técnicas comunes que ayudaron a hacer juegos 2D simples ya no funcionen. Para ayudar en esta transición, vale la pena mencionar que Godot utiliza APIs similares para 2D y 3D. La mayoría de los nodos son iguales y están presentes en las versiones 2D y 3D. De hecho, vale la pena comprobar el tutorial de plataformas 3D, o los tutoriales de personajes cinemáticos 3D, que son casi idénticos a sus homólogos 2D.

Demo del juego de disparos en tercera persona (TPS) Godot, disponible en el repositorio de Github o en la Librería de Assets.
In 3D, math is a little more complex than in 2D. For an introduction to the relevant math written for game developers, not mathemeticians or engineers, check out Matemáticas vectoriales and Usar transformaciones 3D.
Espacio de trabajo 3D
Editing 3D scenes is done in the 3D workspace. This workspace can be selected manually, but it will be automatically selected when a Node3D node is selected.

Al igual que en 2D, las pestañas debajo del selector de viewport se utilizan para cambiar entre las escenas abiertas o crear una nueva con el botón más (+). Los botones izquierdo y derecho le resultarán familiares de la introducción al editor.
Debajo del selector de escena, se ve la barra de herramientas principal y debajo de la barra de herramientas principal se encuentra el viewport 3D.
Main toolbar
Algunos botones de la barra de herramientas principal son los mismos que los del espacio de trabajo 2D. Se ofrece una breve explicación con el acceso directo si se mantiene el cursor sobre un botón durante un segundo. Algunos botones pueden tener funciones adicionales si se pulsa otra tecla. A continuación, se ofrece un resumen de la funcionalidad principal de cada botón con su acceso directo predeterminado, de izquierda a derecha:

Transform Mode (Q): Enables a combined move + rotation mode for the selected nodes.
Modo de Movimiento (W): Habilita el modo de movimiento (o traslación) para los nodos seleccionados. Véase Gizmos de espacio y manipulación para más detalles.
Modo de Rotación (E): Habilita el modo de rotación para los nodos seleccionados. Véase Gizmos de espacio y manipulación para más detalles.
Modo de Escala (R): Habilita los gizmos de escalado en diferentes ejes para los nodos seleccionados. Véase Gizmos de espacio y manipulación para más detalles.
Modo de Selección (Q): Permite seleccionar nodos en el viewport. Un nodo se selecciona usando el clic izquierdo del ratón. Al hacer clic izquierdo y arrastrar un rectángulo, se seleccionan todos los nodos dentro de sus límites; al soltarlo, se seleccionan. Al mantener presionada la tecla Mayús mientras se selecciona, se añaden más nodos. Al hacer clic en un nodo seleccionado mientras se mantiene presionada la tecla Mayús, se deselecciona. En este modo, se pueden usar los gizmos para mover o rotar.
Mostrar la lista de nodos seleccionables en la posición pulsada: Como sugiere la descripción, esto proporciona una lista de nodos seleccionables en la posición en la que se hizo clic como un menú contextual, si hay más de un nodo en el área en la que se hizo clic.
Bloquear Nodos Seleccionados (Ctrl + L) Bloquea los nodos seleccionados, impidiendo su selección y movimiento en el viewport. Al hacer clic de nuevo en el botón (o usando Ctrl + Mayús + L), se desbloquean los nodos seleccionados. Los nodos bloqueados solo se pueden seleccionar en el árbol de escenas. Se identifican fácilmente con un candado junto a sus nombres en el árbol de escenas. Al hacer clic en este candado, también se desbloquean los nodos.
Agrupar Nodos Seleccionados (Ctrl + G). Esto permite seleccionar el nodo raíz si alguno de los secundarios está seleccionado. Usar Ctrl + G los desagrupa. Además, al hacer clic en el botón de desagrupar en el árbol de escenas se realiza la misma acción.
Modo de Regla (M): Cuando está habilitado, puedes hacer clic y arrastrar para medir dentro de la escena distancias en metros.
Usar Espacio Local (T): Si está habilitado, los gizmos de un nodo se dibujan utilizando el ángulo de rotación del nodo actual en lugar de los ejes del viewport global.
Usar Ajuste (Y): Si está habilitado, el movimiento y la rotación se ajustan a la cuadrícula. El ajuste también se puede activar temporalmente presionando Ctrl mientras se realiza la acción. A continuación se explican los ajustes para cambiar sus opciones.
Use Trackball (U): When enabled, dragging the center of a node (represented by a subtle ray disc highlight) will rotate the node like a physical trackball.
Preserve Children Transform (P): When enabled, transforming a node will preserve the global transform of its children.
Cambiar la previsualización de la luz solar: Si no existe DirectionalLight3D en la escena, se puede usar una vista previa de la luz solar como fuente de luz. Véase Preview environment and light para más detalles.
Cambiar la previsualización del entorno: Si no existe un WorldEnvironment en la escena, se puede usar una vista previa del entorno como marcador de posición. Véase Preview environment and light para más detalles.
Editar Configuración del Sol y Entorno (tres puntos): Abre el menú para configurar la vista previa del sol y el entorno. Véase Preview environment and light para más detalles.
Transform menu: It has three options:
Ajustar Objeto al Suelo: Ajusta un objeto a un piso sólido.
Diálogo de Transformación: Abre un diálogo para ajustar los parámetros de transformación (trasladar, rotar, escalar y transformar) manualmente.
Configurar Ajuste: Le permite cambiar las configuraciones de traslado, rotación y ajuste (en grados) y escala de ajuste (en porcentaje).
Menú Ver: Controla las opciones de visualización y habilita viewports adicionales:

En este menú, también puede mostrar u ocultar las cuadrículas, que por defecto tienen un tamaño de 1x1 metro, y el origen, donde se intersecan las líneas de los ejes azul, verde y rojo. Además, puedes activar y desactivar tipos específicos de artilugios en este menú.

Un ojo abierto significa que el gizmo es visible; un ojo cerrado, que está oculto. Un ojo entreabierto significa que también es visible a través de superficies opacas.
Al hacer clic en Configuración en este menú Ver, se abre una ventana para cambiar los parámetros Perspectiva VFOV (Vertical Field of View - Campo de Visión Vertical) (en grados), Z-Cerca y Z-Lejos.
Junto al menú Ver, pueden aparecer botones adicionales. En la imagen de la barra de herramientas al inicio de este capítulo, aparece un botón adicional Mesh porque se ha seleccionado un MeshInstance3D. Este menú ofrece algunas acciones rápidas o herramientas para trabajar en un nodo específico o selección.
View menu of viewport
Below the Select tool, in the 3D viewport, clicking on the three dots opens the View menu for the viewport. Hiding all shown gizmos in the editor's 3D view can also be performed through this menu:

This menu also displays the current view type and enables quick adjustment of the viewport's viewing angle. Additionally, it offers options to modify the appearance of nodes within the viewport.
Sistema de Coordenadas
Godot utiliza el sistema métrico para todo en 3D, donde 1 unidad equivale a 1 metro. La física y otras áreas están ajustadas para esta escala. Por lo tanto, intentar utilizar una escala diferente generalmente es una mala idea (a menos que sepas lo que estás haciendo).
Al trabajar con recursos 3D, siempre es mejor trabajar en la escala correcta (ajusta el DCC a métrico). Godot permite escalar después de la importación y, aunque esto funciona en la mayoría de los casos, en situaciones poco frecuentes puede presentar problemas de precisión de punto flotante (y, por lo tanto, errores o defectos) en áreas delicadas como el renderizado o la física. Por lo tanto, ¡asegúrate de que tus artistas siempre trabajen en la escala correcta!
La coordenada Y se usa para “arriba”, pensado para la mayoría de los objetos que necesitan alineación (como luces, cámaras, colisionador de cápsula, vehículo, etc.), el eje Z se usa como una dirección “apuntando al frente”. Esta convención significa aproximadamente que:
X es los lados
Y es arriba/abajo
Z es adelante/atrás
Mira esta tabla que lo compara con otros programas 3D:

Fuente Freya Holmér
Gizmos de espacio y manipulación
Moving, rotating, and scaling objects in the 3D view is done through the manipulator gizmos. Each axis is represented by a color: Red, Green, Blue represent X, Y, Z respectively. This convention applies to the grid and other gizmos too (and also to the shader language, ordering of components for Vector3, Color, etc.).

Algunos keybindings útiles:
To snap placement or rotation, press Ctrl while moving, scaling, or rotating.
Para centrar la vista en el objeto seleccionado, presiona F.
En la ventana gráfica, se puede hacer clic y mantener pulsadas las flechas para mover el objeto sobre un eje. Se puede hacer clic y mantener pulsados los arcos para rotar el objeto. Para bloquear un eje y mover el objeto libremente en los otros dos, se puede hacer clic, mantener pulsados los rectángulos de colores y arrastrarlos.
Si el modo de transformación se cambia de Modo de selección a Modo de escala, las flechas se reemplazarán por cubos, que se pueden arrastrar para escalar un objeto como si el objeto se estuviera moviendo.
Navigating the 3D environment
En entornos 3D, suele ser importante ajustar el punto de vista o el ángulo desde el que se visualiza la escena. En Godot, navegar por el entorno 3D en la ventana gráfica (o editor espacial) se puede hacer de varias maneras.
Los controles de navegación predeterminados de escena 3D son similares a los de Blender (con el objetivo de tener algún tipo de consistencia en el flujo de trabajo del software libre), pero se incluyen opciones para personalizar los botones y el comportamiento del ratón para que sean similares a otras herramientas en la Configuración del editor. Para cambiar los controles a Maya o Modo, puedes ir a Configuración del Editor > Editores > 3D. Luego, en Navegación, busque Esquema de Navegación.

Usando la configuración predeterminada, los siguientes atajos controlan cómo se puede navegar en la ventana gráfica:
Al presionar el botón central del mouse y arrastrarlo, podrá orbitar alrededor del centro de lo que está en la pantalla.
También es posible hacer clic izquierdo y mantener presionado el manipulador ubicado en la parte superior derecha de la ventana gráfica para orbitar alrededor del centro:

Al hacer clic izquierdo en uno de los círculos de colores, la vista se establecerá en la dirección ortogonal elegida y el menú de vista de la ventana gráfica se actualizará en consecuencia.

Si la vista Perspectiva está habilitada en la ventana gráfica (se puede ver en el menú Ver de la ventana gráfica, no en el de la barra de herramientas principal), al mantener presionado el botón derecho del mouse en la ventana gráfica o presionar Shift + F Mayús + F, se cambia al modo de vista libre. En este modo, puede mover el mouse para observar, usar las teclas WASD W, A, S y D para desplazarse por la vista, E E para subir y Q Q para bajar. Para desactivar este modo, suelte el botón derecho del mouse o presione Shift + F Mayús + F nuevamente.
In the free-look mode, you can temporarily increase the flying speed using Shift or decrease it using Alt. To change and keep the speed modifier use mouse wheel up or mouse wheel down, to increase or decrease it, respectively.
En el modo ortogonal, al mantener pulsado el botón derecho del ratón, se desplazará la vista. Utiliza Keypad 5 para alternar entre la perspectiva y la vista ortogonal.
Usar atajos de transformación estilo Blender
A partir de la versión 4.2 de Godot puedes habilitar atajos estilo Blender para mover, rotar y escalar nodos. En blender esos atajos son:
G para mover
R para rotar
S para escalar
Tras presionar una tecla de atajo mientras se centra la pestaña del editor 3D, mueve el ratón o pulsa un número para mover los modos seleccionados la cantidad especificada en unidades tridimensionales. Puedes restringir el movimiento a un eje concreto especificando primero el eje con una letra y después la distancia (si se añade un valor con el teclado).
Por ejemplo, para mover la selección hacia arriba 2.5 unidades, usa la siguiente secuencia de teclas en orden (Y+ es hacia arriba en Godot):
G-Y-2-.-5-Enter
Para usar los atajos de transformación estilo blender en Godot, ve a la pestaña de Atajos de los Ajustes del Editor, luego en la sección de Editor Espacial:
Enlazar Comenzar Transformación de Traslación con G.
Enlazar Comenzar Transformación de Rotación con R.
Enlazar Comenzar Transformación de Escalado con S.
Finalmente, desenlazar Modo Escalado de modo que ese atajo no entrará en conflicto con Comenzar Transformación de Rotación.
Truco
Se pueden encontrar más atajos en la página 3D / Editor Espacial.
Nodo Node3D
Node2D es el nodo base para 2D. Control es el nodo base para todo el GUI. Siguiendo este razonamiento, el motor 3D utiliza el nodo Node3D para todo lo que es 3D.

Los nodos 3D tienen una transformación local, que es relativa al nodo padre (siempre que el nodo padre también sea o herede del tipo Nodo3D). Se puede acceder a esta transformación como un 3×4 Transform3D, o como 3 Vector3 miembros que representan la ubicación, la rotación de Euler (ángulos X, Y y Z) y la escala.

Contenido 3D
A diferencia de 2D, donde la carga de contenido y dibujo de imágenes es directa, 3D es un poco más difícil. El contenido debe crearse con una herramienta 3D especial (normalmente denominada DCC) y exportarse a un formato de archivo de intercambio para poder importarse en Godot (los formatos 3D no están tan estandarizados como las imágenes).
Geometría generada
Es posible crear geometría personalizada usando el recurso ArrayMesh directamente. Simplemente crea tus arrays y usa la función ArrayMesh.add_surface_from_arrays(). También está disponible una clase de utilidad, SurfaceTool, que proporciona una API más sencilla y ayuda para indexar, generar normales, tangentes, etc.
En cualquier caso, este método está destinado a generar geometría estática (modelos que no se actualizarán con frecuencia), ya que la creación de arrays de vértices y su envío a la API 3D tiene un coste de rendimiento significativo.
Nota
Para obtener más información sobre la creación de prototipos dentro de Godot o el uso de herramientas externas, véase Prototipando niveles con CSG.
Geometría inmediata
Si, en cambio, necesita generar geometría simple que se actualizará con frecuencia, Godot proporciona un recurso especial ImmediateMesh que se puede utilizar en un nodo MeshInstance3D. Esto proporciona una API de modo inmediato al estilo OpenGL 1.x para crear puntos, líneas, triángulos, etc.
2D en 3D
Mientras que Godot cuenta con un potente motor 2D, muchos tipos de juegos utilizan 2D en un entorno 3D. Utilizando una cámara fija (ya sea ortogonal o perspectiva) que no gira, nodos como Sprite3D y AnimatedSprite3D pueden ser usados para crear juegos 2D que se aprovechan de la mezcla con fondos 3D, parallax más realistas, efectos de iluminación/sombra, etc.
La desventaja es, por supuesto, que la complejidad añadida y el rendimiento reducido en comparación con 2D simple, así como la falta de referencia de trabajo en píxeles.
Entorno
Además de editar una escena, a menudo es común editar el entorno. Godot proporciona un nodo WorldEnvironment que permite cambiar el color de fondo, el modo (como por ejemplo, poner un skybox), y aplicar varios tipos de efectos de post-procesamiento incorporados. Los entornos también se pueden anular en la cámara.
Preview environment and light
Por defecto, cualquier escena 3D que no tenga un nodo WorldEnvironment, o un DirectionalLight3D, tendrá una previsualización de lo que falta para iluminar la escena.
La luz de previsualización y de ambiente serán visibles en la escena solo mientras estemos en el editor. Si ejecutas la escena o exportas el proyecto no afectarán a la escena.
La luz de previsualización y de ambiente se puede activar o desactivar desde el menú superior haciendo clic en su icono correspondiente.

El menú desplegable de los tres puntos cercano a esos iconos puede usarse para ajustar las propiedades de la previsualización de ambiente y de luz si están activadas.

El mismo sol y ambiente de previsualización se usa para todas las escenas en un mismo proyecto, así que haz retoques que se deberían aplicar a todas las escenas para las que necesites esta previsualización de luces.
Cámaras
No importa cuántos objetos se coloquen en el espacio 3D, no se mostrará nada a menos que también se agregue una Camera3D a la escena. Las cámaras pueden funcionar en proyecciones ortogonales o en perspectiva:

Las cámaras están asociadas y sólo se muestran en el Viewport de un padre o abuelo. Dado que la raíz del árbol de escenas es un viewport, las cámaras se mostrarán en él de forma predeterminada, pero si se desean sub-viewports (ya sea como objetivo de render o como imagen-en-imagen), estos necesitan sus propias cámaras hijas para que se muestre su contenido.
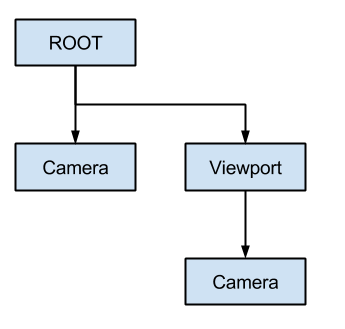
Cuando se trata de varias cámaras, se siguen las siguientes reglas para cada viewport:
Si no hay cámaras en el árbol de escenas, la primera que entre en él se convertirá en la cámara activa. Otras cámaras que entren en la escena serán ignoradas (a menos que estén configuradas como actual).
Si una cámara tiene la propiedad "actual" establecida, se utilizará independientemente de cualquier otra cámara de la escena. Si la propiedad está configurada, se activará, sustituyendo a la cámara anterior.
Si una cámara activa deja el árbol de escena, la primera cámara en orden de árbol tomará su lugar.
Luces
El entorno de fondo emite un poco de luz ambiental la cual, aparece en superficies. Incluso si no hay ninguna fuente de luz colocada en la escena, la escena se verá muy oscura a menos que el entorno de fondo sea muy brillante.
La mayoría de escenas de exterior tienen una luz direccional (el sol o la luna), mientras que las escenas de interior suelen tener varias luces posicionales (lámparas, antorchas, etc.). Mira Luces y sombras 3D para más información sobre la configuración de las luces en Godot.