Attention: Here be dragons
This is the latest
(unstable) version of this documentation, which may document features
not available in or compatible with released stable versions of Godot.
Checking the stable version of the documentation...
Propiedades del sistema de partículas 3D
Propiedades del emisor

La casilla de verificación junto a la propiedad Emitting activa y desactiva el sistema de partículas. Las partículas solo se procesarán y renderizarán si la casilla está marcada. Puedes establecer esta propiedad en tiempo de ejecución si deseas activar o desactivar los sistemas de partículas de forma dinámica.
La propiedad Amount controla el número máximo de partículas visibles en un momento dado. Aumenta este valor para generar más partículas a costa del rendimiento.
La propiedad Amount Ratio es la proporción de partículas en comparación con la cantidad total que se emitirá. Si es menor que 1.0, la cantidad de partículas emitidas durante el tiempo de vida será el resultado de Amount * Amount Ratio. Cambiar este valor mientras se están emitiendo no afecta a las partículas ya creadas ni provoca que el sistema de partículas se reinicie. Es útil para crear efectos donde el número de partículas emitidas varía con el tiempo.
Puedes configurar otro nodo de partículas como un Sub Emitter, el cual se generará como hijo de cada partícula. Consulta la sección de Sub-emitters en este manual para una explicación detallada sobre cómo añadir un subemisor a un sistema de partículas.
Propiedades del tiempo
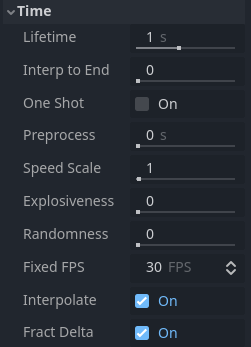
La propiedad Lifetime controla cuánto tiempo existe cada partícula antes de volver a desaparecer. Se mide en segundos. Muchas propiedades de las partículas pueden configurarse para que cambien a lo largo de su tiempo de vida y se mezclen suavemente de un valor a otro.
Lifetime y Amount están relacionados. Determinan la tasa de emisión del sistema de partículas. Siempre que quieras saber cuántas partículas se generan por segundo, esta es la fórmula que debes usar:
Ejemplo: Emitir 32 partículas con un tiempo de vida de 4 segundos cada una significaría que el sistema emite 8 partículas por segundo.
La propiedad Interp to End hace que todas las partículas del nodo interpolen hacia el final de su tiempo de vida.
Si la casilla de verificación junto a la propiedad One Shot está marcada, el sistema de partículas emitirá la cantidad definida en amount y luego se desactivará. Solo se «ejecuta» una vez. Esta propiedad está desmarcada por defecto, por lo que el sistema seguirá emitiendo partículas hasta que se desactive o se destruya manualmente. Las partículas de un solo uso (one-shot) son ideales para efectos que reaccionan a un evento único, como la recogida de objetos o las astillas que saltan cuando una bala impacta contra una pared.
The Preprocess property is a way to fast-forward to a point in the middle of the
particle system's lifetime and start rendering from there. It is measured in seconds. A value of
1 means that when the particle system starts, it will look as if it has been
running for one second already.
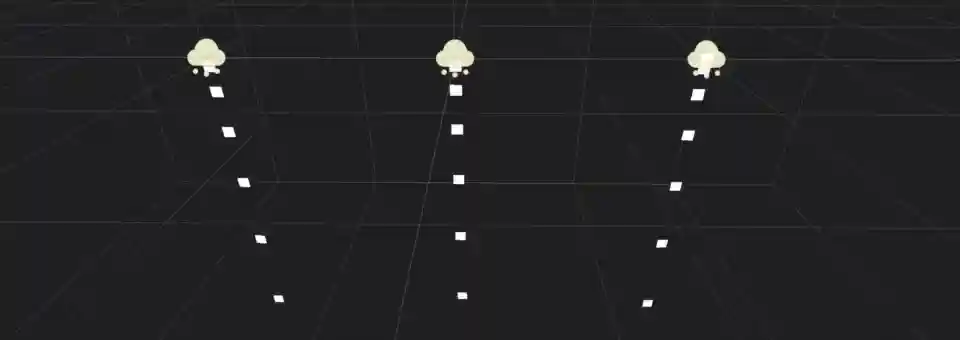
Esto puede ser útil si quieres que el sistema de partículas parezca que ha estado activo durante un tiempo aunque se haya cargado recientemente en la escena. Considera el ejemplo siguiente. Ambos sistemas de partículas simulan el polvo que vuela por el área. Con un valor de preprocesamiento de 0, no habría polvo durante los primeros segundos porque el sistema aún no ha emitido suficientes partículas para que el efecto se note. Esto se puede ver en el video de la izquierda. Compáralo con el video de la derecha donde el sistema de partículas se preprocesa durante 4 segundos. El polvo es completamente visible desde el principio porque nos saltamos los primeros cuatro segundos del tiempo de "configuración".
No preprocess (left) vs. 4 seconds of preprocess (right)
You can slow down or speed up the particle system with the Speed Scale property. This applies
to processing the data as well as rendering the particles. Set it to 0 to pause the particle
system completely or set it to something like 2 to make it move twice as fast.
Different speed scale values: 0.1 (left), 0.5 (middle), 1.0 (right)
The Explosiveness property controls whether particles are emitted sequentially or simultaneously.
A value of 0 means that particles emit one after the other.
A value of 1 means that all amount particles emit at the same time, giving
the effect a more "explosive" appearance.
The Randomness property adds some randomness to the particle emission timing. When set to 0,
there is no randomness at all and the interval between the emission of one particle and
the next is always the same: the particles are emitted at regular intervals. A Randomness
value of 1 makes the interval completely random. You can use this property to break
up some of the uniformity in your effects. When Explosiveness is set to 1, this
property has no effect.
Interpolación desactivada (izquierda) versus activada (derecha)
The Fixed FPS property limits how often the particle system is processed. This includes
property updates as well as collision and attractors. This can improve performance a lot,
especially in scenes that make heavy use of particle collision. Note that this does not
change the speed at which particles move or rotate. You would use the Speed Scale
property for that.
When you set Fixed FPS to very low values, you will notice that
the particle animation starts to look choppy. This can sometimes be desired if it fits
the art direction, but most of the time, you'll want particle systems to animate smoothly.
That's what the Interpolate property does. It blends particle properties between
updates so that even a particle system running at 10 FPS appears as smooth as
running at 60.
Nota
When using particle collision, tunneling can occur
if the particles move fast and colliders are thin. This can be remedied by increasing
Fixed FPS (at a performance cost).
Propiedades de colisión
Ver también
Setting up particle collision requires following further steps described in 3D Particle collisions.
The Base Size property defines each particle's default collision size, which is used
to check whether a particle is currently colliding with the environment. You would usually want this
to be about the same size as the particle. It can make sense to increase this value
for particles that are very small and move very fast to prevent them from clipping
through the collision geometry.
Propiedades de dibujo
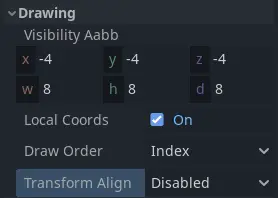
The Visibility AABB property defines a box around the particle system's origin.
As long as any part of this box is in the camera's field of view, the particle system
is visible. As soon as it leaves the camera's field of view, the particle system stops
being rendered at all. You can use this property to boost performance by keeping the
box as small as possible.
One thing to keep in mind when you set a size for the Visibility AABB is that particles
that are outside of its bounds disappear instantly when it leaves the camera's field of view.
Particle collision will also not occur outside the Visibility AABB.
While not technically a bug, this can have a negative effect on the visual experience.
When the Local Coords property is checked, all particle calculations use the local
coordinate system to determine things like up and down, gravity, and movement direction.
Up and down, for example, would follow the particle system's or its parent node's rotation.
When the property is unchecked, the global world space is used for these calculations:
Down will always be -Y in world space, regardless of the particle system's rotation.
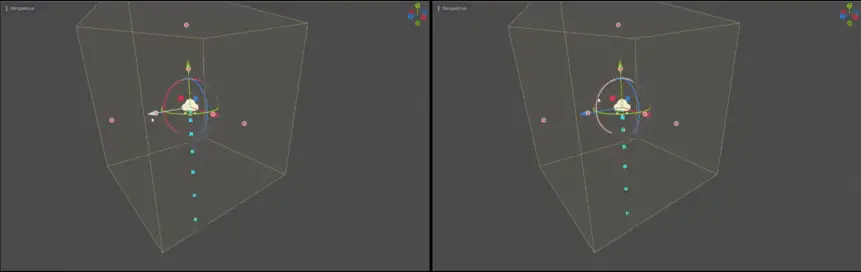
Local space coordinates (left) vs. world space coordinates (right)
The Draw Order property controls the order in which individual particles are drawn. Index means
that they are drawn in the order of emission: particles that are spawned later are drawn
on top of earlier ones. Lifetime means that they are drawn in the order of their
remaining lifetime. Reverse Lifetime reverses the Lifetime draw order. View Depth
means particles are drawn according to their distance from the camera: The ones closer
to the camera on top of those farther away.
La propiedad Transform Align controla la rotación predeterminada de la partícula. Disabled significa que no se alinean de ninguna manera en particular. En cambio, su rotación está determinada por los valores establecidos en el material de proceso. Z-Billboard significa que las partículas siempre estarán orientadas hacia la cámara. Esto es similar a la propiedad Billboard en Standard Material. Y to Velocity significa que el eje Y de cada partícula se alinea con su dirección de movimiento. Esto puede ser útil para cosas como balas o flechas, donde desea que las partículas siempre apunten "hacia adelante". Z-Billboard + Y to Velocity combina los dos modos anteriores. El eje Z de cada partícula apuntará hacia la cámara, mientras que su eje Y se alineará con su velocidad.
Trail properties
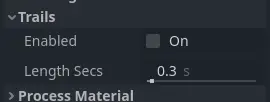
Particle trail properties
The Enabled property controls whether particles are rendered as trails. The box needs
to be checked if you want to make use of particle trails.
The Length Secs property controls for how long a trail should be emitted. The longer
this duration is, the longer the trail will be.
See the Particle trails section in this manual for a detailed explanation of how particle trails work and how to set them up.