Attention: Here be dragons
This is the latest
(unstable) version of this documentation, which may document features
not available in or compatible with released stable versions of Godot.
Checking the stable version of the documentation...
Monitor de alerta
A peça final que nosso jogo precisa é uma Interface de Usuário (UI) para exibir coisas como pontuação, uma mensagem de "game over" e um botão de reiniciar.
Create a new scene, click the "Other Node" button and add a CanvasLayer node named
HUD. "HUD" stands for "heads-up display", an informational display that
appears as an overlay on top of the game view.
O nó CanvasLayer nos permite desenhar nossos elementos de interface em uma camada acima do resto do jogo, de forma que as informações que ela mostrar não fiquem cobertas por quaisquer elementos do jogo, como o jogador ou os inimigos.
O HUD exibirá as seguintes informações:
Pontuação, alterado para
ScoreTimer.Uma mensagem, como "Game Over" ou "Prepare-se!"
Um botão "Iniciar" para começar o jogo.
O nó básico para elementos de interface é Control. Para criar nossa interface, usaremos dois tipos de nós Control: Label e Button.
Crie os seguintes itens como filhos do nó HUD:
Label nomeado
ScoreLabel.Label nomeado
MessageLabel.Button nomeado
StartButton.Timer nomeado
MessageTimer.
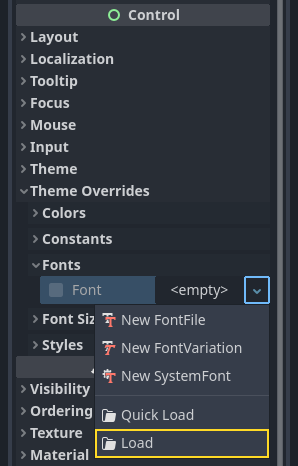
Clique no ScoreLabel e digite um número no campo Text``no Inspetor. A fonte padrão para os nós ``Control é pequena e não escala bem. Há um arquivo de fonte incluído nos assets do jogo chamado "Xolonium-Regular.ttf". Para usar esta fonte, faça o seguinte para cada um dos três nós Control:
Under "Theme Overrides > Fonts", choose "Load" and select the "Xolonium-Regular.ttf" file.
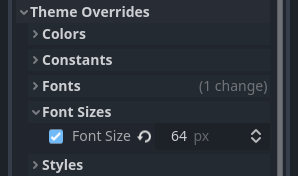
O tamanho da fonte ainda está muito pequeno; aumente-o para 64 em "Theme Overrides > Font Sizes". Depois de fazer isso no nó ScoreLabel, repita as alterações nos nós Message e StartButton.
Nota
Anchors: Control nodes have a position and size,
but they also have anchors. Anchors define the origin -
the reference point for the edges of the node.
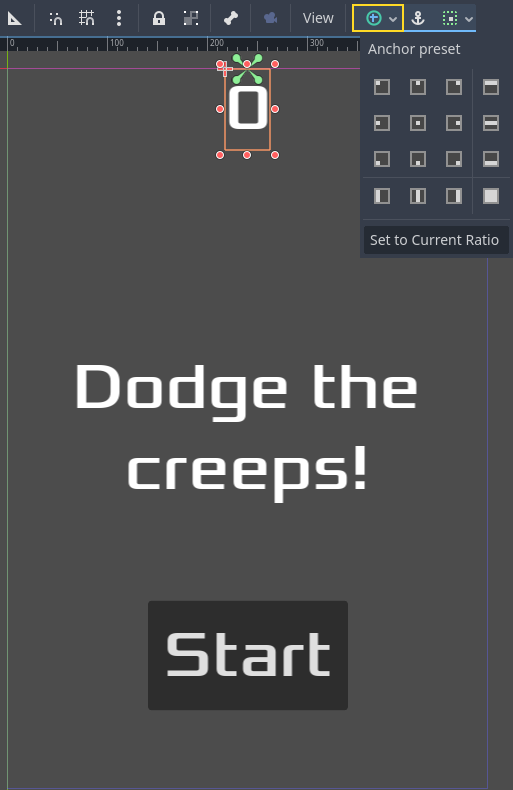
Organize os nós conforme mostrado abaixo. Você pode arrastar os nós para posicioná-los manualmente ou, para um posicionamento mais preciso, usar "Predefinições de âncora".
ScoreLabel
Adicione o texto
0.Defina o "Alinhamento Horizontal" e "Alinhamento Vertical" para
Center.Escolha a "Predefinição de Âncora"
Centro Superior.
Mensagem
Add the text
Dodge the Creeps!.Defina o "Alinhamento Horizontal" e "Alinhamento Vertical" para
Center.Defina o "Modo Autowrap" para
Word, caso contrário o rótulo permanecerá em uma linha.Na aba "Control - Layout - Transform", defina o parâmetro "X" de "Size" para 480 para usar toda a largura da tela.
Escolha a "Predefinição de Âncora"
Centro.
Conectando HUD a Principal
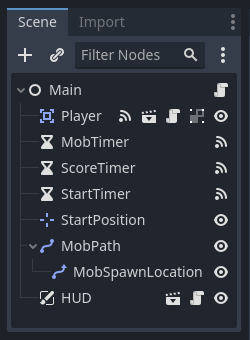
Agora que terminamos de criar a cena HUD, salve-a e volte para a Principal. Crie uma instância da cena HUD como fez com a cena Jogador, e coloque-a no final da árvore. A árvore completa deveria se parecer assim, então confira se não falta alguma coisa:
Agora precisamos conectar a funcionalidade de HUD ao roteiro de Principal. Isso exige algumas adições à cena Principal:
In the Signals tab, connect the HUD's start_game signal to the new_game()
function of the Main node by clicking the "Pick" button in the "Connect a Signal"
window and selecting the new_game() method or type "new_game" below "Receiver Method"
in the window. Verify that the green connection icon now appears next to
func new_game() in the script.
Em new_game(), atualize o mostrador de pontuação e mostre a mensagem "Prepare-se":
$HUD.update_score(score)
$HUD.show_message("Get Ready")
var hud = GetNode<HUD>("HUD");
hud.UpdateScore(_score);
hud.ShowMessage("Get Ready!");
Em game_over(), precisamos chamar a correspondente função de HUD:
$HUD.show_game_over()
GetNode<HUD>("HUD").ShowGameOver();
Finally, add this to _on_score_timer_timeout() to keep the display in sync
with the changing score:
$HUD.update_score(score)
GetNode<HUD>("HUD").UpdateScore(_score);
Aviso
Remember to remove the call to new_game() from
_ready() if you haven't already, otherwise
your game will start automatically.
Now you're ready to play! Click the "Play the Project" button.
Removendo antigas criaturas
Se você jogar até o "Game Over" e iniciar um novo jogo, as criaturas do jogo anterior ainda poderão estar na tela. Seria melhor se todas elas desaparecessem no iníco de cada partida. Nós só precisamos de um jeito de falar para todos os inimigos se auto-destruirem. Nós podemos fazer isso com a funcionalidade "group"(grupo).
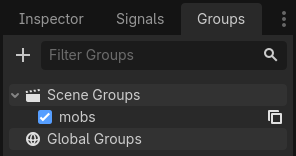
In the Mob scene, select the root node and click the Groups tab next to the
Signals tab and the "+" button to open the "Create New Group" dialog.
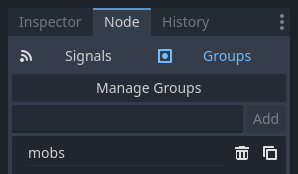
Dê o nome mobs ao grupo e clique em "ok" para adicionar um novo grupo de cena.

Agora todos os mobs estarão no grupo "mobs".
We can then add the following line to the new_game() function in Main:
get_tree().call_group("mobs", "queue_free")
// Note that for calling Godot-provided methods with strings,
// we have to use the original Godot snake_case name.
GetTree().CallGroup("mobs", Node.MethodName.QueueFree);
A função call_group() chama a função passada como parâmetro em cada nó do grupo - neste caso nós estamos falando para cada inimigo se auto-destruir.
O jogo está quase pronto nesse ponto. Na próxima e última parte, daremos um melhor acabamento adicionando um plano de fundo, música em "looping", e alguns atalhos de teclado.