Attention: Here be dragons
This is the latest
(unstable) version of this documentation, which may document features
not available in or compatible with released stable versions of Godot.
Checking the stable version of the documentation...
Game embedding
A Godot permite, opcionalmente, executar o jogo no próprio editor. E essa opção está habilitada por padrão.
Nota
O jogo sempre é executado em um processo separado, independentemente do modo de incorporação utilizado. Isso significa que, se o jogo travar, o editor não será afetado.
Configuring game embedding
Game embedding can be in one of 3 states:
Janela flutuante (padrão): O jogo é executado em uma janela separada, com uma barra de jogo na parte superior que permite ajustar as configurações e selecionar nós no jogo integrado. Clicar no botão da tela principal focaliza a janela flutuante.
Janela principal: O jogo é executado no editor, com uma Barra de Jogo na parte superior que permite ajustar as configurações e selecionar nós no jogo incorporado. Clicar no botão da tela principal alterna para a aba com o projeto em execução.
Desativado: O jogo é executado em uma janela separada, como se fosse um projeto exportado. A barra de jogo na parte superior não está presente; não é possível selecionar nós no jogo incorporado.
Para configurar essa funcionalidade, clique na tela principal do jogo, na parte superior do editor:

Acessando a tela principal de incorporação do jogo
Once on the Game main screen, click the dropdown menu in the top-right corner of the Game bar:
Menu suspenso do modo de incorporação do jogo
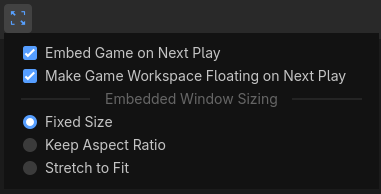
Duas opções estão disponíveis para configurar o modo de incorporação do jogo:
Incorporar Jogo na Próxima Execução: Se ativado, o recurso de incorporação de jogos é habilitado e a barra de jogos fica disponível para uso no jogo em execução.
Tornar a janela flutuante na próxima execução: Se ativado, o jogo será executado em uma janela flutuante. Se desativado, o jogo será executado na janela principal do editor.
Dimensionamento de janelas incorporadas
Como pode ver no menu suspenso à direita da barra de jogos, existem várias opções disponíveis para configurar o comportamento do tamanho da janela incorporada. Isso afeta tanto o modo de incorporação da janela flutuante quanto o da janela principal:
Fixed Size (default): Set the viewport size to a fixed resolution, as configured in the Project Settings. If both display/window/size/window_width_override and display/window/size/window_height_override are set above
0, this override is used instead.Manter proporção: O tamanho da área de visualização se ajusta para corresponder ao tamanho da janela do jogo, mas sempre segue a proporção definida pela
largura / alturaconfigurada nas Configurações do Projeto.Ajustar à tela: O tamanho da área de visualização se ajusta para corresponder ao tamanho da janela do jogo e pode usar uma proporção diferente da
largura / alturaconfigurada nas Configurações do Projeto. Isso corresponde ao comportamento quando a incorporação de jogo está desativada.
Essas opções não têm efeito quando a incorporação de jogo está desativada.
Features
When game embedding is enabled, several features can be adjusted while the project is running using the Game bar at the top.

Game bar at the top of the embedded game window
In order from left to right:
Pausar (F9)
Pauses/resumes the game. When paused, the game will stop processing physics and idle frames, but it will still render and process input. This allows you to select nodes in the scene and inspect their properties in the editor inspector while the game is running.
Avanço de quadro (F10)
Only available when the game is paused. Advances the game by one frame, allowing you to inspect the state of the game at a specific moment in time. This can be used to diagnose short-lived interactions (such as collisions) that are hard to inspect when the game is running at full speed.
Game speed
This option is a menu that can adjust the game speed. If the game sets Engine.time_scale at runtime, it will be multiplied by the value set here.

Game speed dropdown on the left of the Game bar
This can be used to view interactions in slow motion, or speed up the game significantly to test mechanics that normally take a long time to occur.
The reset button to the right of the dropdown resets the game speed to normal (1.0×).
Dica
When adjusting the game speed using this mechanism, the physics tick rate (determined by the physics/common/physics_ticks_per_second project setting) is automatically multiplied by the game speed. This allows the game logic to run at a different speed without affecting the physics simulation. For example:
If you set the game speed to 0.5, the physics tick rate is halved.
Se você definir a velocidade do jogo para 4.0, a taxa de atualização da física será quadruplicada.
The maximum number of physics steps per frame is also increased to match the new physics tick rate, but it will not decrease below the default value when running in slow motion.
Interaction mode
This controls the behavior when clicking or pressing keys while the embedded game window has focus.
Entrada (padrão): Permite a entrada de jogo normalmente.
2D: Disable game input and allow selecting Node2Ds, Controls, and manipulating the 2D camera.
3D: Disable game input and allow selecting Node3Ds and manipulating the 3D camera.
Nodes that are selected in the 2D and 3D modes can be inspected in the editor's inspector, just like if they were selected in the editor. This allows you to inspect and modify properties of nodes in the running game.
Aviso
Like in the Remote scene tree, changes made to the running game this way are not preserved when the game is stopped.
To make changes that are preserved after stopping the game, you need to select the nodes in the editor's Local scene tree and modify them from there while the game is running instead. Make sure is enabled when doing this.
Select mode
Eficaz apenas se o modo de interação for 2D ou 3D, e não Entrada.
When enabling this option, the "show list of selectable nodes at position clicked" mode is disabled. However, you can still perform this action in select mode by using Ctrl + Alt + Right mouse button at the desired location.
Show list of selectable nodes at position clicked
Eficaz apenas se o modo de interação for 2D ou 3D, e não Entrada.
Like in the editor, this shows a list of selectable nodes at the position clicked. This is useful when multiple nodes are overlapping and you want to select a specific one. When enabling this option, select mode is disabled.
Alternar visibilidade da seleção
Eficaz apenas se o modo de interação for 2D ou 3D, e não Entrada.
By default, the selected node in 2D or 3D interaction mode is highlighted with an orange rectangle or box (like in the editor).
When this option is enabled, it appears as a closed eye icon. Future selections will not be highlighted in the game view, but are still selected for inspection in the inspector. This is useful to avoid visual clutter.
Selection advanced options
Two advanced options are available in the dropdown menu next to the select mode icons:
Don't Select Locked Nodes: When enabled, nodes that are locked in the editor cannot be selected. This mimics editor behavior.
Select Group over Children: When enabled, grouped nodes are selected instead of their individual children. This mimics editor behavior.
Mutar áudio do jogo
This mutes game audio when enabled, without affecting the editor or other applications. This is particularly useful on macOS and Android, which do not come with a per-application volume slider out of the box.
Camera override
When enabled, the camera stops following the game camera. You can then move the 2D/3D camera freely by switching to the 2D/3D interaction mode and using the typical navigation controls:
In the 2D interaction mode, use the middle mouse button (or Space + Left mouse button) to pan around and the mouse wheel to zoom.
In the 3D interaction mode, hold the right mouse button and press W, A, S, and D to use freelook. Use the middle mouse button to orbit, Shift + Middle mouse button to pan, and the mouse wheel to zoom. Additionally, you can use Ctrl + Minus, Ctrl + Plus, and Ctrl + 0 to control the field of view (relative to the game's own camera FOV).
This is useful to inspect parts of the scene that are not visible from the game camera's point of view, or to inspect the game camera itself. When the camera override is disabled, the camera will snap back to the game camera's point of view.
When disabling camera override, the overridden camera's position and rotation are not reset. This allows you to quickly toggle back and forth between the game camera and the overridden camera.
Nota
If the camera override appears to be non-interactive, make sure to be in the 2D or 3D interaction mode. The camera override will keep working while in the Input interaction mode, but you won't be able to move the overridden camera while in that mode (unless using the Manipulate From Editors camera override mode as described below).
When overriding the 2D/3D camera, the project's scripts are not aware of this camera override. Keep this in mind when inspecting properties that depend on the camera position, as they will account for the original camera position instead.
Camera override options
Reset 2D/3D Camera: Resets the 2D/3D camera to the position and rotation defined by the game. Note that the camera will still be frozen in place until you disable camera override.
Manipulate In-Game (default): The camera override is controlled from the game window. This allows controlling the camera without needing to switch back to the editor.
Manipulate From Editors: The camera override is controlled from the editor window. This can be useful on multi-monitor setups where the editor can be displayed side-by-side with the running project. Also, when using this option, the camera override position can be remembered across project runs, since it will reuse the editor camera position directly when enabled.
Nota
The camera override may appear less smooth while using the Manipulate From Editors camera override mode, as a result of using local network communication between the editor and the game to update the camera position.
Limitações
Game embedding has a number of limitations to be aware of:
In the Android editor, game embedding always uses a floating window. By default, the floating window is kept on top of the editor using Android's picture-in-picture functionality. This behavior can be disabled in the Game bar by unchecking in the menu on the right of the Game bar.
Window mode changes (e.g. fullscreen) are not supported when using game embedding.
When is used to enable running with multiple instances, only the first instance will use game embedding. Other instances will spawn in their own windows, without the Game bar at the top.