Using TileSets
Introduction
A tilemap is a grid of tiles used to create a game's layout. There are several benefits to using TileMapLayer nodes to design your levels. First, they let you draw a layout by "painting" tiles onto a grid, which is much faster than placing individual Sprite2D nodes one by one. Second, they allow for larger levels because they are optimized for drawing large numbers of tiles. Finally, they allow you to add greater functionality to your tiles with collision, occlusion, and navigation shapes.
To use TileMapLayer nodes, you will need to create a TileSet first. A TileSet is a collection of tiles that can be placed in a TileMapLayer node. After creating a TileSet, you will be able to place them using the TileMap editor.
To follow this guide, you will need an image containing your tiles where every tile has the same size (large objects can be split into several tiles). This image is called a tilesheet. Tiles do not have to be square: they can be rectangular, hexagonal, or isometric (pseudo-3D perspective).
Creating a new TileSet
Using a tilesheet
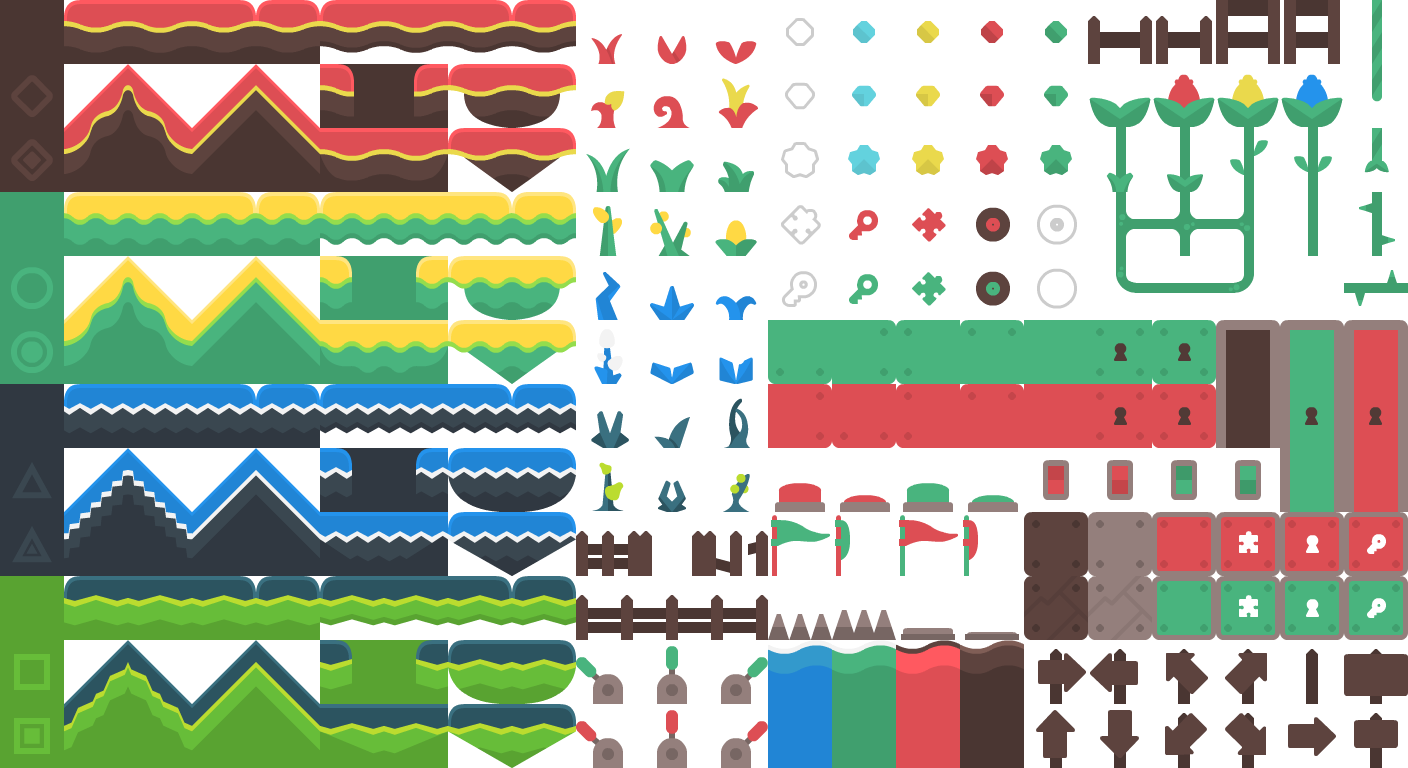
This demonstration will use the following tiles taken from Kenney's "Abstract Platformer" pack. We'll use this particular tilesheet from the set:
Create a new TileMapLayer node, then select it and create a new TileSet resource in the inspector:
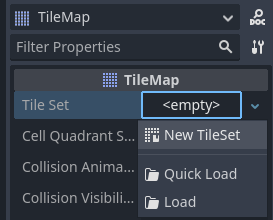
Creating a new TileSet resource within the TileMapLayer node
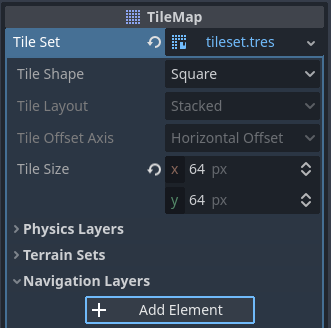
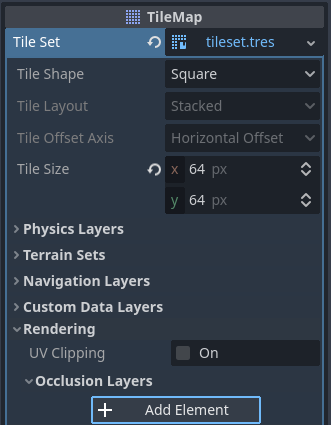
After creating the TileSet resource, click the value to unfold it in the inspector. The default tile shape is Square, but you can also choose Isometric, Half-Offset Square or Hexagon (depending on the shape of your tile images). If using a tile shape other than Square, you may also need to adjust the Tile Layout and Tile Offset Axis properties. Lastly, enabling the Rendering > UV Clipping property may be useful if you wish tiles to be clipped by their tile coordinates. This ensures tiles cannot draw outside their allocated area on the tilesheet.
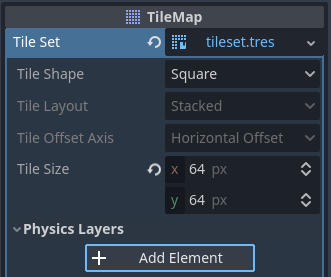
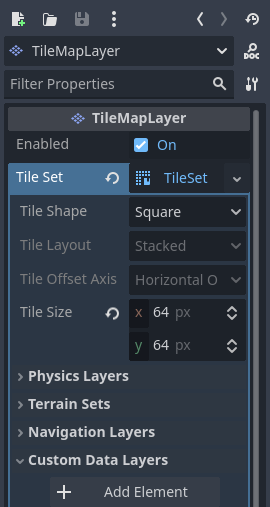
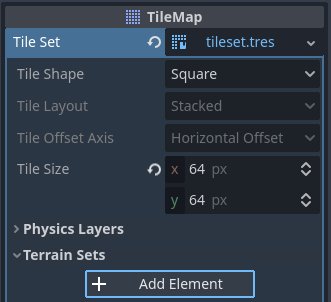
Set the tile size to 64×64 in the inspector to match the example tilesheet:
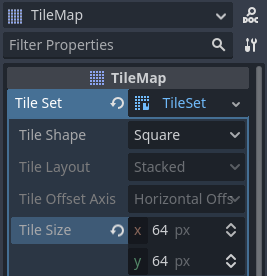
Setting the tile size to 64×64 to match the example tilesheet
If relying on automatic tiles creation (like we're about to do here), you must set the tile size before creating the atlas. The atlas will determine which tiles from the tilesheet can be added to a TileMapLayer node (as not every part of the image may be a valid tile).
Open the TileSet panel at the bottom of the editor, then click and drag the tilesheet image onto the panel. You will be asked whether to create tiles automatically. Answer Yes:
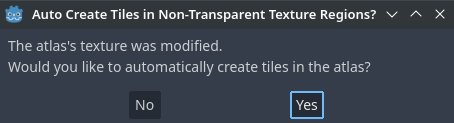
Automatically creating tiles based on tilesheet image content
This will automatically create tiles according to the tile size you specified earlier in the TileSet resource. This greatly speeds up initial tile setup.
Note
When using automatic tile generation based on image contents, parts of the tilesheet that are fully transparent will not have tiles generated.
If there are tiles from the tilesheet you do not wish to be present in atlas, choose the Eraser tool at the top of the tileset preview, then click the tiles you wish to remove:
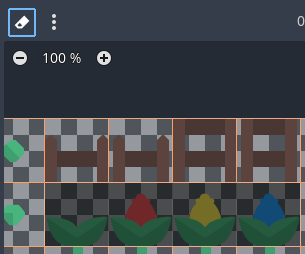
Using the Eraser tool to remove unwanted tiles from the TileSet atlas
You can also right-click a tile and choose Delete, as an alternative to the Eraser tool.
Tip
Like in the 2D and TileMap editors, you can pan across the TileSet panel using the middle or right mouse buttons, and zoom using the mouse wheel or buttons in the top-left corner.
If you wish to source tiles from several tilesheet images for a single TileSet, create additional atlases and assign textures to each of them before continuing. It is also possible to use one image per tile this way (although using tilesheets is recommended for better usability).
You can adjust properties for the atlas in the middle column:

Adjusting TileSet atlas properties in the dedicated inspector (part of the TileSet panel)
The following properties can be adjusted on the atlas:
ID: The identifier (unique within this TileSet), used for sorting.
Name: The human-readable name for the atlas. Use a descriptive name here for organizational purposes (such as "terrain", "decoration", etc).
Margins: The margins on the image's edges that should not be selectable as tiles (in pixels). Increasing this can be useful if you download a tilesheet image that has margins on the edges (e.g. for attribution).
Separation: The separation between each tile on the atlas in pixels. Increasing this can be useful if the tilesheet image you're using contains guides (such as outlines between every tile).
Texture Region Size: The size of each tile on the atlas in pixels. In most cases, this should match the tile size defined in the TileMapLayer property (although this is not strictly necessary).
Use Texture Padding: If checked, adds a 1-pixel transparent edge around each tile to prevent texture bleeding when filtering is enabled. It's recommended to leave this enabled unless you're running into rendering issues due to texture padding.
Note that changing texture margin, separation and region size may cause tiles to be lost (as some of them would be located outside the atlas image's coordinates). To regenerate tiles automatically from the tilesheet, use the three vertical dots menu button at the top of the TileSet editor and choose Create Tiles in Non-Transparent Texture Regions:
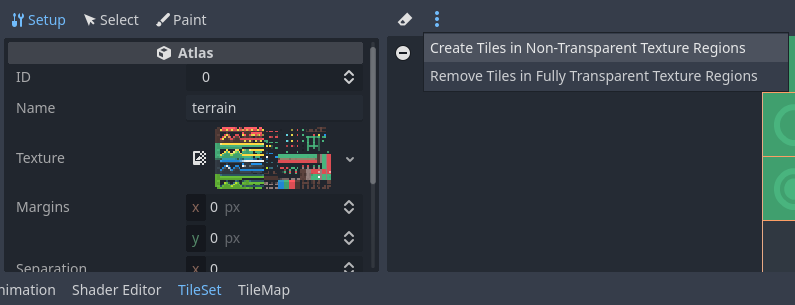
Recreating tiles automatically after changing atlas properties
Using a collection of scenes
You can also place actual scenes as tiles. This allows you to use any collection of nodes as a tile. For example, you could use scene tiles to place gameplay elements, such as shops the player may be able to interact with. You could also use scene tiles to place AudioStreamPlayer2Ds (for ambient sounds), particle effects, and more.
Warning
Scene tiles come with a greater performance overhead compared to atlases, as every scene is instanced individually for every placed tile.
It's recommended to only use scene tiles when necessary. To draw sprites in a tile without any kind of advanced manipulation, use atlases instead.
For this example, we'll create a scene containing a CPUParticles2D root node. Save this scene to a scene file (separate from the scene containing the TileMapLayer), then switch to the scene containing the TileMapLayer node. Open the TileSet editor, and create a new Scenes Collection in the left column:
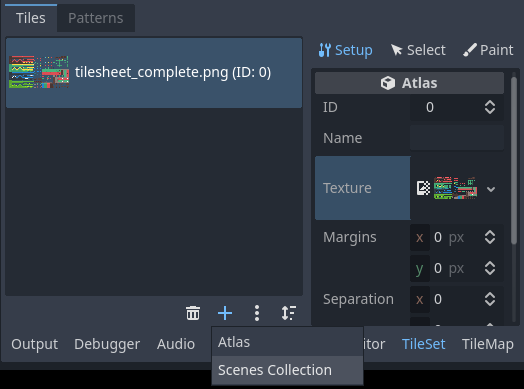
Creating a scenes collection in the TileSet editor
After creating a scenes collection, you can enter a descriptive name for the scenes collection in the middle column if you wish. Select this scenes collection then create a new scene slot:
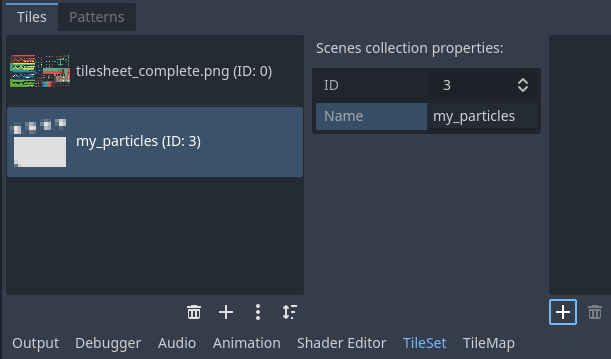
Creating a scene tile after selecting the scenes collection in the TileSet editor
Select this scene slot in the right column, then use Quick Load (or Load) to load the scene file containing the particles:
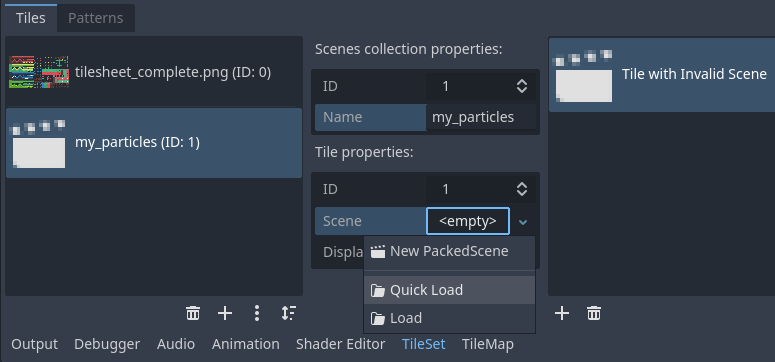
Creating a scene slot, then loading a scene file into it in the TileSet editor
You now have a scene tile in your TileSet. Once you switch to the TileMap editor, you'll be able to select it from the scenes collection and paint it like any other tile.
Merging several atlases into a single atlas
Using multiple atlases within a single TileSet resource can sometimes be useful, but it can also be cumbersome in certain situations (especially if you're using one image per tile). Godot allows you to merge several atlases into a single atlas for easier organization.
To do so, you must have more than one atlas created in the TileSet resource. Use the "three vertical dots" menu button located at the bottom of the list of atlases, then choose Open Atlas Merging Tool:
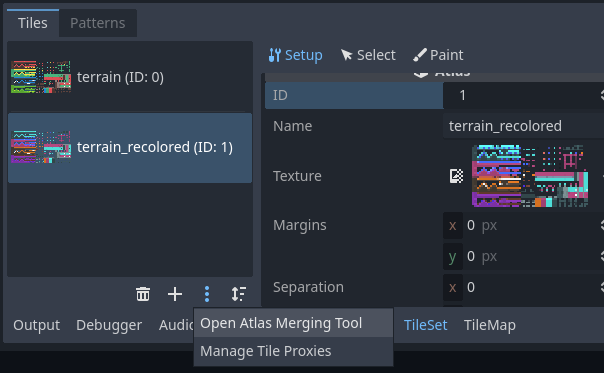
Opening the atlas merging tool after creating multiple atlases
This will open a dialog, in which you can select several atlases by holding Shift or Ctrl then clicking on multiple elements:
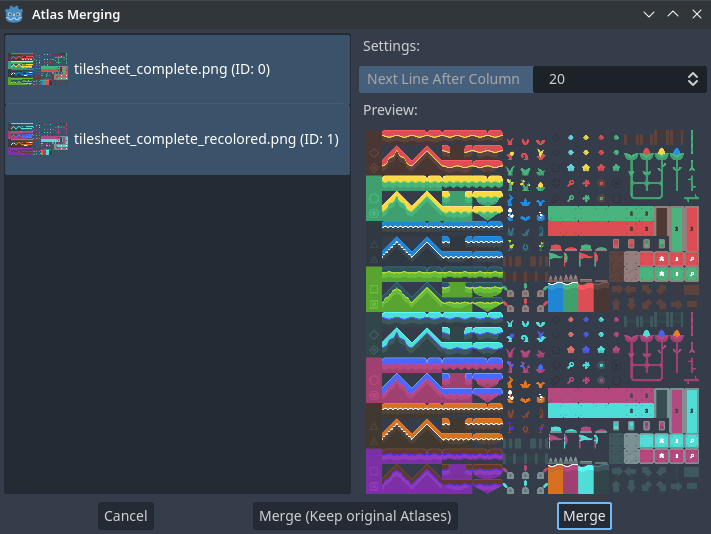
Using the atlas merging tool dialog
Choose Merge to merge the selected atlases into a single atlas image (which translates to a single atlas within the TileSet). The unmerged atlases will be removed within the TileSet, but the original tilesheet images will be kept on the filesystem. If you don't want the unmerged atlases to be removed from the TileSet resource, choose Merge (Keep Original Atlases) instead.
Tip
TileSet features a system of tile proxies. Tile proxies are a mapping table that allows notifying the TileMap using a given TileSet that a given set of tile identifiers should be replaced by another one.
Tile proxies are automatically set up when merging different atlases, but they can also be set manually thanks to the Manage Tile Proxies dialog you can access using the "three vertical dots" menu mentioned above.
Manually creating tile proxies may be useful when you changed an atlas ID or want to replace all tiles from an atlas by the ones from another atlas. Note that when editing a TileMap, you can replace all cells by their corresponding mapped value.
Adding collision, navigation and occlusion to the TileSet
We've now successfully created a basic TileSet. We could start using it in the TileMapLayer node now, but it currently lacks any form of collision detection. This means the player and other objects could walk straight through the floor or walls.
If you use 2D navigation, you'll also need to define navigation polygons for tiles to generate a navigation mesh that agents can use for pathfinding.
Lastly, if you use 2D lights and shadows or GPUParticles2D, you may also want your TileSet to be able to cast shadows and collide with particles. This requires defining occluder polygons for "solid" tiles on the TileSet.
To be able to define collision, navigation and occlusion shapes for each tile, you will need to create a physics, navigation or occlusion layer for the TileSet resource first. To do so, select the TileMapLayer node, click the TileSet property value in the inspector to edit it then unfold Physics Layers and choose Add Element:
Creating a physics layer in the TileSet resource inspector (within the TileMapLayer node)
If you also need navigation support, now is a good time to create a navigation layer:
Creating a navigation layer in the TileSet resource inspector (within the TileMapLayer node)
If you need support for light polygon occluders, now is a good time to create an occlusion layer:
Creating an occlusion layer in the TileSet resource inspector (within the TileMapLayer node)
Note
Future steps in this tutorial are tailored to creating collision polygons, but the procedure for navigation and occlusion is very similar. Their respective polygon editors behave in the same way, so these steps are not repeated for brevity.
The only caveat is that the tile's occlusion polygon property is part of a Rendering subsection in the atlas inspector. Make sure to unfold this section so you can edit the polygon.
After creating a physics layer, you have access to the Physics Layer section in the TileSet atlas inspector:
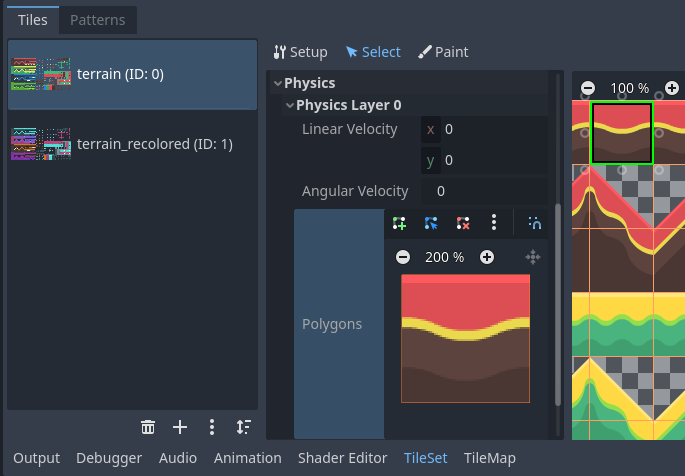
Opening the collision editor while in Select mode
You can quickly create a rectangle collision shape by pressing F while the TileSet editor is focused. If the keyboard shortcut doesn't work, try clicking in the empty area around the polygon editor to focus it:
Using default rectangle collision shape by pressing F
In this tile collision editor, you have access to all the 2D polygon editing tools:
Use the toolbar above the polygon to toggle between creating a new polygon, editing an existing polygon and removing points on the polygon. The "three vertical dots" menu button offers additional options, such as rotating and flipping the polygon.
Create new points by clicking and dragging a line between two points.
Remove a point by right-clicking it (or using the Remove tool described above and left-clicking).
Pan in the editor by middle-clicking or right-clicking. (Right-click panning can only be used in areas where there is no point nearby.)
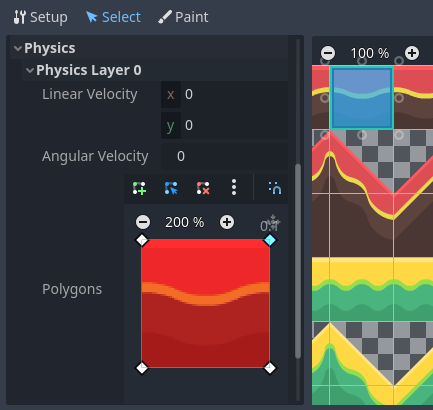
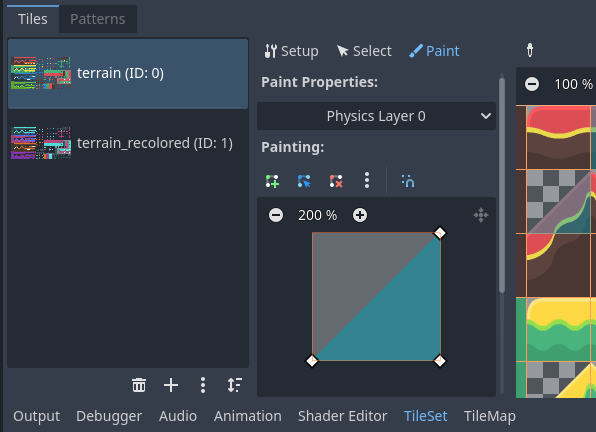
You can use the default rectangle shape to quickly create a triangle-shaped collision shape by removing one of the points:
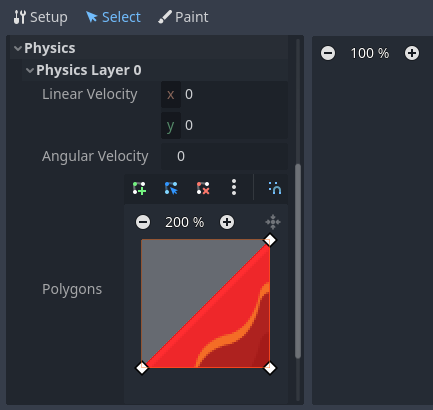
Creating a triangle collision shape by right-clicking one of the corners to remove it
You can also use the rectangle as a base for more complex shapes by adding more points:
Drawing a custom collision for a complex tile shape
Tip
If you have a large tileset, specifying the collision for each tile individually could take a lot of time. This is especially true as TileMaps tend to have many tiles with common collision patterns (such as solid blocks or 45-degree slopes). To apply a similar collision shape to several tiles quickly, use functionality to assign properties to multiple tiles at once.
Assigning custom metadata to the TileSet's tiles
You can assign custom data on a per-tile basis using custom data layers. This can be useful to store information specific to your game, such as the damage that a tile should deal when the player touches it, or whether a tile can be destroyed using a weapon.
The data is associated with the tile in the TileSet: all instances of the placed tile will use the same custom data. If you need to create a variant of a tile that has different custom data, this can be done by creating an alternative tile and changing the custom data for the alternative tile only.
Creating a custom data layer in the TileSet resource inspector (within the TileMapLayer node)
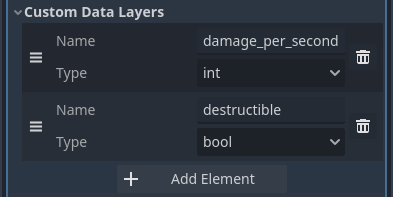
Example of configured custom data layers with game-specific properties
You can reorder custom data without breaking existing metadata: the TileSet editor will update automatically after reordering custom data properties.
With the custom data layers example shown above, we're assigning a tile to have the
damage_per_second metadata set to 25 and the destructible metadata
to false:
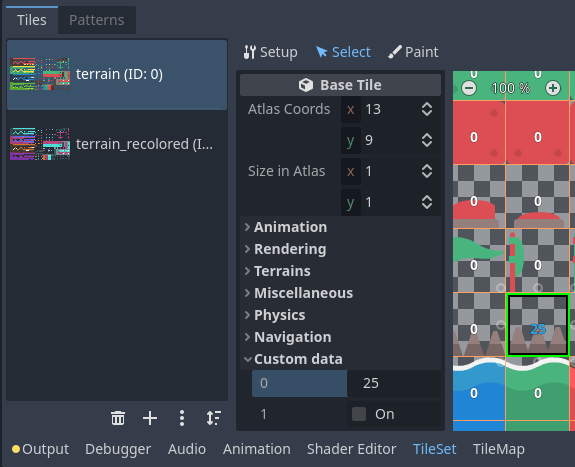
Editing custom data in the TileSet editor while in Select mode
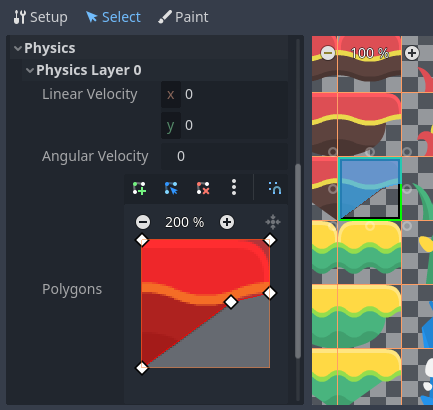
Tile property painting can also be used for custom data:
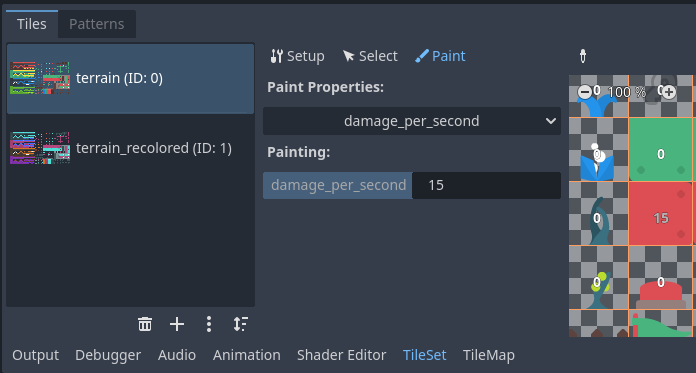
Assigning custom data in the TileSet editor using tile property painting
Creating terrain sets (autotiling)
Note
This functionality was implemented in a different form as autotiling in Godot 3.x. Terrains are essentially a more powerful replacement of autotiles. Unlike autotiles, terrains can support transitions from one terrain to another, as a tile may define several terrains at once.
Unlike before, where autotiles were a specific kind of tiles, terrains are only a set of properties assigned to atlas tiles. These properties are then used by a dedicated TileMap painting mode that selects tiles featuring terrain data in a smart way. This means any terrain tile can be either painted as terrain or as a single tile, like any other.
A "polished" tileset generally features variations that you should use on corners or edges of platforms, floors, etc. While these can be placed manually, this quickly becomes tedious. Handling this situation with procedurally generated levels can also be difficult and require a lot of code.
Godot offers terrains to perform this kind of tile connection automatically. This allows you to have the "correct" tile variants automatically used.
Terrains are grouped into terrain sets. Each terrain set is assigned a mode from Match Corners and Sides, Match Corners and Match sides. They define how terrains are matched to each other in a terrain set.
Note
The above modes correspond to the previous bitmask modes autotiles used in Godot 3.x: 2×2, 3×3 or 3×3 minimal. This is also similar to what the Tiled editor features.
Select the TileMapLayer node, go to the inspector and create a new terrain set within the TileSet resource:
Creating a terrain set in the TileSet resource inspector (within the TileMapLayer node)
After creating a terrain set, you must create one or more terrains within the terrain set:

Creating a terrain within the terrain set
In the TileSet editor, switch to Select mode and click a tile. In the middle
column, unfold the Terrains section then assign a terrain set ID and a
terrain ID for the tile. -1 means "no terrain set" or "no terrain", which
means you must set Terrain Set to 0 or greater before you can set
Terrain to 0 or greater.
Note
Terrain set IDs and terrain IDs are independent from each other. They also
start from 0, not 1.
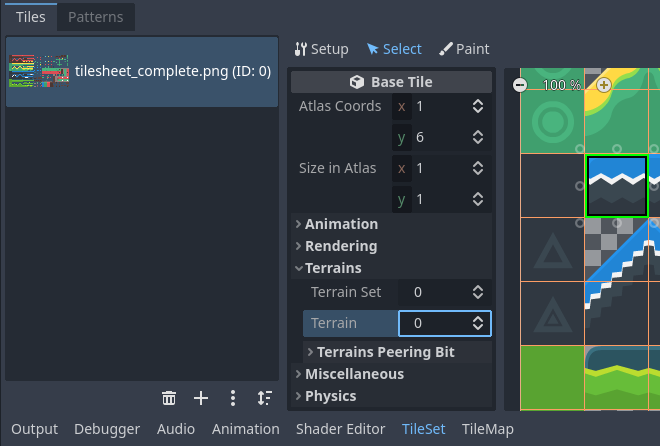
Configuring terrain on a single tile in the TileSet editor's Select mode
After doing so, you can now configure the Terrain Peering Bits section which
becomes visible in the middle column. The peering bits determine which tile will
be placed depending on neighboring tiles. -1 is a special value which refers
to empty space.
For example, if a tile has all its bits set to 0 or greater, it will only
appear if all 8 neighboring tiles are using a tile with the same terrain ID.
If a tile has its bits set to 0 or greater,
but the top-left, top and top-right bits are set to -1, it will only appear
if there is empty space on top of it (including diagonally).
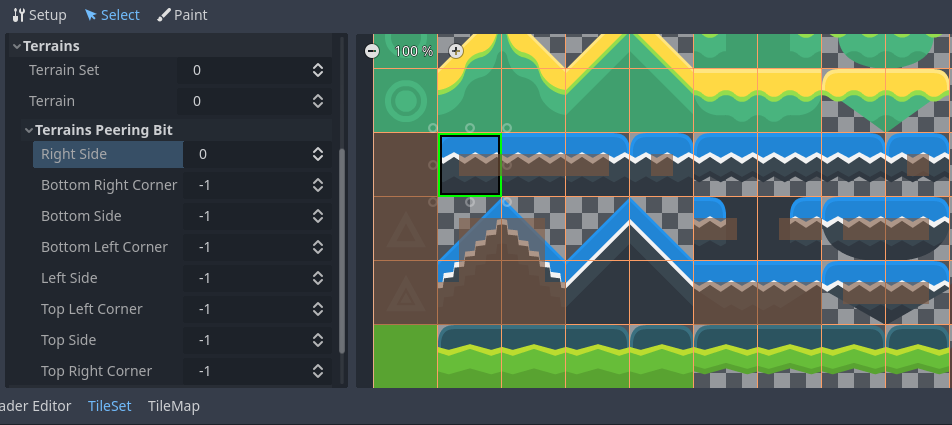
Configuring terrain peering bits on a single tile in the TileSet editor's Select mode
An example configuration for a full tilesheet may look as follows:
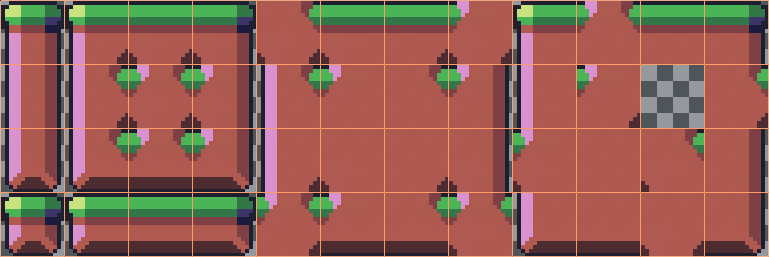
Example full tilesheet for a sidescrolling game
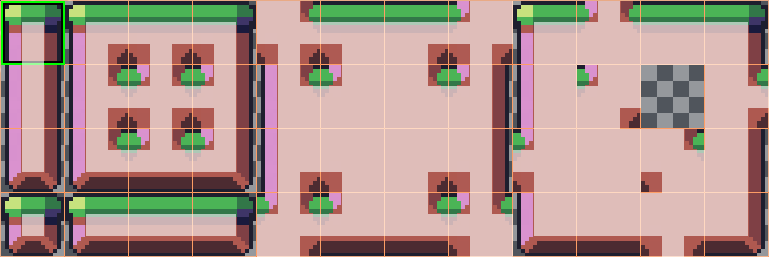
Example full tilesheet for a sidescrolling game with terrain peering bits visible
Assigning properties to multiple tiles at once
There are two ways to assign properties to multiple tiles at once. Depending on your use cases, one method may be faster than the other:
Using multiple tile selection
If you wish to configure various properties on several tiles at once, choose the Select mode at the top of the TileSet editor:
After doing this, you can select multiple tiles on the right column by holding Shift then clicking on tiles. You can also perform rectangle selection by holding down the left mouse button then dragging the mouse. Lastly, you can deselect tiles that were already selected (without affecting the rest of the selection) by holding Shift then clicking on a selected tile.
You can then assign properties using the inspector in the middle column of the TileSet editor. Only properties that you change here will be applied to all selected tiles. Like in the editor's inspector, properties that differ on selected tiles will remain different until you edit them.
With numerical and color properties, you will also see a preview of the property's value on all tiles in the atlas after editing a property:
Selecting multiple tiles using the Select mode, then applying properties
Using tile property painting
If you wish to apply a single property to several tiles at once, you can use the property painting mode for this purpose.
Configure a property to be painted in the middle column, then click on tiles (or hold down the left mouse button) in the right column to "paint" properties onto tiles.
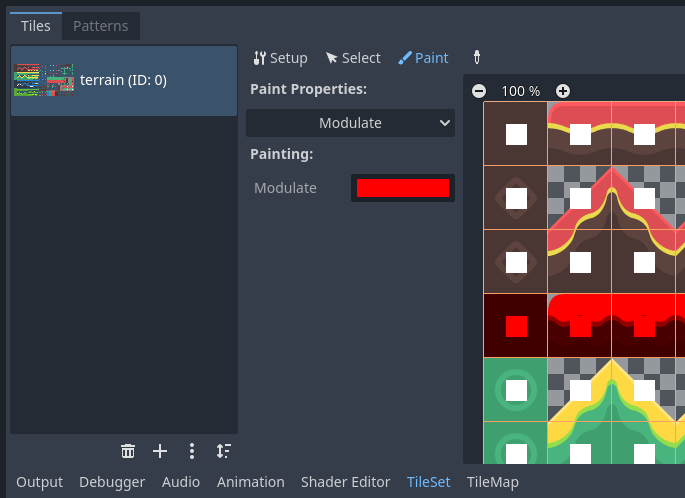
Painting tile properties using the TileSet editor
Tile property painting is especially useful with properties that are time-consuming to set manually, such as collision shapes:
Painting a collision polygon, then left-clicking tiles to apply it
Creating alternative tiles
Sometimes, you want to use a single tile image (found only once within the atlas), but configured in different ways. For example, you may want to use the same tile image, but rotated, flipped, or modulated with a different color. This can be done using alternative tiles.
Tip
Since Godot 4.2, you don't have to create alternative tiles to rotate or flip tiles anymore. You can rotate any tile while placing it in the TileMap editor by using the rotation/flip buttons in the TileMap editor toolbar.
To create an alternative tile, right-click a base tile in the atlas displayed by the TileSet editor, then choose Create an Alternative Tile:
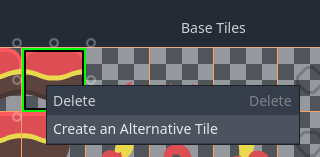
Creating an alternative tile by right-clicking a base tile in the TileSet editor
If currently in Select mode, the alternative tile will already be selected for editing. If not currently in Select mode, you can still create alternative tiles, but you will need to switch to Select mode and select the alternative tile to edit it.
If you don't see the alternative tile, pan over to the right of the atlas image, as alternative tiles always appear on the right of base tiles of a given atlas in the TileSet editor:
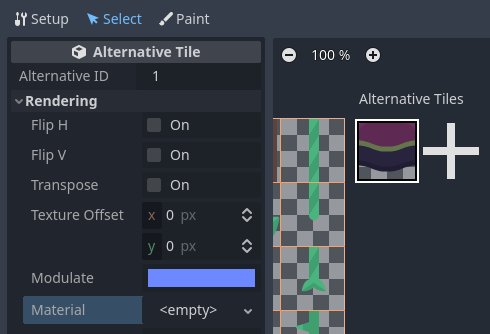
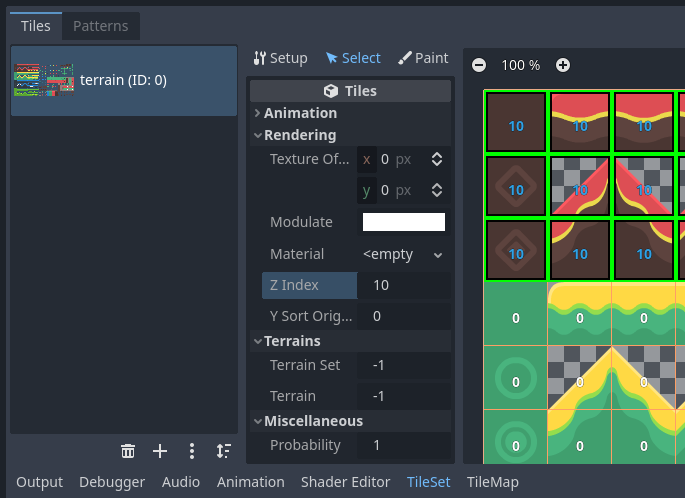
Configuring an alternative tile after clicking it in the TileSet editor
After selecting an alternative tile, you can change any properties using the middle column like you would on a base tile. However, the list of exposed properties is different compared to base tiles:
Alternative ID: The unique numerical identifier for this alternative tile. Changing it will break existing TileMaps, so be careful! This ID also controls the sorting in the list of alternative tiles displayed in the editor.
Rendering > Flip H: If
true, the tile is horizontally flipped.Rendering > Flip V: If
true, the tile is vertically flipped.Rendering > Transpose: If
true, the tile is rotated 90 degrees counter-clockwise and then flipped vertically. In practice, this means that to rotate a tile by 90 degrees clockwise without flipping it, you should enable Flip H and Transpose. To rotate a tile by 180 degrees clockwise, enable Flip H and Flip V. To rotate a tile by 270 degrees clockwise, enable Flip V and Transpose.Rendering > Texture Origin: The origin to use for drawing the tile. This can be used to visually offset the tile compared to the base tile.
Rendering > Modulate: The color multiplier to use when rendering the tile.
Rendering > Material: The material to use for this tile. This can be used to apply a different blend mode or custom shaders to a single tile.
Z Index: The sorting order for this tile. Higher values will make the tile render in front of others on the same layer.
Y Sort Origin: The vertical offset to use for tile sorting based on its Y coordinate (in pixels). This allows using layers as if they were on different height for top-down games. Adjusting this can help alleviate issues with sorting certain tiles. Only effective if Y Sort Enabled is
trueon the TileMapLayer node under CanvasItem > Ordering
You can create an additional alternative tile variant by clicking the large "+" icon next to the alternative tile. This is equivalent to selecting the base tile and right-clicking it to choose Create an Alternative Tile again.
Note
When creating an alternative tile, none of the properties from the base tile are inherited. You must set properties again on the alternative tile if you wish those to be identical on the base tile and the alternative tile.