Resolution scaling
Why use resolution scaling?
With the ever-increasing rendering complexity of modern games, rendering at native resolution isn't always viable anymore, especially on lower-end GPUs.
Resolution scaling is one of the most direct ways to influence the GPU requirements of a scene. In scenes that are bottlenecked by the GPU (rather than by the CPU), decreasing the resolution scale can improve performance significantly. Resolution scaling is particularly important on mobile GPUs where performance and power budgets are limited.
While resolution scaling is an important tool to have, remember that resolution scaling is not intended to be a replacement for decreasing graphics settings on lower-end hardware. Consider exposing both resolution scale and graphics settings in your in-game menus.
See also
You can compare resolution scaling modes and factors in action using the 3D Antialiasing demo project.
Note
Resolution scaling is currently not available for 2D rendering, but it can be
simulated using the viewport stretch mode. See Multiple resolutions
for more information.
Resolution scaling options
In the advanced Project Settings' Rendering > Scaling 3D section, you can find several options for 3D resolution scaling:
Scaling mode
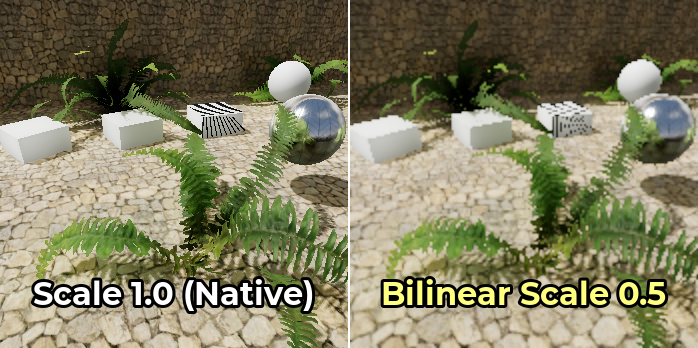
Bilinear: Standard bilinear filtering (default). This is used as a fallback when the current renderer doesn't support FSR 1.0 or FSR 2.2. Available in all renderers.
FSR 1.0: AMD FidelityFX Super Resolution 1.0. Slower, but higher quality compared to bilinear scaling. On very slow GPUs, the cost of FSR1 may be too expensive to be worth using it over bilinear scaling. Only available when using the Forward+ renderer.
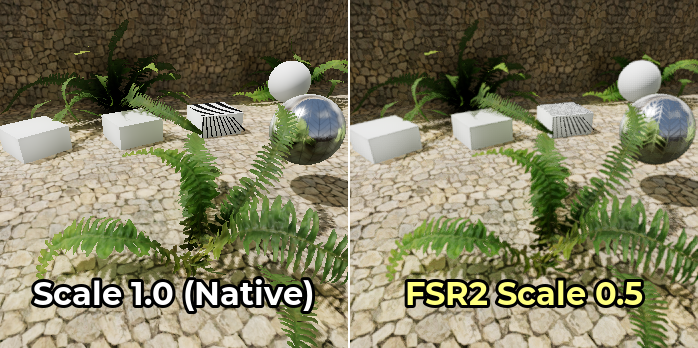
FSR 2.2: AMD FidelityFX Super Resolution 2.2 (since Godot 4.2). Slowest, but even higher quality compared to FSR1 and bilinear scaling. On slow GPUs, the cost of FSR2 may be too expensive to be worth using it over bilinear scaling or FSR1. To match FSR2 performance with FSR1, you need to use a lower resolution scale factor. Only available when using the Forward+ renderer.
Here are comparison images between native resolution, bilinear scaling with 50% resolution scale, FSR1, and FSR2 scaling with 50% resolution scale:
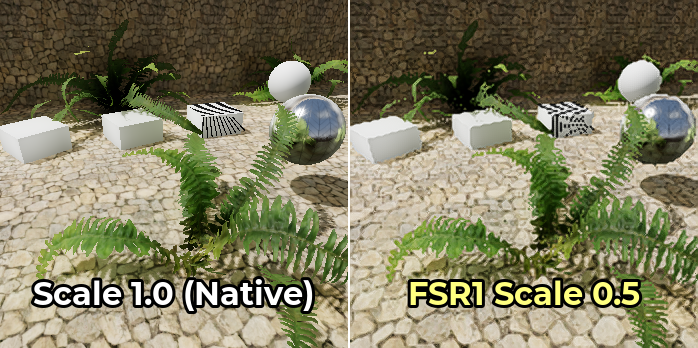
FSR1 upscaling works best when coupled with another form of antialiasing. Temporal antialiasing (TAA) or multisample antialiasing (MSAA) should preferably be used in this case, as FXAA does not add temporal information and introduces more blurring to the image.
On the other hand, FSR2 provides its own temporal antialiasing. This means you don't need to enable other antialiasing methods for the resulting image to look smooth. The Use TAA project setting is ignored when FSR2 is used as the 3D scaling method, since FSR2's temporal antialiasing takes priority.
Here's the same comparison, but with 4× MSAA enabled on all images:
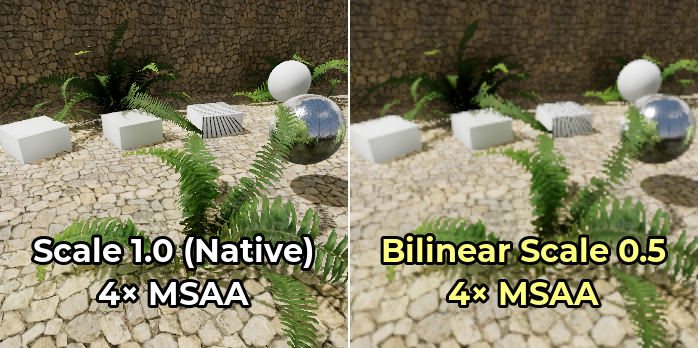
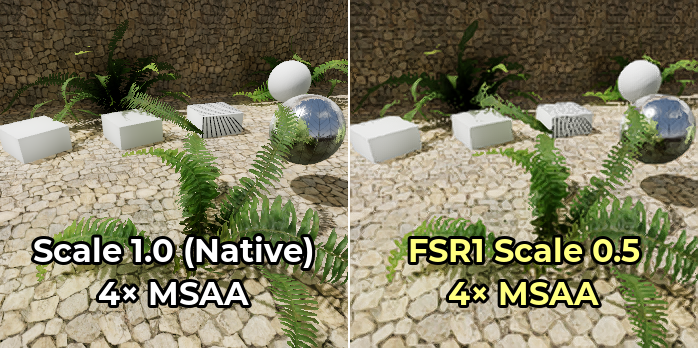
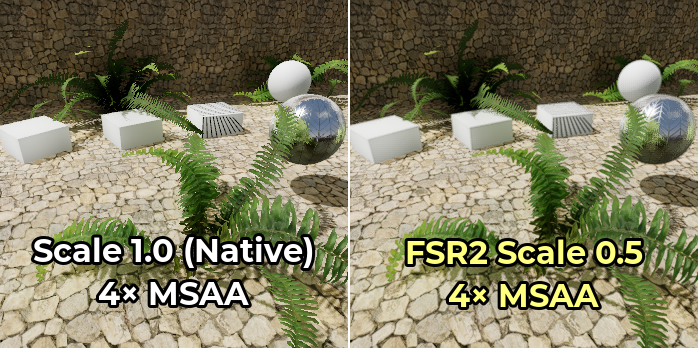
Notice how the edge upscaling of FSR1 becomes much more convincing once 4× MSAA is enabled. However, FSR2 doesn't benefit much from enabling MSAA since it already performs temporal antialiasing.
Rendering scale
The Rendering > Scaling 3D > Scale setting adjusts the resolution scale.
1.0 represents the full resolution scale, with the 3D rendering resolution
matching the 2D rendering resolution. Resolution scales below 1.0 can be
used to speed up rendering, at the cost of a blurrier final image and more aliasing.
The rendering scale can be adjusted at runtime by changing the scaling_3d_scale
property on a Viewport node.
Resolution scales above 1.0 can be used for supersample antialiasing
(SSAA). This will provide antialiasing at a very high performance cost, and is
not recommended for most use cases. See 3D antialiasing for more
information.
The tables below list common screen resolutions, the resulting 3D rendering resolution and the number of megapixels that need to be rendered each frame depending on the rendering scale option. Rows are sorted from fastest to slowest in each table.
Note
The resolution scale is defined on a per-axis basis. For example, this means that halving the resolution scale factor will reduce the number of rendered megapixels per frame by a factor of 4, not 2. Therefore, very low or very high resolution scale factors can have a greater performance impact than expected.
1920×1080 (Full HD)
Resolution scale factor |
3D rendering resolution |
Megapixels rendered per frame |
|---|---|---|
|
960×540 |
0.52 MPix |
|
1286×723 |
0.93 MPix |
|
1440×810 |
1.17 MPix |
|
1632×918 |
1.50 MPix |
|
1920×1080 |
2.07 MPix |
|
2553×1436 |
3.67 MPix |
|
2880×1620 |
4.67 MPix |
|
3840×2160 |
8.29 MPix |
2560×1440 (QHD)
Resolution scale factor |
3D rendering resolution |
Megapixels rendered per frame |
|---|---|---|
|
1280×720 |
0.92 MPix |
|
1715×964 |
1.65 MPix |
|
1920×1080 |
2.07 MPix |
|
2176×1224 |
2.66 MPix |
|
2560×1440 |
3.69 MPix |
|
3404×1915 |
6.52 MPix |
|
3840×2160 |
8.29 MPix |
|
5120×2880 |
14.75 MPix |
3840×2160 (Ultra HD "4K")
Resolution scale factor |
3D rendering resolution |
Megapixels rendered per frame |
|---|---|---|
|
1920×1080 |
2.07 MPix |
|
2572×1447 |
3.72 MPix |
|
2880×1620 |
4.67 MPix |
|
3264×1836 |
5.99 MPix |
|
3840×2160 |
8.29 MPix |
|
5107×2872 |
14.67 MPix |
|
5760×3240 |
18.66 MPix |
|
7680×4320 |
33.18 MPix |
FSR Sharpness
This is only available in the Forward+ renderer, not the Mobile or Compatibility renderers.
When using the FSR1 or FSR2 scaling modes, the sharpness can be controlled using the Rendering > Scaling 3D > FSR Sharpness advanced project setting.
The intensity is inverted compared to most other sharpness sliders: lower
values will result in a sharper final image, while higher values will reduce
the impact of the sharpening filter. 0.0 is the sharpest, while 2.0 is
the least sharp. The default value of 0.2 provides a balance between
preserving the original image's sharpness and avoiding additional aliasing due
to oversharpening.
Note
If you wish to use sharpening when rendering at native resolution, Godot currently doesn't allow using the sharpening component of FSR1 (RCAS) independently from the upscaling component (EASU).
As a workaround, you can set the 3D rendering scale to 0.99, set the
scaling mode to FSR 1.0 then adjust FSR sharpness as needed. This allows
using FSR1 while rendering at a near-native resolution.
Alternatively, you can set the scaling mode to FSR 2.2 with the 3D
rendering scale set to 1.0 if you have enough GPU headroom. This also
provides high-quality temporal antialiasing. The FSR Sharpness setting
remains functional in this case.
Mipmap bias
This is only available in the Forward+ and Mobile renderers, not the Compatibility renderer.
Godot automatically uses a negative texture mipmap bias when the 3D resolution
scale is set below 1.0. This allows for better preservation of texture
detail at the cost of a grainy appearance on detailed textures.
The texture LOD bias currently affects both 2D and 3D rendering in the same way. However, keep in mind it only has an effect on textures with mipmaps enabled. Textures used in 2D don't have mipmaps enabled by default, which means only 3D rendering is affected unless you enabled mipmaps on 2D textures in the Import dock.
The formula used to determine the texture mipmap bias is:
log2f(min(scaling_3d_scale, 1.0)) + custom_texture_mipmap_bias
To counteract the blurriness added by some antialiasing methods, Godot also adds
a -0.25 offset when FXAA is enabled, and a -0.5 offset when TAA is
enabled. If both are enabled at the same time, a -0.75 offset is used. This
mipmap bias offset is applied before the resolution scaling offset, so it does
not change depending on resolution scale.
The texture LOD bias can manually be changed by adjusting the Rendering >
Textures > Default Filters > Texture Mipmap Bias advanced project setting. It
can also be changed at runtime on Viewports by
adjusting the texture_mipmap_bias property.
Warning
Adjusting the mipmap LOD bias manually can be useful in certain scenarios, but this should be done carefully to prevent the final image from looking grainy in motion.
Negative mipmap LOD bias can also decrease performance due to
higher-resolution mips having to be sampled further away. Recommended values
for a manual offset are between -0.5 and 0.0.
Positive mipmap LOD bias will make mipmapped textures appear blurrier than intended. This may improve performance slightly, but is otherwise not recommended as the loss in visual quality is usually not worth the performance gain.
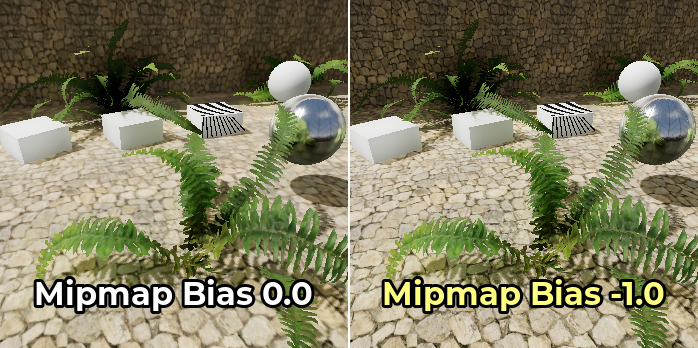
The example below shows an extreme case, with a mipmap LOD bias of -1.0 and
anisotropic filtering disabled to make the difference more noticeable:
Troubleshooting
Performance does not increase much when decreasing resolution scale
If performance doesn't increase much when decreasing resolution scale to a value
like 0.5, it likely means the performance bottleneck is elsewhere in your
scene. For example, your scene could have too many draw calls, causing a CPU
bottleneck to occur. Likewise, you may have too many graphics effects enabled
for your GPU to handle (such as SDFGI, SSAO or SSR).
See the Performance tutorials for more information.