Volumetric fog and fog volumes
Note
Volumetric fog is only supported in the Forward+ renderer, not the Mobile or Compatibility renderers.
As described in Environment and post-processing, Godot supports various visual effects including two types of fog: traditional (non-volumetric) fog and volumetric fog. Traditional fog affects the entire scene at once and cannot be customized with Fog shaders.
Volumetric fog can be used at the same time as non-volumetric fog if desired.
On this page, you'll learn:
How to set up volumetric fog in Godot.
What fog volumes are and how they differ from "global" volumetric fog.
See also
You can see how volumetric fog works in action using the Volumetric Fog demo project.
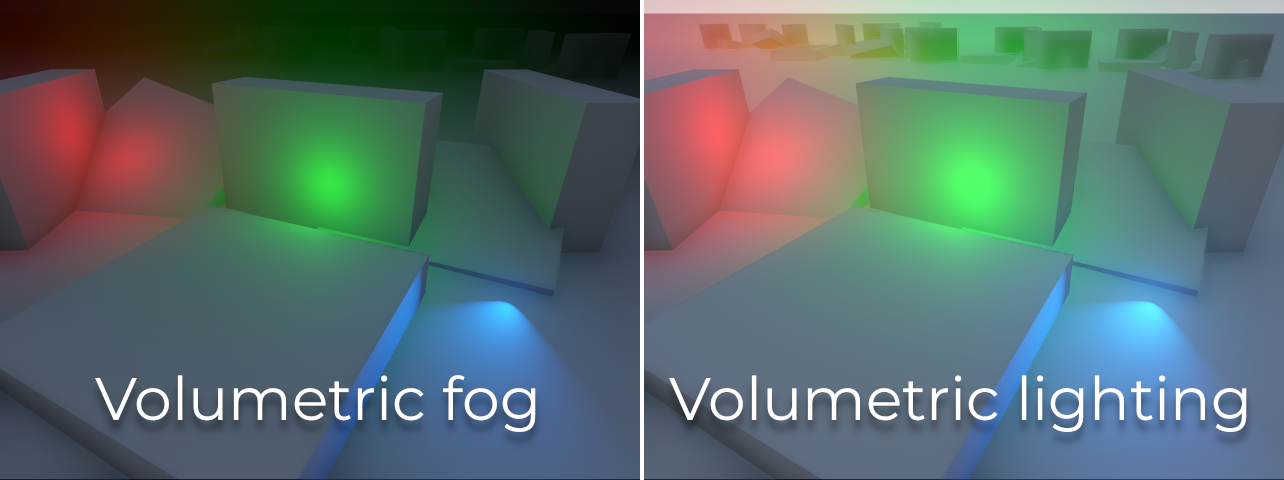
Here is a comparison between traditional fog (which does not interact with lighting) and volumetric fog, which is able to interact with lighting:

Volumetric fog properties
After enabling volumetric fog in the WorldEnvironment node's Environment resource, you can edit the following properties:
Density: The base exponential density of the volumetric fog. Set this to the lowest density you want to have globally. FogVolumes can be used to add to or subtract from this density in specific areas. A value of
0.0disables global volumetric fog while allowing FogVolumes to display volumetric fog in specific areas. Fog rendering is exponential as in real life.Albedo: The Color of the volumetric fog when interacting with lights. Mist and fog have an albedo close to white (
Color(1, 1, 1, 1)) while smoke has a darker albedo.Emission: The emitted light from the volumetric fog. Even with emission, volumetric fog will not cast light onto other surfaces. Emission is useful to establish an ambient color. As the volumetric fog effect uses single-scattering only, fog tends to need a little bit of emission to soften the harsh shadows.
Emission Energy: The brightness of the emitted light from the volumetric fog.
GI Inject: Scales the strength of Global Illumination used in the volumetric fog's albedo color. A value of
0.0means that Global Illumination will not impact the volumetric fog. This has a small performance cost when set above0.0.Anisotropy: The direction of scattered light as it goes through the volumetric fog. A value close to
1.0means almost all light is scattered forward. A value close to0.0means light is scattered equally in all directions. A value close to-1.0means light is scattered mostly backward. Fog and mist scatter light slightly forward, while smoke scatters light equally in all directions.Length: The distance over which the volumetric fog is computed. Increase to compute fog over a greater range, decrease to add more detail when a long range is not needed. For best quality fog, keep this as low as possible.
Detail Spread: The distribution of size down the length of the froxel buffer. A higher value compresses the froxels closer to the camera and places more detail closer to the camera.
Ambient Inject: Scales the strength of ambient light used in the volumetric fog. A value of
0.0means that ambient light will not impact the volumetric fog. This has a small performance cost when set above0.0.Sky Affect: Controls how much volumetric fog should be drawn onto the background sky. If set to
0.0, volumetric fog won't affect sky rendering at all (including FogVolumes).
Two additional properties are offered in the Temporal Reprojection section:
Temporal Reprojection > Enabled: Enables temporal reprojection in the volumetric fog. Temporal reprojection blends the current frame's volumetric fog with the last frame's volumetric fog to smooth out jagged edges. The performance cost is minimal, however it does lead to moving FogVolumes and Light3Ds "ghosting" and leaving a trail behind them. When temporal reprojection is enabled, try to avoid moving FogVolumes or Light3Ds too fast. Short-lived dynamic lighting effects should have Volumetric Fog Energy set to
0.0to avoid ghosting.Temporal Reprojection > Amount: The amount by which to blend the last frame with the current frame. A higher number results in smoother volumetric fog, but makes "ghosting" much worse. A lower value reduces ghosting but can result in the per-frame temporal jitter becoming visible.
Note
Unlike non-volumetric fog, volumetric fog has a finite range. This means volumetric fog cannot entirely cover a large world, as it will eventually stop being rendered in the distance.
If you wish to hide distant areas from the player, it's recommended to enable both non-volumetric fog and volumetric fog at the same time, and adjust their density accordingly.
Light interaction with volumetric fog
To simulate fog light scattering behavior in real life, all light types will interact with volumetric fog. How much each light will affect volumetric fog can be adjusted using the Volumetric Fog Energy property on each light. Enabling shadows on a light will also make those shadows visible on volumetric fog.
If fog light interaction is not desired for artistic reasons, this can be
globally disabled by setting Volumetric Fog > Albedo to a pure black color
in the Environment resource. Fog light interaction can also be disabled for
specific lights by setting its Volumetric Fog Energy to 0. Doing so will
also improve performance slightly by excluding the light from volumetric fog
computations.
Using volumetric fog as a volumetric lighting solution
While not physically accurate, it is possible to tune volumetric fog's settings to work as volumetric lighting solution. This means that unlit parts of the environment will not be darkened anymore by fog, but light will still be able to make fog brighter in specific areas.
This can be done by setting volumetric fog density to the lowest permitted value
greater than zero (0.0001), then increasing the Volumetric Fog Energy
property on lights to much higher values than the default to compensate. Values
between 200.0 and 5000.0 usually work well for this.
Balancing performance and quality
There are a few project settings available to adjust volumetric fog performance and quality:
Rendering > Environment > Volumetric Fog > Volume Size: Base size used to determine size of froxel buffer in the camera X-axis and Y-axis. The final size is scaled by the aspect ratio of the screen, so actual values may differ from what is set. Set a larger size for more detailed fog, set a smaller size for better performance.
Rendering > Environment > Volumetric Fog > Volume Depth: Number of slices to use along the depth of the froxel buffer for volumetric fog. A lower number will be more efficient, but may result in artifacts appearing during camera movement.
Rendering > Environment > Volumetric Fog > Use Filter: Enables filtering of the volumetric fog effect prior to integration. This substantially blurs the fog which reduces fine details, but also smooths out harsh edges and aliasing artifacts. Disable when more detail is required.
Note
Volumetric fog can cause banding to appear on the viewport, especially at higher density levels. See Color banding for guidance on reducing banding.
Using fog volumes for local volumetric fog
Sometimes, you want fog to be constrained to specific areas. Conversely, you may want to have global volumetric fog, but fog should be excluded from certain areas. Both approaches can be followed using FogVolume nodes.
Here's a quick start guide to using FogVolumes:
Make sure Volumetric Fog is enabled in the Environment properties. If global volumetric fog is undesired, set its Density to
0.0.Create a FogVolume node.
Assign a new FogMaterial to the FogVolume node's Material property.
In the FogMaterial, set Density to a positive value to increase density within the FogVolume, or a negative value to subtract the density from global volumetric fog.
Configure the FogVolume's extents and shape as needed.
Note
Thin fog volumes may appear to flicker when the camera moves or rotates. This can be alleviated by increasing the Rendering > Environment > Volumetric Fog > Volume Depth project setting (at a performance cost) or by decreasing Length in the Environment volumetric fog properties (at no performance cost, but at the cost of lower fog range). Alternatively, the FogVolume can be made thicker and use a lower density in the Material.
FogVolume properties
Extents: The size of the FogVolume when Shape is Ellipsoid, Cone, Cylinder or Box. If Shape is Cone or Cylinder, the cone/cylinder will be adjusted to fit within the extents. Non-uniform scaling of cone/cylinder shapes via the Extents property is not supported, but you can scale the FogVolume node instead.
Shape: The shape of the FogVolume. This can be set to Ellipsoid, Cone, Cylinder, Box or World (acts as global volumetric fog).
Material: The material used by the FogVolume. Can be either a built-in FogMaterial or a custom ShaderMaterial (Fog shaders).
After choosing New FogMaterial in the Material property, you can adjust the following properties in FogMaterial:
Density: The density of the FogVolume. Denser objects are more opaque, but may suffer from under-sampling artifacts that look like stripes. Negative values can be used to subtract fog from other FogVolumes or global volumetric fog.
Albedo: The single-scattering Color of the FogVolume. Internally, member albedo is converted into single-scattering, which is additively blended with other FogVolumes and global volumetric fog's Albedo.
Emission: The Color of the light emitted by the FogVolume. Emitted light will not cast light or shadows on other objects, but can be useful for modulating the Color of the FogVolume independently from light sources.
Height Falloff: The rate by which the height-based fog decreases in density as height increases in world space. A high falloff will result in a sharp transition, while a low falloff will result in a smoother transition. A value of
0.0results in uniform-density fog. The height threshold is determined by the height of the associated FogVolume.Edge Fade: The hardness of the edges of the FogVolume. A higher value will result in softer edges, while a lower value will result in harder edges.
Density Texture: The 3D texture that is used to scale the member density of the FogVolume. This can be used to vary fog density within the FogVolume with any kind of static pattern. For animated effects, consider using a custom fog shader. You can import any image as a 3D texture by changing its import type in the Import dock.
Using 3D noise density textures
Since Godot 4.1, there is a NoiseTexture3D resource that can be used to procedurally generate 3D noise. This is well-suited to FogMaterial density textures, which can result in more detailed fog effects:
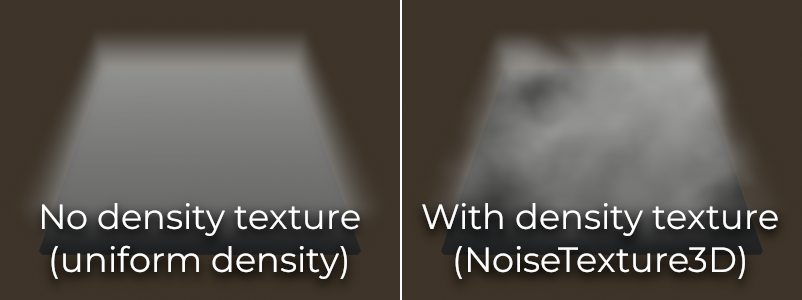
Screenshot taken with Volume Size project setting set to 192 to make high-frequency detail more visible in the fog.
To do so, select the Density Texture property and choose New NoiseTexture3D. Edit this NoiseTexture3D by clicking it, then click Noise at the bottom of the NoiseTexture3D properties and choose New FastNoiseLite. Adjust the noise texture's width, height and depth according to your fog volume's dimensions.
To improve performance, it's recommended to use low texture sizes (64×64×64 or lower), as high-frequency detail is difficult to notice in a FogVolume. If you wish to represent more detailed density variations, you will need to increase Rendering > Environment > Volumetric Fog > Volume Size in the project settings, which has a performance cost.
Note
NoiseTexture3D's Color Ramp affects FogMaterial density textures, but since only the texture's red channel is sampled, only the color ramp's red channel will affect the resulting density.
However, using a color ramp will not tint the fog volume according to the texture. You would need to use a custom shader that reads a Texture3D to achieve this.
Custom FogVolume shaders
This page only covers the built-in settings offered by FogMaterial. If you need to customize fog behavior within a FogVolume node (such as creating animated fog), FogVolume nodes' appearance can be customized using Fog shaders.
Faking volumetric fog using quads
In some cases, it may be better to use specially configured QuadMeshes as an alternative to volumetric fog:
Quads work with any rendering method, including Mobile and Compatibility.
Quads do not require temporal reprojection to look smooth, which makes them suited to fast-moving dynamic effects such as lasers. They can also represent small details which volumetric fog cannot do efficiently.
Quads generally have a lower performance cost than volumetric fog.
This approach has a few downsides though:
The fog effect has less realistic falloff, especially if the camera enters the fog.
Transparency sorting issues may occur when sprites overlap.
Performance will not necessarily be better than volumetric fog if there are lots of sprites close to the camera.
To create a QuadMesh-based fog sprite:
Create a MeshInstance3D node with a QuadMesh resource in the Mesh property. Set the size as desired.
Create a new StandardMaterial3D in the mesh's Material property.
In the StandardMaterial3D, set Shading > Shading Mode to Unshaded, Billboard > Mode to Enabled, enable Proximity Fade and set Distance Fade to Pixel Alpha.
Set the Albedo > Texture to the texture below (right-click and choose Save as…):

After setting the albedo texture, go to the Import dock, select the texture and change its compression mode to Lossless to improve quality.
The fog's color is set using the Albedo > Color property; its density is set using the color's alpha channel. For best results, you will have to adjust Proximity Fade > Distance and Distance Fade > Max Distance depending on the size of your QuadMesh.
Optionally, billboarding may be left disabled if you place the quad in a way where all of its corners are in solid geometry. This can be useful for fogging large planes that the camera cannot enter, such as bottomless pits.