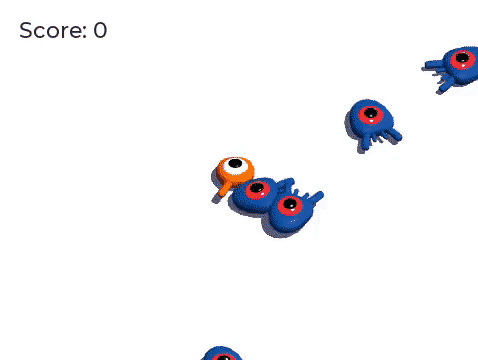
角色動畫
這是最後一課,我們會使用 Godot 的內建動畫工具製作角色的浮動和拍打動畫。你會學到如何在編輯器中設計動畫,以及如何使用程式碼讓遊戲變得活靈活現。
我們會先簡介動畫編輯器的使用方式。
執行編輯器
該引擎自帶的工具可以在編輯器中編寫動畫。然後你可以在運作時使用程式碼來播放和控制它們。
打開玩家場景,選中 Player 節點,然後新增一個 AnimationPlayer 節點。
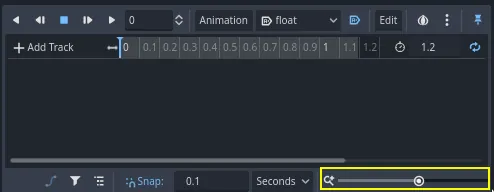
「動畫」停靠視窗會出現在底部面板。
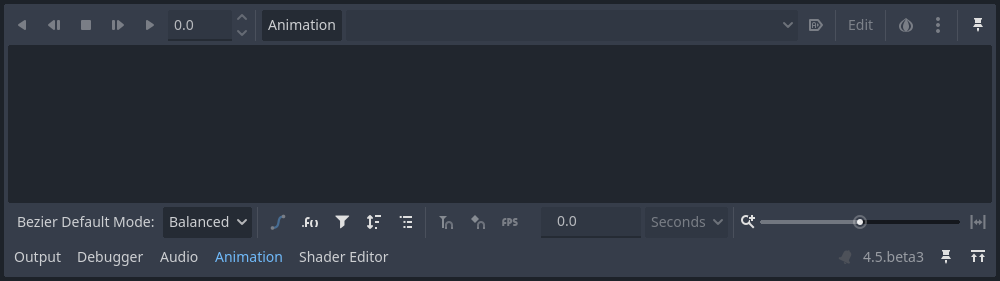
它的特點是頂部有一個工具列和動畫下拉式功能表,中間有一個軌道編輯器,目前是空的,底部有篩選、捕捉和縮放選項。
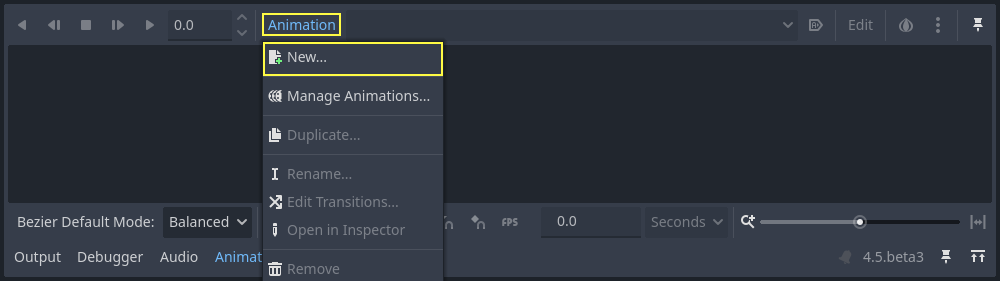
讓我們來建立一個動畫。請點擊*動畫 -> 新建*。
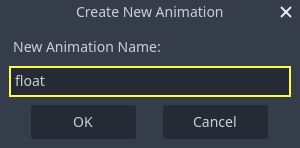
將動畫命名為「float」。
建立完動畫後,就會出現一條時間線,上面的數位代表時間,單位為秒。

我們希望讓這個動畫在遊戲開始時自動開始播放,而且還應該迴圈播放。
要這麼做,您可以分別點擊動畫工具列中的自動播放按鈕 ( ) 和循環箭頭.

你還可以按一下右上角的圖釘圖示,將動畫編輯器進行固定。這樣它就不會在你點擊視口取消選擇節點時折疊。
![]()
在面板右上角將動畫的時長設為 1.2 秒。
您應該看到灰色帶子變寬了一點。它顯示動畫的開始和結束,垂直藍線是您的時間游標。

按一下並拖拽右下角的滑動條,即可將時間線進行縮放。
光照動畫
使用動畫播放機節點,你可以對所需任意數量的節點的大多數屬性做動畫。請注意*屬性檢視器*中屬性旁的鑰匙圖示。在上面按一下就可以建立一個關鍵影格,即對應屬性的一對時間與值。關鍵影格會被插入到時間線上的時間游標處。
讓我們來開始插入關鍵影格吧。這裡,我們要為 Character 節點的平移(translation)和旋轉(rotation)做動畫。
選中 Character 並在*屬性檢視器*中展開 Transform 欄。按一下 Position 和 Rotation 旁的鑰匙圖示。
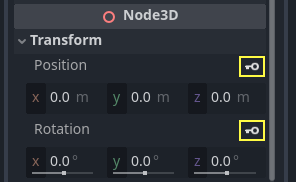
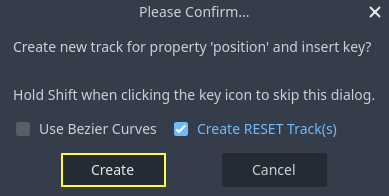
對於本教學,我們只建立預設選擇 RESET(重設)軌道
編輯器中會出現兩個軌道,各有一個代表關鍵影格的菱形圖示。

你可以點擊並拖曳菱形來在時間軸上移動它們。將位置關鍵影格移動到 0.3 秒,並將旋轉關鍵影格移動到 0.1 秒。

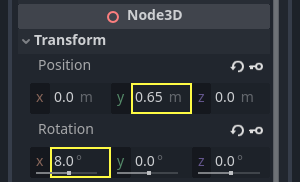
在灰色時間軸上點擊並拖曳,或於輸入欄輸入數值,將時間游標移至 0.5 秒。

按一下灰色的時間線並拖動,將時間游標移動到 0.5 秒的位置。在*屬性檢視器*中將 Translation 的 Y 軸設為約 0.65 米,將 Rotation Degrees 的 X 軸設為 8。
如果您在 屬性檢視器 中沒有看到這些屬性,請先在 場景 停靠視窗中再次點擊 Character 節點。
為這兩個屬性分別建立一個關鍵影格

現在開始在時間線上拖動,將平移的關鍵影格移動到 0.7 秒。

備註
關於動畫原理的講解已經超出了本教學的範圍。請注意,您不想均勻地分配時間和空間。取而代之的是,動畫師使用時間和間隔,這兩個核心動畫原則。您希望讓它們存在一定的偏移,在角色的運動中產生對比,以使他們感覺生動。
將時間游標移動到動畫結尾,即 1.2 秒。將 Y 平移量設為約 0.35、X 旋轉量設為 -9 度。再次為這兩個屬性新增關鍵影格。

按一下播放按鈕或者按 Shift + D 即可預覽結果。按一下停止按鈕或者按 S 即可停止播放。

您可以看到引擎在關鍵影格之間插值以生成連續動畫。不過目前,這個動作感覺非常機器人化。這是因為預設插值是線性的,導致持續的過渡,這與現實世界中生物的移動方式不同。
我們可以使用緩動曲線來控制關鍵影格之間的過渡。
按一下並拖拽,框選時間線上的前兩個關鍵影格。
你可以在*屬性檢視器*中同時編輯這兩個關鍵影格的屬性,你可以在那裡看到一個*緩和*屬性。
按一下並拖動曲線,把它往左拉。這樣就會讓他實作緩出,也就是說,一開始變得快,然後時間游標越接近下一個關鍵影格就變得越慢。
再次播放動畫以查看差異。前半部分應該已經感覺有點彈性了。
將緩動效果應用於旋轉軌跡中的第二個關鍵影格。
對第二個平移關鍵影格執行相反操作,將其拖動到右側。
最後場景應該長這樣。
備註
每一影格,動畫都會去更新被動畫的節點的屬性,覆蓋掉初始值。如果我們直接對 Player 節點做動畫,就沒法使用程式碼來移動它了。這就是 Pivot 節點的用處:儘管我們為 Character 做了動畫,我們還是可以在此動畫之上,再通過程式碼來移動並旋轉 Pivot。
如果你運作遊戲,玩家的生物就會漂浮起來!
如果這個生物離地面太近了,你可以將 Pivot 向上移動,達成偏移的目的。
建立內容
我們可以使用程式碼來根據玩家的輸入控制動畫的播放。讓我們在角色移動時修改動畫的速度吧。
點擊 Player 旁的腳本圖示打開其腳本。
在 _physics_process() 中檢查 direction 向量的那一行之後新增如下程式碼。
func _physics_process(delta):
    #...
    if direction != Vector3.ZERO:
        #...
        $AnimationPlayer.speed_scale = 4
    else:
        $AnimationPlayer.speed_scale = 1
public override void _PhysicsProcess(double delta)
{
    // ...
    if (direction != Vector3.Zero)
    {
        // ...
        GetNode<AnimationPlayer>("AnimationPlayer").SpeedScale = 4;
    }
    else
    {
        GetNode<AnimationPlayer>("AnimationPlayer").SpeedScale = 1;
    }
}
這段程式碼的作用是讓玩家在移動時將播放速度乘以 4。在停止移動時將其恢復原狀。
我們提到樞紐(Pivot)可以在動畫之上疊加變換(transforms)。我們可以用下面這行程式碼使角色在跳躍時產生弧線。將其新增到 _physics_process() 的最後。
func _physics_process(delta):
    #...
    $Pivot.rotation.x = PI / 6 * velocity.y / jump_impulse
public override void _PhysicsProcess(double delta)
{
    // ...
    var pivot = GetNode<Node3D>("Pivot");
    pivot.Rotation = new Vector3(Mathf.Pi / 6.0f * Velocity.Y / JumpImpulse, pivot.Rotation.Y, pivot.Rotation.Z);
}
動畫
在 Godot 中還有一個很好的動畫技巧:只要你使用類似的節點結構,你就可以把它們複製到不同的場景中。
例如,Mob 和 Player 場景都有 Pivot 和 Character 節點,所以我們可以在它們之間複用動畫。
開啟 Player 場景,選取 AnimationPlayer 節點,然後點擊 動畫 > 管理動畫...。點擊 複製動畫到剪貼簿 按鈕(兩個小方塊),它位於 float 動畫旁邊。點擊「確定」關閉視窗。
接著開啟 mob.tscn,建立一個 AnimationPlayer 子節點並選取它。點擊 Animation > Manage Animations,再選 New Library。你應會看到 Global library will be created. 訊息。將文字欄位留白並按 OK。點擊貼上圖示(剪貼簿),它應會出現在視窗中。最後按 OK 關閉視窗。
接著,請確認底部面板動畫編輯器中的自動播放按鈕 () 和循環箭頭 (動畫循環) 也已開啟。這樣就完成了;所有怪物現在都會播放漂浮動畫了。
我們可以根據生物的 random_speed 來更改播放速度。打開 Mob 的腳本,在 initialize() 函式的末尾新增下面這行程式碼。
func initialize(start_position, player_position):
    #...
    $AnimationPlayer.speed_scale = random_speed / min_speed
public void Initialize(Vector3 startPosition, Vector3 playerPosition)
{
    // ...
    GetNode<AnimationPlayer>("AnimationPlayer").SpeedScale = randomSpeed / MinSpeed;
}
這樣,你就完成了你第一個完整 3D 遊戲的編碼。
恭喜!
在下一部分,我們會快速回顧您學到的內容,並提供一些連結讓您繼續深入學習。但現在,這是完整的 player.gd 和 mob.gd 程式碼,您可以對照檢查您的程式碼。
這是 Player 腳本。
extends CharacterBody3D

signal hit

# How fast the player moves in meters per second.
@export var speed = 14
# The downward acceleration while in the air, in meters per second squared.
@export var fall_acceleration = 75
# Vertical impulse applied to the character upon jumping in meters per second.
@export var jump_impulse = 20
# Vertical impulse applied to the character upon bouncing over a mob
# in meters per second.
@export var bounce_impulse = 16

var target_velocity = Vector3.ZERO


func _physics_process(delta):
    # We create a local variable to store the input direction
    var direction = Vector3.ZERO

    # We check for each move input and update the direction accordingly
    if Input.is_action_pressed("move_right"):
        direction.x = direction.x + 1
    if Input.is_action_pressed("move_left"):
        direction.x = direction.x - 1
    if Input.is_action_pressed("move_back"):
        # Notice how we are working with the vector's x and z axes.
        # In 3D, the XZ plane is the ground plane.
        direction.z = direction.z + 1
    if Input.is_action_pressed("move_forward"):
        direction.z = direction.z - 1

    # Prevent diagonal movement being very fast
    if direction != Vector3.ZERO:
        direction = direction.normalized()
        # Setting the basis property will affect the rotation of the node.
        $Pivot.basis = Basis.looking_at(direction)
        $AnimationPlayer.speed_scale = 4
    else:
        $AnimationPlayer.speed_scale = 1

    # Ground Velocity
    target_velocity.x = direction.x * speed
    target_velocity.z = direction.z * speed

    # Vertical Velocity
    if not is_on_floor(): # If in the air, fall towards the floor
        target_velocity.y = target_velocity.y - (fall_acceleration * delta)

    # Jumping.
    if is_on_floor() and Input.is_action_just_pressed("jump"):
        target_velocity.y = jump_impulse

    # Iterate through all collisions that occurred this frame
    # in C this would be for(int i = 0; i < collisions.Count; i++)
    for index in range(get_slide_collision_count()):
        # We get one of the collisions with the player
        var collision = get_slide_collision(index)

        # If the collision is with ground
        if collision.get_collider() == null:
            continue

        # If the collider is with a mob
        if collision.get_collider().is_in_group("mob"):
            var mob = collision.get_collider()
            # we check that we are hitting it from above.
            if Vector3.UP.dot(collision.get_normal()) > 0.1:
                # If so, we squash it and bounce.
                mob.squash()
                target_velocity.y = bounce_impulse
                # Prevent further duplicate calls.
                break

    # Moving the Character
    velocity = target_velocity
    move_and_slide()

    $Pivot.rotation.x = PI / 6 * velocity.y / jump_impulse

# And this function at the bottom.
func die():
    hit.emit()
    queue_free()

func _on_mob_detector_body_entered(body):
    die()
using Godot;

public partial class Player : CharacterBody3D
{
    // Emitted when the player was hit by a mob.
    [Signal]
    public delegate void HitEventHandler();

    // How fast the player moves in meters per second.
    [Export]
    public int Speed { get; set; } = 14;
    // The downward acceleration when in the air, in meters per second squared.
    [Export]
    public int FallAcceleration { get; set; } = 75;
    // Vertical impulse applied to the character upon jumping in meters per second.
    [Export]
    public int JumpImpulse { get; set; } = 20;
    // Vertical impulse applied to the character upon bouncing over a mob in meters per second.
    [Export]
    public int BounceImpulse { get; set; } = 16;

    private Vector3 _targetVelocity = Vector3.Zero;

    public override void _PhysicsProcess(double delta)
    {
        // We create a local variable to store the input direction.
        var direction = Vector3.Zero;

        // We check for each move input and update the direction accordingly.
        if (Input.IsActionPressed("move_right"))
        {
            direction.X += 1.0f;
        }
        if (Input.IsActionPressed("move_left"))
        {
            direction.X -= 1.0f;
        }
        if (Input.IsActionPressed("move_back"))
        {
            // Notice how we are working with the vector's X and Z axes.
            // In 3D, the XZ plane is the ground plane.
            direction.Z += 1.0f;
        }
        if (Input.IsActionPressed("move_forward"))
        {
            direction.Z -= 1.0f;
        }

        // Prevent diagonal movement being very fast.
        if (direction != Vector3.Zero)
        {
            direction = direction.Normalized();
            // Setting the basis property will affect the rotation of the node.
            GetNode<Node3D>("Pivot").Basis = Basis.LookingAt(direction);
            GetNode<AnimationPlayer>("AnimationPlayer").SpeedScale = 4;
        }
        else
        {
            GetNode<AnimationPlayer>("AnimationPlayer").SpeedScale = 1;
        }

        // Ground velocity
        _targetVelocity.X = direction.X * Speed;
        _targetVelocity.Z = direction.Z * Speed;

        // Vertical velocity
        if (!IsOnFloor())
        {
            _targetVelocity.Y -= FallAcceleration * (float)delta;
        }

        // Jumping.
        if (IsOnFloor() && Input.IsActionJustPressed("jump"))
        {
            _targetVelocity.Y += JumpImpulse;
        }

        // Iterate through all collisions that occurred this frame.
        for (int index = 0; index < GetSlideCollisionCount(); index++)
        {
            // We get one of the collisions with the player.
            KinematicCollision3D collision = GetSlideCollision(index);

            // If the collision is with a mob.
            if (collision.GetCollider() is Mob mob)
            {
                // We check that we are hitting it from above.
                if (Vector3.Up.Dot(collision.GetNormal()) > 0.1f)
                {
                    // If so, we squash it and bounce.
                    mob.Squash();
                    _targetVelocity.Y = BounceImpulse;
                    // Prevent further duplicate calls.
                    break;
                }
            }
        }

        // Moving the character
        Velocity = _targetVelocity;
        MoveAndSlide();

        var pivot = GetNode<Node3D>("Pivot");
        pivot.Rotation = new Vector3(Mathf.Pi / 6.0f * Velocity.Y / JumpImpulse, pivot.Rotation.Y, pivot.Rotation.Z);
    }

    private void Die()
    {
        EmitSignal(SignalName.Hit);
        QueueFree();
    }

    private void OnMobDetectorBodyEntered(Node body)
    {
        Die();
    }
}
這是 Mob 的腳本。
extends CharacterBody3D

# Minimum speed of the mob in meters per second.
@export var min_speed = 10
# Maximum speed of the mob in meters per second.
@export var max_speed = 18

# Emitted when the player jumped on the mob
signal squashed

func _physics_process(_delta):
    move_and_slide()

# This function will be called from the Main scene.
func initialize(start_position, player_position):
    # We position the mob by placing it at start_position
    # and rotate it towards player_position, so it looks at the player.
    look_at_from_position(start_position, player_position, Vector3.UP)
    # Rotate this mob randomly within range of -45 and +45 degrees,
    # so that it doesn't move directly towards the player.
    rotate_y(randf_range(-PI / 4, PI / 4))

    # We calculate a random speed (integer)
    var random_speed = randi_range(min_speed, max_speed)
    # We calculate a forward velocity that represents the speed.
    velocity = Vector3.FORWARD * random_speed
    # We then rotate the velocity vector based on the mob's Y rotation
    # in order to move in the direction the mob is looking.
    velocity = velocity.rotated(Vector3.UP, rotation.y)

    $AnimationPlayer.speed_scale = random_speed / min_speed

func _on_visible_on_screen_notifier_3d_screen_exited():
    queue_free()

func squash():
    squashed.emit()
    queue_free() # Destroy this node
using Godot;

public partial class Mob : CharacterBody3D
{
    // Emitted when the played jumped on the mob.
    [Signal]
    public delegate void SquashedEventHandler();

    // Minimum speed of the mob in meters per second
    [Export]
    public int MinSpeed { get; set; } = 10;
    // Maximum speed of the mob in meters per second
    [Export]
    public int MaxSpeed { get; set; } = 18;

    public override void _PhysicsProcess(double delta)
    {
        MoveAndSlide();
    }

    // This function will be called from the Main scene.
    public void Initialize(Vector3 startPosition, Vector3 playerPosition)
    {
        // We position the mob by placing it at startPosition
        // and rotate it towards playerPosition, so it looks at the player.
        LookAtFromPosition(startPosition, playerPosition, Vector3.Up);
        // Rotate this mob randomly within range of -45 and +45 degrees,
        // so that it doesn't move directly towards the player.
        RotateY((float)GD.RandRange(-Mathf.Pi / 4.0, Mathf.Pi / 4.0));

        // We calculate a random speed (integer).
        int randomSpeed = GD.RandRange(MinSpeed, MaxSpeed);
        // We calculate a forward velocity that represents the speed.
        Velocity = Vector3.Forward * randomSpeed;
        // We then rotate the velocity vector based on the mob's Y rotation
        // in order to move in the direction the mob is looking.
        Velocity = Velocity.Rotated(Vector3.Up, Rotation.Y);

        GetNode<AnimationPlayer>("AnimationPlayer").SpeedScale = randomSpeed / MinSpeed;
    }

    public void Squash()
    {
        EmitSignal(SignalName.Squashed);
        QueueFree(); // Destroy this node
    }

    private void OnVisibilityNotifierScreenExited()
    {
        QueueFree();
    }
}