在編輯器中執行程式碼
什麼是 @tool?
@tool 是一個強大的註記,只要加在腳本最上方,腳本就能在編輯器中執行。你也可以決定腳本的哪些部分在編輯器中執行、哪些部分在遊戲中執行,或哪些會在兩者皆執行。
你可以用它做很多事,最常用於關卡設計,能讓難以預測的內容在視覺上即時呈現。以下是一些使用情境:
如果你有一門發射受物理(重力)影響的砲彈的大砲,你可以直接在編輯器裡繪製砲彈軌跡,讓關卡設計更直觀簡單。
如果你有多種跳躍高度的跳板,可以在編輯器裡標示玩家能跳到的最大高度,讓關卡設計更方便。
如果你的遊戲角色不是用貼圖顯示,而是用程式碼繪製,你也可以讓這段繪圖程式在編輯器即時執行,直接看到角色外觀。
危險
@tool 腳本會在編輯器內執行,讓你能存取目前編輯中的場景樹。這是很強大的功能,但也有風險,因為編輯器並不會防止 @tool 腳本的濫用。操作場景樹時要 特別 小心,尤其是使用 Node.queue_free 等方法時,如果在編輯器運作相關邏輯時釋放了節點,可能會導致當機。
如何使用 @tool
要讓腳本成為工具腳本,只要在程式碼最上方加上 @tool 註記即可。
要判斷當前是在編輯器中,可使用 Engine.is_editor_hint()。
例如,如果你只想在編輯器中執行某段程式,可以這樣寫:
if Engine.is_editor_hint():
    # Code to execute when in editor.
if (Engine.IsEditorHint())
{
    // Code to execute when in editor.
}
另一方面,如果你只想在遊戲執行時執行程式碼,只要把條件取反即可:
if not Engine.is_editor_hint():
    # Code to execute when in game.
if (!Engine.IsEditorHint())
{
    // Code to execute when in game.
}
沒有上述兩個條件的程式碼片段會同時在編輯器和遊戲中執行。
以下是 _process() 函式可能的寫法範例:
func _process(delta):
    if Engine.is_editor_hint():
        # Code to execute in editor.

    if not Engine.is_editor_hint():
        # Code to execute in game.

    # Code to execute both in editor and in game.
public override void _Process(double delta)
{
    if (Engine.IsEditorHint())
    {
        // Code to execute in editor.
    }

    if (!Engine.IsEditorHint())
    {
        // Code to execute in game.
    }

    // Code to execute both in editor and in game.
}
重要資訊
一般規則是:工具腳本所使用的任何其他 GDScript 也必須是工具腳本。編輯器無法從沒有 @tool 的 GDScript 檔建立實例,這表示你無法呼叫其方法或存取其成員變數。不過,由於靜態方法、常數與列舉可不建立實例即使用,因此可在 @tool 腳本中呼叫或參照其他非工具腳本的這些成員。其中一個例外是 靜態變數。如果你嘗試在沒有 @tool 的腳本中讀取靜態變數的值,將一律回傳 null,且不會顯示警告或錯誤。此限制不適用於靜態方法;無論目標腳本是否為工具模式,都可以呼叫。
繼承自 @tool 腳本並不會自動讓子腳本成為 @tool。若子腳本未標註 @tool,父類別的工具行為會被停用。因此,繼承的腳本也應該標註 @tool。
在編輯器中進行的修改是永久的,無法復原/重做。例如,在下一節我們移除腳本時,該節點仍會保留其旋轉。請小心操作以避免不必要的修改。建議設定 版本控制,以免不小心操作導致工作遺失。
目前不支援在工具腳本上使用除錯器與中斷點。無論是在腳本編輯器中下中斷點,或使用 breakpoint 關鍵字,都會被忽略。你可以改用列印輸出來檢視變數內容。
試用 @tool
在場景新增一個 Sprite2D 節點,將貼圖設為 Godot 圖示。掛載並打開腳本,改成以下內容:
@tool
extends Sprite2D

func _process(delta):
    rotation += PI * delta
using Godot;

[Tool]
public partial class MySprite : Sprite2D
{
    public override void _Process(double delta)
    {
        Rotation += Mathf.Pi * (float)delta;
    }
}
儲存腳本並回到編輯器,你會看到物件旋轉。執行遊戲時,物件也會旋轉。
警告
你可能需要重新啟動編輯器。這是 Godot 4 版本已知的問題:GH-66381。
備註
如果看不到變化,請重新載入場景(關閉後再打開)。
現在來決定要在什麼時機執行哪段程式。請將你的 _process() 函式改成這樣:
func _process(delta):
    if Engine.is_editor_hint():
        rotation += PI * delta
    else:
        rotation -= PI * delta
public override void _Process(double delta)
{
    if (Engine.IsEditorHint())
    {
        Rotation += Mathf.Pi * (float)delta;
    }
    else
    {
        Rotation -= Mathf.Pi * (float)delta;
    }
}
儲存腳本。現在物件會在編輯器中順時針旋轉,而遊戲執行時則會逆時針旋轉。
編輯變數
在腳本中加入並匯出一個 speed 變數。你可以加一個 setter set(new_speed),這樣從屬性面板調整時會呼叫它來同步速度與重設旋轉。別忘了在 _process() 中套用旋轉速度。
@tool
extends Sprite2D


@export var speed = 1:
    # Update speed and reset the rotation.
    set(new_speed):
        speed = new_speed
        rotation = 0


func _process(delta):
    rotation += PI * delta * speed
using Godot;

[Tool]
public partial class MySprite : Sprite2D
{
    private float _speed = 1;

    [Export]
    public float Speed
    {
        get => _speed;
        set
        {
            // Update speed and reset the rotation.
            _speed = value;
            Rotation = 0;
        }
    }

    public override void _Process(double delta)
    {
        Rotation += Mathf.Pi * (float)delta * _speed;
    }
}
備註
其他節點的程式碼不會在編輯器中執行,你對其他節點的存取也有限。你可以存取場景樹與節點,以及它們的預設屬性,但不能存取使用者自訂變數。若要存取,其他節點也必須在編輯器中執行。
資源變動時取得通知
有時候你會希望工具腳本使用某個資源,但當你在編輯器中修改該資源的屬性時,工具腳本的 set() 方法並不會被呼叫。
@tool
class_name MyTool
extends Node

@export var resource: MyResource:
    set(new_resource):
        resource = new_resource
        _on_resource_set()

# This will only be called when you create, delete, or paste a resource.
# You will not get an update when tweaking properties of it.
func _on_resource_set():
    print("My resource was set!")
using Godot;

[Tool]
public partial class MyTool : Node
{
    private MyResource _resource;

    [Export]
    public MyResource Resource
    {
        get => _resource;
        set
        {
            _resource = value;
            OnResourceSet();
        }
    }

    // This will only be called when you create, delete, or paste a resource.
    // You will not get an update when tweaking properties of it.
    private void OnResourceSet()
    {
        GD.Print("My resource was set!");
    }
}
要解決這個問題,首先必須把你的資源設為工具資源,並在屬性變動時發送 changed 訊號:
# Make Your Resource a tool.
@tool
class_name MyResource
extends Resource

@export var property = 1:
    set(new_setting):
        property = new_setting
        # Emit a signal when the property is changed.
        changed.emit()
using Godot;

[Tool]
public partial class MyResource : Resource
{
    private float _property = 1;

    [Export]
    public float Property
    {
        get => _property;
        set
        {
            _property = value;
            // Emit a signal when the property is changed.
            EmitChanged();
        }
    }
}
然後,當設定新資源時,要連接這個訊號:
@tool
class_name MyTool
extends Node

@export var resource: MyResource:
    set(new_resource):
        resource = new_resource
        # Connect the changed signal as soon as a new resource is being added.
        if resource != null:
            resource.changed.connect(_on_resource_changed)

func _on_resource_changed():
    print("My resource just changed!")
using Godot;

[Tool]
public partial class MyTool : Node
{
    private MyResource _resource;

    [Export]
    public MyResource Resource
    {
        get => _resource;
        set
        {
            _resource = value;
            // Connect the changed signal as soon as a new resource is being added.
            if (_resource != null)
            {
                _resource.Changed += OnResourceChanged;
            }
        }
    }

    private void OnResourceChanged()
    {
        GD.Print("My resource just changed!");
    }
}
最後,記得在換資源時要斷開訊號,否則之前的資源如果在其他地方被變更,會導致不必要的更新。
@export var resource: MyResource:
    set(new_resource):
        # Disconnect the signal if the previous resource was not null.
        if resource != null:
            resource.changed.disconnect(_on_resource_changed)
        resource = new_resource
        if resource != null:
            resource.changed.connect(_on_resource_changed)
[Export]
public MyResource Resource
{
    get => _resource;
    set
    {
        // Disconnect the signal if the previous resource was not null.
        if (_resource != null)
        {
            _resource.Changed -= OnResourceChanged;
        }
        _resource = value;
        if (_resource != null)
        {
            _resource.Changed += OnResourceChanged;
        }
    }
}
顯示節點設定警告
Godot 會以*節點設定警告*系統提醒使用者節點設定錯誤。當節點設定不正確時,場景面板上的節點名稱旁會出現黃色警告標誌。當你滑鼠移過或點擊圖示時,會跳出警告訊息。你可以在腳本中利用這功能,幫助自己和團隊避免設定場景時出錯。
使用節點設定警告時,凡是會影響警告的屬性變動,你都要呼叫 update_configuration_warnings。預設只會在關閉再打開場景時自動更新警告。
# Use setters to update the configuration warning automatically.
@export var title = "":
    set(p_title):
        if p_title != title:
            title = p_title
            update_configuration_warnings()

@export var description = "":
    set(p_description):
        if p_description != description:
            description = p_description
            update_configuration_warnings()


func _get_configuration_warnings():
    var warnings = []

    if title == "":
        warnings.append("Please set `title` to a non-empty value.")

    if description.length() >= 100:
        warnings.append("`description` should be less than 100 characters long.")

    # Returning an empty array means "no warning".
    return warnings
使用 EditorScript 執行一次性腳本
有時候你會需要只執行一次的腳本來自動化某些編輯器內沒內建的任務,例如:
用來當作 GDScript 或 C# 腳本的練習區,不用執行專案也可以測試。
print()的輸出會顯示在編輯器的輸出面板。調整目前編輯場景中所有光源節點的強度,例如發現場景太暗或太亮時,可快速修正。
把複製貼上的節點批次換成場景實例,讓後續維護更方便。
這可以透過繼承 EditorScript 實作。這種方式讓你不用寫外掛也能直接在編輯器裡執行單一腳本。
要建立 EditorScript,請在檔案總管的資料夾或空白處點右鍵選擇「新增 > 腳本...」。在腳本建立對話框中,點樹狀圖示選擇要繼承的物件(或直接在左側欄位輸入 EditorScript,注意大小寫):
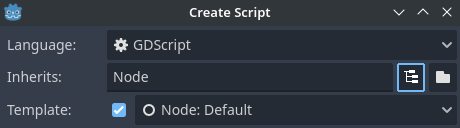
於腳本建立對話框中建立編輯器腳本
這會自動選用適合 EditorScript 的腳本範本,並內建一個 _run() 方法:
@tool
extends EditorScript

# Called when the script is executed (using File -> Run in Script Editor).
func _run():
    pass
這個 _run() 方法會在你用 檔案 > 執行 或快捷鍵 Ctrl + Shift + X (腳本編輯器有焦點時)時執行。
繼承 EditorScript 的腳本必須加上 @tool 才會運作。
備註
EditorScript 只能從 Godot 的腳本編輯器執行。如果你使用外部編輯器,請在 Godot 的腳本編輯器中開啟該腳本來執行。
危險
EditorScript 沒有復原/重做功能,如果腳本會修改資料,執行前請一定要先儲存場景。
要取得目前編輯場景的節點,可使用 EditorScript.get_scene 方法,這會回傳目前場景的根節點。以下是一個範例,會遞迴取得所有節點並把所有 OmniLight3D 節點的 range 乘以二:
@tool
extends EditorScript

func _run():
    for node in get_all_children(get_scene()):
        if node is OmniLight3D:
            # Don't operate on instanced subscene children, as changes are lost
            # when reloading the scene.
            # See the "Instancing scenes" section below for a description of `owner`.
            var is_instanced_subscene_child = node != get_scene() and node.owner != get_scene()
            if not is_instanced_subscene_child:
                node.omni_range *= 2.0

# This function is recursive: it calls itself to get lower levels of child nodes as needed.
# `children_acc` is the accumulator parameter that allows this function to work.
# It should be left to its default value when you call this function directly.
func get_all_children(in_node, children_acc = []):
    children_acc.push_back(in_node)
    for child in in_node.get_children():
        children_acc = get_all_children(child, children_acc)

    return children_acc
小訣竅
即使腳本檢視開啟時,你仍可在編輯器頂部切換當前編輯的場景。這會影響 EditorScript.get_scene 的回傳值,所以執行腳本前要確認選對了要操作的場景。
場景實體化
你可以像平常一樣實例化打包場景並加入目前編輯器打開的場景。預設用 Node.add_child(node) 加進來的節點或場景,在場景樹面板是不會顯示、也不會儲存到磁碟的。如果要讓它在場景樹面板可見並能隨場景存檔,就要把子節點的 owner 屬性設成目前編輯場景的根節點。
如果你是用 @tool:
func _ready():
    var node = Node3D.new()
    add_child(node) # Parent could be any node in the scene

    # The line below is required to make the node visible in the Scene tree dock
    # and persist changes made by the tool script to the saved scene file.
    node.owner = get_tree().edited_scene_root
public override void _Ready()
{
    var node = new Node3D();
    AddChild(node); // Parent could be any node in the scene

    // The line below is required to make the node visible in the Scene tree dock
    // and persist changes made by the tool script to the saved scene file.
    node.Owner = GetTree().EditedSceneRoot;
}
如果你用 EditorScript:
func _run():
    # `parent` could be any node in the scene.
    var parent = get_scene().get_node("Parent")
    var node = Node3D.new()
    parent.add_child(node)

    # The line below is required to make the node visible in the Scene tree dock
    # and persist changes made by the tool script to the saved scene file.
    node.owner = get_scene()
public override void _Run()
{
    // `parent` could be any node in the scene.
    var parent = GetScene().GetNode("Parent");
    var node = new Node3D();
    parent.AddChild(node);

    // The line below is required to make the node visible in the Scene tree dock
    // and persist changes made by the tool script to the saved scene file.
    node.Owner = GetScene();
}
警告
不當使用 @tool 會導致許多錯誤。建議你先寫好程式碼,最後再加上 @tool 註記。也要記得把編輯器用的程式碼和遊戲執行的程式碼區分清楚,如此更容易找出錯誤。