Up to date
This page is up to date for Godot 4.2.
If you still find outdated information, please open an issue.
Compilation pour Windows
Voir aussi
Cette page explique comment compiler l’éditeur Windows et exporter les binaires de modèle d'export depuis le code source. Si vous chercher à exporter votre projet vers Windows, voyez plutôt Exportation pour Windows.
Pré-requis
Pour la compilation sous Windows, ce qui suit est nécessaire :
Visual Studio Community, version 2017 ou ultérieure. VS 2019 est recommandé. Assurez-vous de lire la section "Mise en garde concernant l'installation de Visual Studio" ci-dessous ou vous devrez exécuter/télécharger l'installateur à nouveau.
MinGW-w64 with GCC can be used as an alternative to Visual Studio. Be sure to install/configure it to use the
posixthread model. Important: When using MinGW to compile themasterbranch, you need GCC 9 or later.Python 3.6+. Make sure to enable the option to add Python to the ``PATH`` in the installer.
SCons 3.0+ build system. Using the latest release is recommended, especially for proper support of recent Visual Studio releases.
Note
Si vous avez installé Scoop, vous pouvez facilement installer MinGW et d'autres dépendances en utilisant la commande suivante :
scoop install gcc python scons make mingw
Note
Si vous avez installé MSYS2, vous pouvez facilement installer MinGW et d'autres dépendances en utilisant la commande suivante :
pacman -S mingw-w64-x86_64-python3-pip mingw-w64-x86_64-gcc  \
    mingw-w64-i686-python3-pip mingw-w64-i686-gcc make
Pour chaque sous-système MinGW de MSYS2, vous devez ensuite exécuter pip3 install scons dans sa console.
Voir aussi
Pour récupérer le code source de Godot pour le compiler, voir Obtenir la source.
Pour un aperçu général de l'utilisation de SCons pour Godot, voir Introduction au buildsystem.
Configuration de SCons
Pour installer SCons, ouvrez l'invite de commande et exécutez la commande suivante :
python -m pip install scons
Si le message suivant s'affiche : "Installation par défaut par l'utilisateur parce que normal site-packages n'est pas accessible en écriture", il se peut que vous deviez exécuter à nouveau cette commande en utilisant des droits élevés. Ouvrez une nouvelle invite de commande en tant qu'administrateur puis exécutez à nouveau la commande pour vous assurer que SCons est disponible dans le PATH.
Pour vérifier si vous avez correctement installé Python et SCons, il faut taper python --version et scons --version dans l'invite de commande (cmd.exe).
Si les commandes ci-dessus ne fonctionnent pas, assurez-vous d'ajouter Python dans votre variable d'environnement PATH après son installation, puis vérifiez de nouveau. Vous pouvez le faire en exécutant de nouveau l'installateur Python et en activant l'option pour ajouter Python au PATH.
Si SCons n'arrive pas à détecter votre installation de Visual Studio, ça peut être pare que votre version de SCons est trop ancienne. Mettez-la à jour avec python -m pip install --upgrade scons.
Mise en garde concernant l'installation de Visual Studio
Si vous installez Visual Studio 2017 ou 2019, assurez-vous d'activer C++ dans la liste des flux de travail(workflows) à installer.
Si vous installez Visual Studio 2015, assurez-vous de lancer une installation Custom au lieu d'une installation Typical et sélectionnez C++ comme langage.
Si vous avez déjà fait l'erreur d'installer Visiul Studio sans support C++, exécutez encore l'installateur ; il devrait vous présenter un bouton Modify. L'exécution de l'installateur depuis Add/Remove Programs vous donnera seulement l'option Repair, qui ne vous permettra pas d'installer les outils C ++.
Téléchargement des sources de Godot
Voir Obtenir la source pour plus d'informations.
Le tutoriel suppose que vous avez placé le code source dans le répertoire C:\godot.
Avertissement
Pour éviter les ralentissements causés par une recherche continue de virus pendant la compilation, ajoutez le dossier source de Godot à la liste des exceptions de votre logiciel antivirus.
For Windows Defender, hit the Windows key, type "Windows Security" then hit Enter. Click on Virus & threat protection on the left panel. Under Virus & threat protection settings click on Mange Settings and scroll down to Exclusions. Click Add or remove exclusions then add the Godot source folder.
Compilation
Sélection d'un compilateur
SCons trouvera et utilisera automatiquement une installation existante de Visual Studio. Si vous n'avez pas Visual Studio installé, il essaiera d'utiliser MinGW à la place. Si vous avez déjà Visual Studio installé et que vous voulez utiliser MinGW, passez use_mingw=yes à la ligne de commande de SCons. Notez que les compilations MSVC ne peuvent pas être effectuées à partir des shells MSYS2 ou MinGW. Utilisez plutôt cmd.exe ou PowerShell.
Durant le développement, l'utilisation du compilateur de Visual Studio est une meilleure idée, il relie le binaire de Godot beaucoup plus rapidement que MinGW. Pourtant, MinGW peut produire des binaires plus optimisés en utilisant l'optimisation du temps de liaison (voir ci-dessous), ce qui en fait un meilleur choix pour l'utilisation en production.
Exécuter SCons
Après avoir ouvert une invite de commande, allez dans le répertoire racine du code source du moteur (en utilisant cd) et tapez :
C:\godot> scons platform=windows
Note
Lors de la compilation avec plusieurs threads CPU, Scons peut avertir à propos de pywin32. Vous pouvez ignorer cette avertissement en toute sécurité.
If all goes well, the resulting binary executable will be placed in
C:\godot\bin\ with the name godot.windows.editor.x86_32.exe or
godot.windows.editor.x86_64.exe. By default, SCons will build a binary matching
your CPU architecture, but this can be overridden using arch=x86_64 or
arch=x86_32.
Ce fichier exécutable contient l'ensemble du moteur et peut s'exécuter sans aucune dépendance. L'exécuter fera apparaître le Gestionnaire de Projet.
Note
If you are compiling Godot for production use, then you can
make the final executable smaller and faster by adding the
SCons option target=template_release.
If you are compiling Godot with MinGW, you can make the binary
even smaller and faster by adding the SCons option lto=full.
As link-time optimization is a memory-intensive process,
this will require about 7 GB of available RAM while compiling.
Note
Si vous souhaitez utiliser des paramètres d'édition séparés pour vos propres constructions Godot et vos versions officielles, vous pouvez activer Mode autonome en créant un fichier appelé ._sc_ ou _sc_ dans le dossier bin/.
Development in Visual Studio
L'utilisation d'un IDE n'est pas nécessaire pour compiler Godot, car SCons s'occupe de tout. Mais si vous avez l'intention de développer le moteur de jeu ou de déboguer son code C++, vous serez sûrement amenés à configurer un éditeur de code ou un IDE.
Folder-based editors don't require any particular setup to start working with Godot's codebase. To edit projects with Visual Studio they need to be set up as a solution.
Vous pouvez créer une solution Visual Studio avec SCons en lançant SCons avec le paramètre vsproj=yes, comme ceci :
scons p=windows vsproj=yes
Vous serez maintenant capable d'ouvrir les sources de Godot dans une solution Visual Studio, et à même de construire Godot en utilisant le bouton Build de Visual Studio.
Voir aussi
See Visual Studio for further details.
Compilation croisée pour Windows à partir d'autres systèmes d'exploitation
Si vous êtes un utilisateur de Linux ou de macOS, vous devez installer MinGW-w64, qui se présente généralement sous forme de variantes 32 bits et 64 bits. Les noms de paquets peuvent différer en fonction de votre distribution, en voici quelques uns connus :
Arch Linux |
pacman -Sy mingw-w64
|
Debian / Ubuntu |
apt install mingw-w64
|
Fedora |
dnf install mingw64-gcc-c++ mingw64-winpthreads-static \
            mingw32-gcc-c++ mingw32-winpthreads-static
|
macOS |
brew install mingw-w64
|
Mageia |
urpmi mingw64-gcc-c++ mingw64-winpthreads-static \
      mingw32-gcc-c++ mingw32-winpthreads-static
|
Avant de tenter la compilation, SCons vérifiera les binaires suivants dans votre variable d'environnement PATH :
i686-w64-mingw32-gcc
x86_64-w64-mingw32-gcc
If the binaries are not located in the PATH (e.g. /usr/bin),
you can define the following environment variable to give a hint to
the build system:
export MINGW_PREFIX="/path/to/mingw"
Where /path/to/mingw is the path containing the bin directory where
i686-w64-mingw32-gcc and x86_64-w64-mingw32-gcc are located (e.g.
/opt/mingw-w64 if the binaries are located in /opt/mingw-w64/bin).
Pour vous assurer que vous faites les choses correctement, l'exécution de ce qui suit dans le shell devrait aboutir à un compilateur qui fonctionne (la version de la sortie peut différer en fonction de votre système) :
${MINGW_PREFIX}/bin/x86_64-w64-mingw32-gcc --version
# x86_64-w64-mingw32-gcc (GCC) 13.2.0
Note
When cross-compiling for Windows using MinGW-w64, keep in mind only
x86_64 and x86_32 architectures are supported. Be sure to
specify the right arch= option when invoking SCons if building
from a different architecture.
Dépannage
La compilation croisée à partir de certaines versions d'Ubuntu peut conduire à ce bogue, en raison d'une configuration par défaut ne supportant pas le threading POSIX.
Vous pouvez modifier cette configuration en suivant ces instructions, pour 64 bits :
sudo update-alternatives --config x86_64-w64-mingw32-gcc
<choose x86_64-w64-mingw32-gcc-posix from the list>
sudo update-alternatives --config x86_64-w64-mingw32-g++
<choose x86_64-w64-mingw32-g++-posix from the list>
Et pour 32-bit :
sudo update-alternatives --config i686-w64-mingw32-gcc
<choose i686-w64-mingw32-gcc-posix from the list>
sudo update-alternatives --config i686-w64-mingw32-g++
<choose i686-w64-mingw32-g++-posix from the list>
Création de modèles d'exportation Windows
Les modèles d'exportation Windows sont créés en compilant Godot sans l'éditeur, avec les drapeaux suivants :
C:\godot> scons platform=windows target=template_debug arch=x86_32
C:\godot> scons platform=windows target=template_release arch=x86_32
C:\godot> scons platform=windows target=template_debug arch=x86_64
C:\godot> scons platform=windows target=template_release arch=x86_64
Si vous envisagez de remplacer les modèles d'exportation standard, copiez-les à l'emplacement suivant, en remplaçant <version> par l'identificateur de version (tel que 3.1.1.stable ou 3.2.dev) :
%USERPROFILE%\AppData\Roaming\Godot\templates\<version>\
Avec les noms suivants :
windows_32_debug.exe
windows_32_release.exe
windows_64_debug.exe
windows_64_release.exe
Cependant, si vous utilisez des modules personnalisés ou du code personnalisé dans moteur, vous pouvez plutôt vouloir configurer vos binaires comme modèles d'exportation personnalisés ici :
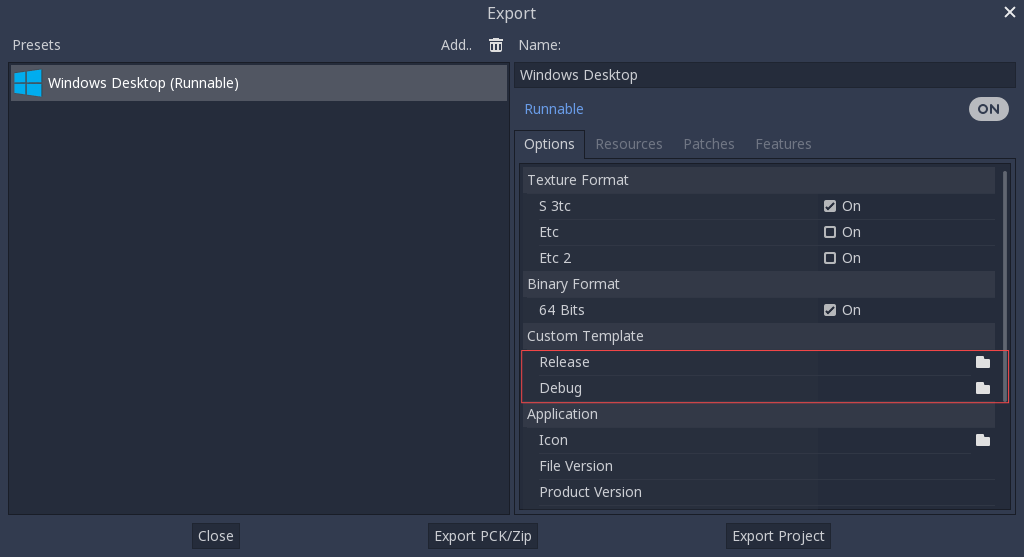
Vous n'avez pas besoin de les copier dans ce cas, il suffit de référencer les fichiers résultants dans le répertoire bin\ de votre dossier source Godot, de sorte que la prochaine fois que vous construirez, vous aurez automatiquement les modèles personnalisés référencés.