Attention: Here be dragons
This is the latest
(unstable) version of this documentation, which may document features
not available in or compatible with released stable versions of Godot.
Checking the stable version of the documentation...
Les lumières et ombres 3D
Introduction
Les sources lumineuses émettent une lumière qui se mélange aux matériaux et produit un résultat visible. La lumière peut provenir de plusieurs types de sources dans une scène :
Du matériau lui-même, sous la forme de la couleur d'émission (bien qu'il n'affecte pas les objets à proximité à moins que l'éclairage indirect pré-calculé ou dans l'espace-écran ne soit activé).
Nœuds de lumière : DirectionalLight3D, OmniLight3D et SpotLight3D.
Lumière ambiante dans l'Environnement ou Reflection probes.
Illumination globale (LightmapGI, VoxelGI ou SDFGI).
La couleur d'émission est une propriété du matériau. Vous pouvez en savoir plus dans le tutoriel Standard Material 3D and ORM Material 3D.
Voir aussi
You can compare various types of lights in action using the 3D Lights and Shadows demo project.
Nœuds de lumière
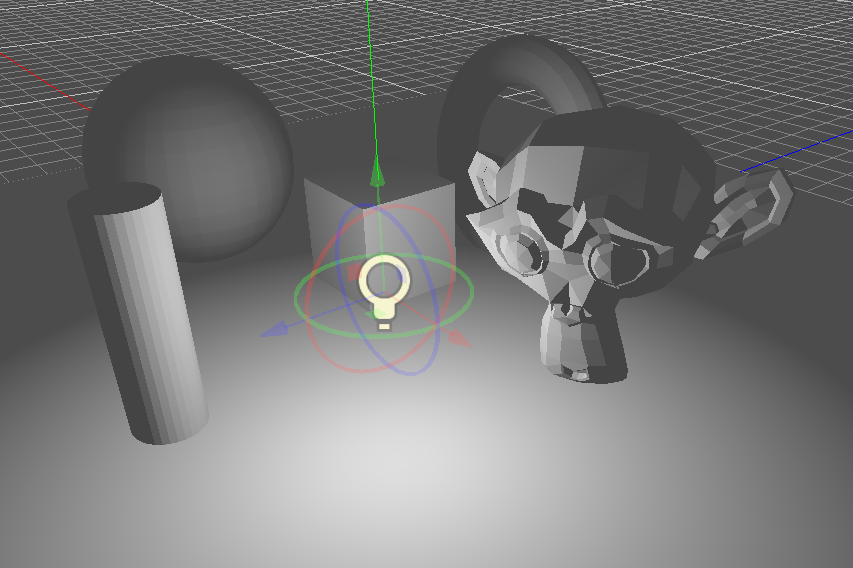
Il existe trois types de nœuds de lumière : DirectionalLight3D, OmniLight3D et SpotLight3D. Jetons un coup d’œil aux paramètres communs pour les lumières :
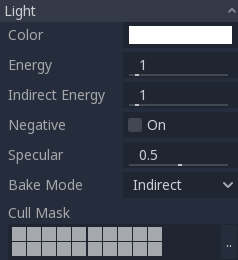
Chaque propriété a une fonction spécifique :
Couleur : Couleur de base de la lumière émise.
Énergie : Multiplicateur d'énergie. Ceci est utile pour saturer les lumières ou travailler avec High dynamic range lighting.
Énergie indirecte : Multiplicateur secondaire utilisé avec la lumière indirecte (rebonds de la lumière). Cela fonctionne Usage de l'illumination globale par lightmap, VoxelGI ou SDFGI.
Énergie du brouillard volumétrique : Multiplicateur secondaire utilisé avec le brouillard volumétrique. Cela n'a qu'un effet que lorsque le brouillard volumétrique est activé.
Négative : La lumière devient soustractive au lieu d'être additive. Il est parfois utile de compenser manuellement certains coins sombres.
Spéculaire : Affecte l'intensité de la tache spéculaire dans les objets affectés par cette lumière. A zéro, cette lumière devient une lumière pure et diffuse.
Bake Mode: Sélectionne le mode de calcul pour la lumière. Voir Usage de l'illumination globale par lightmap.
Cull Mask: Objects that are in the selected layers below will be affected by this light. Note that objects disabled via this cull mask will still cast shadows. If you don't want disabled objects to cast shadows, adjust the Cast Shadow property on the GeometryInstance3D to the desired value.
Voir aussi
Voir Unités physiques de caméra et de lumière si vous souhaitez utiliser des unités du monde réel pour configurer l'intensité et la température de couleur de vos lumières.
Limites aux nombres de lumières
When using the Forward+ renderer, Godot uses a clustering approach for real-time lighting. As many lights as desired can be added (as long as performance allows). However, there's still a default limit of 512 clustered elements that can be present in the current camera view. A clustered element is an omni light, a spot light, a decal or a reflection probe. This limit can be increased by adjusting Max Clustered Elements in Project Settings > Rendering > Limits > Cluster Builder.
When using the Mobile renderer, there is a limitation of 8 OmniLights + 8 SpotLights per mesh resource. There is also a limit of 256 OmniLights + 256 SpotLights that can be rendered in the current camera view. These limits currently cannot be changed.
When using the Compatibility renderer, up to 8 OmniLights + 8 SpotLights can be rendered per mesh resource. This limit can be increased in the advanced Project Settings by adjusting Max Renderable Elements and/or Max Lights per Object in Rendering > Limits > OpenGL, at the cost of performance and longer shader compilation times. The limit can also be decreased to reduce shader compilation times and improve performance slightly.
Avec toutes les méthodes de rendu, jusqu'à 8 DirectionalLights peuvent être visibles à la fois. Cependant, chaque DirectionalLight supplémentaire avec des ombres activées réduira la résolution effective de chaque DirectionalLight. C'est parce que l'atlas d'ombre est partagé entre toutes les lumières.
Si la limite de rendu est dépassée, les lumières commenceront à apparaître et disparaitre pendant le mouvement de la caméra, ce qui peut être distrayant. Activer Fondu de distance sur les nœuds de lumière peut aider à réduire ce problème en améliorant aussi les performances. La séparation de vos maillages en portions plus petites peut également aider, en particulier pour la géométrie de niveau (qui améliore également l'efficacité du culling).
If you need to render more lights than possible in a given renderer, consider using baked lightmaps with lights' bake mode set to Static. This allows lights to be fully baked, which also makes them much faster to render. You can also use emissive materials with any global illumination technique as a replacement for light nodes that emit light over a large area.
Cartographie des ombres
Les lumières peuvent optionnellement projeter des ombres. Cela leur donne plus de réalisme (la lumière n'atteint pas les zones occultées), mais cela peut entraîner un coût de performance plus élevé. Il existe une liste de paramètres d'ombre génériques, chacun ayant également une fonction spécifique :
Activé : Cochez cette case pour activer la cartographie des ombres dans cette lumière.
Opacity: Areas occluded are darkened by this opacity factor. Shadows are fully opaque by default, but this can be changed to make shadows translucent for a given light.
Biais : Si ce paramètre est trop bas, l'ombre de l'objet risque de se projeter sur lui-même. Si il est trop élevé, l'ombre se sépare de l'objet à son origine. Réglez le pour obtenir le meilleur résultat visuel.
Normal Bias: When this parameter is too low, self-shadowing occurs. When too high, shadows appear misaligned from the casters. Tweak to what works best for you.
Transmittance Bias: When this parameter is too low, self-shadowing occurs on materials that have transmittance enabled. When too high, shadows will not affect materials that have transmittance enabled consistently. Tweak to what works best for you.
Reverse Cull Face: Some scenes work better when shadow mapping is rendered with face-culling inverted.
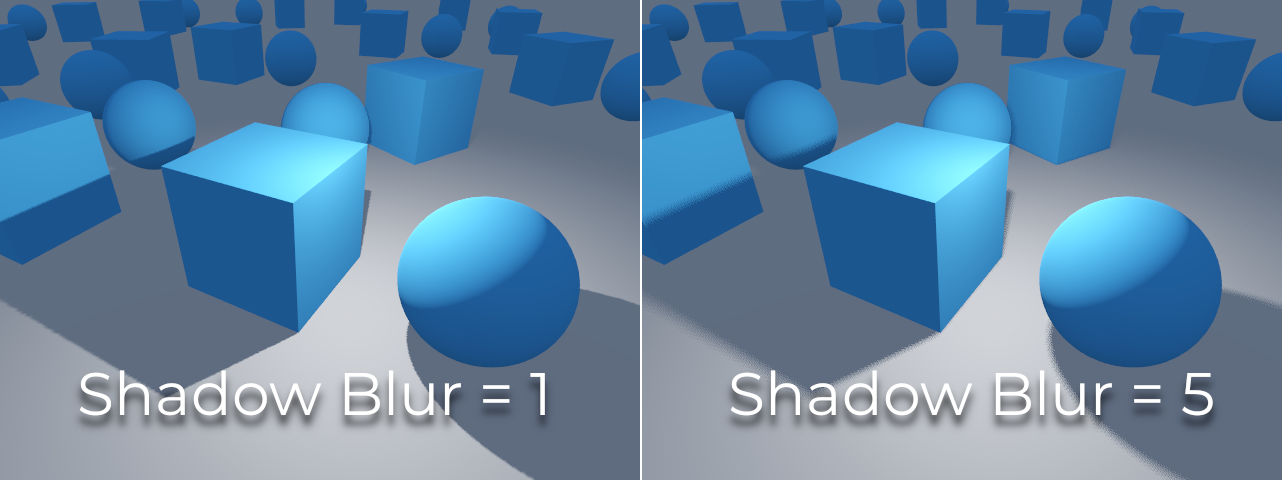
Blur: Multiplies the shadow blur radius for this light. This works with both traditional shadow mapping and contact-hardening shadows (lights with Angular Distance or Size greater than
0.0). Higher values result in softer shadows, which will also appear to be more temporally stable for moving objects. The downside of increasing shadow blur is that it will make the grainy pattern used for filtering more noticeable. See also Mode de filtrage des ombres.Caster Mask: Shadows are only cast by objects in these layers. Note that this mask does not affect which objects shadows are cast onto.
Tweaking shadow bias
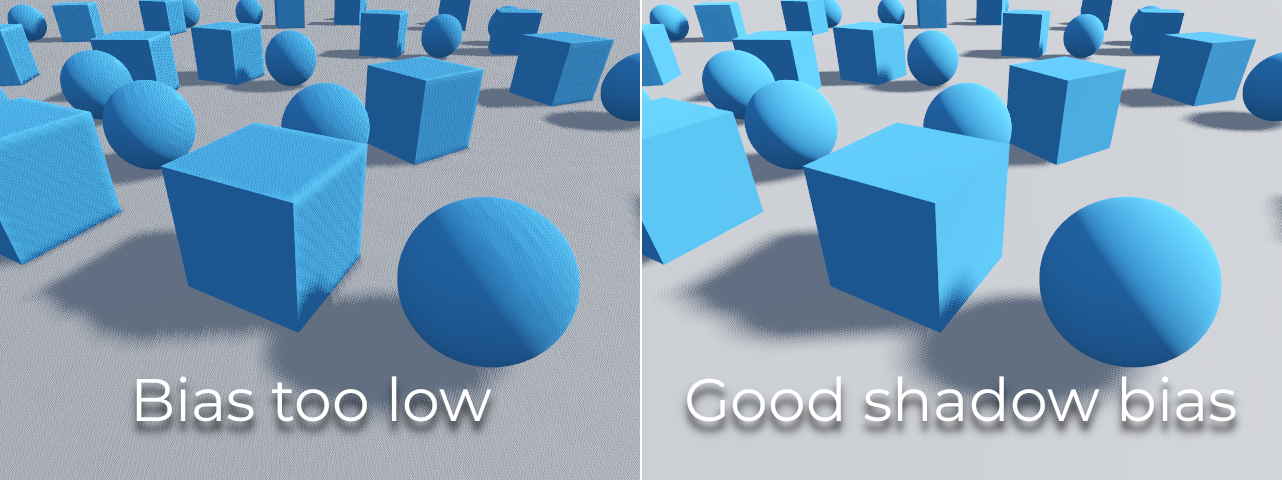
Below is an image of what tweaking bias looks like. Default values work for most cases, but in general, it depends on the size and complexity of geometry.
If the Shadow Bias or Shadow Normal Bias is set too low for a given light, the shadow will be "smeared" onto the objects. This will cause the light's intended appearance to darken, and is called shadow acne:
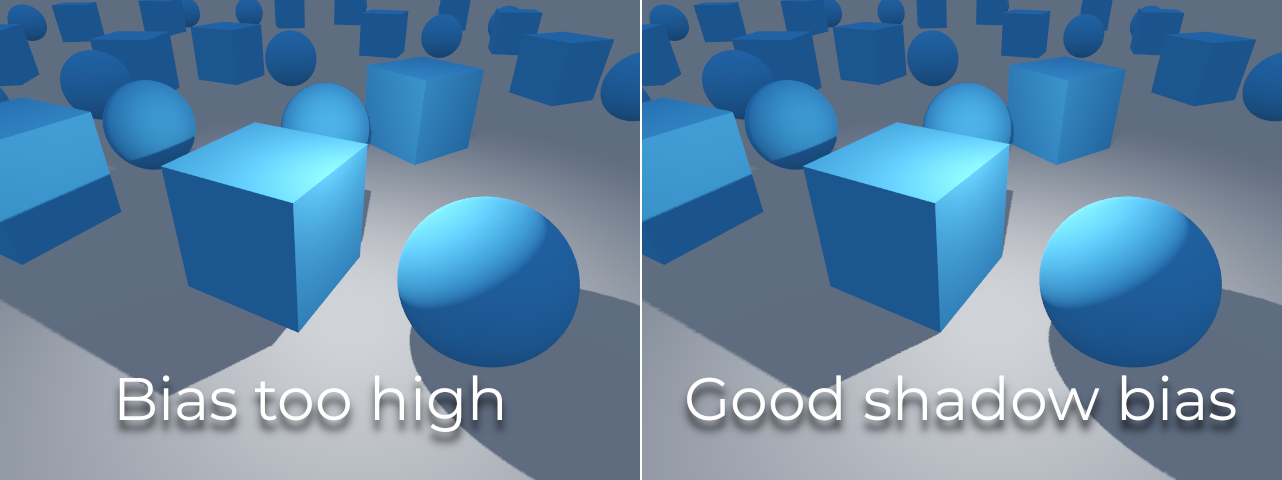
On the other hand, if the Shadow Bias or Shadow Normal Bias is set too high for a given light, the shadow may appear to be disconnected from the object. This is called peter-panning:
In general, increasing Shadow Normal Bias is preferred over increasing Shadow Bias. Increasing Shadow Normal Bias does not cause as much peter-panning as increasing Shadow Bias, but it can still resolve most shadow acne issues efficiently. The downside of increasing Shadow Normal Bias is that it can make shadows appear thinner for certain objects.
Any sort of bias issues can be fixed by increasing the shadow map resolution, at the cost of decreased performance.
Note
Tweaking shadow mapping settings is an art – there are no "one size fits all" settings. To achieve the best visuals, you may need to use different shadow bias values on a per-light basis.
Note on Appearance Changes: When enabling shadows on a light, be aware that the light's appearance might change compared to when it's rendered without shadows in the compatibility renderer. Due to limitations with older mobile devices, shadows are implemented using a multi-pass rendering approach so lights with shadows are rendered in sRGB space instead of linear space. This change in rendering space can sometimes drastically alter the light's appearance. To achieve a similar appearance to an unshadowed light, you may need to adjust the light's energy setting.
Directional light
C'est le type de lumière le plus courant et représente une source lumineuse très éloignée (comme le soleil). C'est aussi la lumière la moins chère à calculer et devrait être utilisée chaque fois que c'est possible (bien que ce ne soit pas la carte des ombres la moins chère à calculer, mais plus à ce sujet ultérieurement).
Directional light modélise un nombre infini de rayons lumineux parallèles couvrant l'ensemble de la scène. Le nœud Directional light est représenté par une grande flèche qui indique la direction des rayons lumineux. Cependant, la position du nœud n'affecte pas du tout l'éclairage et peut être n'importe où.

Every face whose front-side is hit by the light rays is lit, while the others stay dark. Unlike most other light types, directional lights don't have specific parameters.
The directional light also offers an Angular Distance property, which
determines the light's angular size in degrees. Increasing this above 0.0
will make shadows softer at greater distances from the caster, while also
affecting the sun's appearance in procedural sky materials. This is called a
contact-hardening shadow (also known as PCSS).
For reference, the angular distance of the Sun viewed from the Earth is
approximately 0.5. This kind of shadow is expensive, so check the
recommendations in Recommandations pour les PCSS if setting
this value above 0.0 on lights with shadows enabled.
Cartographie des ombres directionnelles
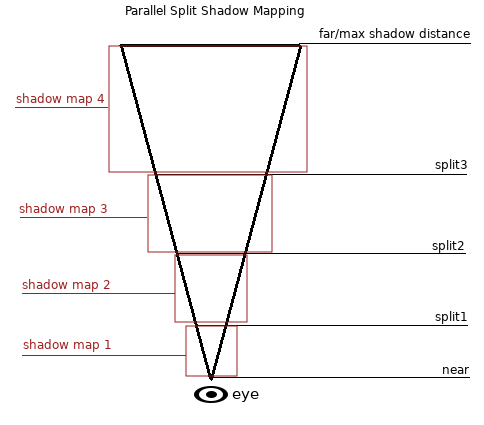
To compute shadow maps, the scene is rendered (only depth) from an orthogonal point of view that covers the whole scene (or up to the max distance). There is, however, a problem with this approach because objects closer to the camera receive low-resolution shadows that may appear blocky.
To fix this, a technique named Parallel Split Shadow Maps (PSSM) is used. This splits the view frustum in 2 or 4 areas. Each area gets its own shadow map. This allows small areas close to the viewer to have the same shadow resolution as a huge, far-away area. When shadows are enabled for DirectionalLight3D, the default shadow mode is PSSM with 4 splits. In scenarios where an object is large enough to appear in all four splits, it results in increased draw calls. Specifically, such an object will be rendered five times in total: once for each of the four shadow splits and once for the final scene rendering. This can impact performance, understanding this behavior is important for optimizing your scene and managing performance expectations.
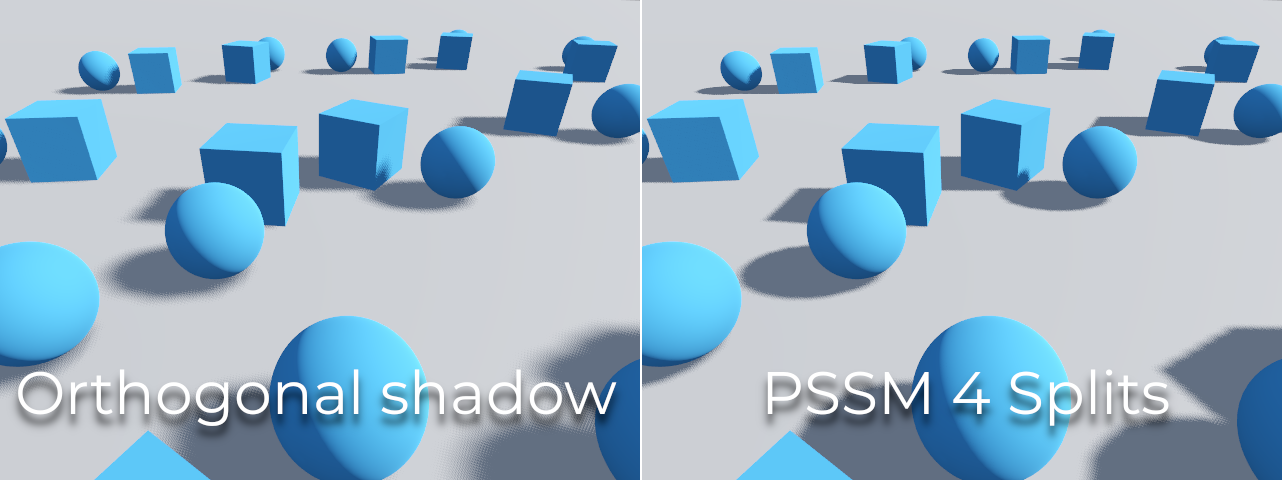
Avec cela, les ombres deviennent plus détaillées :
Pour contrôler le PSSM, un certain nombre de paramètres sont exposés :
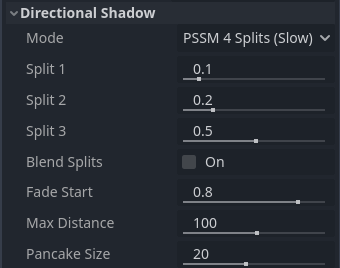
Each split distance is controlled relative to the camera far (or shadow
Max Distance if greater than 0.0). 0.0 is the eye position and
1.0 is where the shadow ends at a distance. Splits are in-between.
Default values generally work well, but tweaking the first split a bit is common
to give more detail to close objects (like a character in a third-person game).
Always make sure to set a shadow Max Distance according to what the scene
needs. A lower maximum distance will result in better-looking shadows and better
performance, as fewer objects will need to be included in shadow rendering. You
can also adjust Fade Start to control how aggressive the shadow fade-out
should be at a distance. For scenes where the Max Distance fully covers the
scene at any given camera position, you can increase Fade Start to 1.0
to prevent the shadow from fading at a distance. This should not be done in
scenes where Max Distance doesn't fully cover the scene, as the shadow will
appear to be suddenly cut off at a distance.
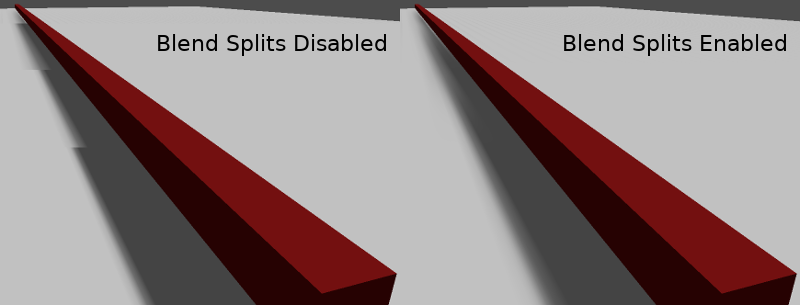
Sometimes, the transition between a split and the next can look bad. To fix this, the Blend Splits option can be turned on, which sacrifices detail and performance in exchange for smoother transitions:
The Shadow > Normal Bias parameter can be used to fix special cases of self-shadowing when objects are perpendicular to the light. The only downside is that it makes the shadow a bit thinner. Consider increasing Shadow > Normal Bias before increasing Shadow > Bias in most situations.
Lastly, Pancake Size is a property that can be adjusted to fix missing shadows when using large objects with unsubdivided meshes. Only change this value if you notice missing shadows that are not related to shadow biasing issues.
Omni light
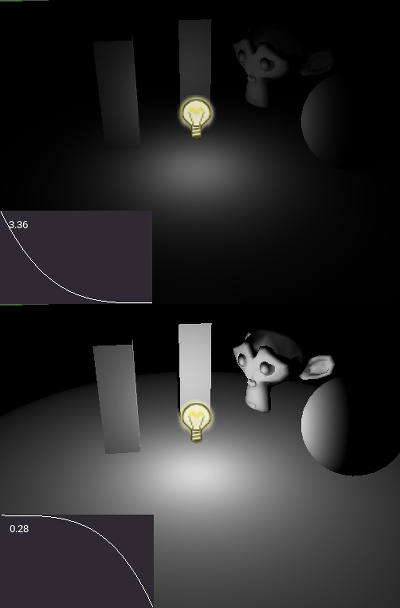
Omni light est une source ponctuelle qui émet une lumière sphérique dans toutes les directions jusqu'à un rayon donné.
Dans la vie réelle, l'atténuation de la lumière est une fonction inverse, ce qui signifie que les lumières omnidirectionnelles n'ont pas de rayon. C'est un problème car cela signifie que le calcul de plusieurs Omni light deviendrait exigeant.
To solve this, a Range parameter is introduced together with an attenuation function.
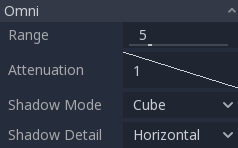
Ces deux paramètres permettent d'ajuster visuellement le fonctionnement afin d'obtenir des résultats esthétiques.
A Size parameter is also available in OmniLight3D. Increasing this value
will make the light fade out slower and shadows appear blurrier when far away
from the caster. This can be used to simulate area lights to an extent. This is
called a contact-hardening shadow (also known as PCSS). This kind of shadow is
expensive, so check the recommendations in
Recommandations pour les PCSS if setting this value above
0.0 on lights with shadows enabled.
Cartographie des ombres de Omni lights
La cartographie des ombres dû à un Omni light est relativement simple. Le principal problème à considérer est l'algorithme utilisé pour le rendu.
Omni Shadows can be rendered as either Dual Paraboloid or Cube mapped. Dual Paraboloid renders quickly, but can cause deformations, while Cube is more correct, but slower. The default is Cube, but consider changing it to Dual Paraboloid for lights where it doesn't make much of a visual difference.
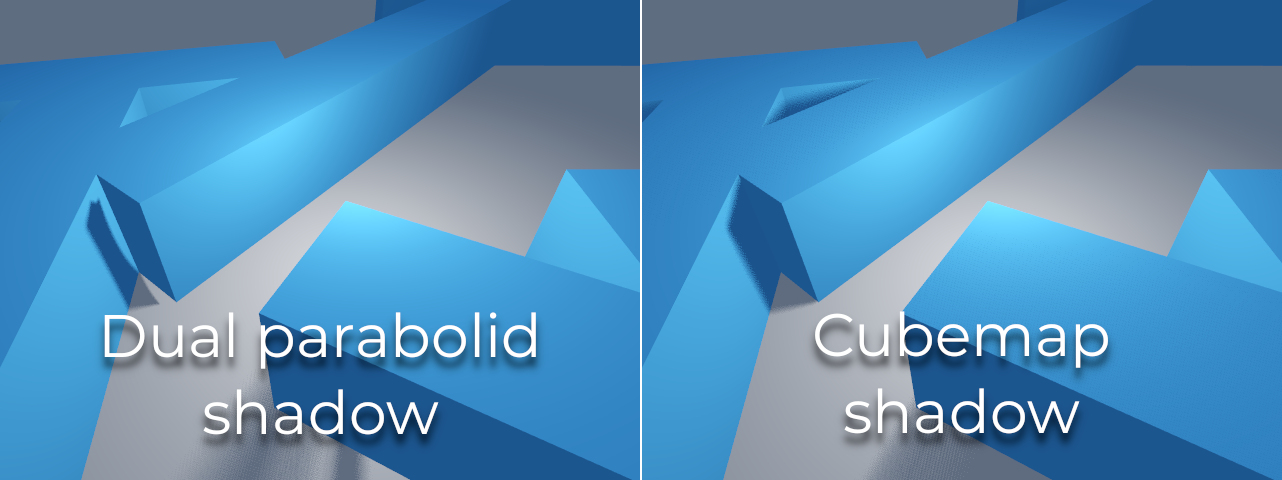
If the objects being rendered are mostly irregular and subdivided, Dual Paraboloid is usually enough. In any case, as these shadows are cached in a shadow atlas (more on that at the end), it may not make a difference in performance for most scenes.
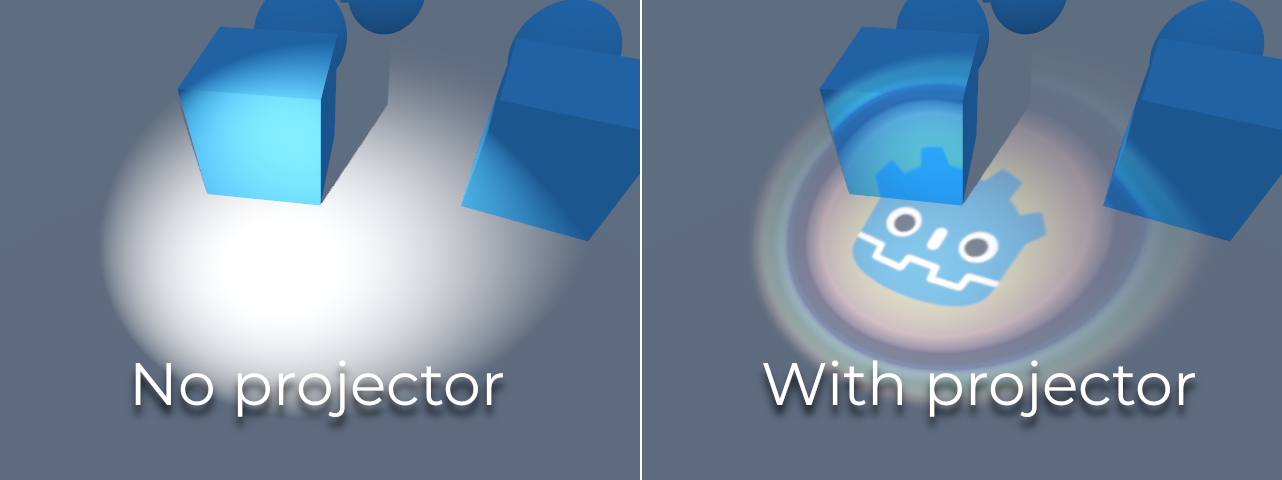
Omni lights with shadows enabled can make use of projectors. The projector texture will multiply the light's color by the color at a given point on the texture. As a result, lights will usually appear to be darker once a projector texture is assigned; you can increase Energy to compensate for this.
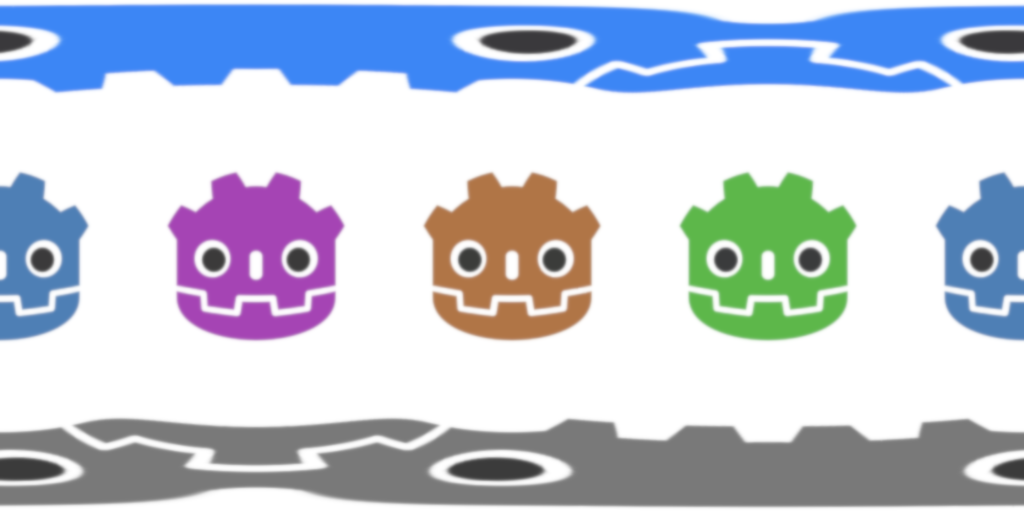
Omni light projector textures require a special 360° panorama mapping, similar to PanoramaSkyMaterial textures.
With the projector texture below, the following result is obtained:
Astuce
If you've acquired omni projectors in the form of cubemap images, you can use this web-based conversion tool to convert them to a single panorama image.
Spot light
Les Spot lights sont semblables aux omni lights, sauf qu'elles émettent de la lumière uniquement dans un cône. elles sont utiles pour simuler des lampes de poche, des feux de voiture, des réflecteurs, des spots, etc. Ce type de lumière est également atténué dans la direction opposée vers laquelle elle pointe.
Spot lights share the same Range, Attenuation and Size as OmniLight3D, and add two extra parameters:
Angle : L’angle d’ouverture de la lumière.
Angle Attenuation: The cone attenuation, which helps soften the cone borders.
Cartographie des ombres de Spot lights
Spots feature the same parameters as omni lights for shadow mapping. Rendering spot shadow maps is significantly faster compared to omni lights, as only one shadow texture needs to be rendered (instead of rendering 6 faces, or 2 in dual paraboloid mode).
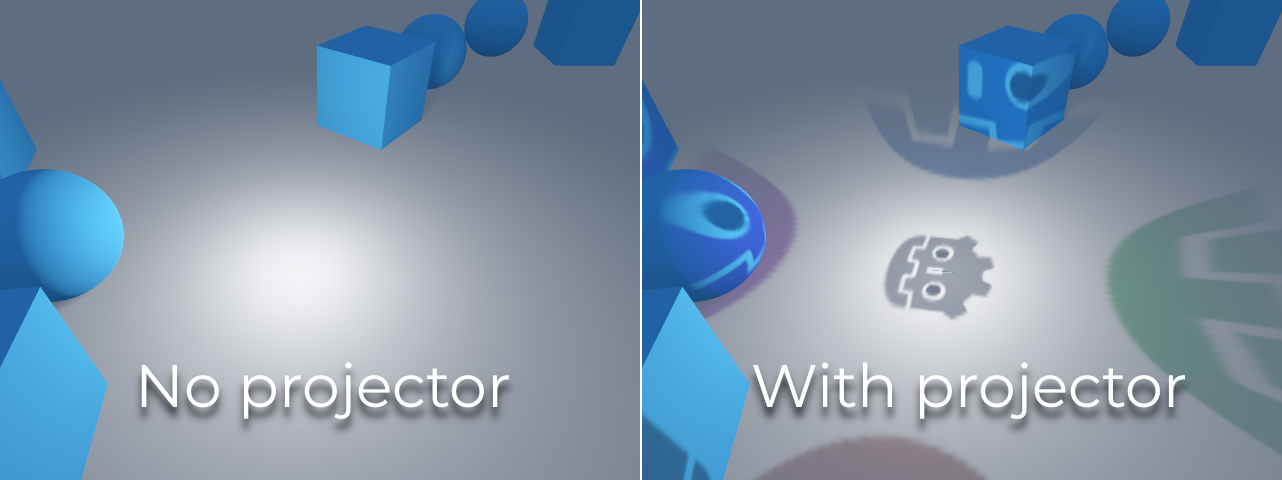
Spot lights with shadows enabled can make use of projectors. The projector texture will multiply the light's color by the color at a given point on the texture. As a result, lights will usually appear to be darker once a projector texture is assigned; you can increase Energy to compensate for this.
Unlike omni light projectors, a spot light projector texture doesn't need to follow a special format to look correct. It will be mapped in a way similar to a decal.
With the projector texture below, the following result is obtained:

Note
Spot lights with wide angles will have lower-quality shadows than spot lights with narrow angles, as the shadow map is spread over a larger surface. At angles wider than 89 degrees, spot light shadows will stop working entirely. If you need shadows for wider lights, use an omni light instead.
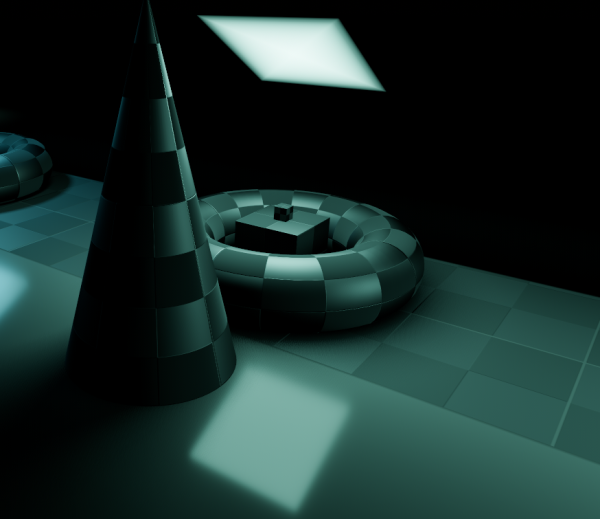
Area light
Sometimes, you want lighting to come from a large area instead of a single point. Area lights are useful for simulating soft, diffuse lighting, such as light coming from a window or a lit billboard.
Godot provides the AreaLight3D node for this purpose, which emits light from a rectangular area. The node only emits light and has no other visual representation in the scene. The screenshots below use a Sprite3D node as a child of the area light for visualization purposes.
Avertissement
This type of light is the most expensive to render in real-time. It should be used sparingly, especially when shadows are enabled. Consider using them only for cinematics or when targeting high-end devices.
In Forward+, as soon as one area light is visible in the view frustum, it incurs an additional performance cost on all rendered objects in the scene, even those that are not reached by an area light. This tradeoff allows for a greater number of area lights to be rendered (clustered lighting).
In Mobile and Compatibility, only objects that are reached by an area light incur an additional performance cost.
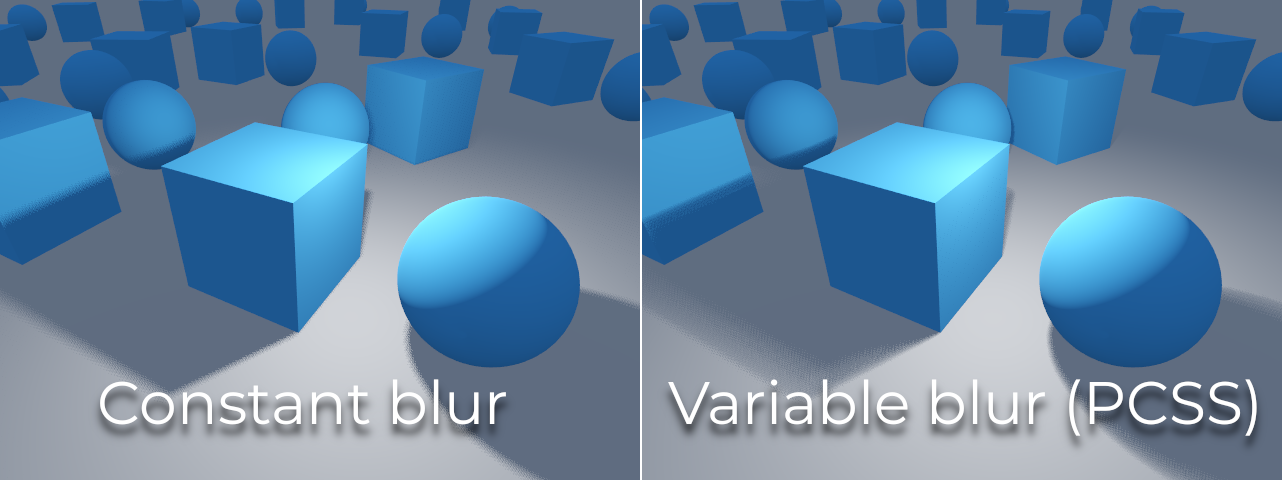
Area lights can also cast shadows, with variable penumbra simulated using
PCSS by default. The size
of this penumbra can be controlled with the Light3D Size property. This
effect can be quite demanding, so it can be turned off by setting Size to
0.0.
Note
Shadows cast by an area light may look incorrect if the object casting shadows doesn't have enough subdivisions and it's very close to the area light. This is the same limitation as Dual Paraboloid shadow mode on an omni light.
Note
Since area lights are difficult to simulate in a real-time rasterized renderer, they come with a number of limitations.
For small light sources, you will likely get better results when using point lights. Shadows from area lights are crude approximations, as they are calculated as if they were point lights, and may appear to be distorted at the edges. To get a better result, make sure the meshes in the light's range are sufficiently subdivided.
Area lights suffer from light leaking on the backside of geometry closely in front of them at grazing angles, so be careful with where you place them.
Lastly, not all material features are fully supported; area lights are practically limited to Lambertian diffuse and GGX specular shading, while anisotropic materials will appear as if isotropic. Vertex shading is also not implemented for area lights.
Area lights emit light in a rectangular area defined by the Area > Size
property (not to be confused with the generic Light3D Size property). To get
a physically accurate result, you should resize this area to match the size of
the real-life light source you are trying to simulate. For example, if you are
simulating a 1-meter neon tube that is 10 centimeters wide, set the area
size to (1, 0.1) and adjust the energy accordingly.
By default, the light's energy is normalized: the larger the area, the weaker the light. This allows you to change the area size without needing to adjust the energy to compensate, which is useful for animation. You can disable this behavior by unchecking Area > Normalize Energy if you want the energy to be independent of the area size.
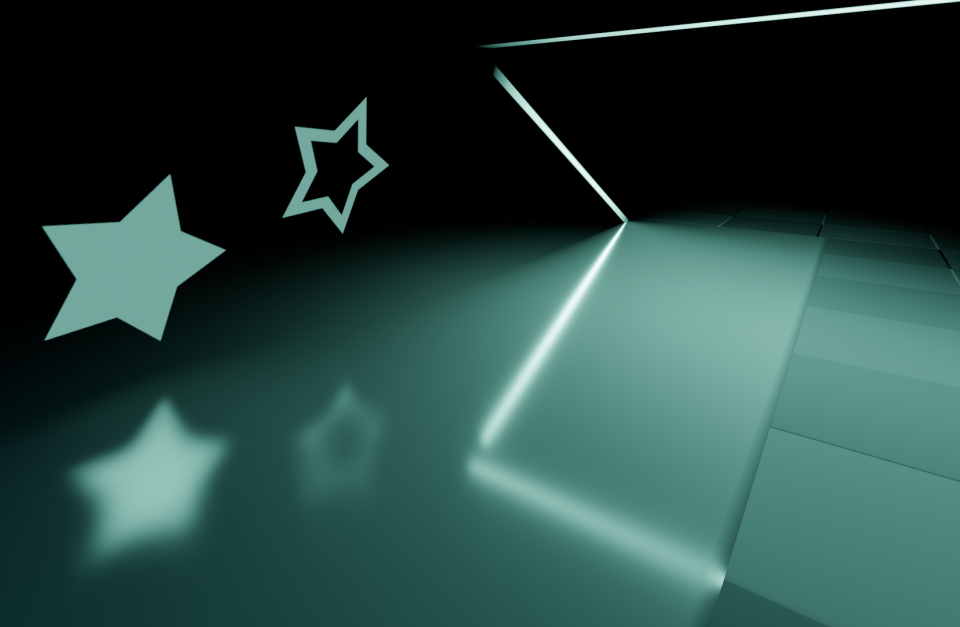
The rectangular area can optionally be textured. This can be effectively used to change the light's shape into any 2D shape, or tint it in different colors. The texture's alpha channel is treated as black (no light coming through). The area light's texture will be visible in reflections according to the surface's roughness. This behavior is different from omni/spot projectors, as it does not project the texture directly onto all diffuse lighting.
When using a textures that are transparent or black toward the edges, you might want to leave a gap of a few pixels to make sure the texture is blurred smoothly.
Note
Changing the area light's texture at runtime can be expensive, especially if the texture is large.
To reduce the performance impact of switching textures at runtime, make sure each dimension of an area texture is either a multiple of 128 pixels, or a power of two. This removes the need for a scaling pass, which slows down texture changes. The textures don't necessarily have to be square to be optimal. Examples of optimal texture sizes include 32×64, 128×128, and 256×384.
Textured area lights are not supported in the Compatibility renderer.
Atlas d'ombre
Unlike Directional lights, which have their own shadow texture, omni and spot lights are assigned to slots of a shadow atlas. This atlas can be configured in the advanced Project Settings (Rendering > Lights And Shadows > Positional Shadow).
La résolution s'applique à l'ensemble de l'atlas d'ombres. Cet atlas est divisé en quatre quadrants :
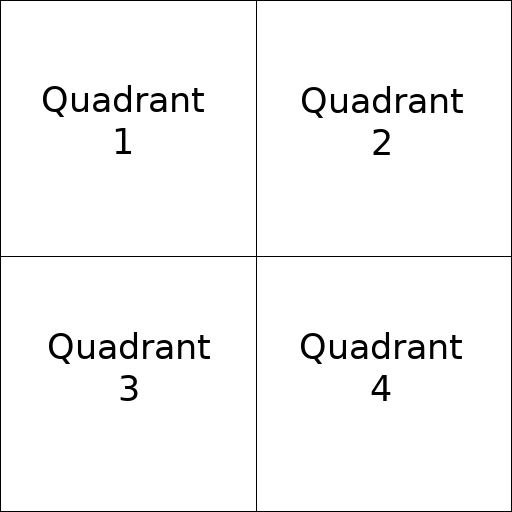
Chaque quadrant peut être subdivisé pour attribuer un nombre quelconque de cartes des ombres ; la subdivision par défaut est la suivante :
L'atlas d'ombres attribue l'espace comme suit :
La plus grande taille de carte d'ombres (lorsqu'aucune subdivision n'est utilisée) représente une lumière de la taille de l'écran (ou plus grande).
Les subdivisions (cartes plus petites) représentent les ombres pour les lumières qui sont plus éloignées de la vue et proportionnellement plus petites.
Pour chaque image, la procédure suivante est exécutée pour toutes les lumières :
Vérifiez si la lumière est sur un emplacement de la bonne taille. Si ce n'est pas le cas, re-rendez-le et déplacez-le dans un emplacement plus grand ou plus petit.
Vérifiez si un objet affectant la carte des ombres a changé. Si c'est le cas, re-rendez la lumière.
Si rien de ce qui précède ne s'est produit, rien n'est fait et l'ombre n'est pas touchée.
Si les emplacements d'un quadrant sont pleins, les lumières sont repoussées vers des emplacements plus petits, selon la taille et la distance. Si toutes les emplacements dans tous les quadrants sont pleines, certaines lumières ne seront pas en mesure de rendre des ombres même si les ombres sont activées sur eux.
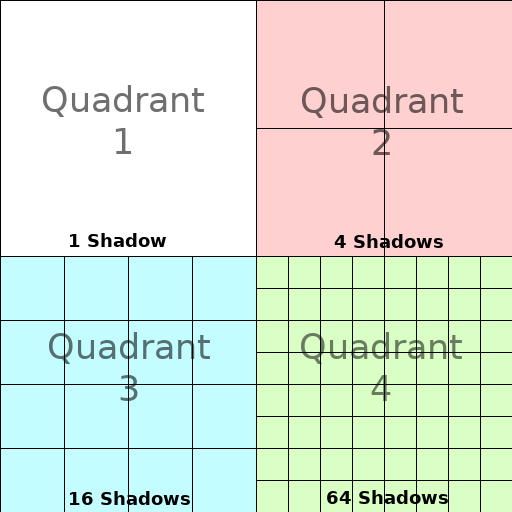
The default shadow allocation strategy allows rendering up to 88 lights with shadows enabled in the camera frustum (4 + 4 + 16 + 64):
The first and most detailed quadrant can store 4 shadows.
Le deuxième quadrant peut stocker 4 autres ombres.
Le troisième quadrant peut stocker 16 ombres, avec moins de détails.
Le quatrième et moins détaillé quadrant peut stocker 64 ombres, avec encore moins de détails.
L'utilisation d'un nombre plus élevé d'ombres par quadrant permet de supporter un plus grand total de lumières avec les ombres activées, tout en améliorant les performances (comme les ombres seront rendues à une résolution plus basse pour chaque lumière). Cependant, augmenter le nombre d'ombres par quadrant diminue la qualité des ombres.
In some cases, you may want to use a different allocation strategy. For example, in a top-down game where all lights are around the same size, you may want to set all quadrants to have the same subdivision so that all lights have shadows of similar quality level.
Équilibrer la qualité et les performances
Le rendu des ombres est un sujet critique dans la performance des rendus en 3D. Il est important de faire les bons choix ici pour éviter de créer des goulets d'étranglement.
Les paramètres de qualité des ombres directionnelles peuvent être changés en temps réel en appelant les méthodes de RenderingServer appropriées.
Les paramètres de qualité des ombres positionnelles (omni/spot) peuvent être modifiés lors de l’exécution sur le Viewport racine.
Taille de la shadow map
Les hautes résolutions d'ombre se traduisent par des ombres plus nettes, mais à un coût de performance important. Il convient également de noter que des ombres plus nettes ne sont pas toujours plus réalistes. Dans la plupart des cas, cela devrait être maintenu à sa valeur par défaut de 4096 ou diminué à 2048 pour les GPUs bas de gamme.
If positional shadows become too blurry after decreasing the shadow map size, you can counteract this by adjusting the shadow atlas quadrants to contain fewer shadows. This will allow each shadow to be rendered at a higher resolution.
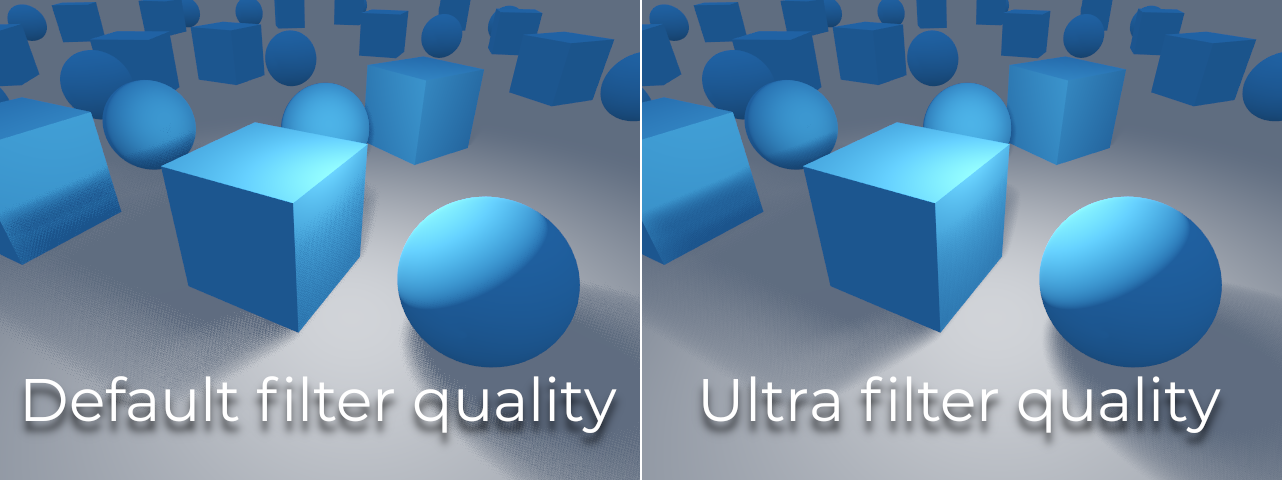
Mode de filtrage des ombres
Several shadow map quality settings can be chosen here. The default Soft Low is a good balance between performance and quality for scenes with detailed textures, as the texture detail will help make the dithering pattern less noticeable.
However, in projects with less detailed textures, the shadow dithering pattern may be more visible. To hide this pattern, you can either enable Anticrénelage temporel (TAA), AMD FidelityFX Super Resolution 2.2 (FSR2), Anticrénelage approximatif rapide (FXAA), or increase the shadow filter quality to Soft Medium or higher.
The Soft Very Low setting will automatically decrease shadow blur to make artifacts from the low sample count less visible. Conversely, the Soft High and Soft Ultra settings will automatically increase shadow blur to better make use of the increased sample count.
16-bits contre 32-bit
By default, Godot uses 16-bit depth textures for shadow map rendering. This is recommended in most cases as it performs better without a noticeable difference in quality.
If 16 Bits is disabled, 32-bit depth textures will be used instead. This can result in less artifacting in large scenes and large lights with shadows enabled. However, the difference is often barely visible, yet this can have a significant performance cost.
Light/shadow distance fade
OmniLight3D and SpotLight3D offer several properties to hide distant lights. This can improve performance significantly in large scenes with dozens of lights or more.
Enabled: Controls whether distance fade (a form of LOD) is enabled. The light will fade out over Begin + Length, after which it will be culled and not sent to the shader at all. Use this to reduce the number of active lights in a scene and thus improve performance.
Begin: The distance from the camera at which the light begins to fade away (in 3D units).
Shadow: The distance from the camera at which the shadow begins to fade away (in 3D units). This can be used to fade out shadows sooner compared to the light, further improving performance. Only available if shadows are enabled for the light.
Length: The distance over which the light and shadow fades (in 3D units). The light becomes slowly more transparent over this distance and is completely invisible at the end. Higher values result in a smoother fade-out transition, which is more suited when the camera moves fast.
Recommandations pour les PCSS
Le Percentage-closer soft shadow (PCSS, litt. "Ombres Douces Plus Proches en Pourcentage") fournit une apparence des shadow maps plus réaliste, avec la taille de la pénombre variant selon la distance entre le projeteur et la surface recevant l'ombre. Cela a un fort coût sur les performances, surtout pour les lumières directionnelles.
To avoid performance issues, it's recommended to:
Utilisez seulement une poignée de lumières avec des ombres PCSS actives à un moment donné. L'effet est généralement le plus visible sur les grandes lumières lumineuses. Les sources lumineuses secondaires qui sont plus faibles ne bénéficient généralement pas beaucoup de l'utilisation des ombres PCSS.
Provide a setting for users to disable PCSS shadows. On directional lights, this can be done by setting the DirectionalLight3D's
light_angular_distanceproperty to0.0in a script. On positional lights, this can be done by setting the OmniLight3D or SpotLight3D'slight_sizeproperty to0.0in a script.
Projector filter mode
The way projectors are rendered also has an impact on performance. The Rendering > Textures > Light Projectors > Filter advanced project setting lets you control how projector textures should be filtered. Nearest/Linear do not use mipmaps, which makes them faster to render. However, projectors will look grainy at distance. Nearest/Linear Mipmaps will look smoother at a distance, but projectors will look blurry when viewed from oblique angles. This can be resolved by using Nearest/Linear Mipmaps Anisotropic, which is the highest-quality mode, but also the most expensive.
If your project has a pixel art style, consider setting the filter to one of the Nearest values so that projectors use nearest-neighbor filtering. Otherwise, stick to Linear.