Attention: Here be dragons
This is the latest
(unstable) version of this documentation, which may document features
not available in or compatible with released stable versions of Godot.
Checking the stable version of the documentation...
GDScript Propriétés exportées
In Godot, class members can be exported. This means their value gets saved along
with the resource (such as the scene) they're
attached to, and get transferred over when using RPCs.
They will also be available for editing in the property editor. Exporting is done by using
the @export annotation.
@export var number: int = 5
Dans cet exemple, la valeur 5 sera enregistrée et visible dans l'éditeur de propriétés.
Une variable exportée doit être initialisée à une expression constante ou avoir un spécificateur de type dans la variable. Certaines des annotations d'exportation ont un type spécifique et n'ont pas besoin que la variable soit typée (voir la section Exemples ci-dessous).
One of the fundamental benefits of exporting member variables is to have them visible and editable in the editor. This way, artists and game designers can modify values that later influence how the program runs. For this, a special export syntax is provided. Additionally, documentation comments can be used for tooltip descriptions, visible on mouse over.
Note
L'exportation de propriétés peut également se faire dans d'autres langages comme le C#. La syntaxe varie en fonction du langage. Voir C# exported properties pour plus d'informations pour les exportations en C#.
Utilisation de base
Si la valeur exportée est initialisée avec une constante ou une expression constante, le type sera déduit et utilisé dans l'éditeur.
@export var number = 5
S'il n'y a pas de valeur par défaut, vous pouvez ajouter un type à la variable.
@export var number: int
Les ressources et les nœuds peuvent être exportés.
@export var resource: Resource
@export var node: Node
Even if a script is not executed in the editor, exported properties can still be edited. However, getters and setters will only be used if the script is in Mode tool(outil).
Grouping exports
Il est possible de regrouper vos propriétés exportées dans l'inspecteur avec l'annotation @export_group. Chaque propriété exportée après cette annotation sera ajoutée au groupe. Démarrez un nouveau groupe ou utilisez @export_group("") pour en sortir.
@export_group("My Properties")
@export var number = 3
Le deuxième argument de l'annotation peut être utilisé pour regrouper uniquement les propriétés avec le préfixe spécifié.
Les groupes ne peuvent pas être imbriqués, utilisez @export_subgroup pour créer des sous-groupes au sein d'un groupe.
@export_subgroup("Extra Properties")
@export var string = ""
@export var flag = false
Vous pouvez également modifier le nom de votre catégorie principale ou créer des catégories supplémentaires dans la liste des propriétés avec l'annotation @export_category.
@export_category("Main Category")
@export var number = 3
@export var string = ""

@export_category("Extra Category")
@export var flag = false
Note
La liste des propriétés est organisée en fonction de l'héritage de classe et les nouvelles catégories brisent cette habitude. Utilisez-les avec précaution, en particulier lors de la création de projets destinés à un usage public.
Chaînes de caractères représentant des chemins
String as a path to a file. See @export_file.
@export_file var f
String as a path to a directory. See @export_dir.
@export_dir var f
String as a path to a file, custom filter provided as hint. See again @export_file.
@export_file("*.txt") var f
L'utilisation de chemins dans le système de fichiers global est également possible, mais uniquement dans les scripts en mode outil (tool).
String as a path to a PNG file in the global filesystem. See @export_global_file.
@export_global_file("*.png") var tool_image
String as a path to a directory in the global filesystem. See @export_global_dir.
@export_global_dir var tool_dir
The multiline annotation tells the editor to show a large input field for editing over multiple lines. See @export_multiline.
@export_multiline var text
Strings as input actions
String as an input action defined in the project's input map.
@export_custom(PROPERTY_HINT_INPUT_NAME) var my_input
String as an input action defined in the project's input map, plus default
built-in values such as ui_accept and ui_cancel.
@export_custom(PROPERTY_HINT_INPUT_NAME, "show_builtin") var my_input
String as an input action defined in the project's input map, plus arbitrary values that can manually be entered.
@export_custom(PROPERTY_HINT_INPUT_NAME, "loose_mode") var my_input
String as an input action defined in the project's input map, plus default
built-in values such as ui_accept and ui_cancel and arbitrary values
that can manually be entered.
@export_custom(PROPERTY_HINT_INPUT_NAME, "show_builtin,loose_mode") var my_input
Limitation des plages de saisie de l'éditeur
Voir @export_range pour tout ce qui suit.
Autorise les valeurs entières de 0 à 20.
@export_range(0, 20) var i
Autorise les valeurs entières de -10 à 20.
@export_range(-10, 20) var j
Autorise les nombres à virgule flottante de -10 à 20 et aligne la valeur sur des multiples de 0,2.
@export_range(-10, 20, 0.2) var k: float
The limits can be made to affect only the slider if you add the hints "or_less"
and/or "or_greater". If either these hints are used, it will be possible for
the user to enter any value or drag the value with the mouse when not using
the slider, even if outside the specified range.
@export_range(0, 100, 1, "or_less", "or_greater") var l: int
The "exp" hint can be used to make a value have an exponential slider
instead of a linear slider. This means that when dragging the slider towards
the right, changes will become progressively faster when dragging the mouse.
This is useful to make editing values that can be either very small or very large
easier, at the cost of being less intuitive.
@export_range(0, 100000, 0.01, "exp") var exponential: float
For values that are meant to represent an easing factor, use Nombre à virgule flottante avec indice d'assouplissement instead.
The "hide_slider" hint can be used to hide the horizontal bar that
appears below float properties, or the up/down arrows that appear besides
int properties:
@export_range(0, 1000, 0.01, "hide_slider") var no_slider: float
On the other hand, the "prefer_slider" hint can be used to show a horizontal
bar below int properties instead of up/down arrows:
@export_range(0, 100, 1, "prefer_slider") var with_slider: int
Ajouter des suffixes et gérer les degrés/radians
A suffix can also be defined to make the value more self-explanatory in the
inspector. For example, to define a value that is meant to be configured as
"meters" (m) by the user:
@export_range(0, 100, 1, "suffix:m") var m: int
For angles that are stored in radians but displayed as degrees to the user, use the "radians_as_degrees" hint:
@export_range(0, 360, 0.1, "radians_as_degrees") var angle: float
This performs automatic conversion when the value is displayed or modified in
the inspector and also displays a degree (°) suffix. This approach is used
by Godot's own rotation properties throughout the editor.
If the angle is stored in degrees instead, use the "degrees" hint to display the degree symbol while disabling the automatic degrees-to-radians conversion when the value is modified from the inspector.
Linking vector values together
It is possible to link vector values together. When the user adjusts one of the vector's components, the other components are automatically adjusted proportionally. For example, this is useful to maintain the aspect ratio of a 2D sprite when adjusting its scale. This feature can be temporarily disabled by the user by clicking the link icon to the right of the property.
# Leave the hint string empty if you don't want to add a suffix.
@export_custom(PROPERTY_HINT_LINK, "suffix:px") var vector2_linked: Vector2 = Vector2(16, 16)
Résultat dans :
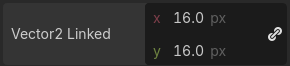
Linked Vector2i property with the "px" suffix
This hint is effective on Vector2, Vector2i, Vector3, Vector3i, Vector4, and Vector4i. It can be used at the same time as a property suffix, as seen in the example above.
Nombre à virgule flottante avec indice d'assouplissement
Display a visual representation of the ease() function
when editing. See @export_exp_easing.
@export_exp_easing var transition_speed
Couleurs
Couleur classique donnée sous la forme de valeur rouge-vert-bleu-alpha.
@export var col: Color
Color given as red-green-blue value (alpha will always be 1). See @export_color_no_alpha.
@export_color_no_alpha var col: Color
Nœuds
Nodes can also be directly exported as properties in a script without having to use NodePaths:
# Allows any node.
@export var node: Node

# Allows any node that inherits from BaseButton.
# Custom classes declared with `class_name` can also be used.
@export var some_button: BaseButton
L'exportation de NodePaths comme dans Godot 3.x est toujours possible, au cas où vous en auriez besoin :
@export var node_path: NodePath
var node = get_node(node_path)
Si vous souhaitez limiter les types de nœuds avec NodePaths, vous pouvez utiliser l'annotation @export_node_path :
@export_node_path("Button", "TouchScreenButton") var some_button
Ressources
@export var resource: Resource
Dans l'inspecteur, vous pouvez ensuite faire glisser et déposer un fichier de ressources depuis le dock 'Système de fichier' dans l'emplacement de la variable.
L'ouverture de la liste déroulante de l'inspecteur peut toutefois entraîner une liste extrêmement longue de classes possibles à créer. Par conséquent, si vous spécifiez une extension de ressource telle que :
@export var resource: AnimationNode
The drop-down menu will be limited to AnimationNode and all its derived classes.
Note
Using @export variables for Resource objects
makes them a dependency of the instance, meaning that all the resources
referenced by @export variables are loaded when the scene
containing the script is loaded. If you want to reference a
Resource object but load it manually when you need
it (which, for example, is often the case for
PackedScenes containing a whole level), use
@export_file or @export_file_path instead.
Exportation de bit flags
Voir @export_flags.
Integers used as bit flags can store multiple true/false (boolean)
values in one property. By using the @export_flags annotation, they
can be set from the editor:
# Set any of the given flags from the editor.
@export_flags("Fire", "Water", "Earth", "Wind") var spell_elements = 0
Vous devez fournir une description sous forme de chaîne de caractère pour chaque flag. Dans cet exemple, Fire a la valeur 1, Water a la valeur 2, Earth a la valeur 4 et Wind correspond à la valeur 8. Généralement, les constantes doivent être définies en conséquence (p. ex. const ELEMENT_WIND = 8 et ainsi de suite).
Vous pouvez ajouter des valeurs explicites en utilisant les deux-points :
@export_flags("Self:4", "Allies:8", "Foes:16") var spell_targets = 0
Seules les valeurs en puissance de 2 sont valides comme options de drapeaux d'octet. La valeur la plus basse est 1, car 0 signifie que rien n'est sélectionné. Vous pouvez également ajouter des options qui sont une combinaison d'autres drapeaux :
@export_flags("Self:4", "Allies:8", "Self and Allies:12", "Foes:16")
var spell_targets = 0
Export annotations are also provided for the physics, render, and navigation layers defined in the project settings:
@export_flags_2d_physics var layers_2d_physics
@export_flags_2d_render var layers_2d_render
@export_flags_2d_navigation var layers_2d_navigation
@export_flags_3d_physics var layers_3d_physics
@export_flags_3d_render var layers_3d_render
@export_flags_3d_navigation var layers_3d_navigation
L'utilisation de bit flags nécessite une certaine compréhension des opérations sur les bits. En cas de doute, utilisez des variables booléennes à la place.
Exportation d'énumérations
Voir @export_enum.
Les propriétés peuvent être exportées avec une indication de type référençant une énumération afin de limiter leurs valeurs aux valeurs de l'énumération. L'éditeur créera un gadget dans l'inspecteur, énumérant les éléments suivants comme "Thing 1", "Thing 2", "Another Thing". La valeur sera stockée sous forme d'entier.
enum NamedEnum {THING_1, THING_2, ANOTHER_THING = -1}
@export var x: NamedEnum
Les propriétés de type entier et chaîne de caractères peuvent également être limitées à une liste spécifique de valeurs à l'aide de l'annotation @export_enum. L'éditeur créera un gadget dans l'inspecteur, énumérant les éléments suivants : Warrior, Magician, Thief. La valeur sera stockée sous forme d'entier, correspondant à l'index de l'option sélectionnée (c'est-à-dire 0, 1 ou 2).
@export_enum("Warrior", "Magician", "Thief") var character_class: int
Vous pouvez ajouter des valeurs explicites en utilisant les deux-points :
@export_enum("Slow:30", "Average:60", "Very Fast:200") var character_speed: int
Si le type est String, la valeur sera stockée sous forme de chaîne de caractères.
@export_enum("Rebecca", "Mary", "Leah") var character_name: String
If you want to set an initial value, you must specify it explicitly:
@export_enum("Rebecca", "Mary", "Leah") var character_name: String = "Rebecca"
Exportation de tableaux
Les tableaux exportés peuvent être initialisés, mais ils doivent l'être avec des expressions constantes.
Si le tableau exporté spécifie un type qui hérite de Resource, les valeurs du tableau peuvent être définies dans l'inspecteur en glissant et déposant plusieurs fichiers du dock Système de fichiers en même temps.
La valeur par défaut doit être une expression constante.
@export var a = [1, 2, 3]
Les tableaux exportés peuvent spécifier un type (en utilisant les mêmes indications que précédemment).
@export var ints: Array[int] = [1, 2, 3]

# Nested typed arrays such as `Array[Array[float]]` are not supported yet.
@export var two_dimensional: Array[Array] = [[1.0, 2.0], [3.0, 4.0]]
Vous pouvez omettre la valeur par défaut, mais elle serait alors null si elle n'est pas définie.
@export var b: Array
@export var scenes: Array[PackedScene]
Les tableaux avec des types spécifiés qui héritent de Resource peuvent être définis en faisant glisser et en déposant plusieurs fichiers depuis le dock Système de fichiers.
@export var textures: Array[Texture] = []
@export var scenes: Array[PackedScene] = []
Les tableaux compacts fonctionnent également, mais uniquement initialisés sans valeur :
@export var vector3s = PackedVector3Array()
@export var strings = PackedStringArray()
D'autres variant exportables peuvent également être utilisées lors de l'exportation de tableaux :
@export_range(-360, 360, 0.001, "degrees") var laser_angles: Array[float] = []
@export_file("*.json") var skill_trees: Array[String] = []
@export_color_no_alpha var hair_colors = PackedColorArray()
@export_enum("Espresso", "Mocha", "Latte", "Capuccino") var barista_suggestions: Array[String] = []
@export_storage
Voir @export_storage.
Par défaut, l'exportation d'une propriété a deux effets :
sauve la propriété dans le fichier de scène/ressource ( PROPERTY_USAGE_STORAGE );
ajoute un champ à l'inspecteur (PROPERTY_USAGE_EDITOR).
Cependant, vous souhaiterez parfois rendre une propriété sérialisable, mais ne pas l'afficher dans l'éditeur pour éviter les modifications involontaires et l'encombrement de l'interface.
Pour cela, vous pouvez utiliser @export_storage. Cela peut être utile pour les scripts en mode outil @tool. De plus, la valeur de la propriété est copiée lorsque Resource.duplicate() ou Node.duplicate() est appelée, contrairement aux variables non exportées.
var a # Not stored in the file, not displayed in the editor.
@export_storage var b # Stored in the file, not displayed in the editor.
@export var c: int # Stored in the file, displayed in the editor.
@export_custom
If you need more control than what's exposed with the built-in @export
annotations, you can use @export_custom instead. This allows defining any
property hint, hint string and usage flags, with a syntax similar to the one
used by the editor for built-in nodes.
For example, this exposes the altitude property with no range limits but an
m (meter) suffix defined:
@export_custom(PROPERTY_HINT_NONE, "suffix:m") var altitude: float
The above is normally not feasible with the standard @export_range syntax,
since it requires defining a range.
See the class reference for a list of parameters and their allowed values.
Avertissement
When using @export_custom, GDScript does not perform any validation on
the syntax. Invalid syntax may have unexpected behavior in the inspector.
Définition des variables exportées à partir d'un script tool(outil)
Quand la valeur d'une variable exportée depuis un script Mode tool(outil) est modifiée, la valeur dans l'inspecteur ne sera pas mise-à-jour automatiquement. Pour la mettre à jour, appelez notify_property_list_changed() après avoir défini la valeur de la variable exportée.
Reading an exported variable's value early on
If you read an exported variable's value in _init(), it will return the default value specified in the export annotation instead of the value that was set in the inspector. This is because assigning values from the saved scene/resource file occurs after object initialization; until then, the default value is used.
To get the value that was set in the inspector (and therefore saved in the scene/resource file),
you need to read it after the object is constructed, such as in
Node._ready(). You can also read the value
in a setter that's defined on the exported property, which is useful in
custom resources where _ready() is not available:
# Set this property to 3 in the inspector.
@export var exported_variable = 2:
    set(value):
        exported_variable = value
        print("Inspector-set value: ", exported_variable)

func _init():
    print("Initial value: ", exported_variable)
Résultat dans :
Initial value: 2
Inspector-set value: 3
Exportations avancées
Tous les types d'exportation ne peuvent pas être fournis au niveau du langage lui-même pour éviter une complexité de conception inutile. Ce qui suit décrit quelques fonctions d'exportation plus ou moins courantes qui peuvent être mises en œuvre avec une API de bas niveau.
Avant de poursuivre la lecture, vous devriez vous familiariser avec la manière dont les propriétés sont gérées et comment elles peuvent être personnalisées avec les méthodes _set(), _get(), et _get_property_list() comme décrit dans Accès aux données ou à la logique à partir d'un objet.
Voir aussi
Pour les propriétés de liaison utilisant les méthodes ci-dessus en C++, voir Liaison (Binding) des propriétés à l'aide de _set/_get/_get_property_list.
Avertissement
Le script doit fonctionner en mode @tool pour que les méthodes ci-dessus puissent fonctionner dans l'éditeur.