Attention: Here be dragons
This is the latest
(unstable) version of this documentation, which may document features
not available in or compatible with released stable versions of Godot.
Checking the stable version of the documentation...
Windows용 컴파일
더 보기
이 페이지는 소스로부터 Windows 편집기와 내보내기 템플릿 바이너리를 컴파일하는 방법을 설명합니다. 프로젝트를 Windows로 내보내고자 한다면, 대신 Windows로 내보내기를 읽으세요.
요구 사항
Windows에서 컴파일하려면 다음이 필요합니다.
인터페이스를 활성화하기 위해, 다음 코드를 실행합니다:
Visual Studio Community, version 2019 or later. Visual Studio 2022 is recommended. During installation make sure to select C++ in the list of workflows, and select the following individual components:
MSVC v142 - VS 2019 C++ {arch} build tools (Latest) for the target architectures.
Windows 11 SDK (10.0.22621.0) (exact version).
MSVC v143 - VS 2022 C++ {arch} build tools (Latest) for the target architectures.
Windows 11 SDK (10.0.22621.0) or newer.
MSVC Build Tools for {arch} (Latest) for the target architectures.
Windows 11 SDK (10.0.22621.0) or newer.
If you've already installed Visual Studio without C++ support for the target architecture, or without the Windows SDK, run the installer again; it should present you a Modify button. Supports
x86_64,x86_32, andarm64.MinGW-w64 with GCC can be used as an alternative to Visual Studio. Be sure to install/configure it to use the
posixthread model. Important: When using MinGW to compile themasterbranch, you need GCC 12 or later. Supportsx86_64andx86_32only.MinGW-LLVM with clang can be used as an alternative to Visual Studio and MinGW-w64. Important: When using MinGW to compile the
masterbranch, you need clang 14 or later. Supportsx86_64,x86_32, andarm64.
Python 3.9+. Make sure to enable the option to add Python to the
PATHin the installer.SCons 4.4+ build system. Using the latest release is recommended, especially for proper support of recent Visual Studio releases.
Direct3D 12 종속성 <doc_compiling_for_windows_installing_d3d12_requirements>`(Direct3D 12 지원을 원하지 않는 경우 ``d3d12=no` SCons 옵션을 사용하여 건너뛸 수 있음)
참고
`Scoop <https://scoop.sh/>`_이 설치되어 있는 경우 다음 명령을 사용하여 MinGW 및 기타 종속성을 쉽게 설치할 수 있습니다.
scoop install python mingw
Scons는 여전히 pip를 통해 설치되어야 합니다.
참고
`MSYS2 <https://www.msys2.org/>`_이 설치되어 있는 경우 다음 명령을 사용하여 MinGW 및 기타 종속성을 쉽게 설치할 수 있습니다.
pacman -S mingw-w64-x86_64-gcc mingw-w64-i686-gcc make python-pip
각 MSYS2 MinGW 하위 시스템에 대해 해당 셸에서 `pip3 install scons`를 실행해야 합니다.
SCons 설정
kinematic body에 스크립트를 추가하고 다음과 같은 코드를 추가합니다:
python -m pip install scons
Defaulting to user installation because normal site-packages is not writeable 메시지가 표시되면 높은 권한을 사용하여 해당 명령을 다시 실행해야 할 수도 있습니다. 관리자로 새 명령 프롬프트를 연 다음 명령을 다시 실행하여 ``PATH``에서 SCons를 사용할 수 있는지 확인하세요.
Python과 SCons를 올바르게 설치했는지 확인하려면 명령 프롬프트(cmd.exe)에 python --version 및 ``scons --version``를 입력하면 됩니다.
위의 명령이 작동하지 않으면 Python을 설치한 후 PATH 환경 변수에 추가한 후 다시 확인하세요. Python 설치 프로그램을 다시 실행하고 Python을 ``PATH``에 추가하는 옵션을 활성화하면 됩니다.
SCons가 Visual Studio 설치를 감지할 수 없다면 SCons 버전이 너무 오래된 것일 수 있습니다. ``python -m pip install --upgrade scons``를 사용하여 최신 버전으로 업데이트하세요.
Godot 소스 다운로드
자세한 설명은 프로젝트 내보내기 를 참고하세요.
튜토리얼에서는 이제부터 ``C:godot``에 소스 코드를 배치했다고 가정합니다.
경고
컴파일 중 지속적인 바이러스 검색으로 인한 속도 저하를 방지하려면 바이러스 백신 소프트웨어의 예외 목록에 Godot 소스 폴더를 추가하세요.
Windows Defender의 경우 Windows 키를 누르고 "Windows Security"를 입력한 다음 :kbd:`Enter`를 누릅니다. 왼쪽 패널에서 **바이러스 및 위협 방지**를 클릭합니다. **바이러스 및 위협 방지 설정**에서 **설정 관리**를 클릭하고 **제외**까지 아래로 스크롤합니다. **제외 추가 또는 제거**를 클릭한 다음 Godot 소스 폴더를 추가하세요.
컴파일링
발사 예제
SCons는 기존 Visual Studio 설치를 자동으로 찾아서 사용합니다. Visual Studio가 설치되어 있지 않으면 대신 MinGW를 사용하려고 시도합니다. Visual Studio가 이미 설치되어 있고 MinGW-w64를 사용하려는 경우 use_mingw=yes``를 SCons 명령줄에 전달합니다. MSYS2 또는 MinGW 셸에서는 MSVC 빌드를 수행할 수 없습니다. 대신 ``cmd.exe 또는 PowerShell을 사용하세요. MinGW-LLVM을 사용하는 경우 use_mingw=yes 및 ``use_llvm=yes``를 모두 SCons 명령줄에 전달합니다.
팁
개발 중에는 일반적으로 Visual Studio 컴파일러를 사용하는 것이 더 좋습니다. MinGW보다 Godot 바이너리를 훨씬 빠르게 연결하기 때문입니다. 그러나 MinGW는 링크 시간 최적화(아래 참조)를 사용하여 더욱 최적화된 바이너리를 생성할 수 있으므로 프로덕션 용도로 더 나은 선택이 됩니다. 이는 특히 MSVC에 비해 MinGW에서 훨씬 더 나은 성능을 발휘하는 GDScript VM의 경우입니다. 따라서 MinGW를 사용하여 플레이어에게 배포할 빌드를 생성하는 것이 좋습니다.
모든 공식 Godot 바이너리는 MinGW를 사용하여 `사용자 정의 컨테이너 <https://github.com/godotengine/build-containers>`__에 구축됩니다.
SCons 실행
명령 프롬프트를 연 후 엔진 소스 코드의 루트 디렉터리로 변경하고(cd 사용) 다음을 입력합니다.
C:\godot> scons platform=windows
참고
여러 CPU 스레드로 컴파일할 때 SCons는 pywin32 누락에 대해 경고할 수 있습니다. 이 경고는 무시해도 됩니다.
팁
엔진을 변경하거나 기여하기 위해 Godot를 컴파일하는 경우 SCons 옵션 dev_build=yes 또는 ``dev_mode=yes``를 사용할 수 있습니다. 자세한 내용은 :ref:`doc_introduction_to_the_buildsystem_development_and_production_aliases`를 참조하세요.
모든 것이 순조롭게 진행되면 결과 바이너리 실행 파일은 godot.windows.editor.x86_32.exe 또는 godot.windows.editor.x86_64.exe``라는 이름으로 ``C:\godot\bin\``에 배치됩니다. 기본적으로 SCons는 CPU 아키텍처와 일치하는 바이너리를 빌드하지만 이는 ``arch=x86_64, arch=x86_32 또는 ``arch=arm64``를 사용하여 재정의할 수 있습니다.
이 실행 파일에는 전체 엔진이 포함되어 있으며 종속성 없이 실행됩니다. 이를 실행하면 프로젝트 관리자가 나타납니다.
팁
프로덕션 용도로 Godot를 컴파일하는 경우 SCons 옵션 ``production=yes``를 추가하여 최종 실행 파일을 더 작고 빠르게 만들 수 있습니다. 이를 통해 추가적인 컴파일러 최적화 및 링크 타임 최적화가 가능해집니다.
LTO는 실행하는 데 약간의 시간이 걸리며 컴파일하는 동안(툴체인에 따라) 최대 30GB의 사용 가능한 RAM이 필요합니다. 위 옵션으로 메모리가 부족한 경우 가볍지만 덜 효과적인 형태의 LTO를 위해 production=yes lto=none 또는 ``production=yes lto=thin``(LLVM 전용)를 사용하세요.
Direct3D 12 요구 사항 설치
기본적으로 Godot의 Windows 빌드에는 Direct3D 12 그래픽 API에 대한 지원이 포함되어 있습니다. Direct3D 12 지원으로 컴파일하려면 추가 종속성을 설치해야 합니다. 이 단계를 건너뛰려면 d3d12=no SCons 옵션을 사용할 수 있습니다. 그렇게 해도 Vulkan 및 OpenGL 지원은 계속 제공됩니다.
Godot 소스 저장소에서 ``python misc/scripts/install_d3d12_sdk_windows.py``를 실행하여 필요한 종속성을 설치할 수 있습니다. 스크립트를 실행한 후 평소대로 Godot를 컴파일하세요. 이는 스크립트에 사용된 것과 일치하는 다양한 종속성에 대한 기본 경로를 사용합니다.
종속성을 수동으로 설정하려는 경우 아래의 세부 단계를 찾을 수 있지만 위의 스크립트가 모든 것을 처리합니다(선택적인 PIX 및 Agility SDK 구성 요소 포함).
godot-nir-static 라이브러리. 우리는 필요한 메사 라이브러리를 정적 라이브러리로 컴파일합니다. 어디서나 다운로드하고 압축을 푼 다음 압축을 푼 폴더의 경로를 기억해 두세요. 아래에서 필요합니다.
참고
선택적으로 다음 단계에 따라 godot-nir-static 라이브러리를 직접 빌드할 수 있습니다:
일부 파일을 생성하는 데 필요한 Python 패키지 `mako <https://www.makotemplates.org>`_를 설치합니다.
godot-cpp 저장소 의 사본.
다음을 명심하세요:
git submodule update --init
./update_mesa.sh
scons
MinGW-w64로 빌드하는 경우 use_mingw=yes``를 ``scons 명령에 추가하고 arch={architecture}``를 사용하여 빌드 아키텍처를 지정할 수도 있습니다. MinGW-LLVM을 사용하여 빌드하는 경우 ``use_mingw=yes 및 use_llvm=yes``를 모두 ``scons 명령에 추가합니다.
MinGW로 빌드 중이고 바이너리가 PATH``에 없으면 ``mingw_prefix="/path/to/mingw"``를 ``scons 명령에 추가하세요.
Mesa 정적 라이브러리는 Godot 빌드에 사용하는 것과 동일한 컴파일러 및 CRT(MinGW로 빌드하는 경우)를 사용하여 빌드해야 합니다.
선택적으로 추가 기능을 위해 다음을 사용하여 컴파일할 수 있습니다.
`PIX <https://devblogs.microsoft.com/pix/download>`_은 Direct3D12 애플리케이션을 위한 성능 조정 및 디버깅 애플리케이션입니다. 이에 대한 지원을 컴파일하면 PIX를 통해 게임을 최적화하고 그래픽 버그를 해결하는 데 도움이 되는 훨씬 더 자세한 정보를 얻을 수 있습니다. 이를 사용하려면 WinPixEventRuntime 패키지를 다운로드하세요. "패키지 다운로드"를 클릭하여 얻을 수 있는 NuGet 패키지 페이지로 이동됩니다. 다운로드가 완료되면 파일 확장자를 .zip으로 변경하고 특정 경로에 파일의 압축을 풉니다.
`Agility SDK <https://devblogs.microsoft.com/directx/directx12agility>`_을 사용하면 드라이버 업데이트에 의존하지 않고도 최신 Direct3D 12 기능에 대한 액세스를 제공할 수 있습니다. 사용하려면 최신 Agility SDK 패키지를 다운로드하세요. "패키지 다운로드"를 클릭하여 얻을 수 있는 NuGet 패키지 페이지로 이동됩니다. 다운로드가 완료되면 파일 확장자를 .zip으로 변경하고 특정 경로에 파일의 압축을 풉니다.
참고
Agility SDK의 미리 보기 버전을 사용하는 경우 Windows에서 개발자 모드를 활성화해야 합니다. 그렇지 않으면 사용되지 않습니다.
참고
MinGW 빌드와 함께 PIX를 사용하려면 PIX 런타임 디렉터리로 이동하고 다음 명령을 사용하여 가져오기 라이브러리를 생성합니다.
# For x86-64:
gendef ./bin/x64/WinPixEventRuntime.dll
dlltool --machine i386:x86-64 --no-leading-underscore -d WinPixEventRuntime.def -D WinPixEventRuntime.dll -l ./bin/x64/libWinPixEventRuntime.a

# For ARM64:
gendef ./bin/ARM64/WinPixEventRuntime.dll
dlltool --machine arm64 --no-leading-underscore -d WinPixEventRuntime.def -D WinPixEventRuntime.dll -l ./bin/ARM64/libWinPixEventRuntime.a
Godot를 빌드할 때 SCons에게 추가 라이브러리를 찾을 위치를 알려주어야 합니다:
C:\godot> scons platform=windows mesa_libs=<...>
또는 모든 옵션이 활성화된 상태에서:
C:\godot> scons platform=windows mesa_libs=<...> agility_sdk_path=<...> pix_path=<...>
참고
PIX 지원은 설치되어 있더라도 기본적으로 비활성화되어 있습니다. 활성화하려면 ``use_pix=yes``를 SCons에 전달하세요.
참고
Agility SDK의 DLL의 경우 워크플로 종류를 명시적으로 선택해야 합니다. 단일 아치가 기본값입니다(DLL은 bin/``에 복사됨). ``agility_sdk_multi_arch=yes``를 SCons에 전달하면 멀티 아키텍처를 선택하게 됩니다. DLL은 적절한 ``bin/<arch>/ 하위 디렉터리에 복사되고 런타임 시 올바른 DLL이 로드됩니다.
ANGLE 지원으로 컴파일하기
AccessKit은 스크린 리더를 지원합니다.
Compiling with AccessKit requires additional dependencies to be installed.
If you wish to skip this step, you can use the accesskit=no SCons option.
You can install the required dependencies by running
python misc/scripts/install_accesskit.py
in the Godot source repository. After running this script, compile Godot as usual.
참고
You can optionally build the AccessKit libraries yourself with the following steps:
godot-cpp 저장소 의 사본.
다음 예제에서:
cd accesskit-c
cmake -S . -B build -DCMAKE_BUILD_TYPE=Release
cmake --build build
cmake --install build
AccessKit 정적 라이브러리는 Godot 빌드에 사용하는 것과 동일한 컴파일러 및 CRT(MinGW로 빌드하는 경우)를 사용하여 빌드해야 합니다.
To compile Godot with a custom build of AccessKit, add accesskit_sdk_path={path} to
tell SCons where to look for the AccessKit libraries:
scons platform=windows accesskit_sdk_path=<...>
Compiling with WinRT support
WinRT provides support for OneCore TTS (accessing Windows 10+ voices), HDR color information monitoring, and emoji picker.
If you are building with MinGW, compiling with WinRT requires additional dependencies to be installed.
If you wish to skip this step, you can use the winrt=no SCons option.
You can install the required dependencies by running
python misc/scripts/install_winrt.py
in the Godot source repository. After running this script, compile Godot as usual.
참고
You can optionally build the WinRT headers yourself with the following steps:
Clone the winrt-mingw directory and navigate to it.
다음 예제에서:
cmake -Bbuild -DCMAKE_BUILD_TYPE=Release -DCPPWINRT_BUILD_VERSION=2.0.250303.1 -DBUILD_TESTING=OFF cppwinrt/
echo "" > build/app.manifest.rc
cmake --build build
./build/cppwinrt.exe -input windows-rs/crates/libs/bindgen/default/ -output include/
To compile Godot with a custom build of WinRT, add winrt_path={path} to
tell SCons where to look for the AccessKit headers:
scons platform=windows winrt_path=<...>
ANGLE 지원으로 컴파일하기
ANGLE은 OpenGL ES 3.x에서 Direct3D 11로의 변환 레이어를 제공하며 오래된 OpenGL 드라이버가 있는 일부 구형 GPU와 ARM용 Windows에서 호환성 렌더러에 대한 지원을 향상시키는 데 사용할 수 있습니다.
Compiling with ANGLE requires additional dependencies to be installed.
If you wish to skip this step, you can use the angle=no SCons option.
You can install the required dependencies by running
python misc/scripts/install_angle.py
in the Godot source repository. After running this script, compile Godot as usual.
참고
선택적으로 다음 단계에 따라 godot-angle-static 라이브러리를 직접 구축할 수 있습니다:
godot-cpp 저장소 의 사본.
다음 예제에서:
git submodule update --init
./update_angle.sh
scons
MinGW로 빌드하는 경우 명령에 use_mingw=yes``를 추가하고 ``arch={architecture}``를 사용하여 빌드 아키텍처를 지정할 수도 있습니다. MinGW-LLVM을 사용하여 빌드하는 경우 ``use_mingw=yes 및 use_llvm=yes``를 모두 ``scons 명령에 추가합니다.
MinGW로 빌드 중이고 바이너리가 PATH``에 없으면 ``mingw_prefix="/path/to/mingw"``를 ``scons 명령에 추가하세요.
ANGLE 정적 라이브러리는 Godot 빌드에 사용하는 것과 동일한 컴파일러 및 CRT(MinGW로 빌드하는 경우)를 사용하여 빌드해야 합니다.
To compile Godot with a custom build of ANGLE, add angle_libs={path} to
tell SCons where to look for the ANGLE libraries:
scons platform=windows angle_libs=<...>
개발
SCons가 모든 것을 처리하므로 Godot를 컴파일하는 데 IDE를 사용할 필요가 없습니다. 그러나 엔진 개발이나 엔진의 C++ 코드 디버깅을 수행하려는 경우 코드 편집기나 IDE 구성에 관심이 있을 수 있습니다.
폴더 기반 편집기는 Godot의 코드베이스 작업을 시작하기 위해 특별한 설정이 필요하지 않습니다. Visual Studio를 사용하여 프로젝트를 편집하려면 솔루션으로 설정해야 합니다.
다음과 같이 vsproj=yes 매개 변수로 SCons를 실행하여 SCons를 통해 Visual Studio 솔루션을 만들 수 있습니다.
scons platform=windows vsproj=yes
이제 Visual Studio 솔루션에서 Godot의 소스를 열 수 있으며 Visual Studio의 빌드 버튼을 사용하여 Godot를 빌드할 수 있습니다.
더 보기
자세한 설명은 편집기에서 코드 실행하기를 참고하세요.
문제 해결
MSVC 사용 시 컴파일 오류가 발생하는 경우 최신 업데이트를 적용하세요. Visual Studio IDE를 시작하고 :button:`코드 없이 계속`을 사용한 다음 상단 메뉴 표시줄에서 :menu:`도움말 > 업데이트 확인`을 사용하면 됩니다. 모든 업데이트를 설치한 후 다시 컴파일해 보세요.
다른 운영 체제에서 Windows용 크로스 컴파일
Linux 또는 macOS 사용자인 경우 일반적으로 32비트 및 64비트 변형으로 제공되는 `MinGW-w64 <https://www.mingw-w64.org/>`__을 설치하거나 모든 대상 아키텍처에 대한 단일 아카이브로 제공되는 `MinGW-LLVM <https://github.com/mstorsjo/llvm-mingw/releases>`_을 설치해야 합니다. 패키지 이름은 배포판에 따라 다를 수 있습니다. 알려진 이름은 다음과 같습니다.
아치 리눅스 |
pacman -S mingw-w64
|
데비안 / 우분투 |
apt install mingw-w64
|
페도라 |
dnf install mingw64-gcc-c++ mingw64-winpthreads-static \
            mingw32-gcc-c++ mingw32-winpthreads-static
|
맥OS |
brew install mingw-w64
|
마게이아 |
urpmi mingw64-gcc-c++ mingw64-winpthreads-static \
      mingw32-gcc-c++ mingw32-winpthreads-static
|
컴파일을 시도하기 전에 SCons는 PATH 환경 변수에서 다음 바이너리를 확인합니다.
# for MinGW-w64
i686-w64-mingw32-gcc
x86_64-w64-mingw32-gcc

# for MinGW-LLVM
aarch64-w64-mingw32-clang
i686-w64-mingw32-clang
x86_64-w64-mingw32-clang
바이너리가 PATH``(예: ``/usr/bin)에 없으면 다음 환경 변수를 정의하여 빌드 시스템에 힌트를 제공할 수 있습니다.
export MINGW_PREFIX="/path/to/mingw"
여기서 /path/to/mingw``는 ``i686-w64-mingw32-gcc 및 x86_64-w64-mingw32-gcc``가 있는 ``bin 디렉터리를 포함하는 경로입니다(예: 바이너리가 /opt/mingw-w64/bin``에 있는 경우 ``/opt/mingw-w64).
작업이 올바르게 수행되고 있는지 확인하려면 셸에서 다음을 실행하면 컴파일러가 작동하게 됩니다(버전 출력은 시스템에 따라 다를 수 있음).
${MINGW_PREFIX}/bin/x86_64-w64-mingw32-gcc --version
# x86_64-w64-mingw32-gcc (GCC) 13.2.0
참고
MinGW-LLVM을 사용하여 빌드하는 경우 use_llvm=yes``를 ``scons 명령에 추가하세요.
참고
MinGW-w64를 사용하여 Windows용으로 크로스 컴파일하는 경우 x86_64 및 x86_32 아키텍처만 지원된다는 점에 유의하세요. MinGW-LLVM은 arm64``도 지원합니다. 다른 아키텍처에서 빌드하는 경우 SCons를 호출할 때 올바른 ``arch= 옵션을 지정해야 합니다.
문제 해결
일부 Ubuntu 버전에서 크로스 컴파일하면 POSIX 스레딩을 지원하지 않는 기본 구성으로 인해 `이 버그 <https://github.com/godotengine/godot/issues/9258>`_이 발생할 수 있습니다.
64비트의 경우 해당 지침에 따라 해당 구성을 변경할 수 있습니다.
sudo update-alternatives --config x86_64-w64-mingw32-gcc
<choose x86_64-w64-mingw32-gcc-posix from the list>
sudo update-alternatives --config x86_64-w64-mingw32-g++
<choose x86_64-w64-mingw32-g++-posix from the list>
그리고 어떻게 실행하는 지에 대한 예제입니다:
sudo update-alternatives --config i686-w64-mingw32-gcc
<choose i686-w64-mingw32-gcc-posix from the list>
sudo update-alternatives --config i686-w64-mingw32-g++
<choose i686-w64-mingw32-g++-posix from the list>
Windows 내보내기 템플릿 만들기
Windows 내보내기 템플릿은 다음 플래그를 사용하여 편집기 없이 Godot를 컴파일하여 생성됩니다:
C:\godot> scons platform=windows target=template_debug arch=x86_32
C:\godot> scons platform=windows target=template_release arch=x86_32
C:\godot> scons platform=windows target=template_debug arch=x86_64
C:\godot> scons platform=windows target=template_release arch=x86_64
C:\godot> scons platform=windows target=template_debug arch=arm64
C:\godot> scons platform=windows target=template_release arch=arm64
표준 내보내기 템플릿을 바꾸려는 경우 이를 다음 위치에 복사하고 <version>``를 버전 식별자(예: ``4.2.1.stable 또는 4.3.dev)로 바꿉니다.
%APPDATA%\Godot\export_templates\<version>\
다음 예제에서:
windows_debug_x86_32_console.exe
windows_debug_x86_32.exe
windows_debug_x86_64_console.exe
windows_debug_x86_64.exe
windows_debug_arm64_console.exe
windows_debug_arm64.exe
windows_release_x86_32_console.exe
windows_release_x86_32.exe
windows_release_x86_64_console.exe
windows_release_x86_64.exe
windows_release_arm64_console.exe
windows_release_arm64.exe
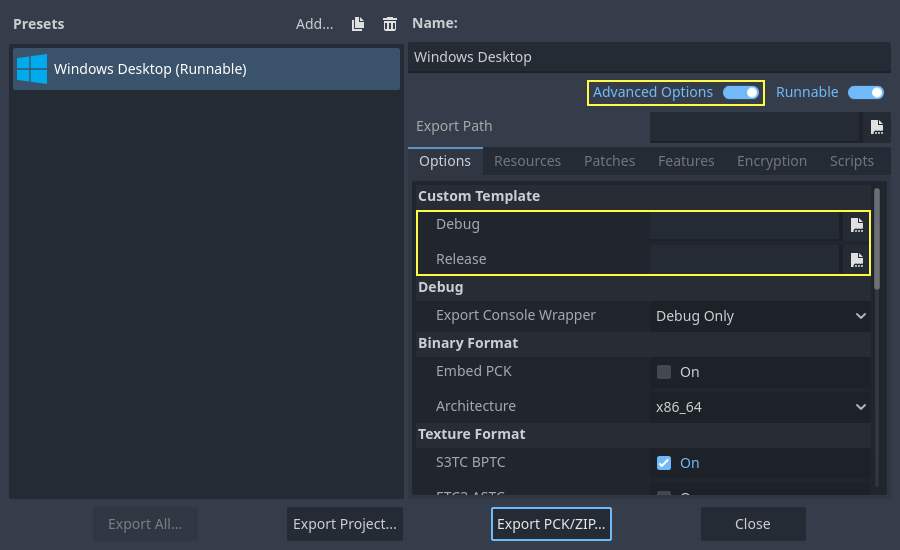
그러나 사용자 정의 모듈이나 사용자 정의 엔진 코드를 사용하는 경우 대신 프로젝트 내보내기 메뉴에서 바이너리를 사용자 정의 내보내기 템플릿으로 구성할 수 있습니다. 이를 설정하려면 **고급 옵션**을 활성화해야 합니다.
이 경우에는 복사할 필요가 없습니다. Godot 소스 폴더의 bin\ 디렉터리에 있는 결과 파일을 참조하면 다음에 빌드할 때 자동으로 사용자 정의 템플릿이 참조됩니다.