Attention: Here be dragons
This is the latest
(unstable) version of this documentation, which may document features
not available in or compatible with released stable versions of Godot.
Checking the stable version of the documentation...
핵심 기능
Godot는 게임플레이 경험을 더욱 향상시킬 수 있는 컨트롤러별 기능을 지원합니다. 이 페이지에서는 이러한 기능, 기존 게임에서 해당 기능을 사용하는 방법, Godot에서 해당 기능을 시작하는 방법을 설명합니다.
경고
These controller features are currently only supported on Windows, macOS, iOS, and Linux.
경고
게임에 특정 컨트롤러가 필요하다고 구체적으로 광고하지 않는 한, 플레이어가 특정 기능을 갖춘 컨트롤러를 갖게 될 것이라는 보장은 없다는 점을 기억하세요.
결과적으로, 컨트롤러가 없는 플레이어를 방해하지 않으면서 컨트롤러가 지원하는 플레이어의 게임 플레이 경험을 향상시키기 위해 이러한 기능을 사용하는 것이 좋습니다.
색
게임은 특정 컨트롤러의 LED 조명을 사용하여 플레이어의 손에 어울리는 시각적 요소를 제공함으로써 화면상의 게임 플레이를 미묘하게 보완할 수 있습니다. 다음은 몇 가지 주목할만한 예입니다.
*Hades*에서는 빛의 색상이 당신이 혜택을 받는 신과 일치합니다.
*Resident Evil 2*에서는 표시등 색상이 건강 상태를 나타냅니다(녹색은 최대, 노란색은 중간, 빨간색은 낮음).
*스타워즈 제다이: 오더의 몰락*에서는 빛의 색상이 광선검의 색상과 일치합니다.
특정 컨트롤러의 LED 색상을 설정하려면 Input.set_joy_light() 메서드를 사용하세요.
특정 컨트롤러가 LED 조명 설정을 지원하는지 확인하려면 Input.has_joy_light() 메서드를 사용하세요. PlayStation DualShock 및 DualSense 컨트롤러는 LED 조명을 지원하는 것으로 알려져 있습니다.
다음 _process() 메서드는 현재 누른 버튼에 따라 LED 색상을 설정하고 버튼을 누르지 않으면 LED 색상을 끕니다.
func _process(_delta):
    var color := Color.BLACK

    if Input.is_joy_button_pressed(0, JOY_BUTTON_A):
        color = Color.BLUE
    elif Input.is_joy_button_pressed(0, JOY_BUTTON_X):
        color = Color.MAGENTA
    elif Input.is_joy_button_pressed(0, JOY_BUTTON_B):
        color = Color.RED
    elif Input.is_joy_button_pressed(0, JOY_BUTTON_Y):
        color = Color.GREEN

    Input.set_joy_light(0, color)
다음 예에서는 루프의 색상을 통해 LED를 부드럽게 페이드합니다.
var hue = 0.0

func _process(delta):
    var col = Color.from_hsv(hue, 1.0, 1.0)
    Input.set_joy_light(0, col)
    hue += delta * 0.1
다음 예에서는 남쪽 버튼(PlayStation 컨트롤러의 Cross/X)을 누를 때 LED가 빨간색으로 세 번 깜박이도록 합니다.
var blink_tween: Tween = null

func _process(_delta):
    var ready_to_blink = not blink_tween or not blink_tween.is_running()
    if Input.is_joy_button_pressed(0, JOY_BUTTON_A) and ready_to_blink:
        do_blink()

func do_blink():
    if blink_tween:
        blink_tween.kill()

    blink_tween = create_tween()
    blink_tween.tween_callback(func(): Input.set_joy_light(0, Color.RED))
    blink_tween.tween_interval(0.2)
    blink_tween.tween_callback(func(): Input.set_joy_light(0, Color.BLACK))
    blink_tween.tween_interval(0.2)
    blink_tween.set_loops(3)
Motion sensors (gyroscope and accelerometer)
With motion controls, games can track the controller's physical rotation and movement. This can be used to let the player turn the in-game camera by moving their controller, or shaking their controller to perform a special action.
There are several controller brands that have implemented gyroscope and accelerometer sensors into their modern controllers, the biggest two being PlayStation and Nintendo. Note that the Xbox controllers don't have motion sensors inside of them.
To check if a connected controller has motion sensors, use Input.has_joy_motion_sensors().
Motion sensors are disabled by default to avoid draining the controller battery when games don't use those features. To enable them, call Input.set_joy_motion_sensors_enabled().
Note that the axes of the values that controller's motion sensors report are always relative to the controller's natural orientation. Here's an image of the axes mapping for more clarity:
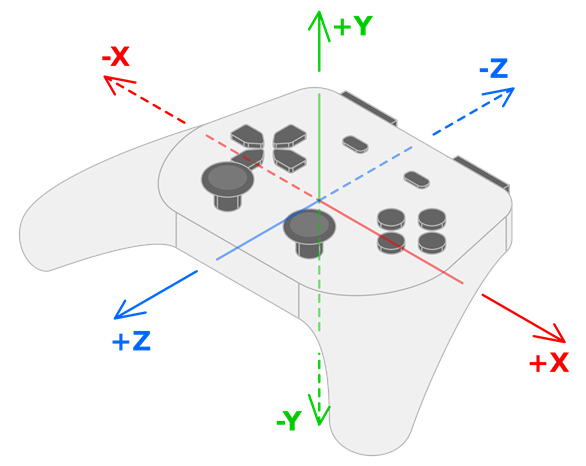
The controller's gyroscope values show rotation around their respective axes:
the X value of the gyroscope data shows the rotation around the X axis (roll).
the Y value of the gyroscope data shows the rotation around the Y axis (yaw).
the Z value of the gyroscope data shows the rotation around the Z axis (pitch).
The controller's accelerometer will provide values in the following ways, respectively:
Movement left and right are reported as +X and -X.
Movement down and up are reported as +Y and -Y.
Movement away from and towards the user are reported as +Z and -Z.
Gyroscope
A gyroscope is a type of sensor that detects the controller's rotation. Here are some notable examples of gyroscope use in games:
In Helldivers 2, Horizon Forbidden West, Star Wars: Dark Forces Remaster, and Fortnite, tilting the controller causes the camera to rotate accordingly ("gyro aiming"). This video by *Daven On The Moon* demonstrates and discusses gyro aiming in more detail.
In Death Stranding, BB can be soothed by rotating the controller softly.
The following example rotates an object using a controller's gyroscope sensor. You can also access this example by taking a look at the Input.start_joy_motion_sensors_calibration() documentation.
const GYRO_SENSITIVITY = 10.0

func _ready():
    # In this example we only use the first connected joypad (id 0).
    if 0 not in Input.get_connected_joypads():
        return

    if not Input.has_joy_motion_sensors(0):
        return

    # We must enable the motion sensors before using them.
    Input.set_joy_motion_sensors_enabled(0, true)

    # (Tell the users here that they need to put their joypads on a flat surface and wait for confirmation.)

    # Start the calibration process.
    calibrate_motion()

func _process(delta):
    # Only move the object if the joypad motion sensors are calibrated.
    if Input.is_joy_motion_sensors_calibrated(0):
        move_object(delta)

func calibrate_motion():
    Input.start_joy_motion_sensors_calibration(0)

    # Wait for some time.
    await get_tree().create_timer(1.0).timeout

    Input.stop_joy_motion_sensors_calibration(0)
    # The joypad is now calibrated.

func move_object(delta):
    var node: Node3D = ... # Put your object here.

    var gyro := Input.get_joy_gyroscope(0)
    node.rotation.x -= -gyro.y * GYRO_SENSITIVITY * delta  # Use rotation around the Y axis (yaw) here.
    node.rotation.y += -gyro.x * GYRO_SENSITIVITY * delta  # Use rotation around the X axis (pitch) here.
Note that before using the gyroscope's data, we must first calibrate it by calling Input.start_joy_motion_sensors_calibration() and Input.stop_joy_motion_sensors_calibration(). That's because modern gyroscopes often need calibration. This is like how a weighing scale can need calibration to tell it what "zero" is. Like a weighing scale, only a correctly calibrated gyroscope will give an accurate reading. During calibration, the user sets the controller down on a flat surface. The controller then determines what values its gyroscope reports when it is actually not moving at all (its "bias"), and uses this information to make its rotation data more accurate.
See the article on GyroWiki for information on how to use gyroscope input as a mouse.
After the controller's gyroscope has been enabled and correctly calibrated, you can read its reported values by using Input.get_joy_gyroscope().
Accelerometer
경고
Do not use accelerometer data to find the controller's position in 3D space; the accelerometers in general are not precise enough for this.
An accelerometer is a type of sensor that detects a controller's acceleration in m/s². For example, it can detect if the player quickly raises their controller, moves it to the side, or shakes it.
The acceleration that an accelerometer detects includes gravity by default. To get only the acceleration imparted by the user, subtract gravity from the detected acceleration:
Input.get_joy_accelerometer(device) - Input.get_joy_gravity(device)
Due to how accelerometers work physically, after movement in one direction stops they almost immediately report movement in the opposite direction. After detecting movement in one direction, you may want to ignore further readings for a small period of time to avoid detecting this opposite movement.
The following example prints the controller movement when it's being quickly moved by using its accelerometer.
If the sensitivity doesn't feel right for you,
you can tweak the THRESHOLD constant or you can replace it by using a different value in the code below.
var detect_accelerometer = true

# Change to make the game detect movement at different thresholds.
# With a lower value, smaller movements will be detected, and with a
# larger value, only big movements will be detected.
const THRESHOLD = 10.0

func _ready():
    # In this example, we only use the first connected joypad (ID 0).
    if 0 not in Input.get_connected_joypads():
        return

    if not Input.has_joy_motion_sensors(0):
        return

    # We must enable the motion sensors before using them.
    Input.set_joy_motion_sensors_enabled(0, true)

func _process(delta):
    if Input.has_joy_motion_sensors(0):
        accelerometer_example()

func accelerometer_example():
    if not detect_accelerometer:
        return

    var acceleration = Input.get_joy_accelerometer(0) - Input.get_joy_gravity(0)
    if acceleration.length() > THRESHOLD:
        if acceleration.x > THRESHOLD:
            print("Moved left")
        elif acceleration.x < -THRESHOLD:
            print("Moved right")
        if acceleration.y < -THRESHOLD:
            print("Moved up")
        elif acceleration.y > THRESHOLD:
            print("Moved down")
        if acceleration.z < -THRESHOLD:
            print("Moved closer to the player")
        elif acceleration.z > THRESHOLD:
            print("Moved away from the player")

        # After detecting movement in one direction, the accelerometer sensor
        # will briefly report movement in the opposite direction, even though the controller only moved once.
        # So we need to ignore these reported values for a short amount of time.
        detect_accelerometer = false
        await get_tree().create_timer(0.5, false).timeout
        detect_accelerometer = true