Attention: Here be dragons
This is the latest
(unstable) version of this documentation, which may document features
not available in or compatible with released stable versions of Godot.
Checking the stable version of the documentation...
콘텐츠 만들기
네! Godot는 광범위한 내장 UI 시스템을 갖추고 있고 Godot의 작은 배포 크기는 Electron, Qt와 같은 프레임 워크의 적절한 대안이 될 수 있습니다.
이 페이지는 Godot를 사용하여 게임이 아닌 응용 프로그램을 만드는 지침과 데스크탑 통합을 개선하기 위한 일반적인 작업 수행에 대한 지침을 제공합니다.
참고
Godot는 무엇보다도 게임 엔진입니다. 이는 Godot로 애플리케이션을 만드는 것이 개발의 주요 초점이 아니라 기능 세트의 부산물이라는 것을 의미합니다.
더 보기
Godot로 만든 오픈소스 예제 애플리케이션 Material Maker와 Pixelorama를 확인해보세요.
성능
멀티스레드 사용하기
이는 Windows, macOS 및 Linux에서만 지원됩니다(X11/XWayland에만 해당, 기본 Wayland 모드에서는 지원되지 않음).
Window 노드를 사용하여 추가 창을 생성할 수 있습니다. 창은 기본 응용 프로그램 창과 독립적으로 이동, 크기 조정, 최소화 및 닫힐 수 있습니다.
그러나 메인 창을 닫으면 메인 창을 닫으면 프로세스가 종료되므로 다른 모든 창도 닫힙니다. 기본 창을 최소화하고 unfocusable 속성을 ``true``로 설정한 다음(작업 표시줄 및 작업 전환기에서 숨기기 위해) 시작 시 즉시 추가 창 노드를 생성하여 이를 방지할 수 있습니다. 이 경우 :ref:`tray icon <doc_creating_applications_tray_icon>`과 같이 애플리케이션을 종료할 수 있는 대체 수단을 제공해야 합니다.
파일 크기 최적화하기
대부분의 응용 프로그램은 특정 최소 창 크기부터 올바르게 렌더링할 수 있습니다. 보다 구체적인 사용 사례에서는 최대 창 크기를 강제로 적용하는 것이 필요할 수도 있습니다.
Window 노드에서 min_size 및 max_size 속성을 사용하여 크기 제한을 적용할 수 있습니다. 애플리케이션의 배율에 따라 이러한 크기 제한을 곱해야 합니다(자세한 내용은 hiDPI 디스플레이로 크기 조정 참조).
팁
참고로 모든 노드에서 :ref:`get_window() <class_Node_method_get_window>`를 사용하여 루트 Window 노드를 검색하여 속성을 설정할 수 있습니다.
파일 전달하기
이 기능은 Windows, macOS, Linux, Android에서만 지원됩니다.
기본적으로 Godot는 파일 대화 상자에 자체 FileDialog 구현을 사용합니다. 그러나 대신 운영 체제의 기본 파일 대화 상자를 사용할 수 있습니다. 기본 파일 대화 상자가 데스크탑 환경과 더 잘 통합되고 보다 친숙한 경험을 제공하므로 이는 일반적으로 사용자가 선호합니다.
FileDialog 노드에서 use_native_dialog 속성을 활성화하여 기본 파일 대화 상자를 선택할 수 있습니다. 이 동작은 전역적으로 제어하기 위한 프로젝트 설정이 없기 때문에 프로젝트에 사용되는 각 FileDialog 노드에서 수행되어야 합니다.
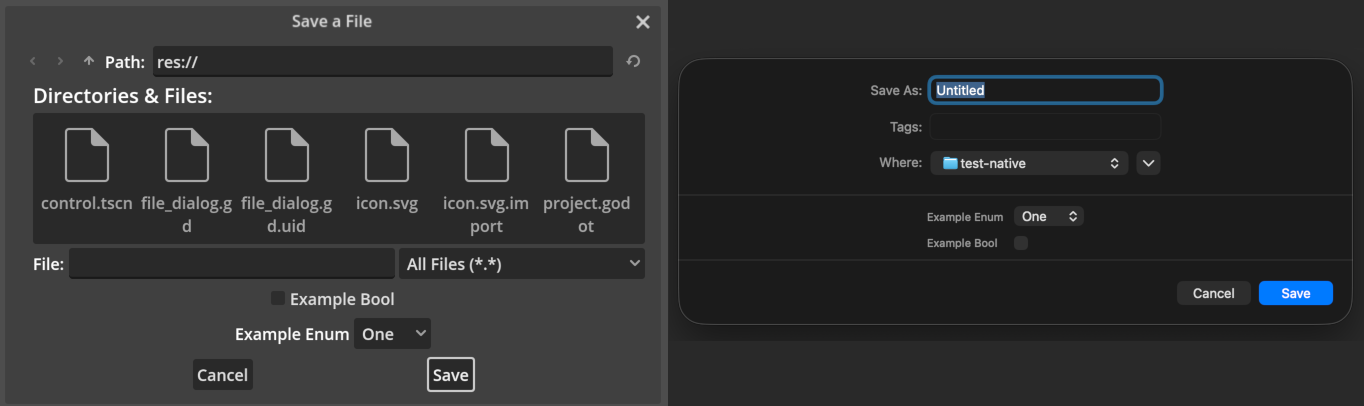
macOS의 표준 FileDialog(왼쪽)와 기본 파일 대화 상자(오른쪽) 비교
참고
플랫폼 지원에 대한 자세한 내용은 :ref:`속성 설명 <class_FileDialog_property_use_native_dialog>`을 참조하세요.
Additionally, on macOS, native file dialogs are not supported when game embedding is enabled in the editor. To test this functionality when running the project, make sure you disable game embedding by switching to the screen, clicking the rightmost icon in the bar at the top and unchecking .
노드에서 시그널 연결하기
ETC2 (macOS에서는 지원하지 않음).
StatusIndicator 노드를 사용하여 시스템 트레이(알림 영역이라고도 함)에 하나 이상의 아이콘을 만들 수 있습니다. 도구 설명 외에도 이 노드에는 PopupMenu 노드가 할당되어 아이콘을 클릭할 때 드롭다운이 표시될 수 있습니다.
StatusIndicator에는 아이콘을 클릭할 때 내보내지는 pressed 시그널도 있습니다. 드롭다운을 표시하지 않고 작업을 수행하거나 누른 마우스 버튼에 따라 다른 작업을 수행하려면 이 옵션을 사용합니다.
트레이 아이콘을 만든 후 "닫을 때 최소화" 동작을 구현할 수도 있습니다. 즉, 사용자가 창 관리자의 X 버튼을 사용하여 응용 프로그램을 닫으려고 하면 응용 프로그램이 대신 트레이로 최소화됩니다. 이렇게 하려면 이 스크립트를 StatusIndicator를 루트 노드로 사용하여 Autoload *씬*에 연결하세요.
extends StatusIndicator

# Disable this behavior when running from the editor with game embedding,
# as it doesn't cooperate well.
var tray_icon_supported = (
        DisplayServer.has_feature(DisplayServer.FEATURE_STATUS_INDICATOR)
        and not Engine.is_embedded_in_editor()
    )


func _ready():
    visible = false

    if tray_icon_supported:
        get_tree().auto_accept_quit = false
        get_window().focus_entered.connect(
                func():
                    # Hide the tray icon when the window gains focus,
                    # which means it was restored from its minimized state.
                    visible = false
            )
        pressed.connect(
                func(_mouse_button, _position):
                    # Restore the application when the tray icon is clicked.
                    get_window().mode = Window.MODE_WINDOWED
            )


func _notification(what):
    if not tray_icon_supported:
        return

    match what:
        NOTIFICATION_WM_CLOSE_REQUEST:
            get_window().mode = Window.MODE_MINIMIZED
            # Show the tray icon.
            visible = true
사용자가 애플리케이션을 닫으려고 할 때 동작을 재정의하는 방법에 대한 자세한 내용은 :ref:`doc_handling_quit_requests`를 참조하세요. 이는 데이터 손실을 방지하기 위해 사용자가 저장하지 않은 변경 사항이 있을 때 처리하는 것이 중요합니다.
참고
StatusIndicator 노드가 여러 개 있는 경우 시스템 트레이에서의 순서는 씬 트리에 추가된 순서에 따라 결정됩니다.
게임 실행하기
ETC2 (macOS에서는 지원하지 않음).
macOS에서 애플리케이션은 애플리케이션 창 내부에 메뉴 표시줄을 표시하는 대신 시스템의 전역 메뉴 표시줄을 사용할 수 있습니다. 이것은 Godot의 *기본 메뉴*라고도 합니다.

macOS의 표준 MenuBar(왼쪽), 기본 팝업이 포함된 MenuBar(가운데) 및 기본 메뉴(오른쪽) 비교
Godot는 PopupMenu 자식 노드를 메뉴로 표시하는 MenuBar 노드를 통해 메뉴 생성을 지원합니다. 검사기에서 prefer_global_menu 속성을 활성화하여 특정 MenuBar 노드에서 전역 메뉴 지원을 활성화할 수 있습니다. macOS에서는 이로 인해 MenuBar 노드가 사라지고 공간을 차지하지 않으며 해당 메뉴가 대신 시스템의 전역 메뉴 표시줄에 표시됩니다. 이 속성이 비활성화되면 MenuBar 노드는 평소와 같이 응용 프로그램 창 내부에 메뉴를 표시하지만 운영 체제에서 지원하는 경우 기본 팝업이 계속 사용됩니다.
참고
앱 메뉴(굵게 표시된 프로젝트 이름)와 및 메뉴는 macOS에 항상 표시됩니다. 전역 메뉴에 수동으로 추가하면 안 됩니다.
Godot 4.6 이상에서는 PopupMenu 노드의 system_menu_id 속성을 변경하여 이 메뉴 내에 새 항목을 추가할 수 있습니다. 애플리케이션 메뉴**(굵게 표시된 애플리케이션 이름이 있는 첫 번째 메뉴), **창 메뉴, 도움말 메뉴 및 **Dock**(Dock에서 아이콘을 마우스 오른쪽 버튼으로 클릭하면 표시됨) 중에서 선택할 수 있습니다. 해당 메뉴에 이미 있는 표준 메뉴 항목은 유지됩니다.
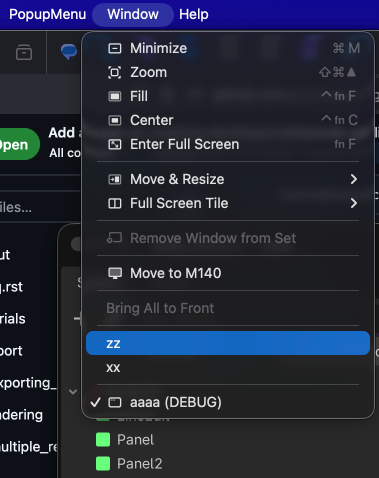
macOS의 시스템 창 메뉴에 추가된 사용자 정의 옵션
프로젝트에는 여러 개의 MenuBar 노드가 있을 수 있습니다. 여러 개의 MenuBar 노드에 Prefer Global Menu 속성이 활성화된 경우 MenuBar 노드가 씬 트리에 추가되면 Start Index 속성에 의해 정의된 인덱스에 메뉴 옵션이 추가됩니다. 이를 통해 메뉴 표시줄 끝에 상황에 맞는 메뉴를 배치할 수 있으므로 추가 메뉴 표시줄이 추가되거나 제거될 때 첫 번째 메뉴 옵션이 그대로 유지됩니다.
고급 사용 사례의 경우 MenuBar 노드를 사용하지 않고 NativeMenu 싱글톤를 직접 사용할 수도 있습니다.
참고
Global menu integration is not supported when game embedding is enabled in the editor. To test this functionality when running the project, make sure you disable game embedding by switching to the screen, clicking the rightmost icon in the bar at the top and unchecking .
내보내기 고려 사항
ETC2 (macOS에서는 지원하지 않음).
많은 최신 애플리케이션은 운영 체제의 창 관리자를 사용하여 제목 표시줄과 창 테두리(서버측 장식)를 그리는 대신 *클라이언트측 장식*(CSD)을 사용합니다. 이를 통해 모양을 더 사용자 정의할 수 있고 애플리케이션 UI와 더 잘 통합할 수 있습니다.
Godot는 현재 macOS에서 클라이언트측 데코레이션만 지원합니다. 이는 display/window/size/extend_to_title 프로젝트 설정을 활성화하여 사용할 수 있습니다.

macOS의 표준 창 장식(위)과 클라이언트 측 장식(아래) 비교
클라이언트 측 장식을 활성화한 후에는 창 테두리가 더 이상 표시되지 않으며 최소화/최대화/닫기 버튼이 애플리케이션에 오버레이로 표시됩니다. 버튼이 편안하게 표시될 수 있도록 애플리케이션 상단에 충분한 여백을 제공하는 동시에 라벨 노드 또는 이와 유사한 것을 사용하여 창 제목을 표시하는지 확인해야 합니다.
클라이언트측 장식 활성화 여부에 따라 UI를 조건부로 조정하려면 :ref:`DisplayServer.has_feature <class_DisplayServer_method_has_feature>`을 사용하고 :ref:`Window.extend_to_title <class_Window_property_extend_to_title>`의 현재 값(프로젝트 설정이 변경되는 내용)도 확인하세요.
func _ready():
    if DisplayServer.has_feature(FEATURE_EXTEND_TO_TITLE) and get_window().extend_to_title:
        # Adjust UI for client-side decorations (a MarginContainer node
        # can be useful here). Also set the window title to be displayed
        # according to the native window title.
        $WindowTitle.visible = true
        $WindowTitle.text = get_window().title
        if OS.is_debug_build():
            $WindowTitle.text += " (DEBUG)"
창 제목을 올바르게 배치하려면 :ref:`DisplayServer.window_get_safe_title_margins() <class_DisplayServer_method_window_get_safe_title_margins>`를 사용하여 Vector3을 반환하는 것을 고려하세요. 여기서 ``x``는 왼쪽 여백이고 ``y``는 오른쪽 여백입니다(시스템에서 오른쪽에서 왼쪽으로 조판을 사용하는 경우 증가함). ``z``는 높이입니다. 또한 :ref:`DisplayServer.window_set_window_buttons_offset() <class_DisplayServer_method_window_set_window_buttons_offset>`을 호출하여 닫기/최소화/최대화 버튼의 위치를 조정할 수 있습니다(보통 수직으로 중앙에 위치).

macOS에서 클라이언트 측 장식을 사용할 때 안전한 제목 여백
참고
On macOS, client-side decorations are not supported when game embedding is enabled in the editor. To test this functionality when running the project, make sure you disable game embedding by switching to the screen, clicking the rightmost icon in the bar at the top and unchecking .
Displaying progress status on the taskbar/Dock
ETC2 (macOS에서는 지원하지 않음).
It is possible for applications to report a progress status to the operating system, which can be displayed on the taskbar or Dock icon. This status is composed of a state (active, paused, error) and a completion percentage. This can be used to show progress while the user is not focused on the application.

Progress reporting in the Dock on macOS
This is often accomplished by synchronizing a ProgressBar node's progress with the progress reported to the operating system:
func set_progress(value, indeterminate = false):
    $ProgressBar.value = value
    $ProgressBar.indeterminate = indeterminate

    if $ProgressBar.indeterminate:
        get_window().set_taskbar_progress_state(DisplayServer.PROGRESS_STATE_INDETERMINATE)
    else:
        get_window().set_taskbar_progress_state(DisplayServer.PROGRESS_STATE_NORMAL)

    # The taskbar progress value must be between `0.0` and `1.0`
    # (values outside this range are clamped).
    # However, ProgressBar can have minimum/maximum values that differ.
    # We use the `remap()` method to convert the value to the range
    # expected by taskbar progress reporting.
    get_window().set_taskbar_progress_value(remap($ProgressBar.value, $ProgressBar.min_value, $ProgressBar.max_value, 0.0, 1.0))
Several progress states are available: no progress (hides the progress bar), indeterminate, normal, paused, error. Check the class reference for details.
You can also use Window.request_attention() to make the window flash in the taskbar (or bounce in the Dock on macOS). For example, this can be used to attract the user's attention after a long operation is completed.
참고
Reporting progress is not supported when game embedding is enabled in the editor. To test this functionality when running the project, make sure you disable game embedding by switching to the screen, clicking the rightmost icon in the bar at the top and unchecking .
알림(Notifications)
Godot는 현재 데스크탑 알림 전송에 대한 기본 지원을 제공하지 않습니다.
그러나 macOS 및 Linux에서는 각각 osascript 및 notify-send 명령줄 유틸리티를 사용하여 데스크톱 알림을 보낼 수 있습니다.
func send_notification(title, message):
    var app_name = ProjectSettings.get_setting("application/config/name")
    if app_name.is_empty():
        app_name = "Unnamed Project"

    if OS.has_feature("macos") and not OS.is_sandboxed():
        # Note that this will not work if the project is exported in sandbox mode
        # (e.g. for the Mac App Store).
        OS.execute("osascript", [
                "-e",
                'display notification \\"%s\\" with title \\"%s\\" subtitle \\"%s\\"' % [
                    message,
                    app_name,
                    title,
                ]
            ])
    elif OS.has_feature("linuxbsd"):
        OS.execute("notify-send", ["--app-name", app_name, title, message])

func _ready():
    send_notification("Success", "Operation completed successfully.")
안타깝게도 Windows에서는 바로 사용할 수 있는 동등한 기능이 없습니다.
세션 전반에 걸쳐 창 위치 및 크기 기억
Godot에는 세션 전반에 걸쳐 창 위치와 크기를 기억하는 기능이 내장되어 있지 않지만 스크립트를 사용하여 수동으로 구현할 수 있습니다. 다중 모니터 설정을 지원하는 기본 예는 다음 스크립트가 포함된 :ref:`Autoload <doc_singletons_autoload>`입니다.
extends Node

# Use a dedicated configuration file for the window state.
# This way, the application's other configuration files are left
# untouched and can be put in version control without unnecessary diffs
# being produced.
const CONFIG_WINDOW_PATH = "user://window.ini"

var config_file = ConfigFile.new()


func _enter_tree():
    config_file.load(CONFIG_WINDOW_PATH)

    # Do not restore previous window state if running from the editor
    # with game embedding enabled.
    if not Engine.is_embedded_in_editor():
        var window_screen = config_file.get_value("main", "screen", -1)
        if window_screen is int:
            get_window().current_screen = window_screen

        var window_mode = config_file.get_value("main", "mode", -1)
        if window_mode is Window.Mode:
            get_window().mode = window_mode

        var window_position = config_file.get_value("main", "position", -1)
        if window_position is Vector2i:
            get_window().position = window_position

        var window_size = config_file.get_value("main", "size", -1)
        if window_size is Vector2i:
            get_window().size = window_size


func _exit_tree():
    # Save the current window state when the application is quit normally.
    # In a real world scenario, it's recommended to also save this information
    # regularly (e.g. with a Timer node), so that the window state can be
    # restored after a crash or when terminated externally.
    config_file.set_value("main", "screen", get_window().current_screen)
    config_file.set_value("main", "mode", get_window().mode)
    config_file.set_value("main", "position", get_window().position)
    config_file.set_value("main", "size", get_window().size)
    config_file.save(CONFIG_WINDOW_PATH)
참고
위의 예는 기본 창의 위치만 추적합니다. 여러 창을 생성하는 응용 프로그램에서는 각 창 위치와 크기를 별도로 저장하고 로드해야 합니다.
스플래시 화면에서 창 숨기기
일부 애플리케이션의 경우, 진행률 표시줄이 있는 사용자 정의 스플래시 화면을 그리기 위해 스플래시 화면을 숨기는 것이 더 나을 수 있습니다(또는 애플리케이션이 빠르게 부팅되는 경우 스플래시 화면이 전혀 없을 수도 있습니다).
Godot는 스플래시 화면 동안 창을 숨기는 기본 지원이 부족하지만, 프로젝트 설정에서 매우 작은 투명 창을 사용한 다음, 메인 씬이 로드되면 창 크기를 조정하고 투명도를 비활성화하여 이를 달성할 수 있습니다.
가장 일반적인 사용 케이스는 다음과 같습니다:
application/boot_splash/bg_color 투명한 검정색(RGBA: 0, 0, 0, 0)으로 설정합니다.
application/boot_splash/show_image 비활성화되었습니다.
display/window/size/borderless 활성화되었습니다.
display/window/size/no_focus 활성화되었습니다.
:ref:`display/window/size/window_width_override <class_ProjectSettings_property_display/window/size/window_width_override>`를 ``1``로 설정합니다.
:ref:`display/window/size/window_height_override <class_ProjectSettings_property_display/window/size/window_height_override>`가 ``1``로 설정되었습니다.
display/window/size/transparent 활성화되었습니다.
rendering/뷰포트/transparent_Background 활성화되었습니다.
이 스크립트는 스플래시 화면 표시가 완료되면 :ref:`Autoload <doc_singletons_autoload>`로 사용하여 원래 설정을 복원할 수 있습니다.
extends Node


func _enter_tree():
    # Wait a frame to be rendered before restoring the window properties.
    # Otherwise, properties will be restored too early and the window border
    # will show up around a transparent window.
    await get_tree().process_frame

    get_viewport().transparent_bg = false
    get_window().transparent = false
    get_window().borderless = false
    get_window().size = Vector2i(1152, 648)
문서의 구조
응용프로그램 창을 다른 창 위에 오버레이로 표시할 수 있습니다. 이는 위젯이나 시스템 모니터와 같은 애플리케이션에 유용할 수 있습니다.
적 씬은 다음 노드들을 사용할 것입니다:
rendering/뷰포트/transparent_Background
-
이렇게 하면 오버레이가 키보드 입력을 수신하지 못하고 작업 표시줄 및 작업 전환기에서도 숨겨집니다. 오버레이를 통해 마우스 입력을 계속 수신할 수 있습니다(아래 참조).
Remember to position and resize the window using scripts, as a borderless window can generally not be moved by the user.
마우스 입력이 백그라운드 응용 프로그램으로 전달되도록 하려면 오버레이로 그려지는 창에서 mouse_passthrough 속성을 ``true``로 설정합니다. :ref:`mouse_passthrough_polygon <class_Window_property_mouse_passthrough_polygon>`에서 다각형을 정의하여 특정 영역이 오버레이에서 마우스 입력을 계속 가로챌 수 있도록 할 수도 있습니다.
또한 오버레이가 스크린샷이나 녹음에 표시되지 않도록 exclude_from_capture 속성을 ``true``로 설정할 수 있습니다. 이 힌트는 Windows 및 macOS에서만 구현되며 최선의 노력을 바탕으로 하기 때문에 절대적인 보안 조치나 DRM으로 사용해서는 안 됩니다.
참고
Displaying as an overlay is not supported when game embedding is enabled in the editor. To test this functionality when running the project, make sure you disable game embedding by switching to the screen, clicking the rightmost icon in the bar at the top and unchecking .
또한 문제의 애플리케이션이 독점적인 전체 화면을 사용하는 경우 오버레이는 다른 애플리케이션 위에 표시될 수 없다는 점에 유의하세요. 오버레이를 표시하려면 테두리 없는 전체 화면을 대신 사용해야 합니다.
하이브리드 GPU 설정(예: NVIDIA Optimus)을 사용하는 Windows에서 투명한 창 디스플레이와 관련된 `알려진 문제 <https://github.com/godotengine/godot/issues/76167>`__도 있습니다. 렌더러를 전환하면 문제를 해결하는 데 도움이 될 수 있습니다.
X11이 설치된 Linux에서는 사용자가 창 관리자 설정에서 합성을 비활성화한 경우 투명도가 작동하지 않습니다.
hiDPI 디스플레이로 크기 조정
최신 디스플레이는 픽셀 밀도 측면에서 매우 다양합니다. 즉, UI 요소를 읽을 수 있도록 하려면 다른 배율 인수가 필요한 경우가 많습니다. 애플리케이션을 편안하게 사용할 수 있도록 배율 인수를 사용자를 위한 수동 조정으로 제공할 수도 있습니다.
Godot의 다중 해상도 지원은 올바르게 구성되었을 때 애플리케이션 확장에 매우 적합합니다. :ref:`다중 해상도 문서의 비게임 애플리케이션 섹션 <doc_multiple_resolutions_non_game_application>`의 지침을 따르세요.
참고
Godot는 현재 macOS, Android, Linux(Wayland만 해당)의 OS 설정에서 화면 배율 인수 읽기만 지원합니다. Linux(X11) 및 Windows에서는 사용자가 필요에 따라 UI 크기를 조정할 수 있도록 수동 크기 조정 옵션을 제공해야 합니다.
벡터 보간
화면 판독기를 사용하면 시각 장애인이 UI 요소를 읽고 탐색 컨트롤을 제공하여 애플리케이션을 사용할 수 있습니다. 점자 디스플레이는 제대로 작동하기 위해 접근성 정보에 의존하는 또 다른 접근 방식입니다.
Godot는 스크린 리더가 실행 중인 것으로 감지되면 자동으로 스크린 리더 지원을 활성화합니다. 이는 :ref:`accessibility/general/accessibility_support <class_ProjectSettings_property_accessibility/general/accessibility_support>`를 사용하여 프로젝트 설정에서 구성하여 원하지 않는 상황에서 비활성화할 수 있습니다. 강제로 활성화할 수도 있는데, 이는 Godot에서 화면 판독기로 인식되지 않는 접근성 디버깅 도구를 사용할 때 유용합니다.
Godot는 스크린 리더 통합을 위해 AccessKit 라이브러리를 사용합니다.
팁
스크린 리더 지원은 스크린 리더 애플리케이션 자체를 사용하여 (Godot 프로젝트가 아닌) 오디오를 재생하기 때문에 아래 설명된 대로 프로젝트 설정에서 오디오 드라이버가 ``Dummy``로 설정되어 있어도 작동합니다.
시각 장애가 있는 사용자에게 좋은 사용자 경험을 보장하려면 대상 플랫폼에서 널리 사용되는 화면 판독기를 사용하여 애플리케이션을 테스트하는 것이 좋습니다. 예를 들면 Windows의 NVDA, macOS의 VoiceOver, Linux의 Orca 등이 있습니다.
스크린 리더 지원을 좋은 수준의 유용성으로 얻으려면 상당한 양의 작업이 필요합니다. Control.accessibility_name 및 Control.accessibility_description 속성을 사용하여 접근성 레이블을 정의하고 화면 판독기에서 읽을 때 UI가 논리적 순서로 흐르는지 확인해야 합니다.
더 보기
화면 판독기와 별개인 텍스트 음성 변환 기능에 대해서는 :ref:`doc_text_to_speech`를 참조하세요.
프로젝트 설정 재정의하기
벡터 보간
애플리케이션이 데스크톱 환경과 더 잘 통합되도록 하려면 다음과 같이 프로젝트 설정을 지정할 수 있습니다.
application/config/use_custom_user_dir 대신 전용 폴더에 저장됩니다. 관례적으로 Windows에서는 일반 케이스(예:
Application Name)를 사용하고 macOS 및 Linux에서는 케밥 케이스(예:application-name)를 사용하는 것이 좋습니다.:ref:`application/config/windows_native_icon <class_ProjectSettings_property_application/config/windows_native_icon>`(ICO 형식) 및 :ref:`application/config/macos_native_icon <class_ProjectSettings_property_application/config/macos_native_icon>`을 사용하여 운영 체제의 디자인 지침과 일치하는 기본 아이콘을 구성합니다. (ICNS 형식). 기본적으로 Godot는 프로젝트 아이콘을 기반으로 기본 아이콘을 자동으로 생성하지만 이것이 항상 최적인 것은 아닙니다.
Windows에서는 수동으로 디자인한 ICO 파일을 사용하면 다양한 해상도에 다양한 아이콘을 사용할 수 있습니다. 이는 더 나은 가독성을 위해 낮은 해상도에서 특수 디자인을 만드는 데 사용할 수 있습니다.
macOS에는 다른 플랫폼과 크게 다른 `앱 아이콘 지침 <https://developer.apple.com/design/human-interface-guidelines/app-icons/>`__이 있습니다. 맞춤형 기본 아이콘 디자인을 사용하면 애플리케이션이 데스크톱 환경에 더 잘 들어맞도록 보장됩니다.
:ref:`display/window/subwindows/embed_subwindows <class_ProjectSettings_property_display/window/subwindows/embed_subwindows>`을 비활성화하면 추가 창이 운영 체제 테마를 사용하고 기본 운영 체제 창으로 표시됩니다.
성능
CPU, GPU, 메모리 사용률을 줄이는 데 사용할 수 있는 몇 가지 프로젝트 설정은 다음과 같습니다.
Forward+ 또는 Mobile 전용 기능이 필요하지 않은 경우 호환성 렌더러를 사용하세요. 호환성 렌더러는 하드웨어 요구 사항이 낮고 일반적으로 더 빠르게 실행되므로 응용 프로그램에 더 적합한 옵션입니다. 이 렌더러를 사용하면 새 창을 만드는 속도도 더 빨라집니다.
게임이 아닌 응용 프로그램을 제작할 때는 CPU와 GPU 사용률을 줄이기 위해 반드시 프로젝트 설정에서 low-processor mode를 활성화해주세요.
특정 경우에는 프로젝트를 계속해서 다시 그려야 합니다(예: ``TIME``를 사용하는 애니메이션 또는 셰이더가 표시되는 경우). 장시간 사용하면 상당한 전력 소모가 발생하여 배터리 수명이 단축되고 팬 소음이 증가합니다. 프로젝트가 계속해서 다시 그려지는 상황을 해결하려면 편집기 상단에서 프로젝트 설정.
애플리케이션이 그릴 수 있는 최대 프레임 속도는 application/run/low_processor_mode_sleep_usec <class_ProjectSettings_property_application/run/low_processor_mode_sleep_usec>`에 의해 결정됩니다. 이 값은 프레임당 마이크로초로 표시되므로 ``1000000.0 / sleep_usec` 공식을 사용하여 최대 FPS를 얻을 수 있습니다. 기본적으로 이는 ``6900``로 설정되어 있으며 이는 최대 약 145FPS에 해당합니다. 이 값을 늘려 CPU 및 GPU 사용량을 더 줄일 수 있지만 경험이 덜 원활해집니다.
:ref:`display/window/energy_saving/keep_screen_on <class_ProjectSettings_property_display/window/energy_saving/keep_screen_on>`을 비활성화하면 애플리케이션이 유휴 상태일 때 운영 체제의 전원 설정에 따라 화면이 꺼질 수 있습니다. 이 동작은 일반적으로 게임(예: 컷씬을 볼 때)에서는 바람직하지 않지만, 애플리케이션에서는 사용자가 애플리케이션을 적극적으로 사용하지 않을 때 전원을 절약하기 위해 화면이 꺼지길 원합니다.
애플리케이션에 오디오 출력 또는 입력이 필요하지 않은 경우 audio/driver/driver <class_ProjectSettings_property_audio/driver/driver>`을 ``Dummy` *(대소문자 구분)*로 설정합니다. 이렇게 하면 오디오 서버가 시작되지 않아 일부 CPU 및 메모리 리소스가 절약됩니다. 또한 운영 체제의 오디오 믹서에서 오디오를 재생하는 응용 프로그램 목록에 응용 프로그램이 표시되는 것을 방지합니다. macOS에서는 애플리케이션이 장치의 절전 모드를 방해하지 않도록 보장합니다.
응용 프로그램에 물리학이 필요하지 않은 경우 physics/2d/physics_engine 및 :ref:`physics/3d/physics_engine <class_ProjectSettings_property_physics/3d/physics_engine>`을 ``Dummy``로 설정합니다. 시뮬레이션(객체 선택 포함). 이렇게 하면 물리 서버가 시작되지 않아 CPU 및 메모리 리소스가 절약됩니다. 또한 이를 통해 :ref:`엔진 컴파일 구성 편집기 <doc_engine_compilation_configuration_editor>`가 프로젝트가 물리학을 사용하지 않는다는 사실을 자동으로 감지할 수 있습니다.
입력 지연을 줄이려면 :ref:`display/window/vsync/vsync_mode <class_ProjectSettings_property_display/window/vsync/vsync_mode>`를 **비활성화**로 설정하는 것이 좋습니다. 이는 드로잉 애플리케이션과 같이 대기 시간에 민감한 프로젝트에 특히 유용합니다. 이로 인해 전력 사용량이 증가하고 화면이 찢어질 수 있으므로 사용자가 필요에 따라 V-Sync를 전환할 수 있는 옵션을 제공하는 것이 좋습니다.
Godot로 만든 오픈소스 예제 애플리케이션 Material Maker와 Pixelorama를 확인해보세요.
모바일
모바일 플랫폼용 애플리케이션을 디자인할 때 유용성을 향상시키기 위해 활성화할 수 있는 몇 가지 설정이 있습니다.
Android
:ref:`input_devices/pointing/android/enable_long_press_as_right_click <class_ProjectSettings_property_input_devices/pointing/android/enable_long_press_as_right_click>`을 활성화하면 사용자가 길게 누르기 동작을 사용하여 오른쪽 클릭 작업을 수행할 수 있습니다.
input_devices/pointing/android/enable_pan_and_scale_gestures <class_ProjectSettings_property_input_devices/pointing/android/enable_pan_and_scale_gestures>`을 활성화하면 사용자가 터치 제스처를 사용하여 이동 및 확대/축소할 수 있습니다. 이는 프로젝트 코드에서 처리할 수 있고 일반적으로 노트북 트랙패드에서 발생하는 :ref:`class_InputEventPanGesture 및 InputEventMagnifyGesture 이벤트를 에뮬레이트합니다.
Android 내보내기 사전 설정에서 및 :ref:`DisplayServer.get_display_cutouts <class_DisplayServer_method_get_display_cutouts>`을 사용하여 응용 프로그램이 안전하게 그릴 수 있는 영역을 쿼리할 수 있습니다.
iOS:
:ref:`display/window/ios/hide_home_indicator <class_ProjectSettings_property_display/window/ios/hide_home_indicator>`을 비활성화하여 애플리케이션 상단에 홈 표시기를 표시합니다.
:ref:`display/window/ios/hide_status_bar <class_ProjectSettings_property_display/window/ios/hide_status_bar>`를 비활성화하면 애플리케이션이 활성화되어 있을 때 상태 표시줄이 계속 표시됩니다.
:ref:`display/window/ios/suppress_ui_gesture <class_ProjectSettings_property_display/window/ios/suppress_ui_gesture>`을 비활성화하면 UI 제스처를 두 번 수행할 필요 없이 즉시 작동할 수 있습니다.
커스텀 단위 테스트 작성하기
애플리케이션에서는 게임에 비해 단위 테스트 설정이 더 가치 있는 경우가 많습니다. 이는 자동화된 방식으로 회귀를 포착하는 데 사용될 수 있으며, 이는 논리가 깔끔하게 분리될 수 있는 애플리케이션 시나리오에서 더 쉽게 수행할 수 있는 경향이 있습니다.
GDScript에는 통합 단위 테스트 프레임워크가 없지만 커뮤니티에서 유지 관리하는 단위 테스트용 플러그인이 여러 개 있습니다.
C# 및 GDExtension(C++, Rust 등)을 사용하면 NUnit 또는 `doctest <https://github.com/doctest/doctest>`__과 같은 표준 테스트 프레임워크를 사용할 수 있습니다.
파일 크기 최적화하기
게임이 아닌 응용 프로그램은 일반적으로 오디오나 3D 기능과 같은 엔진의 큰 부분을 사용하지 않기 때문에 최적화된 내보내기 템플릿을 컴파일하여 파일 크기를 줄일 수 있습니다. 이는 특히 바이너리 크기가 초기화 속도와 직접 연결되는 웹 플랫폼에서 시작 시간을 향상시킵니다.
응용 프로그램에는 게임에 비해 더 적은 수의 대규모 자산이 포함되어 있으므로 크기 감소는 프로젝트 크기에 비해 상당한 경우가 많습니다. 이 작업을 수행하는 방법에 대한 자세한 내용은 :ref:`doc_optimizing_for_size`를 참조하세요.
Creating a single-executable distribution
By default, Godot creates a PCK file containing the project data next to the executable. This means that if the executable is moved without moving the PCK file at the same time, the application will not run. This is not ideal for applications, which are increasingly being distributed as a single executable file.
To make the application entirely self-contained to a single executable, you can enable Embed PCK in the export preset options. This will embed the PCK data within the executable, so that the application can be moved around without breaking. This also makes it possible to run the application directly from a ZIP archive without having to extract it first.
참고
PCK embedding has a size limitation depending on the platform. Very large applications (several GBs) may not be able to use this feature on all platforms. Check the export documentation for the target platform for more details.
Creating portable applications
An application is called portable when it can be run without installation, and when its configuration is entirely self-contained to the folder it was extracted to. This allows placing the application files on an USB drive or similar, and running it on different machines without having to go through an installation process.
The Godot editor's own self-contained mode currently can't be used within projects. However, you can still choose to save your own configuration files to the folder containing the executable as follows:
var config_path = OS.get_executable_path().get_base_dir().path_join("config.ini")
# Then use `config_path` to save/load configuration files using ConfigFile or similar.
You may want to make portable mode optional as it's not always desired.
Typically, this is performed by detecting the presence of a specific file in the
executable's folder (e.g. a file named portable.txt), and only using the
executable's folder for configuration if that file is present.
경고
Remember that this will only work if the application is extracted to a
writable location. This will result in permission errors if the executable
is run from a read-only location, such as C:\Program Files on Windows.
인스톨러 만들기
게임은 일반적으로 Steam과 같은 실행 프로그램을 통해 설치되거나 ZIP으로 다운로드되는 반면, 애플리케이션은 더 나은 데스크톱 통합을 위해 설치 프로그램으로 배포되는 경우가 많습니다. 설치 프로그램은 시작 메뉴 또는 바탕 화면에 바로가기 추가, 파일 연결 설정 등과 같은 작업을 수행할 수 있습니다. 설치 프로그램은 명령줄을 통해 자동으로 실행될 수도 있으므로 기업 환경에 더 적합합니다.
Godot는 내보낸 프로젝트에 대한 설치 프로그램 생성을 기본적으로 지원하지 않습니다. 그러나 타사 도구를 사용하여 자체 설치 프로그램을 만드는 것은 여전히 가능합니다.
이 가이드라인을 기반으로 한 전체 클래스 예제입니다:
Linux: Flatpak
Godot 프로젝트용 Flatpak 패키지를 생성하기 위한 기반으로 사용할 수 있는 `Godot BaseApp <https://github.com/flathub/org.godotengine.Godot.BaseApp>`__이 있습니다. 이 BaseApp을 사용하는 Flatpak의 예는 `the Pixelorama Flatpak <https://github.com/flathub/com.orama_interactive.Pixelorama>`__을 참조하세요.
리소스
이 페이지에서는 게임이 아닌 응용 프로그램에서 일반적으로 수행되는 작업을 다룹니다.
:ref:`class_ConfigFile`(사용자 기본 설정을 저장하는 데 사용)