Attention: Here be dragons
This is the latest
(unstable) version of this documentation, which may document features
not available in or compatible with released stable versions of Godot.
Checking the stable version of the documentation...
예:
소개
이 튜토리얼에서는 Godot의 InputEvent 시스템을 사용하여 플레이어 입력을 캡처하는 방법을 배우게 됩니다. 게임에서 사용할 수 있는 입력 유형은 키보드, 게임패드, 마우스 등 매우 다양하며 이러한 입력을 게임 내 작업으로 전환하는 방법도 다양합니다. 이 문서에서는 자신의 프로젝트를 위한 시작점으로 사용할 수 있는 가장 일반적인 시나리오 중 일부를 보여줍니다.
참고
Godot의 입력 이벤트 시스템 작동 방식에 대한 자세한 개요는 :ref:`doc_inputevent`를 참조하세요.
이벤트 대 폴링
때로는 게임이 특정 입력 이벤트(예: "점프" 버튼 누르기)에 응답하기를 원할 수도 있습니다. 다른 상황에서는 이동과 같이 키를 누르는 동안 어떤 일이 발생하기를 원할 수도 있습니다. 첫 번째 경우에는 입력 이벤트가 발생할 때마다 호출되는 _input() 함수를 사용할 수 있습니다. 두 번째 경우, Godot는 입력 상태를 쿼리하는 데 사용할 수 있는 Input 싱글톤를 제공합니다.
예시:
func _input(event):
    if event.is_action_pressed("jump"):
        jump()


func _physics_process(delta):
    if Input.is_action_pressed("move_right"):
        # Move as long as the key/button is pressed.
        position.x += speed * delta
public override void _Input(InputEvent @event)
{
    if (@event.IsActionPressed("jump"))
    {
        Jump();
    }
}

public override void _PhysicsProcess(double delta)
{
    if (Input.IsActionPressed("move_right"))
    {
        // Move as long as the key/button is pressed.
        position.X += speed * (float)delta;
    }
}
이를 통해 수행하는 입력 처리 유형을 혼합하고 일치시킬 수 있는 유연성이 제공됩니다.
이 튜토리얼의 나머지 부분에서는 ``_input()``에서 개별 이벤트를 캡처하는 데 중점을 둘 것입니다.
입력 이벤트
입력 이벤트는 :ref:`InputEvent <class_InputEvent>`에서 상속되는 개체입니다. 이벤트 유형에 따라 개체에는 해당 이벤트와 관련된 특정 속성이 포함됩니다. 이벤트가 실제로 어떤 모습인지 확인하려면 노드를 추가하고 다음 스크립트를 연결하세요.
extends Node


func _input(event):
    print(event.as_text())
using Godot;

public partial class Node : Godot.Node
{
    public override void _Input(InputEvent @event)
    {
        GD.Print(@event.AsText());
    }
}
키를 누르고, 마우스를 움직이고, 다른 입력을 수행하면 출력 창에서 각 이벤트가 스크롤되는 것을 볼 수 있습니다. 출력의 예는 다음과 같습니다.
A
Mouse motion at position ((971, 5)) with velocity ((0, 0))
Right Mouse Button
Mouse motion at position ((870, 243)) with velocity ((0.454937, -0.454937))
Left Mouse Button
Mouse Wheel Up
A
B
Shift
Alt+Shift
Alt
Shift+T
Mouse motion at position ((868, 242)) with velocity ((-2.134768, 2.134768))
보시다시피 입력 유형에 따라 결과가 매우 다릅니다. 주요 이벤트는 주요 기호로 인쇄됩니다. 예를 들어 :ref:`InputEventMouseButton <class_InputEventMouseButton>`을 고려해 보겠습니다. 다음 클래스에서 상속됩니다.
InputEvent - 모든 입력 이벤트의 기본 클래스
InputEventWithModifiers - Shift 또는 :kbd:`Alt`과 같은 수정자를 눌렀는지 확인하는 기능을 추가합니다.
InputEventMouse - ``position``와 같은 마우스 이벤트 속성을 추가합니다.
InputEventMouseButton - 누른 버튼의 인덱스, 더블클릭 여부 등을 포함합니다.
팁
이벤트 작업을 하는 동안 클래스 참조를 열어 두어 이벤트 유형의 사용 가능한 속성과 메서드를 확인할 수 있도록 하는 것이 좋습니다.
포함되지 않은 입력 유형의 속성에 액세스하려고 하면 오류가 발생할 수 있습니다. 예를 들어 ``InputEventKey``에서 ``position``를 호출합니다. 이를 방지하려면 먼저 이벤트 유형을 테스트하십시오.
func _input(event):
    if event is InputEventMouseButton:
        print("mouse button event at ", event.position)
public override void _Input(InputEvent @event)
{
    if (@event is InputEventMouseButton mouseEvent)
    {
        GD.Print("mouse button event at ", mouseEvent.Position);
    }
}
입력맵
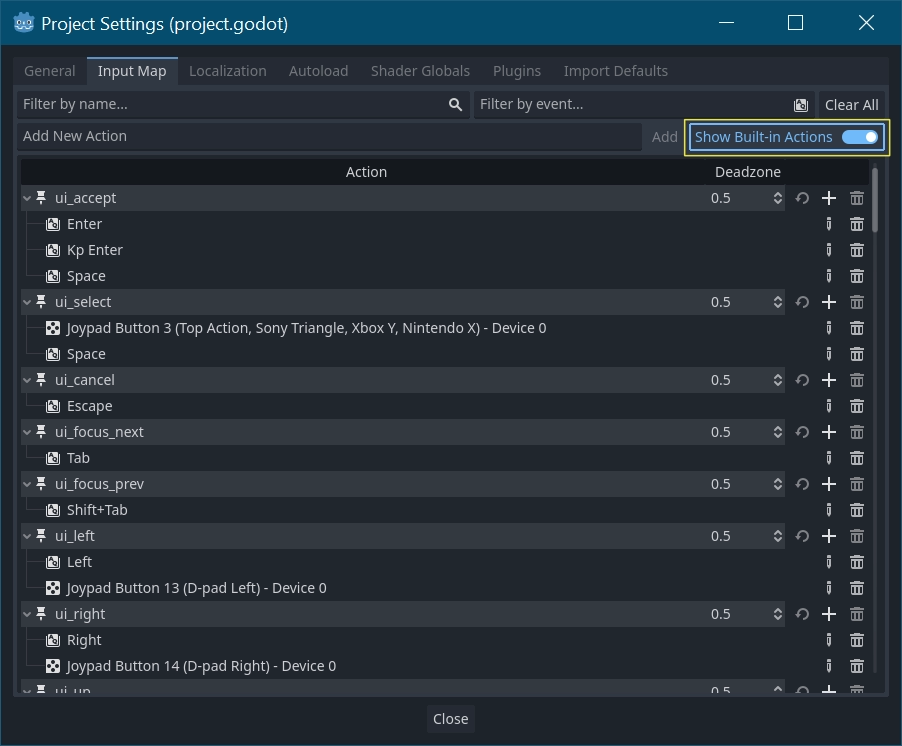
:ref:`InputMap <class_InputMap>`은 다양한 입력을 처리하는 가장 유연한 방법입니다. 키 누르기나 마우스 클릭과 같은 입력 이벤트를 원하는 만큼 할당할 수 있는 명명된 입력 *작업*을 생성하여 이를 사용합니다. 이를 보고 자신만의 것을 추가하려면 프로젝트 -> 프로젝트 설정를 열고 InputMap 탭을 선택하세요.
팁
A new Godot project includes a number of default actions already defined. To see them, turn on in the InputMap dialog.
While not strictly required, it's recommended to use the snake_case naming
convention for input action names.
수학 함수
작업을 정의한 후에는 찾고 있는 작업의 이름을 전달하여 is_action_pressed() 및 ``is_action_released()``를 사용하여 스크립트에서 처리할 수 있습니다.
func _input(event):
    if event.is_action_pressed("my_action"):
        print("my_action occurred!")
public override void _Input(InputEvent @event)
{
    if (@event.IsActionPressed("my_action"))
    {
        GD.Print("my_action occurred!");
    }
}
키보드 단축키
키보드 이벤트는 :ref:`InputEventKey <class_InputEventKey>`에서 캡처됩니다. 대신 입력 작업을 사용하는 것이 좋지만 주요 이벤트를 구체적으로 살펴보고 싶은 경우가 있을 수 있습니다. 이 예에서는 :kbd:`T`을 확인해 보겠습니다.
func _input(event):
    if event is InputEventKey and event.pressed:
        if event.keycode == KEY_T:
            print("T was pressed")
public override void _Input(InputEvent @event)
{
    if (@event is InputEventKey keyEvent && keyEvent.Pressed)
    {
        if (keyEvent.Keycode == Key.T)
        {
            GD.Print("T was pressed");
        }
    }
}
팁
키코드 상수 목록은 :ref:`@GlobalScope_Key <enum_@GlobalScope_Key>`을 참조하세요.
경고
*키보드 고스팅*으로 인해 한 번에 너무 많은 키를 누르면 특정 시간에 모든 키 입력이 등록되지 않을 수 있습니다. 키보드에서의 위치로 인해 특정 키는 다른 키보다 고스팅이 발생하기 쉽습니다. 일부 키보드에는 하드웨어 수준의 안티고스팅 기능이 있지만 일반적으로 저가형 키보드와 노트북 키보드에는 이 기능이 없습니다.
따라서 안티고스팅 없이 키보드에서 잘 작동하도록 설계된 기본 키보드 레이아웃을 사용하는 것이 좋습니다. 자세한 내용은 `이 Gamedev 스택 교환 질문 <https://gamedev.stackexchange.com/a/109002>`__을 참조하세요.
키보드 모디파이어
수정자 속성은 :ref:`InputEventWithModifiers <class_InputEventWithModifiers>`에서 상속됩니다. 이를 통해 부울 속성을 사용하여 수정자 조합을 확인할 수 있습니다. :kbd:`T`을 눌렀을 때 한 가지 일이 발생하기를 원하지만 :kbd:`Shift + T`일 때는 다른 일이 발생하기를 원한다고 가정해 보겠습니다.
func _input(event):
    if event is InputEventKey and event.pressed:
        if event.keycode == KEY_T:
            if event.shift_pressed:
                print("Shift+T was pressed")
            else:
                print("T was pressed")
public override void _Input(InputEvent @event)
{
    if (@event is InputEventKey keyEvent && keyEvent.Pressed)
    {
        switch (keyEvent.Keycode)
        {
            case Key.T:
                GD.Print(keyEvent.ShiftPressed ? "Shift+T was pressed" : "T was pressed");
                break;
        }
    }
}
팁
키코드 상수 목록은 :ref:`@GlobalScope_Key <enum_@GlobalScope_Key>`을 참조하세요.
마우스 이벤트
마우스 이벤트는 InputEventMouse 클래스에서 유래하며 InputEventMouseButton 및 InputEventMouseMotion <class_InputEventMouseMotion>`의 두 가지 유형으로 구분됩니다. 이는 모든 마우스 이벤트에 ``position` 속성이 포함된다는 것을 의미합니다.
옵션들 가져오기
InputEventMouseMotion 이벤트는 마우스가 움직일 때마다 발생합니다. relative 속성을 사용하여 이동 거리를 확인할 수 있습니다.
다음은 마우스 이벤트를 사용하여 Sprite2D 노드를 드래그 앤 드롭하는 예입니다.
extends Node


var dragging = false
var click_radius = 32 # Size of the sprite.


func _input(event):
    if event is InputEventMouseButton and event.button_index == MOUSE_BUTTON_LEFT:
        if (event.position - $Sprite2D.position).length() < click_radius:
            # Start dragging if the click is on the sprite.
            if not dragging and event.pressed:
                dragging = true
        # Stop dragging if the button is released.
        if dragging and not event.pressed:
            dragging = false

    if event is InputEventMouseMotion and dragging:
        # While dragging, move the sprite with the mouse.
        $Sprite2D.position = event.position
using Godot;

public partial class MyNode2D : Node2D
{
    private bool _dragging = false;
    private int _clickRadius = 32; // Size of the sprite.

    public override void _Input(InputEvent @event)
    {
        Sprite2D sprite = GetNodeOrNull<Sprite2D>("Sprite2D");
        if (sprite == null)
        {
            return; // No suitable node was found.
        }

        if (@event is InputEventMouseButton mouseEvent && mouseEvent.ButtonIndex == MouseButton.Left)
        {
            if ((mouseEvent.Position - sprite.Position).Length() < _clickRadius)
            {
                // Start dragging if the click is on the sprite.
                if (!_dragging && mouseEvent.Pressed)
                {
                    _dragging = true;
                }
            }
            // Stop dragging if the button is released.
            if (_dragging && !mouseEvent.Pressed)
            {
                _dragging = false;
            }
        }
        else
        {
            if (@event is InputEventMouseMotion motionEvent && _dragging)
            {
                // While dragging, move the sprite with the mouse.
                sprite.Position = motionEvent.Position;
            }
        }
    }
}
터치 이벤트
터치스크린 장치를 사용하는 경우 터치 이벤트를 생성할 수 있습니다. :ref:`InputEventScreenTouch <class_InputEventScreenTouch>`는 마우스 클릭 이벤트와 동일하며 :ref:`InputEventScreenDrag <class_InputEventScreenDrag>`는 마우스 동작과 거의 동일하게 작동합니다.
팁
터치스크린이 아닌 장치에서 터치 이벤트를 테스트하려면 프로젝트 설정를 열고 "입력 장치/포인팅" 섹션으로 이동하세요. "마우스에서 터치 에뮬레이션"을 활성화하면 프로젝트에서 마우스 클릭과 모션을 터치 이벤트로 해석합니다.