Attention: Here be dragons
This is the latest
(unstable) version of this documentation, which may document features
not available in or compatible with released stable versions of Godot.
Checking the stable version of the documentation...
Scène Player et actions d'entrée
Dans les deux prochaines leçons, nous allons concevoir la scène du joueur, enregistrer des actions d'entrée personnalisées, et coder le mouvement du joueur. À la fin, vous aurez un personnage jouable qui se déplace dans huit directions.
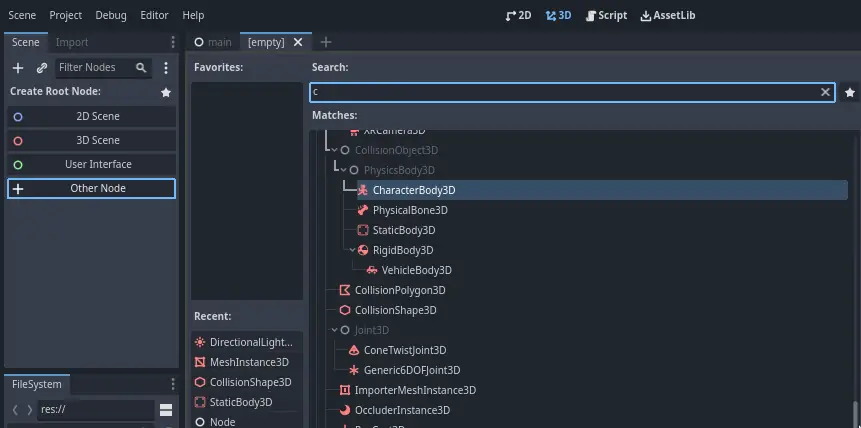
Créez une nouvelle scène en allant dans le menu Scène en haut à gauche et en cliquant sur Nouvelle scène.

Cliquez sur le bouton Autre nœud et sélectionnez le type de nœud CharacterBody3D pour créer un CharacterBody3D comme nœud racine.
Renommez le CharacterBody3D en Player. Les corps des personnages sont complémentaires de la zone et des corps rigides utilisés dans le didacticiel du jeu 2D. Comme les corps rigides, ils peuvent se déplacer et entrer en collision avec l'environnement, mais au lieu d'être contrôlés par le moteur physique, vous dictez leur mouvement. Vous verrez comment nous utilisons les fonctionnalités uniques du nœud lorsque nous codons les mécanismes de saut et d'écrasement.
Voir aussi
Pour en savoir plus sur les différents types de nœuds de physique, consultez la Introduction à la physique.
Pour l'instant, nous allons créer un rig basique pour le modèle 3D de notre personnage. Ça nous permettra de faire pivoter le modèle plus tard depuis le code pendant qu'il joue une animation.
Ajoutez un nœud Node3D comme enfant de Player. Sélectionnez le nœud Player dans l'arborescence de Scène et cliquez sur le bouton "+" pour ajouter un nœud enfant. Renommez le Pivot.

Ensuite, dans le dock Système de fichiers, développez le dossier art/ en double-cliquant dessus et faites glisser et déposez player.glb sur Pivot.

Cela devrait instancier le modèle comme enfant de Pivot. Vous pouvez le renommer en Character.

Note
Les fichiers .glb contiennent des données de scènes 3D basées sur la spécification open-source glTF 2.0. C'est une alternative moderne et puissante à un format propriétaire comme FBX, que Godot prend également en charge. Pour produire ces fichiers, nous avons conçu le modèle dans Blender 3D et l'avons exporté en glTF.
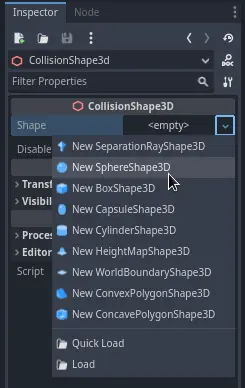
Comme avec tous les types de nœuds physiques, nous avons besoin d'une forme de collision pour que notre personnage puisse entrer en collision avec l'environnement. Sélectionnez le nœud Player à nouveau et ajoutez-lui un nœud enfant CollisionShape3D. Dans l'Inspecteur, assignez une nouvelle SphereShape3D à la propriété Shape.
L'armature filaire de la sphère apparaît sous le caractère.

Ce sera la forme que le moteur physique utilisera pour entrer en collision avec l'environnement, nous voulons donc qu'elle s'adapte mieux au modèle 3D. Agrandissez-la un peu en faisant glisser le point orange dans la fenêtre d'affichage. Ma sphère a un rayon d'environ 0,8 mètre.
Ensuite, déplacez la forme de collision vers le haut afin que son bas s'aligne à peu près avec le plan de la grille.

Pour faciliter le déplacement de la forme, vous pouvez activer et désactiver la visibilité du modèle en cliquant sur l'icône en forme d'œil à côté des nœuds Character ou Pivot.

Enregistrez la scène sous le nom player.tscn.
Les nœuds étant prêts, nous pouvons presque commencer à coder. Mais d'abord, nous devons définir quelques actions d'entrée.
Création d'actions d'entrée
Pour déplacer le personnage, nous écouterons l'entrée du joueur, comme l'appui sur les touches fléchées. Dans Godot, plutôt que d'écrire toutes les liaisons dans le code, il y a un système puissant qui nous permet d'attribuer une étiquette à un ensemble de touches et de boutons. Cela simplifie nos scripts et les rend plus lisibles.
Ce système est l'Input Map ("Contrôles" en français). Pour accéder à son éditeur, allez dans le menu Projet et sélectionnez Paramètres du projet....

En haut, il y a plusieurs onglets. Cliquez sur Contrôles. Cette fenêtre vous permet d'ajouter de nouvelles actions en haut ; ce sont vos étiquettes. Dans la partie inférieure, vous pouvez lier des touches à ces actions.

Les projets Godot sont livrés avec des actions prédéfinies conçues pour la conception de l'interface utilisateur (voir la capture d'écran ci-dessus). Celles-ci deviendront visibles si vous activez le bouton Afficher les actions intégrées. Nous pourrions les utiliser ici, mais à la place, nous définissons les nôtres pour prendre en charge les manettes de jeu. Laissez Afficher les actions intégrées désactivé.
Nous allons nommer nos actions move_left, move_right, move_forward, move_back, et jump.
Pour ajouter une action, écrivez son nom dans la barre en haut et appuyez sur Entrée ou cliquez sur le bouton Ajouter.

Créez les cinq actions suivantes :

Pour lier une touche ou un bouton à une action, cliquez sur le bouton "+" à sa droite. Faîtes-le pour move_left. Appuyez sur la touche flèche gauche et cliquez sur OK.
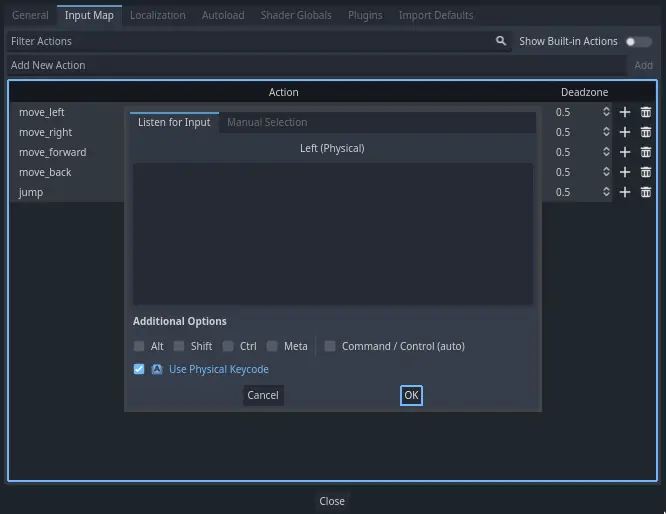
Liez également la touche A à l'action move_left.

Ajoutons maintenant le support du joystick gauche d'une manette. Cliquez encore sur le bouton "+", mais cette fois, sélectionnez l'entrée dans l'arbre des entrées vous-même. Sélectionnez l'axe X négatif du joystick gauche dans Axes de joystick.
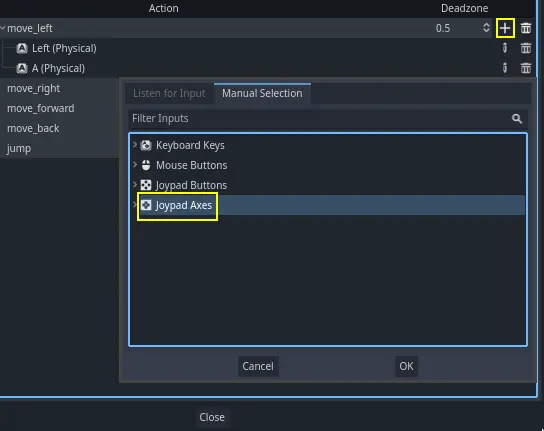
Laissez les autres valeurs par défaut et appuyez sur OK.
Note
Si vous souhaitez que les contrôleurs aient des actions d'entrée différentes, vous devez utiliser l'option Périphériques dans les Options supplémentaires. Le périphérique 0 correspond à la première manette de jeu branchée, le périphérique 1 correspond à la deuxième manette de jeu branchée, et ainsi de suite.
Faîtes de même pour les autres actions. Par exemple, liez la flèche de droite, D, et l'axe positif du joystick gauche à move_right. Après avoir lié toutes les touches, votre interface devrait ressembler à ceci.

La dernière action à mettre en place est l'action jump. Associez la touche Espace et le bouton A de la manette situé sous Boutons de joystick.

Votre action d'entrée de saut devrait ressembler à ceci.

Voilà toutes les actions dont nous avons besoin pour ce jeu. Vous pouvez utiliser ce menu pour étiqueter tout groupe de touches et de boutons dans vos projets.
Dans la partie suivante, nous allons coder et tester le mouvement du joueur.