Attention: Here be dragons
This is the latest
(unstable) version of this documentation, which may document features
not available in or compatible with released stable versions of Godot.
Checking the stable version of the documentation...
Création de plugins
A propos des plugins
Un plugin est un excellent moyen d'étendre l'éditeur avec des outils utiles. Il peut être réalisé entièrement avec GDScript et des scènes standard, sans même recharger l'éditeur. Contrairement aux modules, vous n'avez pas besoin de créer du code C++ ni de recompiler le moteur. Bien que cela rende les plugins moins puissants, il y a encore beaucoup de choses que vous pouvez faire avec eux. Notez qu'un plugin est similaire à toute scène que vous pouvez déjà faire, sauf qu'il est créé à l'aide d'un script pour ajouter une fonctionnalité à l'éditeur.
This tutorial will guide you through the creation of two plugins so you can understand how they work and be able to develop your own. The first is a custom node that you can add to any scene in the project, and the other is a custom dock added to the editor.
Créer un plugin
Avant de commencer, créez un nouveau projet vide où vous voulez. Cela servira de base pour développer et tester les plugins.
La première chose dont vous avez besoin pour que l'éditeur identifie un nouveau plugin est de créer deux fichiers : un plugin.cfg pour la configuration et un script outil avec la fonctionnalité. Les plugins ont un chemin standard comme addons/plugin_name dans le dossier du projet. Godot fournit un dialogue pour générer ces fichiers et les placer là où ils doivent être.
Dans la barre d'outils principale, cliquez sur le menu déroulant Projet. Ensuite, cliquez sur Paramètres du projet.... Allez dans l'onglet Plugins et cliquez sur le bouton en haut à droite.
Vous verrez le dialogue s'afficher, comme ceci :
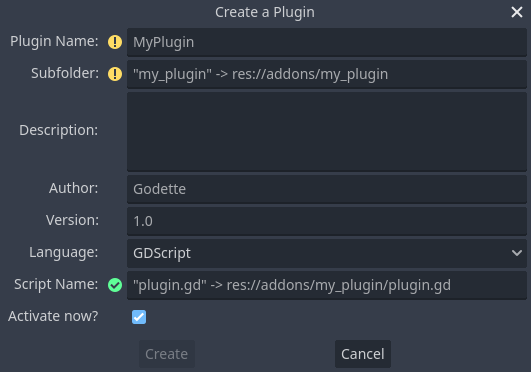
Le texte à remplacer de chaque champ décrit comment il affecte la création des fichiers par le plugin et les valeurs du fichier de configuration.
Pour continuer avec l'exemple, utilisez les valeurs suivantes :
Plugin Name: My Custom Node
Subfolder: my_custom_node
Description: A custom node made to extend the Godot Engine.
Author: Your Name Here
Version: 1.0.0
Language: GDScript
Script Name: custom_node.gd
Plugin Name: My Custom Node
Subfolder: MyCustomNode
Description: A custom node made to extend the Godot Engine.
Author: Your Name Here
Version: 1.0.0
Language: C#
Script Name: CustomNode.cs
Avertissement
En C#, le script EditorPlugin doit être compilé, ce qui nécessite la compilation du projet. Après avoir compilé le projet, le plugin peut être activé dans l'onglet Plugins des Paramètres du projet.
Vous devriez vous retrouver avec une structure de répertoire comme celle-ci :
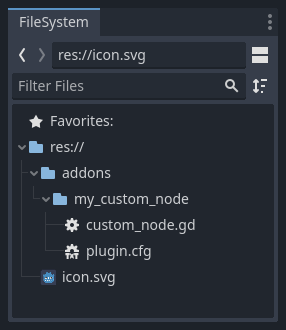
plugin.cfg est un fichier INI contenant des métadonnées sur votre plugin. Le nom et la description aident les gens à comprendre ce qu'il fait. Votre nom vous aide à être correctement crédité pour votre travail. Le numéro de version aide les autres à savoir s'ils ont une version obsolète ; si vous n'êtes pas sûr de savoir comment définir le numéro de version, consultez le site Semantic Versioning. Le fichier de script principal indiquera à Godot ce que fait votre plugin dans l'éditeur une fois qu'il est actif.
Le fichier script
Upon creation of the plugin, the dialog will automatically open the
EditorPlugin script for you. The script has two requirements that you cannot
change: it must be a @tool script, or else it will not load properly in the
editor, and it must inherit from EditorPlugin.
Avertissement
In addition to the EditorPlugin script, any other GDScript that your plugin uses
must also be a tool. Any GDScript without @tool used by the editor
will act like an empty file!
Il est important de s'occuper de l'initialisation et du nettoyage des ressources. Une bonne pratique consiste à utiliser la fonction virtuelle _enter_tree() pour initialiser votre plugin et _exit_tree() pour le nettoyer. Heureusement, le dialogue génère ces rappels pour vous. Votre script devrait ressembler à ceci :
@tool
extends EditorPlugin


func _enter_tree():
    # Initialization of the plugin goes here.
    pass


func _exit_tree():
    # Clean-up of the plugin goes here.
    pass
#if TOOLS
using Godot;

[Tool]
public partial class CustomNode : EditorPlugin
{
    public override void _EnterTree()
    {
        // Initialization of the plugin goes here.
    }

    public override void _ExitTree()
    {
        // Clean-up of the plugin goes here.
    }
}
#endif
C'est un bon modèle à utiliser lors de la création de nouveaux plugins.
Un nœud personnalisé
Parfois, vous souhaitez un certain comportement dans de nombreux nœuds, comme une scène ou un contrôle personnalisé qui peut être réutilisé. L'instanciation est utile dans de nombreux cas, mais elle peut parfois être lourde, surtout si vous l'utilisez dans de nombreux projets. Une bonne solution consiste à créer un plugin qui ajoute un nœud avec un comportement personnalisé.
For this tutorial, we'll create a button that prints a message when clicked. For that, we'll need a script that extends from Button. It could also extend BaseButton if you prefer:
# Optional, add to execute in the editor.
@tool

# Icons are optional.
# Alternatively, you may use the UID of the icon or the absolute path.
@icon("icon.svg")

# Automatically register the node in the Create New Node dialog
# and make it available for use with other scripts.
class_name MyButton
extends Button


func _enter_tree():
    pressed.connect(clicked)


func clicked():
    print("You clicked me!")
using Godot;

// Optional, add to execute in the editor.
[Tool]

// Icons are optional.
// Alternatively, you may use the UID of the icon or the absolute path.
[Icon("icon.svg")]

// Automatically register the node in the Create New Node dialog
// and make it available for use with other scripts.
[GlobalClass]
public partial class MyButton : Button
{
    public override void _EnterTree()
    {
        Pressed += Clicked;
    }

    public void Clicked()
    {
        GD.Print("You clicked me!");
    }
}
That's it for our basic button. You can save this as my_button.gd inside the
plugin folder. You may have a 16×16 icon to show in the scene tree. If you
don't have one, you can grab the default one from the engine and save it in your
addons/my_custom_node folder as icon.svg, or use the default Godot logo
(@icon("res://icon.svg")).
Astuce
SVG images that are used as custom node icons should have the Editor > Scale With Editor Scale and Editor > Convert Colors With Editor Theme import options enabled. This allows icons to follow the editor's scale and theming settings if the icons are designed with the same color palette as Godot's own icons.
Une fois cela fait, le plugin devrait déjà être disponible dans la liste des plugins dans les Paramètres du projet, donc activez-le comme expliqué dans Checking the results.
Essayez ensuite en ajoutant votre nouveau nœud :
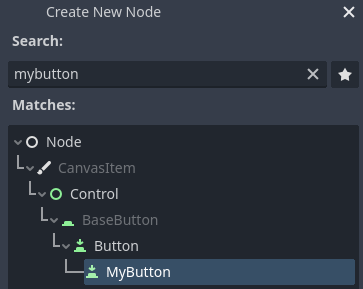
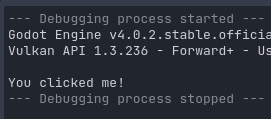
Lorsque vous ajoutez le nœud, vous pouvez voir que le script que vous avez créé y est déjà attaché. Définissez un texte sur le bouton, enregistrez et lancez la scène. Lorsque vous cliquez sur le bouton, vous pouvez voir du texte dans la console :
Un dock personnalisé
Parfois, vous devez étendre l'éditeur et ajouter des outils qui sont toujours disponibles. Une façon simple de le faire est d'ajouter un nouveau dock avec un plugin. Les docks ne sont que des scènes basées sur Control, elles sont donc créées d'une manière similaire aux scènes habituelles d'interface graphique.
La création d'un dock personnalisé se fait tout comme un nœud personnalisé. Créez un nouveau fichier plugin.cfg dans le dossier addons/mon_dock_custom, puis ajoutez-y le contenu suivant :
[plugin]

name="My Custom Dock"
description="A custom dock made so I can learn how to make plugins."
author="Your Name Here"
version="1.0"
script="custom_dock.gd"
[plugin]

name="My Custom Dock"
description="A custom dock made so I can learn how to make plugins."
author="Your Name Here"
version="1.0"
script="CustomDock.cs"
Créez ensuite le script custom_dock.gd dans le même dossier. Remplissez-le avec le modèle que nous avons vu auparavant pour bien démarrer.
Puisque nous essayons d'ajouter un nouveau dock personnalisé, nous devons créer le contenu du dock. Ce n'est rien d'autre qu'une scène Godot standard : il suffit de créer une nouvelle scène dans l'éditeur puis de la modifier.
For an editor dock, the root node must be a Control or one of its child classes. For this tutorial, you can create a single button. Don't forget to add some text to your button.
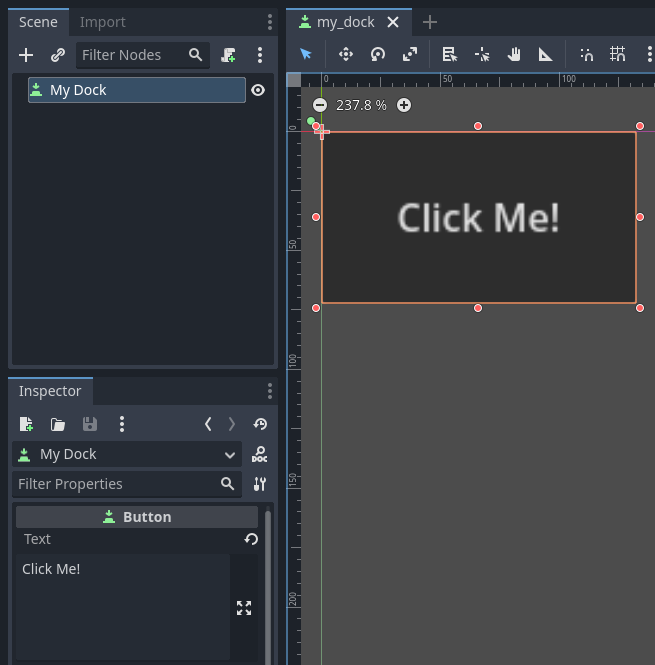
Save this scene as my_dock.tscn. Now, we need to grab the scene we created
then add it as a dock in the editor. For this, you can rely on the function
add_dock() from the
EditorPlugin class.
Vous devez sélectionner une position de dock et définir le contrôle à ajouter (qui est la scène que vous venez de créer). N'oubliez pas de remove the dock lorsque le plugin est désactivé. Le script pourrait ressembler à ceci :
@tool
extends EditorPlugin


# A class member to hold the dock during the plugin life cycle.
var dock


func _enter_tree():
    # Initialization of the plugin goes here.
    # Load the dock scene and instantiate it.
    var dock_scene = preload("res://addons/my_custom_dock/my_dock.tscn").instantiate()

    # Create the dock and add the loaded scene to it.
    dock = EditorDock.new()
    dock.add_child(dock_scene)

    dock.title = "My Dock"

    # Note that LEFT_UL means the left of the editor, upper-left dock.
    dock.default_slot = DOCK_SLOT_LEFT_UL

    # Allow the dock to be on the left or right of the editor, and to be made floating.
    dock.available_layouts = EditorDock.DOCK_LAYOUT_VERTICAL | EditorDock.DOCK_LAYOUT_FLOATING

    add_dock(dock)


func _exit_tree():
    # Clean-up of the plugin goes here.
    # Remove the dock.
    remove_dock(dock)
    # Erase the control from the memory.
    dock.queue_free()
#if TOOLS
using Godot;

[Tool]
public partial class CustomDock : EditorPlugin
{
    private EditorDock _dock;

    public override void _EnterTree()
    {
        var _dock_scene = GD.Load<PackedScene>("res://addons/MyCustomDock/MyDock.tscn").Instantiate<Control>();

        // Create the dock and add the loaded scene to it.
        _dock = new EditorDock();
        _dock.AddChild(dock_scene);

        _dock.Title = "My Dock";

        // Note that LeftUl means the left of the editor, upper-left dock.
        _dock.DefaultSlot = DockSlot.LeftUl;

        // Allow the dock to be on the left or right of the editor, and to be made floating.
        _dock.AvailableLayouts = DockLayout.Horizontal | DockLayout.Floating;

        AddDock(_dock);
    }

    public override void _ExitTree()
    {
        // Clean-up of the plugin goes here.
        // Remove the dock.
        RemoveDock(_dock);
        // Erase the control from the memory.
        _dock.QueueFree();
    }
}
#endif
Notez que, bien que le dock apparaisse initialement à sa position spécifiée, l'utilisateur peut librement changer sa position et enregistrer la disposition résultante.
Vérifier le résultat
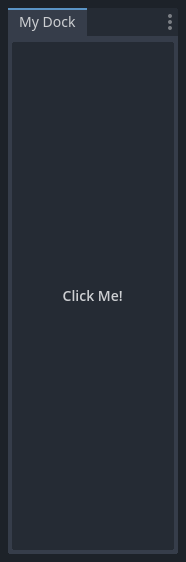
It's now time to check the results of your work. Open the Project Settings and click on the Plugins tab. Your plugin should be the only one on the list.

You can see the plugin is not enabled. Click the Enable checkbox to activate the plugin. The dock should become visible before you even close the settings window. You should now have a custom dock:
Enregistrer des chargements auto/singletons dans des extensions
Il est possible pour les plugins d'éditeur de d'enregistrer automatiquement des autoloads lorsque le plugin est activé. Cela inclut également le desenregistrement du chargement automatique lorsque le plugin est désactivé.
Cela rend la configuration des plugins plus rapide pour les utilisateurs, car ils n'ont plus à ajouter manuellement des chargements automatiques à leurs paramètres de projet si votre plugin d'éditeur nécessite l'utilisation d'un chargement automatique.
Utilisez ensuite le code suivant pour déclarer un singleton depuis un plugin d'éditeur :
@tool
extends EditorPlugin

# Replace this value with a PascalCase autoload name, as per the GDScript style guide.
const AUTOLOAD_NAME = "SomeAutoload"


func _enable_plugin():
    # The autoload can be a scene or script file.
    add_autoload_singleton(AUTOLOAD_NAME, "res://addons/my_addon/some_autoload.tscn")


func _disable_plugin():
    remove_autoload_singleton(AUTOLOAD_NAME)
#if TOOLS
using Godot;

[Tool]
public partial class MyEditorPlugin : EditorPlugin
{
    // Replace this value with a PascalCase autoload name.
    private const string AutoloadName = "SomeAutoload";

    public override void _EnablePlugin()
    {
        // The autoload can be a scene or script file.
        AddAutoloadSingleton(AutoloadName, "res://addons/MyAddon/SomeAutoload.tscn");
    }

    public override void _DisablePlugin()
    {
        RemoveAutoloadSingleton(AutoloadName);
    }
}
#endif
Using sub-plugins
Often a plugin adds multiple things, for example a custom node and a panel. In those cases it might be easier to have a separate plugin script for each of those features. Sub-plugins can be used for this.
First create all plugins and sub plugins as normal plugins:

Then move the sub plugins into the main plugin folder:

Godot will hide sub-plugins from the plugin list, so that a user can't enable or disable them. Instead the main plugin script should enable and disable sub-plugins like this:
@tool
extends EditorPlugin

# The main plugin is located at res://addons/my_plugin/
const PLUGIN_NAME = "my_plugin"

func _enable_plugin():
    EditorInterface.set_plugin_enabled(PLUGIN_NAME + "/node", true)
    EditorInterface.set_plugin_enabled(PLUGIN_NAME + "/panel", true)

func _disable_plugin():
    EditorInterface.set_plugin_enabled(PLUGIN_NAME + "/node", false)
    EditorInterface.set_plugin_enabled(PLUGIN_NAME + "/panel", false)
Aller plus loin
Maintenant que vous avez appris à créer des plugins de base, vous pouvez étendre l'éditeur de plusieurs façons. GDScript permet d'ajouter de nombreuses fonctionnalités à l'éditeur ; c'est un moyen puissant de créer des éditeurs spécialisés sans avoir se plonger dans les modules C++.
Vous pouvez créer vos propres plugins pour vous aider et les partager dans l'Asset Library afin que tous puissent bénéficier de votre travail.