Attention: Here be dragons
This is the latest
(unstable) version of this documentation, which may document features
not available in or compatible with released stable versions of Godot.
Checking the stable version of the documentation...
Création de la scène joueur
Avec les paramètres du projet en place, nous pouvons commencer à travailler sur le personnage contrôlé par le joueur.
La première scène définira l'objet Player. L'un des avantages de la création d'une scène Player séparée est que nous pouvons la tester séparément, avant même d'avoir créé d'autres parties du jeu.
Structure des nœuds
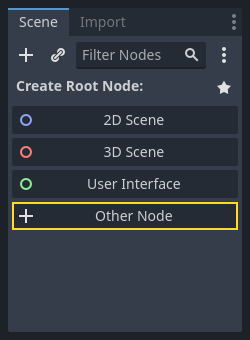
Pour commencer, nous devons choisir un nœud racine pour l'objet joueur. En règle générale, le nœud racine d'une scène doit refléter la fonctionnalité souhaitée de l'objet - ce que l'objet est. Dans le coin en haut à gauche, dans l'onglet "Scène", cliquez sur le bouton "Autre nœud" et ajoutez un nœud Area2D à la scène.
Note
Godot also provides the CharacterBody2D node, specifically designed for 2D characters, which includes built-in support for some of the processes explained in this tutorial. In many real world projects, CharacterBody2D would be a better choice for players and enemies. However, this tutorial focuses on core concepts that apply to a wider range of nodes and use cases.
Quand vous ajoutez le nœud Area2D, Godot affiche à côté l'icône d'avertissement suivante dans l'arborescence de scène :

Cet avertissement nous indique que le nœud Area2D nécessite une forme pour détecter les collisions ou les chevauchements. Nous pouvons ignorer l'alerte temporairement parce que nous allons tout d'abord configurer les visuels du joueur (en utilisant un sprite animé). Une fois que les visuels sont prêts, nous ajouterons une forme de collision en nœud enfant. Cela nous permettra de dimensionner et de positionner avec précision la forme en fonction de l'apparence du sprite.
Avec Area2D, nous pouvons détecter les objets qui chevauchent ou rentrent en collision le joueur. Changez le nom du nœud en Player en double-cliquant sur son nom. Maintenant que nous avons défini le nœud racine de la scène, nous pouvons ajouter des nœuds supplémentaires pour lui donner plus de fonctionnalités.
Avant d'ajouter des enfants au nœud Player, nous voulons nous assurer de ne pas les déplacer ou les redimensionner accidentellement en cliquant dessus. Sélectionnez le nœud et cliquez sur l'icône à droite du cadenas. Son info-bulle indique "Regroupe le nœud sélectionné avec ses enfants. Cela entraîne la sélection du parent lorsque l'on clique sur un nœud enfant en vue 2D et 3D."

Sauvegardez la scène en tant que player.tscn. Cliquez sur Scène -> Enregistrer, ou appuyez sur Ctrl + S sous Windows/Linux ou Cmd + S sous macOS.
Note
Pour ce projet, nous suivrons les conventions de nommage de Godot.
GDScript : Les classes (nœuds) utilisent le PascalCase, les variables et les fonctions utilisent le snake_case, et les constantes utilisent le ALL_CAPS (Voir Guide de style GDScript).
C# : Les classes, les variables d'exportation et les méthodes utilisent PascalCase, les attributs privés utilisent _camelCase, les variables locales et les paramètres utilisent camelCase (Voir Guide de style C#). Attention à taper les noms des méthodes précisément lorsque vous connectez des signaux.
Animation du sprite
Cliquez sur le nœud Player et ajoutez (Ctrl + A sous Windows/Linux ou Cmd + A sous macOS) un nœud enfant AnimatedSprite2D. L'AnimatedSprite2D gérera l'apparence et les animations de notre joueur. Notez qu'il y a un symbole d'avertissement à côté du nœud. Un AnimatedSprite2D nécessite une ressource SpriteFrames, qui est une liste des animations qu'il peut afficher. Assurez vous que AnimatedSprite2D est sélectionné et recherchez la propriété Trames d'animation sous l'onglet Animation dans l'inspecteur et cliquez sur "[vide]" -> "Nouveau SpriteFrames" :
Cliquez sur le SpriteFrames que vous venez de créer pour ouvrir le panneau "SpriteFrames" :
Sur la gauche se trouve une liste d'animations. Cliquez sur default et renommez-la en walk. Cliquez ensuite sur le bouton Ajouter une animation pour créer une seconde animation nommée up.
Recherchez les images du joueur dans l'onglet Système de fichiers - elles se trouvent dans le dossier art que vous avez décompressé précédemment. Faites glisser les deux images de chaque animation, dans le côté Trames d'animation du panneau pour l'animation correspondante :
playerGrey_walk1etplayerGrey_walk2pour l'animationwalkplayerGrey_up1etplayerGrey_up2pour l'animationup
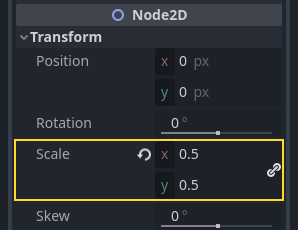
Les images du joueur sont un peu trop grandes pour la fenêtre de jeu, nous devons donc les réduire. Cliquez sur le nœud AnimatedSprite2D et réglez la propriété Scale sur (0.5, 0.5). Vous pouvez la trouver dans l'Inspecteur sous la catégorie Node2D.
Enfin, ajoutez un CollisionShape2D en tant qu'enfant de Player. Ceci déterminera la "hitbox" du joueur, soit les limites de sa zone de collision. Pour ce personnage, un nœud CapsuleShape2D donne le meilleur ajustement, donc à côté de "Shape" dans l'Inspecteur, cliquez sur "<vide>" -> "Nouveau CapsuleShape2D". En utilisant les deux poignées de redimensionnement, redimensionnez la forme pour couvrir le sprite :

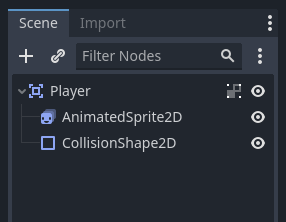
Lorsque vous avez terminé, votre scène Player devrait ressembler à ceci :
Une fois cela fait, l'avertissement sur le nœud Area2D disparaîtra, car il a maintenant une forme assignée et peut interagir avec d'autres objets.
Veillez à sauvegarder à nouveau la scène après ces changements.
Dans la prochaine partie, nous ajouterons un script sur le nœud du joueur pour le déplacer et l'animer. Ensuite, nous mettrons en place une détection de collisions pour savoir quand le joueur a été touché par quelque chose.