Attention: Here be dragons
This is the latest
(unstable) version of this documentation, which may document features
not available in or compatible with released stable versions of Godot.
Checking the stable version of the documentation...
Animation Sprite 2D
Introduction
Dans ce tutoriel, vous apprendrez à créer des personnages animés en 2D avec la classe AnimatedSprite2D et l'AnimationPlayer. En général, lorsque vous créez ou téléchargez un personnage animé, vous pouvez le faire de deux manières : sous forme d'images individuelles ou de feuille de sprite unique contenant toutes les images de l'animation. Les deux peuvent être animés dans Godot avec la classe AnimatedSprite2D.
Tout d'abord, nous utiliserons AnimatedSprite2D pour animer une collection d'images individuelles. Ensuite, nous animerons une feuille de sprite en utilisant cette classe. Enfin, nous apprendrons une autre façon d'animer une feuille de sprite avec AnimationPlayer et la propriété Animation de Sprite2D.
Note
Art pour les exemples suivants par https://opengameart.org/users/ansimuz et par tgfcoder.
Images individuelles avec AnimatedSprite2D
Dans ce scénario, vous avez une collection d'images, qui contient toutes les images pour l'animation de votre personnage. Pour cet exemple, nous allons utiliser l'animation suivante :

Vous pouvez télécharger les images ici : 2d_sprite_animation_assets.zip
Décompressez les images et placez-les dans le dossier de votre projet. Configurez votre arbre de scène avec les nœuds suivants :
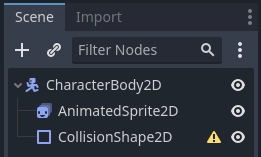
Note
Le nœud racine peut également être Area2D ou RigidBody2D. L'animation sera toujours faite de la même manière. Une fois l'animation terminée, vous pouvez attribuer une forme à CollisionShape2D. Voir Physics Introduction pour plus d'informations.
Sélectionnez maintenant le AnimatedSprite2D et dans propriété SpriteFrames, sélectionnez "Nouveau SpriteFrames".
Cliquez sur la nouvelle ressource SpriteFrames et vous verrez un nouveau panneau apparaît en bas de la fenêtre de l'éditeur :
Depuis le dock situé à gauche, faites glisser les 8 images individuelles dans la partie centrale du panneau SpriteFrames. Sur le côté gauche, modifiez le nom de l'animation de "default" par "run" (courir).
Use the "Play" buttons on the top-right of the Filter Animations input to preview the animation. You should now see the animation playing in the viewport. However, it is a bit slow. To fix this, change the Speed (FPS) setting in the SpriteFrames panel to 10.
Vous pouvez rajouter des animations supplémentaires en cliquant sur le bouton "Nouvelle Animation" et en ajoutant des images supplémentaires.
Contrôle de l'animation
Une fois l'animation terminée, vous pouvez contrôler l'animation via le code en utilisant les méthodes play() et stop(). Voici un bref exemple pour lire l'animation tant que la touche fléchée droite est maintenue enfoncée et l'arrêter lorsque vous la relâchez.
extends CharacterBody2D

@onready var _animated_sprite = $AnimatedSprite2D

func _process(_delta):
    if Input.is_action_pressed("ui_right"):
        _animated_sprite.play("run")
    else:
        _animated_sprite.stop()
using Godot;

public partial class Character : CharacterBody2D
{
    private AnimatedSprite2D _animatedSprite;

    public override void _Ready()
    {
        _animatedSprite = GetNode<AnimatedSprite2D>("AnimatedSprite2D");
    }

    public override void _Process(double delta)
    {
        if (Input.IsActionPressed("ui_right"))
        {
            _animatedSprite.Play("run");
        }
        else
        {
            _animatedSprite.Stop();
        }
    }
}
Feuille de Sprite avec AnimatedSprite2D
Vous pouvez aussi facilement animer à partir d'une feuille de sprite avec la classe AnimatedSprite2D. Nous utiliserons cette feuille de sprites du domaine public :
Faites un clique-droit sur l'image et choisissez "Enregistrer l'image sous" pour la télécharger, puis copiez l'image dans le dossier de votre projet.
Configurez votre arbre de scènes de la même manière que vous le faisiez auparavant pour les images individuelles. Sélectionnez l' AnimatedSprite2D et dans sa propriété SpriteFrames, sélectionnez "New SpriteFrames".
Cliquez sur la nouvelle ressource SpriteFrames. Cette fois, lorsque le panneau inférieur apparaît, sélectionnez "Add frames from a Sprite Sheet".
Il vous sera demandé d'ouvrir un fichier. Sélectionnez votre feuille de sprite.
Une nouvelle fenêtre s'ouvrira, montrant votre feuille de sprite. La première chose à faire est de modifier le nombre d'images verticales et horizontales de votre feuille de sprites. Dans cette feuille de sprites, nous avons quatre images horizontales et deux images verticales.
Ensuite, sélectionnez les images de la feuille de sprites que vous voulez inclure dans votre animation. Nous sélectionnerons les quatre du haut, puis nous cliquerons sur "Add 4 frames" pour créer l'animation.
Vous verrez maintenant votre animation sous la liste des animations dans le panneau du bas. Double-cliquez sur le nom par défaut pour changer le nom de l'animation de saut.
Enfin, lancez la lecture du SpriteFrames dans l'inspecteur pour voir votre grenouille sauter !
Feuille de Sprite avec AnimationPlayer
Une autre façon d'animer lorsque vous utilisez une feuille de sprite est d'utiliser un nœud standard Sprite2D pour afficher la texture, puis d'animer le changement de texture avec AnimationPlayer.
Considérez cette feuille de sprite (sprite sheet), qui contient 6 images d'animation :

Faites un clique-droit sur l'image et choisissez "Enregistrer l'image sous" pour télécharger, puis copiez l'image dans votre dossier de votre projet.
Notre objectif est d’afficher ces images l’une après l’autre en boucle. Commencez par configurer votre arbre de scène :
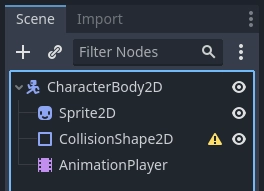
Note
Le nœud racine peut également être Area2D ou RigidBody2D. L'animation sera toujours faite de la même manière. Une fois l'animation terminée, vous pouvez attribuer une forme à CollisionShape2D. Voir Physics Introduction pour plus d'informations.
Faites glisser la feuille de sprite (sprite sheet) dans la propriété Texture du sprite et vous verrez toute la feuille affichée à l'écran. Pour la découper en images individuelles, développez la section Animation de l'inspecteur et réglez Hframes sur 6. Hframes et Vframes représente le nombre d'images horizontales et verticales dans votre feuille de sprite.
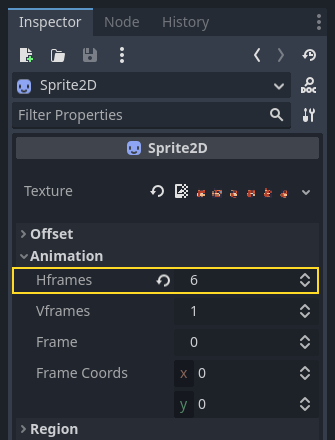
Maintenant, essayez de changer la valeur de la propriété Frame. Vous verrez qu'elles vont de 0 à 5 et que l'image affichée par le Sprite2D change en conséquence. C'est la propriété que nous allons animer.
Sélectionnez AnimationPlayer et cliquez sur le bouton "Animation" suivi de "Nouveau". Nommez la nouvelle animation "walk" (marche). Définissez la longueur de l'animation sur 0.6 et cliquez sur le bouton "Bouclage de l'animation" pour que notre animation se répète.
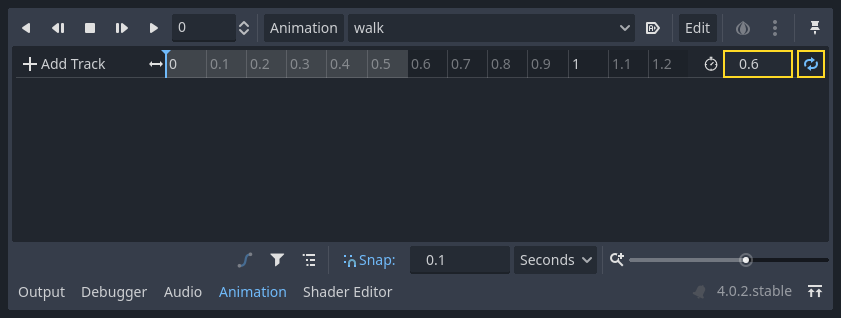
Maintenant, sélectionnez le nœud Sprite2D et cliquez sur l'icône de la clé pour ajouter une nouvelle piste.

Continuez à ajouter des images à chaque point de la timeline (0.1 secondes par défaut) jusqu'à ce que toutes les images soient comprises entre 0 et 5. Vous verrez les images apparaître dans la piste d'animation :
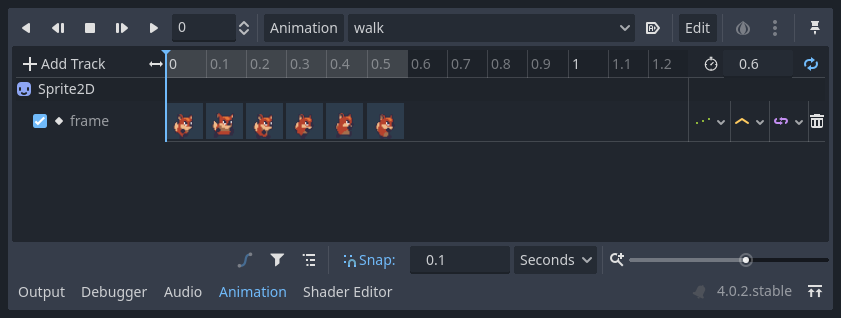
Appuyez sur "Play" pour voir à quoi ressemble l'animation.
Contrôle d'une animation AnimationPlayer
Comme avec AnimatedSprite2D, vous pouvez contrôler l'animation via le code en utilisant les méthodes play() et stop(). Encore une fois, voici un exemple pour jouer l'animation pendant que la touche fléchée droite est maintenue enfoncée, et l'arrêter quand la touche est relâchée.
extends CharacterBody2D

@onready var _animation_player = $AnimationPlayer

func _process(_delta):
    if Input.is_action_pressed("ui_right"):
        _animation_player.play("walk")
    else:
        _animation_player.stop()
using Godot;

public partial class Character : CharacterBody2D
{
    private AnimationPlayer _animationPlayer;

    public override void _Ready()
    {
        _animationPlayer = GetNode<AnimationPlayer>("AnimationPlayer");
    }

    public override void _Process(double delta)
    {
        if (Input.IsActionPressed("ui_right"))
        {
            _animationPlayer.Play("walk");
        }
        else
        {
            _animationPlayer.Stop();
        }
    }
}
Note
If updating both an animation and a separate property at once
(for example, a platformer may update the sprite's h_flip/v_flip
properties when a character turns while starting a 'turning' animation),
it's important to keep in mind that play() isn't applied instantly.
Instead, it's applied the next time the AnimationPlayer is processed.
This may end up being on the next frame, causing a 'glitch' frame,
where the property change was applied, but the animation was not.
If this turns out to be a problem, after calling play(), you can call advance(0)
to update the animation immediately.
Résumé
Ces exemples illustrent les deux classes que vous pouvez utiliser dans Godot pour l'animation 2D. AnimationPlayer est un peu plus complexe que AnimatedSprite2D, mais il offre des fonctionnalités supplémentaires, puisque vous pouvez également animer d'autres propriétés comme la position ou l'échelle. La classe AnimationPlayer peut également être utilisée avec un AnimatedSprite2D. Expérimentez pour voir ce qui fonctionne le mieux pour vos besoins.