Attention: Here be dragons
This is the latest
(unstable) version of this documentation, which may document features
not available in or compatible with released stable versions of Godot.
Checking the stable version of the documentation...
Sauter et écraser les monstres
Dans cette partie, nous allons ajouter la possibilité de sauter et d'écraser les monstres. Dans la prochaine leçon, nous ferons en sorte que le joueur meure quand un monstre le touche au sol.
Tout d'abord, nous devons modifier quelques paramètres liés aux interactions physiques. Entrez dans le monde des couches de physique.
Contrôler les interactions physiques
Les corps physiques ont accès à deux propriétés complémentaires : les calques et les masques. Les calques définissent sur quel(s) calque(s) physique se trouve un objet.
Les masques contrôlent les calques qu'un corps va écouter et détecter. Cela affecte la détection de collisions. Quand vous voulez que deux corps interagissent, il faut qu'au moins l'un d'entre eux ait un masque correspondant à l'autre.
Si cela vous paraît confus, ne vous inquiétez pas, nous allons voir trois exemples dans une seconde.
Le point important est que vous pouvez utiliser les calques et les masques pour filtrer les interactions physiques, contrôler les performances, et supprimer le besoin de conditions supplémentaires dans votre code.
Par défaut, tous les corps physiques et les zones ont leur calque et masque définis à 1. Cela signifie qu'ils peuvent tous entrer en collision les uns avec les autres.
Les calques de physique sont représentés par des nombres, mais nous pouvons leur donner des noms pour garder une trace de qui est quoi.
Définition des noms de layer
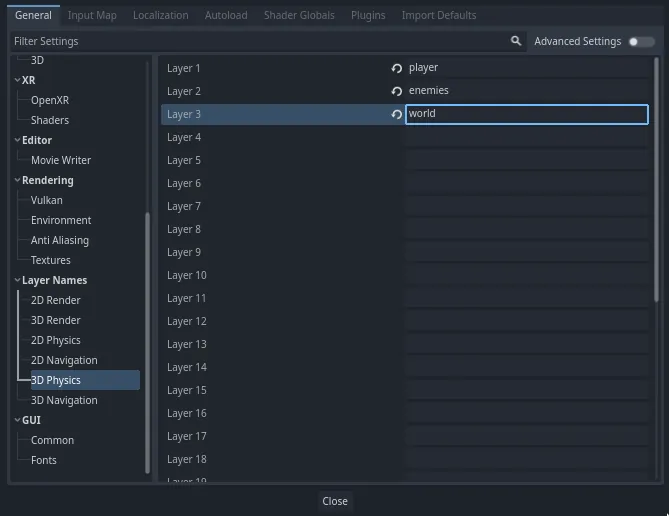
Donnons un nom à nos calques de physique. Allez dans Projet -> Paramètres du projet....

Dans le menu de gauche, naviguez jusqu'à Layer Names -> 3D Physics. Vous pouvez voir une liste de calques avec un champ à côté de chacun d'entre eux sur la droite. Vous pouvez définir leur nom ici. Nommez les trois premiers calques player, enemies, et world, respectivement.
Maintenant, nous pouvons les assigner à nos nœuds de physique.
Affectation des layers et des masks
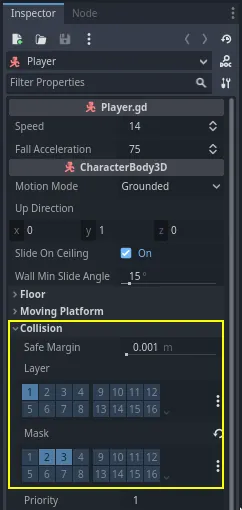
Dans la scène Main, sélectionnez le nœud Ground. Dans l'Inspecteur, développez la section Collision. Ici, vous pouvez voir les calques et masques du nœud sous la forme d'une grille de boutons.
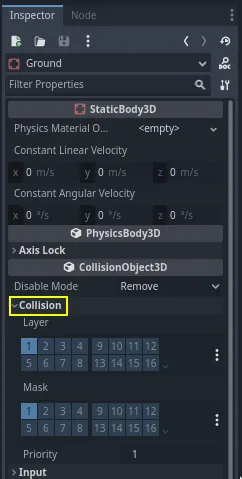
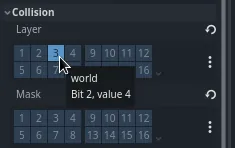
Le sol fait partie du monde, nous voulons donc qu'il fasse partie de la troisième couche. Cliquez sur le bouton allumé pour désactiver le premier Layer, puis activez le troisième. Ensuite, désactivez le Mask en cliquant dessus.
Comme mentionné ci-dessus, la propriété Mask permet à un nœud d'écouter les interactions avec les autres objets physiques, mais nous n'en avons pas besoin pour qu'il y ait des collisions. Le Ground n'a pas besoin d'écouter quoi que ce soit ; il est juste là pour empêcher les créatures de tomber.
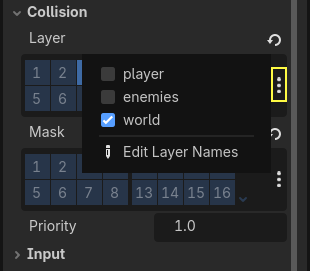
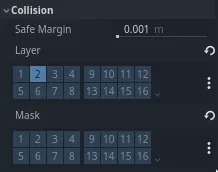
Notez que vous pouvez cliquer sur le bouton "..." à droite des propriétés pour voir une liste de cases à cocher nommées.
Ensuite viennent le Player et le Mob. Ouvrez player.tscn en double-cliquant sur le fichier dans le dock Système de fichiers.
Sélectionnez le nœud Player et définissez son Collision -> Mask sur "enemies" et "world". Vous pouvez laisser la propriété Layer par défaut car le premier calque est celui du "player".
Ensuite, ouvrez la scène Mob en double-cliquant sur mob.tscn et sélectionnez le nœud Mob.
Définissez son Collision -> Layer sur "enemies" et désactivez son Collision -> Mask, laissant le masque vide.
Ces paramètres signifient que les monstres se déplaceront les uns à travers les autres. Si vous voulez que les monstres collisionnent et glissent les uns sur les autres, activez le masque "enemies".
Note
Les mobs n'ont pas besoin de masquer le calque "world" car ils se déplacent seulement sur le plan XZ. Nous n'avons pas besoin de leur appliquer de gravité, par design.
Sauter
La mécanique de saut ne nécessite que deux lignes de code. Ouvrez le script Player. Nous avons besoin d'une valeur pour contrôler la force de saut et de mettre à jour _physics_process() pour coder le saut.
Après la ligne qui définit fall_acceleration, en haut du script, ajoutez le jump_impulse.
#...
# Vertical impulse applied to the character upon jumping in meters per second.
@export var jump_impulse = 20
// Don't forget to rebuild the project so the editor knows about the new export variable.

// ...
// Vertical impulse applied to the character upon jumping in meters per second.
[Export]
public int JumpImpulse { get; set; } = 20;
À l'intérieur de _physics_process(), ajoutez le code suivant avant le bloc move_and_slide().
func _physics_process(delta):
    #...

    # Jumping.
    if is_on_floor() and Input.is_action_just_pressed("jump"):
        target_velocity.y = jump_impulse

    #...
public override void _PhysicsProcess(double delta)
{
    // ...

    // Jumping.
    if (IsOnFloor() && Input.IsActionJustPressed("jump"))
    {
        _targetVelocity.Y = JumpImpulse;
    }

    // ...
}
C'est tout ce dont vous avez besoin pour sauter !
La méthode is_on_floor() est un outil de la classe CharacterBody3D. Elle retourne true si le corps a collisionné avec le sol pendant cette image. C'est pourquoi nous appliquons la gravité au Player : pour que nous soyons en collision avec le sol au lieu de flotter au-dessus comme les monstres.
Si le personnage est sur le sol et que le joueur appuie sur "jump", nous lui donnons instantanément une grande vitesse verticale. Dans les jeux, il faut vraiment que les contrôles soient réactifs et donnent des accélérations instantanées comme celles-ci, bien que ça soit irréaliste, c'est agréable.
Remarquez que l'axe Y est positif vers le haut. C'est différent de la 2D, où l'axe Y est positif vers le bas.
Écraser les monstres
Ajoutons ensuite la mécanique d'écrasement. Nous allons faire en sorte que le personnage rebondisse sur les monstres et les tue en même temps.
Nous avons besoin de détecter les collisions avec un monstre et de les différencier des collisions avec le sol. Pour ça, nous pouvons utiliser la fonctionnalité de tags de groupe de Godot.
Ouvrez à nouveau la scène mob.tscn et sélectionnez le nœud Mob. Allez dans le dock Groupes sur la droite pour voir une liste de groupes, ce qui vous permet d'assigner des tags à des nœuds. Cliquez sur le bouton + pour ouvrir la fenêtre Créer un nouveau groupe.
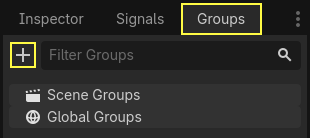
Entrez "mob" dans le champ Nom et cliquez sur le bouton Ok.

Le groupe "mob" apparaît maintenant dans la section Groupes de la scène.
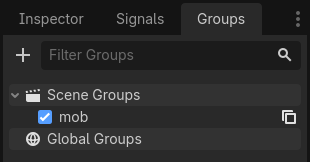
Une icône apparaît dans le dock Scène pour indiquer que le nœud fait partie d'au moins un groupe.
![]()
Nous pouvons maintenant utiliser le groupe depuis le code pour distinguer les collisions des monstres des collisions avec le sol.
Coder la mécanique d'écrasement
Retournez au script Player pour coder l'écrasement et le rebond.
En haut du script, nous avons besoin d'une autre propriété, bounce_impulse. Lorsque nous écrasons un ennemi, nous ne voulons pas nécessairement que le personnage monte aussi haut que lors d'un saut.
# Vertical impulse applied to the character upon bouncing over a mob in
# meters per second.
@export var bounce_impulse = 16
// Don't forget to rebuild the project so the editor knows about the new export variable.

// Vertical impulse applied to the character upon bouncing over a mob in meters per second.
[Export]
public int BounceImpulse { get; set; } = 16;
Ensuite, après le bout de code Jumping que nous avons ajouté dans _physics_process(), ajoutez la boucle suivante. Avec move_and_slide(), Godot fait parfois bouger le corps plusieurs fois de suite afin de fluidifier le mouvement du personnage. Nous devons donc boucler sur toutes les collisions qui ont pu se produire.
À chaque itération de la boucle, nous vérifions que nous avons atterri sur un mob. Si c'est le cas, nous le tuons et rebondissons.
Avec ce code, si aucune collision ne s'est produite sur une image donnée, la boucle ne s'exécutera pas.
func _physics_process(delta):
    #...

    # Iterate through all collisions that occurred this frame
    for index in range(get_slide_collision_count()):
        # We get one of the collisions with the player
        var collision = get_slide_collision(index)

        # If there are duplicate collisions with a mob in a single frame
        # the mob will be deleted after the first collision, and a second call to
        # get_collider will return null, leading to a null pointer when calling
        # collision.get_collider().is_in_group("mob").
        # This block of code prevents processing duplicate collisions.
        if collision.get_collider() == null:
            continue

        # If the collider is with a mob
        if collision.get_collider().is_in_group("mob"):
            var mob = collision.get_collider()
            # we check that we are hitting it from above.
            if Vector3.UP.dot(collision.get_normal()) > 0.1:
                # If so, we squash it and bounce.
                mob.squash()
                target_velocity.y = bounce_impulse
                # Prevent further duplicate calls.
                break
public override void _PhysicsProcess(double delta)
{
    // ...

    // Iterate through all collisions that occurred this frame.
    for (int index = 0; index < GetSlideCollisionCount(); index++)
    {
        // We get one of the collisions with the player.
        KinematicCollision3D collision = GetSlideCollision(index);

        // If the collision is with a mob.
        // With C# we leverage typing and pattern-matching
        // instead of checking for the group we created.
        if (collision.GetCollider() is Mob mob)
        {
            // We check that we are hitting it from above.
            if (Vector3.Up.Dot(collision.GetNormal()) > 0.1f)
            {
                // If so, we squash it and bounce.
                mob.Squash();
                _targetVelocity.Y = BounceImpulse;
                // Prevent further duplicate calls.
                break;
            }
        }
    }
}
Cela fait beaucoup de nouvelles fonctions. Voici quelques informations supplémentaires à leur sujet.
Les fonctions get_slide_count() et get_slide_collision() viennent toutes les deux de la classe CharacterBody3D et sont liées à move_and_slide().
get_slide_collision() retourne un objet KinematicCollision3D qui contient des informations sur le lieu et la manière dont la collision s'est produite. Par exemple, nous utilisons sa propriété get_collider pour vérifier si nous sommes entrés en collision avec un "mob", en appelant is_in_group() dessus : collision.get_collider().is_in_group("mob").
Note
La méthode is_in_group() est disponible sur chaque Node.
Pour vérifier que nous atterrissons sur le monstre, nous utilisons le produit scalaire de vecteurs : Vector3.UP.dot(collision.get_normal()) > 0.1. La normale de la collision est un vecteur 3D qui est perpendiculaire au plan sur lequel la collision s'est produite. Le produit scalaire nous permet de la comparer à la direction vers le haut.
Avec les produits scalaires, quand le résultat est supérieur à 0, les deux vecteurs forment un angle inférieur à 90 degrés. Une valeur plus grande que 0.1 nous indique que nous sommes à peu près au-dessus du monstre.
Après avoir géré la logique de squash et de rebond, nous terminons la boucle prématurément via l'instruction break afin d'éviter les appels répétés à mob.squash(), qui pourraient entraîner des bugs involontaires tels que le comptage du score plusieurs fois pour un seul kill.
Nous appelons une fonction indéfinie, mob.squash(), que nous devons donc ajouter à la classe Mob.
Ouvrez le script mob.gd en double-cliquant dessus dans le dock Système de fichiers. En haut du script, nous voulons définir un nouveau signal nommé squashed (écrasé). Et en bas, vous pouvez ajouter la fonction squash, d'où nous émettrons le signal et détruirons le mob.
# Emitted when the player jumped on the mob.
signal squashed

# ...


func squash():
    squashed.emit()
    queue_free()
// Don't forget to rebuild the project so the editor knows about the new signal.

// Emitted when the player jumped on the mob.
[Signal]
public delegate void SquashedEventHandler();

// ...

public void Squash()
{
    EmitSignal(SignalName.Squashed);
    QueueFree();
}
Note
Lors de l'utilisation de C#, Godot créera les événements appropriés automatiquement pour tous les signaux finissant par EventHandler, voir C# Signals.
Nous utiliserons le signal pour ajouter des points au score dans la prochaine leçon.
Avec ceci, vous devriez pouvoir tuer les monstres en leur sautant dessus. Vous pouvez appuyer sur F5 pour essayer le jeu et définir main.tscn comme la scène principale de votre projet.
Cependant, le joueur ne mourra pas encore. Nous y travaillerons dans la partie suivante.