Attention: Here be dragons
This is the latest
(unstable) version of this documentation, which may document features
not available in or compatible with released stable versions of Godot.
Checking the stable version of the documentation...
Créer l'ennemi
Il est temps maintenant de créer des ennemis que notre joueur devra esquiver. Leur comportement ne sera pas très complexe : des monstres vont apparaître au hasard aux bords de l'écran et se déplacer dans une direction aléatoire en ligne droite, puis disparaître lorsqu'ils sortent de l'écran.
Nous allons créer une scène Mob, que nous pouvons ensuite instancier pour créer un nombre quelconque de monstres indépendants dans le jeu.
Configuration du nœud
Cliquez sur Scène -> Nouvelle scène dans le menu principal et ajoutez les nœuds suivants :
RigidBody2D (nommé
Mob)
Don't forget to set the children so they can't be selected, like you did with
the Player scene. This is done by selecting the parent node (RigidBody2D) in the
Scene tree dock, then using the button at the top of the 2D editor
(Ctrl + G or Cmd + G on macOS).
Sélectionnez le nœud Mob et définissez sa propriété Gravity Scale dans la section RigidBody2D de l'inspecteur sur 0. Cela empêchera l'ennemi de tomber vers le bas.
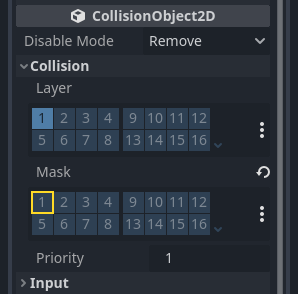
In addition, in the Mob node inspector,
under the CollisionObject2D
section, expand the Collision group and
uncheck the 1 inside the Mask property.
This will ensure the mobs do not collide with each other.
Configurez l'AnimatedSprite2D comme vous l'avez fait pour le joueur. Cette fois, nous avons 3 animations : fly, swim, et walk. Il y a deux images pour chaque animation dans le dossier art.
La propriété Animation Speed doit être définie pour chaque animation individuelle. Ajustez-le à 3 pour les 3 animations.
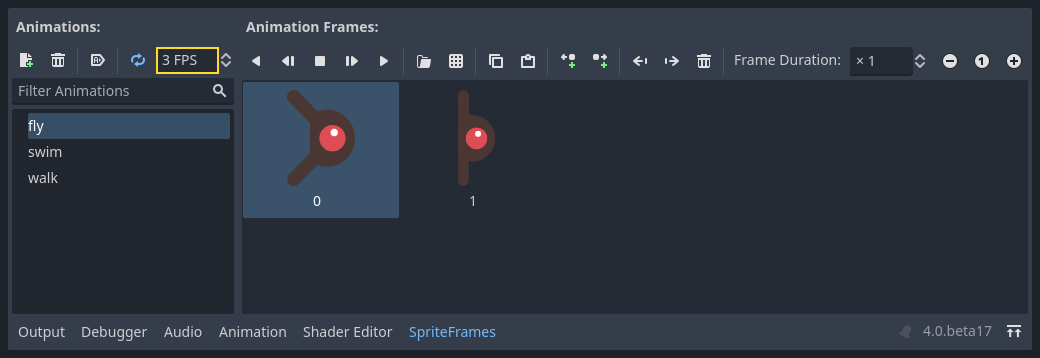
Vous pouvez utiliser les boutons "Play Animation" à droite du champ de saisie Animation Speed pour prévisualiser vos animations.
Nous allons choisir une de ces animations au hasard pour que les monstres aient une certaine variété.
Comme les images du joueur, ces images de monstre doivent être réduites. Réglez la propriété Scale d' AnimatedSprite2D sur (0.75, 0.75).
Comme dans la scène Player, ajouter un CapsuleShape2D pour la collision. Pour aligner la forme avec l'image, vous aurez besoin de paramétrer la propriété Rotation à 90 (sous "Transform" dans l'inspecteur).
Enregistrer la scène.
Script de l'ennemi
Ajoutez un script au Mob comme ceci :
extends RigidBody2D
using Godot;

public partial class Mob : RigidBody2D
{
    // Don't forget to rebuild the project.
}
Maintenant, regardons le reste du script. Dans _ready(), nous jouons l'animation et choisissons au hasard un des trois types d'animation :
func _ready():
    var mob_types = Array($AnimatedSprite2D.sprite_frames.get_animation_names())
    $AnimatedSprite2D.animation = mob_types.pick_random()
    $AnimatedSprite2D.play()
public override void _Ready()
{
    var animatedSprite2D = GetNode<AnimatedSprite2D>("AnimatedSprite2D");
    string[] mobTypes = animatedSprite2D.SpriteFrames.GetAnimationNames();
    animatedSprite2D.Play(mobTypes[GD.Randi() % mobTypes.Length]);
}
Tout d'abord, nous obtenons la liste des noms d'animation à partir de la propriété sprite_frames de l'AnimatedSprite2D. On obtient ainsi un tableau contenant les trois noms d'animation : ["walk", "swim", "fly"].
Dans le code GDScript, nous utilisons la méthode Array.pick_random pour sélectionner un de ces noms d'animation au hasard. Autrement, dans le code C#, on choisit un numéro aléatoire entre 0 et 2 pour sélectionner un de ces noms dans la liste (les indices de tableau commençant à 0). L'expression GD.Randi() % n désigne un entier aléatoire entre 0 et n-1.
Enfin, nous appelons play() pour commencer à jouer l'animation choisie.
La dernière étape consiste à faire en sorte que les monstres s'effacent lorsqu'ils quittent l'écran. Connectez le signal screen_exited() du nœud VisibleOnScreenNotifier2D au Mob et ajoutez ce code :
func _on_visible_on_screen_notifier_2d_screen_exited():
    queue_free()
// We also specified this function name in PascalCase in the editor's connection window.
private void OnVisibleOnScreenNotifier2DScreenExited()
{
    QueueFree();
}
queue_free() est une fonction qui essentiellement 'libère', ou supprime, le nœud à la fin de la trame.
Cela complète la scène Mob.
Le joueur et les ennemis étant prêts, dans la partie suivante, nous allons les réunir dans une nouvelle scène. Nous ferons en sorte que les ennemis apparaissent de manière aléatoire sur le plateau de jeu et avancent, transformant notre projet en un jeu jouable.