Attention: Here be dragons
This is the latest
(unstable) version of this documentation, which may document features
not available in or compatible with released stable versions of Godot.
Checking the stable version of the documentation...
Utilisation de GridMaps
Introduction
Gridmaps sont un outil pour créer des niveaux de jeu 3D, similaire à la manière dont TileMap fonctionne en 2D. Vous commencez avec une collection prédéfinie de maillages 3D (une MeshLibrary) qui peuvent être placés sur une grille, comme si vous construisiez un niveau avec un nombre illimité de blocs Lego.
Les collisions et la navigation peuvent également être ajoutées aux maillages, tout comme vous le feriez avec les tuiles d'une carte en mosaïque.
Exemple de projets
Pour apprendre comment fonctionnent les GridMaps, commencez par télécharger le projet d'exemple :gridmap_starter.zip.
Unzip this project and add it to the Project Manager using the "Import" button. You may get a popup saying that it needs to be converted to a newer Godot version, click Convert project.godot.
Création d’une MeshLibrary
Pour commencer, vous avez besoin d'une MeshLibrary, qui est une collection de maillages individuels qui peuvent être utilisés dans la gridmap. Ouvrez la scène "mesh_library_source.tscn" pour voir un exemple de configuration de la bibliothèque de maillages.

Comme vous pouvez le voir, cette scène a un nœud Node3D comme racine, et un certain nombre d'enfants MeshInstance3D.
Si vous n'avez pas besoin de physique dans votre scène, alors c'est fini. Cependant, dans la plupart des cas, vous voudrez assigner des corps de collision aux mailles.
Collisions
Vous pouvez assigner manuellement un StaticBody3D et un CollisionShape3D à chaque maillage. Vous pouvez également utiliser le menu "Maillage" pour créer automatiquement le corps de collision en fonction des données du maillage.

Notez qu'un corps de collision "convexe" fonctionnera mieux pour des mailles simples. Pour des formes plus complexes, sélectionnez "Create Trimesh Static Body". Une fois que chaque maille a un corps physique et une forme de collision assignés, votre bibliothèque de mailles est prête à être utilisée.

Matériaux
Seuls les matériaux provenant des mailles sont utilisés lors de la génération de la bibliothèque de mailles. Les matériaux définis sur le nœud seront ignorés.
Maillages de Navigation
Comme toutes les instances de maillages, une ressource NavigationMesh peut être assignée aux objets MeshLibrary ; celle-ci peut être créée manuellement, ou précalculée comme décrit ci-dessous.
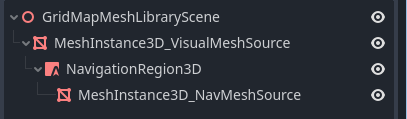
Pour créer la NavigationMesh depuis une exportation de scène MeshLibrary, placez un nœud enfant NavigationRegion3D en dessous du MeshInstance3D principal de l'élément GridMap. Ajoutez une ressource NavigationMesh valide à la NavigationRegion3D ainsi que des nœuds sources de géométries en dessous puis précalculez la NavigationMesh.
Note
Avec les cellules de petites grilles, il est souvent nécessaire de réduire les propriétés du rayon des agents et la taille minimum de la région de la NavigationMesh.
Nodes below the NavigationRegion3D are ignored for the MeshLibrary scene export, so additional nodes can be added as source geometry just for baking the navmesh.
Avertissement
La taille de cellule précalculée du NavigationMesh doit correspondre à la taille de cellule de la carte du NavigationServer afin de correctement fusionner les maillages de navigation des cellules des différentes grilles.
Lightmaps
It is possible to bake lightmaps onto a GridMap. Lightmap UV2 data will be reused from meshes if already present. If UV2 data is not present, then it will be automatically generated on bake with a lightmap texel size of 0.1 units. To generate UV2 data with a different lightmap texel size, you can set the global illumination mode in the Import dock to Static Lightmaps and specify the texel size there. This option must be changed before the scene is converted to a MeshLibrary, as changing it later on will not affect the existing MeshLibrary data.
Aside from this peculiarity, the lightmap baking process is the same as for any other 3D scene. See Usage de l'illumination globale par lightmap for more information about lightmap baking.
Le format MeshLibrary
To summarize the specific constraints of the MeshLibrary format, a MeshLibrary scene has a Node3D as the root node, and several child nodes which will become MeshLibrary items. Each child of the root node should:
Be a MeshInstance3D, which will become the MeshLibrary item. Only this visual mesh will be exported.
Have a material, in the mesh's material slot, not the MeshInstance3D's material slots.
Have up to one StaticBody3D child, for collision. The StaticBody3D should have one or more CollisionShape3D children.
Have up to one NavigationRegion3D child, for navigation. The NavigationRegion3D can have one or more additional MeshInstance3D children, which can be baked for navigation, but won't be exported as a visual mesh.
Only this specific format is recognized. Other node types placed as children will not be recognized and exported. GridMap is not a general-purpose system for placing nodes on a grid, but rather a specific, optimized system, designed to place meshes with collisions and navigation.
Exportation de la MeshLibrary
Pour exporter la bibliothèque, cliquez sur Scene > Exporter sous... > MeshLibrary..., et enregistrez-la comme ressource.

Vous pouvez trouver une MeshLibrary déjà exportée dans le projet nommé MeshLibrary.tres.
Utilisation de GridMap
Créez une nouvelle scène et ajoutez un nœud GridMap. Ajoutez la bibliothèque de maillages en faisant glisser le fichier ressource depuis le dock FileSystem et en le déposant dans la propriété Mesh Library de l'Inspecteur.

Propriétés dans l'inspecteur
The Physics Material setting allows you to override the physics material for every mesh in the NavigationMesh.
Under Cells, the Size property should be set to the size of your meshes. You can leave it at the default value for the demo. Uncheck the Center Y property.
The Collision options allow you to set the collision layer, collision mask, and priority for the entire grid. For more information on how those work see the Physique section.
Under Navigation is the "Bake Navigation" option. If enabled it creates a navigation region for each cell that uses a mesh library item with a navigation mesh.
If you click on the MeshLibrary itself in the inspector you can adjust settings for individual meshes, such as their navigation mesh, navigation layers, or if the mesh casts shadows.

GridMap panel
At the bottom of the editor is the GridMap panel, which should have opened automatically when you added the GridMap node.

De gauche à droite dans la barre d'outils :
Transform: Adds a gizmo to the scene that allows you to change the relative position and rotation of the gridmap in the scene.
Selection: While active you can select an area in the viewport, click and drag to select more than one space on the grid.
Erase: While active, click in the viewport and delete meshes.
Paint: While active, click in the viewport and add whatever mesh is currently selected in the GridMap panel to the scene.
Pick: While active, clicking on a gridmap mesh in the viewport will cause it to be selected in the GridMap panel.
Fill: Fill the area that has been selected in the viewport with whatever mesh is selected in the GridMap bottom panel.
Move: Move whatever mesh or meshes are currently selected in the viewport.
Duplicate: Create a copy of whatever the selected mesh or meshes in the GridMap are.
Delete: Similar to erase, but for the entire selected area.
Cursor Rotate X: While the paint tool is selected, this will rotate the mesh that will be painted on the X-axis. This will also rotate selected areas if they are being moved.
Cursor Rotate Y: While the paint tool is selected, this will rotate the mesh that will be painted on the Y-axis. This will also rotate selected areas if they are being moved.
Cursor Rotate Z: While the paint tool is selected, this will rotate the mesh that will be painted on the Z-axis. This will also rotate selected areas if they are being moved.
Change Grid Floor: Adjusts what floor is currently being worked on. Can be changed with the arrows, typing a value in the field, or Ctrl + Mouse wheel.
Filter Meshes: Used to search for a specific mesh in the bottom panel.
Zoom: Controls the zoom level on meshes in the bottom panel.
Layout toggles: These two buttons toggle between different layouts for meshes in the bottom panel.
Tools dropdown: This button opens a dropdown menu with a few more options.

Clicking on Settings in that dropdown brings up a window that allows you to change the Pick Distance, which is the maximum distance at which tiles can be placed on a GridMap, relative to the camera position (in meters).
Utiliser GridMap dans le code
Voir GridMap pour plus de détails sur les méthodes du nœud et les variables membres.