Attention: Here be dragons
This is the latest
(unstable) version of this documentation, which may document features
not available in or compatible with released stable versions of Godot.
Checking the stable version of the documentation...
Processus d’importation
Importer des ressources dans Godot
To import assets in Godot, place your assets (image files, scenes, audio files, fonts, etc) directly in the project folder. There are 2 ways to achieve this:
For any file type: Copy files manually with your operating system's file manager.
For file types that can be imported by Godot: Drag-and-drop files from the operating system's file manager to the editor's FileSystem dock. This only works with resource file types (i.e. file types that Godot can import).
Godot will automatically import these files internally and keep the imported
resources hidden in a res://.godot/imported/ folder.
Cela signifie que lorsque vous essayez d'accéder à des ressources importées par le code, vous devez utiliser le Resource Loader car il prendra automatiquement en compte l'endroit où les fichiers internes sont enregistrés. Si vous essayez d'accéder à une ressource importée en utilisant la classe FileAccess, cela fonctionnera dans l'éditeur, mais pas dans le projet exporté.
Cependant, la classe Resource Loader ne peut pas accéder aux fichiers non importés. Seule la classe FileAccess le peut.
Changer les paramètres d’importation
Note
Import parameters are only present in non-native Godot resource types.
This means Godot's own scene and resource file formats (.tscn, .scn,
.tres, .res) don't have import options you can select in the Import
dock.
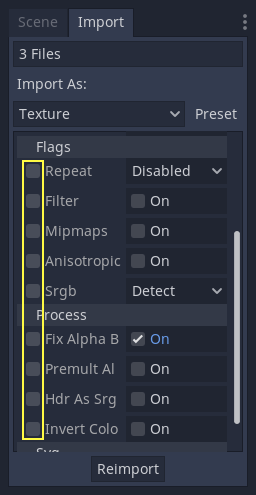
Pour changer les paramètres d’importation d’un asset dans Godot, sélectionnez la ressource concernée dans le dock du système de fichiers :

After adjusting the parameters, click Reimport. Be careful: if you select another file in the FileSystem dock before clicking Reimport, changes will be discarded. After clicking Reimport, the chosen parameters will only be used for this asset and on future reimports.
Changing the import parameters of several assets at the same time is also possible. Select all of them together in the FileSystem dock and the exposed parameters will apply to all of them when reimporting.
Réimporter plusieurs assets
En travaillant sur un projet, vous pouvez constater que plusieurs assets doivent avoir les mêmes paramètres modifiés, comme l'activation des mipmaps, mais que vous ne voulez que ces paramètres spécifiques uniquement soient modifiés. Pour ce faire, sélectionnez chaque asset que vous souhaitez réimporter dans le système de fichiers. Dans l'onglet d'importation, il y aura désormais une case à cocher à gauche de chaque paramètre d'importation.
Cochez la case des paramètres que vous souhaitez modifier sur vos assets importés, puis modifiez les paramètres normalement. Enfin, cliquez sur le bouton de réimportation et chaque asset sélectionné sera réimporté avec uniquement les paramètres modifiés.
Réimportation automatique
Lorsque que la somme de contrôle MD5 d’une ressource change, Godot effectuera une réimportation automatique de celle-ci, en appliquant les paramètres configurés pour cette ressource spécifique.
Ignorer des dossiers spécifiques
Sometimes, you have files that you don't want to be imported by Godot, such as images used in a game's press kit or promotional materials. You can place those files in a folder that you instruct Godot to ignore. Ignoring a folder ensures it is not imported by Godot; this also hides the folder from the FileSystem dock. Ignoring a folder also results in its contents not being exported with the project, therefore reducing the exported PCK size.
See Ignorer des dossiers spécifiques in the project organization tutorial for details.
Fichiers générés
Importer ajoutera un fichier <asset>.import en plus, contenant la configuration d’importation.
Make sure to commit these files to your version control system, as these files contain important metadata.
ls
example.png
example.png.import
project.godot
Additionally, extra assets will be present in the hidden
res://.godot/imported/ folder:
ls .godot/imported
example.png-218a8f2b3041327d8a5756f3a245f83b.ctex
example.png-218a8f2b3041327d8a5756f3a245f83b.md5
Si l'un des fichiers présents dans ce dossier est effacé (ou le dossier entier), la ou les ressources seront réimportées automatiquement. Ainsi, commit le dossier .godot/ sur le système de contrôle de version n'est pas recommandé. Bien que commit ce dossier permet de gagner du temps sur la réimportation lors de la vérification sur un autre ordinateur, cela prend beaucoup plus de place et de bande passante.
The default version control metadata that can be generated on project creation
will automatically ignore the .godot/ folder.
Changer le type d’importation de ressource
Some source assets can be imported as different types of resources. For this, select the relevant type of resource desired then click Reimport:

Select Keep File (exported as is) as resource type to skip file import, files
with this resource type will be preserved as is during project export.
Select Skip File (not exported) as resource type to skip file import and ignore
file during project export.
Changer les paramètres d’importation par défaut
Different types of projects might require different defaults. Changing the import options to a predefined set of options can be achieved by using the Preset... Menu. Besides some resource types offering presets, the default settings can be saved and cleared too:

The default import parameters for a given resource type can be changed project-wide using the Import Defaults tab of the Project Settings dialog:

Further reading
This workflow takes a little time to get used to, but it enforces a more correct way to deal with resources.
Il existe de nombreux types de ressources disponibles pour l’importation. Continuez ci-après votre lecture pour comprendre comment les utiliser :