Attention: Here be dragons
This is the latest
(unstable) version of this documentation, which may document features
not available in or compatible with released stable versions of Godot.
Checking the stable version of the documentation...
Score et rejouer
Dans cette partie, nous ajouterons le score, la lecture de la musique et la possibilité de redémarrer le jeu.
Nous devons garder la trace du score actuel dans une variable et l'afficher à l'écran en utilisant une interface minimale. Nous allons utiliser une étiquette de texte pour ce faire.
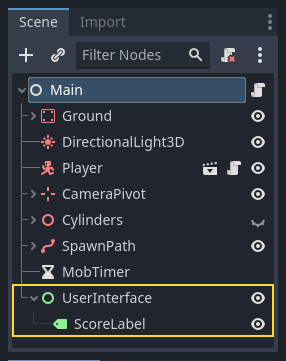
Dans la scène principale, ajoutez un nouveau nœud Control comme enfant de Main et nommez-le UserInterface. Assurez-vous d'être sur l'écran 2D, où vous pourrez modifier votre interface utilisateur (UI).
Ajoutez un nœud Label et nommez le ScoreLabel
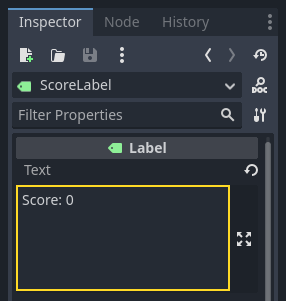
Dans l'Inspecteur, définissez le Text du Label avec un texte générique tel que "Score : 0".
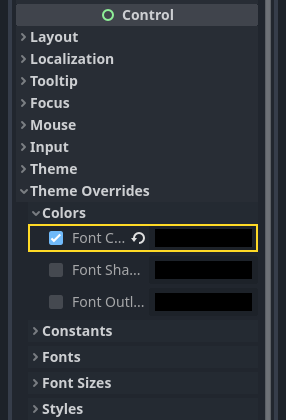
En outre, le texte est blanc par défaut, comme l'arrière-plan de notre jeu. Nous devons changer sa couleur pour le voir au moment de l'exécution.
Faites défiler l'écran vers le bas jusqu'à Redéfinition du thème, développez Couleurs et activez Couleur de la police pour teinter le texte en noir (ce qui contrastera bien avec le blanc de la scène 3D)
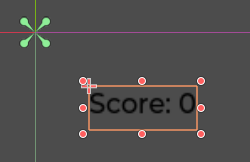
Enfin, cliquez et faites glisser le texte dans la fenêtre d'affichage pour l'éloigner du coin supérieur gauche.
Le nœud UserInterface nous permet de regrouper notre interface utilisateur dans une branche de l'arbre de scène et d'utiliser une ressource de thème qui se propagera à tous ses enfants. Nous allons l’utiliser pour définir la police de caractères de notre jeu.
Création d'un thème d'interface utilisateur
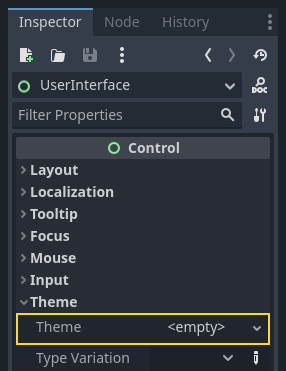
Une fois encore, sélectionnez le nœud UserInterface. Dans l'Inspecteur, créez une nouvelle ressource de thème dans Theme -> Theme.
Cliquez dessus pour ouvrir l'éditeur de thème dans le panneau inférieur. Il vous donne un aperçu de l'apparence de tous les widgets intégrés à l'interface utilisateur avec votre ressources de thème.
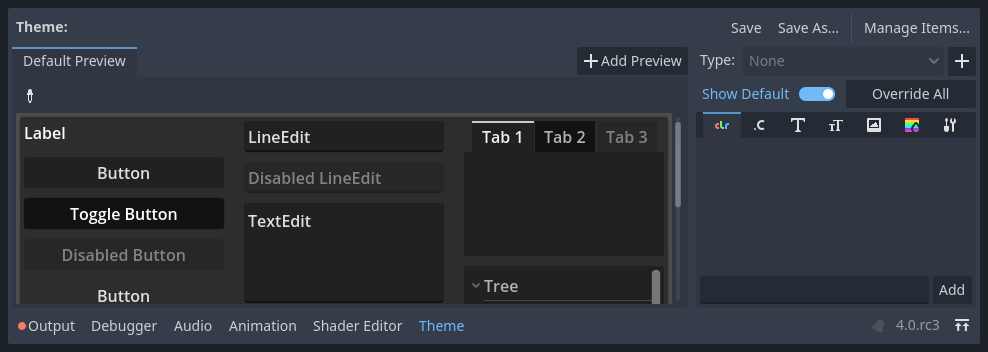
Par défaut, un thème ne possède que quelques propriétés : Default Base Scale, Default Font et Default Font Size.
Voir aussi
Vous pouvez ajouter d'autres propriétés à la ressource de thème pour concevoir des interfaces utilisateur complexes, mais cela dépasse le cadre de cette série. Pour en savoir plus sur la création et l'édition de thèmes, consultez Introduction à l'habillage des interfaces graphiques.
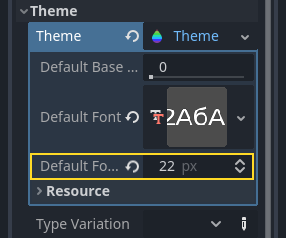
La propriété Default Font attend un fichier de police comme ceux que vous avez sur votre ordinateur. Deux formats de fichiers de police habituels sont TrueType Font (TTF) et OpenType Font (OTF).
Dans le dock Système de fichiers, développez le répertoire fonts et cliquez et faites glisser le fichier Montserrat-Medium.ttf que nous avons inclus dans le projet via Default Font. Le texte réapparaîtra dans l'aperçu du thème.
Le texte est un peu petit. Réglez le paramètre Default Font Size sur 22 pixels pour augmenter la taille du texte.
Garder une trace du score
Travaillons ensuite sur le score. Attachez un nouveau script au ScoreLabel et définissez la variable score.
extends Label

var score = 0
using Godot;

public partial class ScoreLabel : Label
{
    private int _score = 0;
}
Le score devrait augmenter de 1 chaque fois que nous écrasons un monstre. Nous pouvons utiliser leur signal squashed pour savoir quand cela se produit. Cependant, comme nous instancions les monstres à partir du code, nous ne pouvons pas utiliser l'éditeur pour connecter le signal du mob à ScoreLabel.
Au lieu de cela, nous devons établir la connexion depuis le code à chaque fois que nous créons un monstre.
Ouvrez le script main.gd. S'il est toujours ouvert, vous pouvez cliquer sur son nom dans la colonne de gauche de l'éditeur de script.
Vous pouvez également double-cliquer sur le fichier main.gd dans le dock FileSystem.
Au bas de la fonction _on_MobTimer_timeout(), ajoutez la ligne suivante :
func _on_mob_timer_timeout():
    #...
    # We connect the mob to the score label to update the score upon squashing one.
    mob.squashed.connect($UserInterface/ScoreLabel._on_mob_squashed.bind())
private void OnMobTimerTimeout()
{
    // ...
    // We connect the mob to the score label to update the score upon squashing one.
    mob.Squashed += GetNode<ScoreLabel>("UserInterface/ScoreLabel").OnMobSquashed;
}
Cette ligne signifie que lorsque le mob émet le signal squashed, le nœud ScoreLabel le recevra et appellera la fonction _on_mob_squashed().
Retournez au script score_label.gd pour définir la fonction de rappel _on_mob_squashed().
Là, nous incrémentons le score et mettons à jour le texte affiché.
func _on_mob_squashed():
    score += 1
    text = "Score: %s" % score
public void OnMobSquashed()
{
    _score += 1;
    Text = $"Score: {_score}";
}
La deuxième ligne utilise la valeur de la variable score pour remplacer le caractère générique %s. En utilisant cette fonctionnalité, Godot convertit automatiquement les valeurs en texte, ce qui est pratique pour sortir du texte dans les étiquettes ou lorsqu'on utilise la fonction print().
Voir aussi
Vous pouvez en savoir plus sur le formatage des chaînes de caractères ici : Chaînes de format en GDScript. En C#, envisagez d'utiliser interpolation de chaîne avec "$".
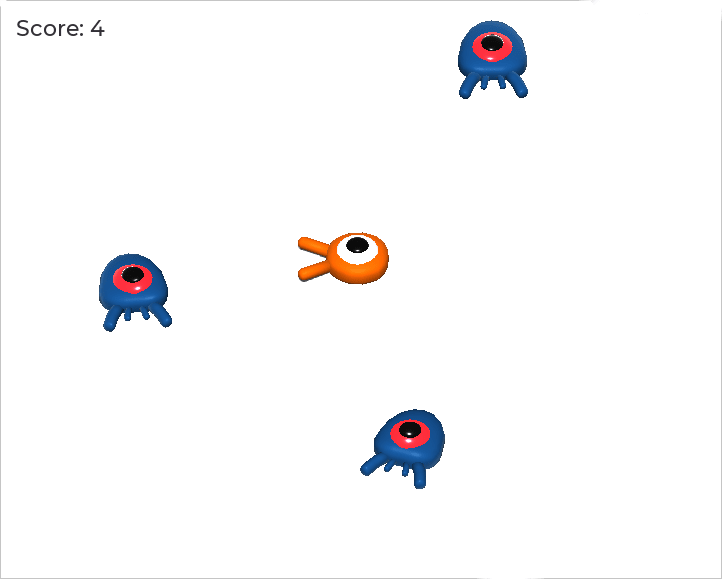
Vous pouvez maintenant jouer le jeu et écraser quelques ennemis pour voir le score augmenter.
Note
Dans un jeu complexe, vous voudrez peut-être séparer complètement votre interface utilisateur de l'univers du jeu. Dans ce cas, vous ne garderez pas trace du score sur l'étiquette. Au lieu de cela, vous voudrez peut-être le stocker dans un objet distinct et dédié. Mais pour le prototypage ou lorsque votre projet est simple, il est bon de garder votre code simple. La programmation est toujours un exercice d'équilibre.
Réessayer le jeu
Nous allons maintenant ajouter la possibilité de rejouer après être mort. Lorsque le joueur meurt, nous affichons un message à l'écran et nous attendons une entrée.
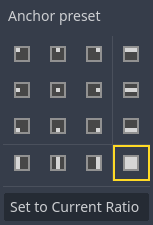
Revenez à la scène main.tscn, sélectionnez le nœud UserInterface, ajoutez un nœud enfant ColorRect nommé Retry. Ce nœud remplit un rectangle avec une couleur uniforme et servira de superposition pour assombrir l'écran.
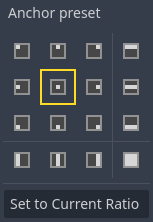
Pour qu'il s'étende sur toute la fenêtre, vous pouvez utiliser le menu Anchor Preset de la barre d'outils.

Ouvrez-le et appliquez la commande Full Rect.
Rien ne se passe. Enfin, presque rien : seules les quatre broches vertes se déplacent vers les coins de la boîte de sélection.
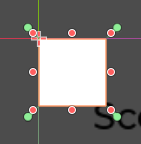
En effet, les nœuds d'interface utilisateur (tous ceux qui ont une icône verte) fonctionnent avec des ancres et des marges relatives à la boîte englobante de leur parent. Ici, le nœud UserInterface a une petite taille et le nœud Retry est limité par celle-ci.
Sélectionnez UserInterface et appliquez Anchor Preset -> Full Rect à celle-ci également. Le nœud Retry devrait maintenant couvrir la totalité de la fenêtre.
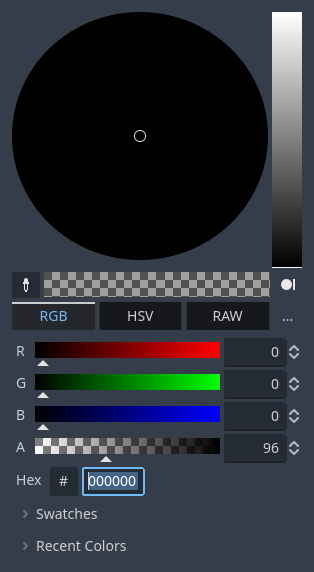
Changeons sa couleur pour qu'il assombrisse la zone de jeu. Sélectionnez Retry et dans l'Inspecteur, définissez sa Couleur sur quelque chose de sombre et de transparent. Pour ce faire, dans le sélecteur de couleurs, faites glisser le curseur A vers la gauche. Il contrôle le canal alpha de la couleur, c'est-à-dire son opacité/transparence.
Ensuite, ajoutez un Label comme enfant de Retry et donnez-lui le Texte "Appuyez sur Entrée pour réessayer.". Pour le déplacer et l'ancrer au centre de l'écran, appliquez-lui Anchor Preset -> Center.
Coder l'option réessayer
Nous pouvons maintenant nous diriger vers le code pour afficher et cacher le nœud Retry lorsque le joueur meurt et rejoue.
Ouvrez le script main.gd. Tout d'abord, nous voulons cacher la superposition au début du jeu. Ajoutez cette ligne à la fonction _ready().
func _ready():
    $UserInterface/Retry.hide()
public override void _Ready()
{
    GetNode<Control>("UserInterface/Retry").Hide();
}
Ensuite, quand le joueur est touché, nous montrons la surimpression.
func _on_player_hit():
    #...
    $UserInterface/Retry.show()
private void OnPlayerHit()
{
    //...
    GetNode<Control>("UserInterface/Retry").Show();
}
Enfin, lorsque le nœud Retry est visible, nous devons écouter l'entrée du joueur et redémarrer le jeu s'il appuie sur la touche Entrée. Pour ce faire, nous utilisons le callback intégré _unhandled_input(). Ce callback est déclenché sur toute entrée.
Si le joueur a appuyé sur l'action d'entrée prédéfinie ui_accept et que Retry est visible, nous rechargeons la scène actuelle.
func _unhandled_input(event):
    if event.is_action_pressed("ui_accept") and $UserInterface/Retry.visible:
        # This restarts the current scene.
        get_tree().reload_current_scene()
public override void _UnhandledInput(InputEvent @event)
{
    if (@event.IsActionPressed("ui_accept") && GetNode<Control>("UserInterface/Retry").Visible)
    {
        // This restarts the current scene.
        GetTree().ReloadCurrentScene();
    }
}
La fonction get_tree() nous donne accès à l'objet global SceneTree, qui nous permet de recharger et de redémarrer la scène actuelle.
Ajouter de la musique
Pour ajouter une musique qui joue continuellement en arrière-plan, nous allons utiliser une autre fonctionnalité de Godot : autoloads.
Pour lire de l'audio, il suffit d'ajouter un nœud AudioStreamPlayer à votre scène et d'y attacher un fichier audio. Lorsque vous démarrez la scène, elle peut jouer automatiquement. Cependant, lorsque vous rechargez la scène, comme nous le faisons pour rejouer, les nœuds audio sont également réinitialisés, et la musique reprend depuis le début.
Vous pouvez utiliser la fonction autoload pour que Godot charge automatiquement un nœud ou une scène au début du jeu, en dehors de la scène actuelle. Vous pouvez également l'utiliser pour créer des objets accessibles à tous.
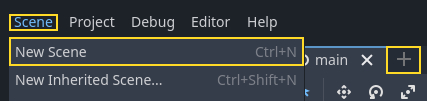
Créez une nouvelle scène en allant dans le menu Scène et en cliquant sur Nouvelle scène ou en utilisant l'icône + juxtaposée à votre scène actuellement ouverte.
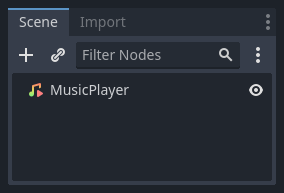
Cliquez sur le bouton Autre nœud pour créer un AudioStreamPlayer et nommez-le MusicPlayer.
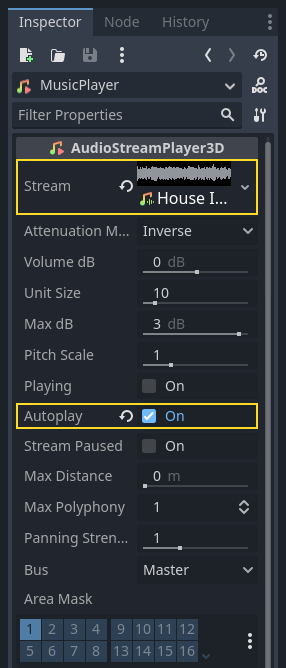
Nous avons inclus une bande sonore dans le répertoire art/, House In a Forest Loop.ogg. Cliquez et faites-la glisser sur la propriété Stream dans l'Inspector. Activez également l'option Autoplay pour que la musique soit jouée automatiquement au début du jeu.
Enregistrez la scène sous le nom de music_player.tscn.
Nous devons l'enregistrer en tant qu'autoload. Allez dans le menu Projet -> Paramètres du projet... et cliquez sur l'onglet Généraux -> Autoload.
Dans le champ Chemin, vous voulez entrer le chemin d'accès à votre scène. Cliquez sur l'icône du dossier pour ouvrir le navigateur de fichiers et double-cliquez sur music_player.tscn. Ensuite, cliquez sur le bouton Add à droite pour enregistrer le nœud.

music_player.tscn se charge maintenant dans toutes les scènes que vous ouvrez ou jouez. Ainsi, si vous lancez le jeu maintenant, la musique sera jouée automatiquement dans n'importe quelle scène.
Avant de conclure cette leçon, voici un bref aperçu de son fonctionnement. Lorsque vous lancez le jeu, votre dock Scene change pour vous donner deux onglets : Remote et Local.
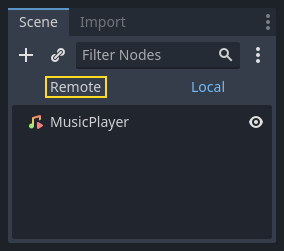
L'onglet Remote vous permet de visualiser l'arbre de nœuds de votre jeu en cours. Vous y verrez le nœud Main et tout ce que la scène contient ainsi que les mobs instanciés en bas.
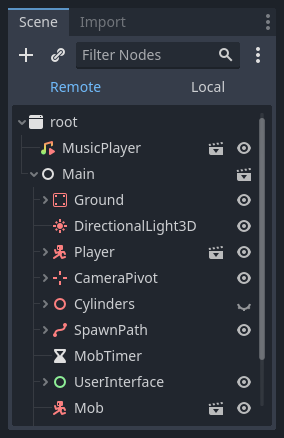
Au sommet se trouvent le MusicPlayer autochargé et un nœud root, qui est le viewport (fenêtre d'affichage) de votre jeu.
Et c'est tout pour cette leçon. Dans la prochaine partie, nous ajouterons une animation pour rendre le jeu plus agréable à regarder et à toucher.
Voici le script complet main.gd pour référence.
extends Node

@export var mob_scene: PackedScene

func _ready():
    $UserInterface/Retry.hide()


func _on_mob_timer_timeout():
    # Create a new instance of the Mob scene.
    var mob = mob_scene.instantiate()

    # Choose a random location on the SpawnPath.
    # We store the reference to the SpawnLocation node.
    var mob_spawn_location = get_node("SpawnPath/SpawnLocation")
    # And give it a random offset.
    mob_spawn_location.progress_ratio = randf()

    var player_position = $Player.position
    mob.initialize(mob_spawn_location.position, player_position)

    # Spawn the mob by adding it to the Main scene.
    add_child(mob)

    # We connect the mob to the score label to update the score upon squashing one.
    mob.squashed.connect($UserInterface/ScoreLabel._on_mob_squashed.bind())

func _on_player_hit():
    $MobTimer.stop()
    $UserInterface/Retry.show()

func _unhandled_input(event):
    if event.is_action_pressed("ui_accept") and $UserInterface/Retry.visible:
        # This restarts the current scene.
        get_tree().reload_current_scene()
using Godot;

public partial class Main : Node
{
    [Export]
    public PackedScene MobScene { get; set; }

    public override void _Ready()
    {
        GetNode<Control>("UserInterface/Retry").Hide();
    }

    public override void _UnhandledInput(InputEvent @event)
    {
        if (@event.IsActionPressed("ui_accept") && GetNode<Control>("UserInterface/Retry").Visible)
        {
            // This restarts the current scene.
            GetTree().ReloadCurrentScene();
        }
    }

    private void OnMobTimerTimeout()
    {
        // Create a new instance of the Mob scene.
        Mob mob = MobScene.Instantiate<Mob>();

        // Choose a random location on the SpawnPath.
        // We store the reference to the SpawnLocation node.
        var mobSpawnLocation = GetNode<PathFollow3D>("SpawnPath/SpawnLocation");
        // And give it a random offset.
        mobSpawnLocation.ProgressRatio = GD.Randf();

        Vector3 playerPosition = GetNode<Player>("Player").position;
        mob.Initialize(mobSpawnLocation.Position, playerPosition);

        // Spawn the mob by adding it to the Main scene.
        AddChild(mob);

        // We connect the mob to the score label to update the score upon squashing one.
        mob.Squashed += GetNode<ScoreLabel>("UserInterface/ScoreLabel").OnMobSquashed;
    }

    private void OnPlayerHit()
    {
        GetNode<Timer>("MobTimer").Stop();
        GetNode<Control>("UserInterface/Retry").Show();
    }
}