Attention: Here be dragons
This is the latest
(unstable) version of this documentation, which may document features
not available in or compatible with released stable versions of Godot.
Checking the stable version of the documentation...
La scène principale du jeu
Il est maintenant temps de transformer tout ce que nous avons fait ensemble en une scène de jeu jouable.
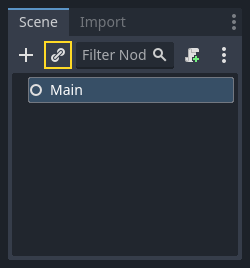
Créez une nouvelle scène et ajoutez un nœud Node nommé Main. (Nous utilisons Node au lieu Node2D par ce que nous l'utiliserons comme contenant pour gérer la logique du jeu qui ne nécessite pas de gestion 2D en soit.)
Cliquez sur le bouton Instance (représenté par une icône en chaine) et sélectionne votre scène player.tscn.
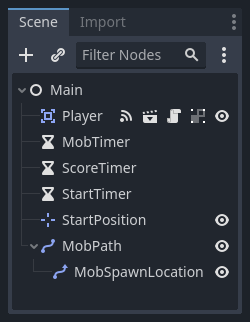
Ajoutez maintenant les nœuds suivants en tant qu'enfants de Main, et nommez-les comme indiqué :
Timer (nommé
MobTimer) - pour contrôler à quelle fréquence les ennemis apparaissentTimer (nommé
ScoreTimer) - pour incrémenter le score à chaque secondeTimer (nommé
StartTimer) - pour ajouter un délai avant le débutMarker2D (nommé
StartPosition) - pour indiquer la position de départ du joueur
Définissez la propriété Wait Time de chacun des nœuds Timer comme suit (les valeurs sont en secondes) :
MobTimer:0.5ScoreTimer:1StartTimer:2
En outre, mettez la propriété One Shot de StartTimer sur "On" et réglez la Position du nœud StartPosition sur (240, 450).
Générer des monstres
Le nœud Main va générer de nouveaux monstres, et nous voulons qu'ils apparaissent à un endroit aléatoire sur le bord de l'écran. Cliquez sur le nœud Main dans le dock de Scène, puis ajoutez un nœud Path2D enfant nommé MobPath. Lorsque vous sélectionnez Path2D, vous verrez de nouveaux boutons en haut de l'éditeur :

Sélectionnez celui du milieu ("Ajouter un point") et tracez le chemin en cliquant pour ajouter les points aux coins indiqués. Pour que les points s'alignent sur la grille, assurez-vous que "Utiliser Grid Snap" et "Utiliser Smart Snap" sont tous deux sélectionnés. Ces options se trouvent à gauche du bouton "Verrouiller", apparaissant respectivement comme un aimant à côté de certains points et lignes qui se croisent.

Important
Tracez le chemin dans le sens des aiguilles d'une montre, ou vos monstres pointeront vers l'extérieur au lieu de vers l'intérieur !

Après avoir placé le point 4 dans l'image, cliquez sur le bouton "Fermer la courbe" et votre courbe sera terminée.
Maintenant que le chemin est défini, ajoutez un nœud PathFollow2D en tant qu'enfant de MobPath et nommez-le MobSpawnLocation. Ce nœud tournera automatiquement et suivra le chemin au fur et à mesure qu'il se déplace, de sorte que nous pouvons l'utiliser pour sélectionner une position et une direction aléatoires le long du chemin.
Votre scène devrait ressembler à ceci :
Script principal
Ajoutez un script à Main. Au début du script nous utilisons @export var mob_scene: PackedScene pour nous permettre de choisir la scène du monstre que nous voulons instancier.
extends Node

@export var mob_scene: PackedScene
var score
using Godot;

public partial class Main : Node
{
    // Don't forget to rebuild the project so the editor knows about the new export variable.

    [Export]
    public PackedScene MobScene { get; set; }

    private int _score;
}
Cliquez sur le nœud Main et vous verrez la propriété Mob Scene dans l'inspecteur sous "Main.gd".
Vous pouvez affecter la valeur de cette propriété de deux façons :
Faites glisser
mob.tscndepuis le dock "FileSystem" et déposez-le dans la propriété Mob Scene.Cliquez sur la flèche vers le bas à côté de "<vide>" et choisissez "Charger". Sélectionnez
mob.tscn.
Next, select the instance of the Player scene under Main node in the Scene dock,
and access the Signals dock on the sidebar.
Vous devriez voir une liste des signaux pour le nœud Player. Recherchez et double-cliquez sur le signal hit dans la liste (ou cliquez dessus avec le bouton droit et sélectionnez « Connecter... »). Cela ouvrira la boîte de dialogue de connexion du signal. Nous voulons créer une nouvelle fonction nommée game_over, qui gérera ce qui doit se passer à la fin d'une partie. Tapez "game_over" dans la case « Méthode de réception » en bas de la boîte de dialogue de connexion du signal et cliquez sur « Connecter ». Vous souhaitez que le signal hit soit émis depuis Player et géré dans le script Main. Ajoutez le code suivant à la nouvelle fonction, ainsi qu'une fonction new_game qui configurera tout pour un nouveau jeu :
func game_over():
    $ScoreTimer.stop()
    $MobTimer.stop()

func new_game():
    score = 0
    $Player.start($StartPosition.position)
    $StartTimer.start()
public void GameOver()
{
    GetNode<Timer>("MobTimer").Stop();
    GetNode<Timer>("ScoreTimer").Stop();
}

public void NewGame()
{
    _score = 0;

    var player = GetNode<Player>("Player");
    var startPosition = GetNode<Marker2D>("StartPosition");
    player.Start(startPosition.Position);

    GetNode<Timer>("StartTimer").Start();
}
Maintenant, nous allons connecter le signal timeout() de chaque nœud Timer (StartTimer, ScoreTimer et MobTimer) au script principal. Pour chacun des trois minuteurs, sélectionnez le minuteur dans le dock de Scène, ouvrez l'onglet Signaux du dock Nœud, puis double-cliquez sur le signal timeout() dans la liste. Cela ouvrira une nouvelle fenêtre de connexion du signal. Les paramètres par défaut dans cette fenêtre devraient être bons, alors sélectionnez Connect pour créer une nouvelle connexion de signal.
Une fois que les trois minuteurs sont configurés, vous devriez être en mesure de voir que chaque minuteur a une connexion de signal pour leurs signaux timeout() respectifs, affichées en vert, dans leur onglets Signaux respectifs :
(Pour MobTimer) :
_on_mob_timer_timeout()(Pour ScoreTimer) :
_on_score_timer_timeout()(Pour StartTimer) :
_on_start_timer_timeout()
Maintenant, nous définissons comment chaque timer fonctionne en ajoutant le code ci-dessous. Notez que StartTimer va démarrer les deux autres minuteurs, et que ScoreTimer va incrémenter le score de 1.
func _on_score_timer_timeout():
    score += 1

func _on_start_timer_timeout():
    $MobTimer.start()
    $ScoreTimer.start()
// We also specified this function name in PascalCase in the editor's connection window.
private void OnScoreTimerTimeout()
{
    _score++;
}

// We also specified this function name in PascalCase in the editor's connection window.
private void OnStartTimerTimeout()
{
    GetNode<Timer>("MobTimer").Start();
    GetNode<Timer>("ScoreTimer").Start();
}
Dans _on_MobTimer_timeout(), nous allons créer une instance de monstre, choisir un emplacement de départ aléatoire le long du Path2D, et mettre le monstre en mouvement. Le nœud PathFollow2D tournera automatiquement puisqu'il suit le chemin, donc nous l'utiliserons pour sélectionner la direction du monstre ainsi que sa position. Lorsque nous créons un mob, nous choisirons une valeur aléatoire entre 150.0 et 250.0 pour la vitesse de déplacement de chaque monstre (ce serait ennuyeux s'ils se déplaçaient tous à la même vitesse).
Notez qu'une nouvelle instance doit être ajoutée à la scène en utilisant add_child().
func _on_mob_timer_timeout():
    # Create a new instance of the Mob scene.
    var mob = mob_scene.instantiate()

    # Choose a random location on Path2D.
    var mob_spawn_location = $MobPath/MobSpawnLocation
    mob_spawn_location.progress_ratio = randf()

    # Set the mob's position to the random location.
    mob.position = mob_spawn_location.position

    # Set the mob's direction perpendicular to the path direction.
    var direction = mob_spawn_location.rotation + PI / 2

    # Add some randomness to the direction.
    direction += randf_range(-PI / 4, PI / 4)
    mob.rotation = direction

    # Choose the velocity for the mob.
    var velocity = Vector2(randf_range(150.0, 250.0), 0.0)
    mob.linear_velocity = velocity.rotated(direction)

    # Spawn the mob by adding it to the Main scene.
    add_child(mob)
// We also specified this function name in PascalCase in the editor's connection window.
private void OnMobTimerTimeout()
{
    // Create a new instance of the Mob scene.
    Mob mob = MobScene.Instantiate<Mob>();

    // Choose a random location on Path2D.
    var mobSpawnLocation = GetNode<PathFollow2D>("MobPath/MobSpawnLocation");
    mobSpawnLocation.ProgressRatio = GD.Randf();

    // Set the mob's direction perpendicular to the path direction.
    float direction = mobSpawnLocation.Rotation + Mathf.Pi / 2;

    // Set the mob's position to a random location.
    mob.Position = mobSpawnLocation.Position;

    // Add some randomness to the direction.
    direction += (float)GD.RandRange(-Mathf.Pi / 4, Mathf.Pi / 4);
    mob.Rotation = direction;

    // Choose the velocity.
    var velocity = new Vector2((float)GD.RandRange(150.0, 250.0), 0);
    mob.LinearVelocity = velocity.Rotated(direction);

    // Spawn the mob by adding it to the Main scene.
    AddChild(mob);
}
Important
Pourquoi PI ? Dans les fonctions nécessitant des angles, Godot utilise des radians et non des degrés. Pi représente un demi-tour en radians, environ 3.1415 (il existe aussi TAU qui est égal à 2 * PI). Si vous êtes plus à l'aise avec les degrés, vous devrez utiliser les fonctions deg_to_rad() et rad_to_deg() pour convertir les angles entre les deux.
Tester la scène
Testons la scène pour nous assurer que tout fonctionne. Ajoutez cet appel new_game à _ready() :
func _ready():
    new_game()
public override void _Ready()
{
    NewGame();
}
Assignons également Main comme "Scène Principale" - celle qui s'exécute automatiquement au lancement du jeu. Appuyez sur le bouton "Play" et sélectionnez main.tscn lorsque vous y êtes invité.
Astuce
Si vous avez déjà défini une autre scène comme "Scène Principale", vous pouvez faire du clic-droit sur main.tscn dans le dock du système de fichier et sélectionner "Définir comme Scène Principale".
Vous devriez être capable de bouger le joueur, voir les monstres apparaître, et voir le joueur disparaître quand il est touché par un monstre.
Quand vous êtes sûr que tout fonctionne, supprimez l'appel à new_game() depuis _ready() et remplacez le par pass.
Que manque-t-il à notre jeu ? Une interface utilisateur. Dans la prochaine leçon, nous ajouterons un écran titre et afficherons le score du joueur.