Attention: Here be dragons
This is the latest
(unstable) version of this documentation, which may document features
not available in or compatible with released stable versions of Godot.
Checking the stable version of the documentation...
使用光照貼圖全域光照
烘焙光照貼圖是一種為場景增加間接(或全烘焙)光源的工作流程。與 VoxelGI 和 SDFGI 方法不同,烘焙光照貼圖在低階 PC 與行動裝置上也能順利運作,因為執行時幾乎不消耗資源。此外,與 VoxelGI 與 SDFGI 不同,烘焙光照貼圖也可以選擇性地儲存直接光源,進一步提升效能。
烘焙光照貼圖與 GIProbe 不同,是完全靜態的,一旦被烘焙就完全不能被修改。它也不能為場景提供反射,所以如果要達到較好的畫質,在室內場景(或者是使用 Sky 的室外場景)中就需要和 反射探針 搭配使用。
As they are baked, they have fewer problems than VoxelGI and SDFGI regarding light bleeding, and indirect light will often look better. The downside is that baking lightmaps takes longer compared to baking VoxelGI. While baking VoxelGI can be done in a matter of seconds, baking lightmaps can take several minutes if not more. This can slow down iteration speed significantly, so it is recommended to bake lightmaps only when you actually need to see changes in lighting. Lightmaps are baked on the GPU, making light baking faster if you have a mid-range or high-end dedicated GPU.
烘焙光照貼圖時也會佔用材質的 UV2 通道,這表示你無法把 UV2 用於其他材質用途(不論是內建 標準 3D 材質與 ORM 3D 材質 還是自訂著色器)。
儘管缺乏靈活性,烘焙光照貼圖通常在(大部分)靜態場景中同時提供最佳品質*和*性能。這使得光照貼圖在遊戲開發中仍然很流行,儘管光照貼圖是電玩遊戲中最古老的全域照明技術。
也參考
不確定 LightmapGI 是否適合你的需求?請參閱 我該選用哪一種全域照明技術? 以比較 Godot 4 提供的各種 GI 技術。
視覺比較
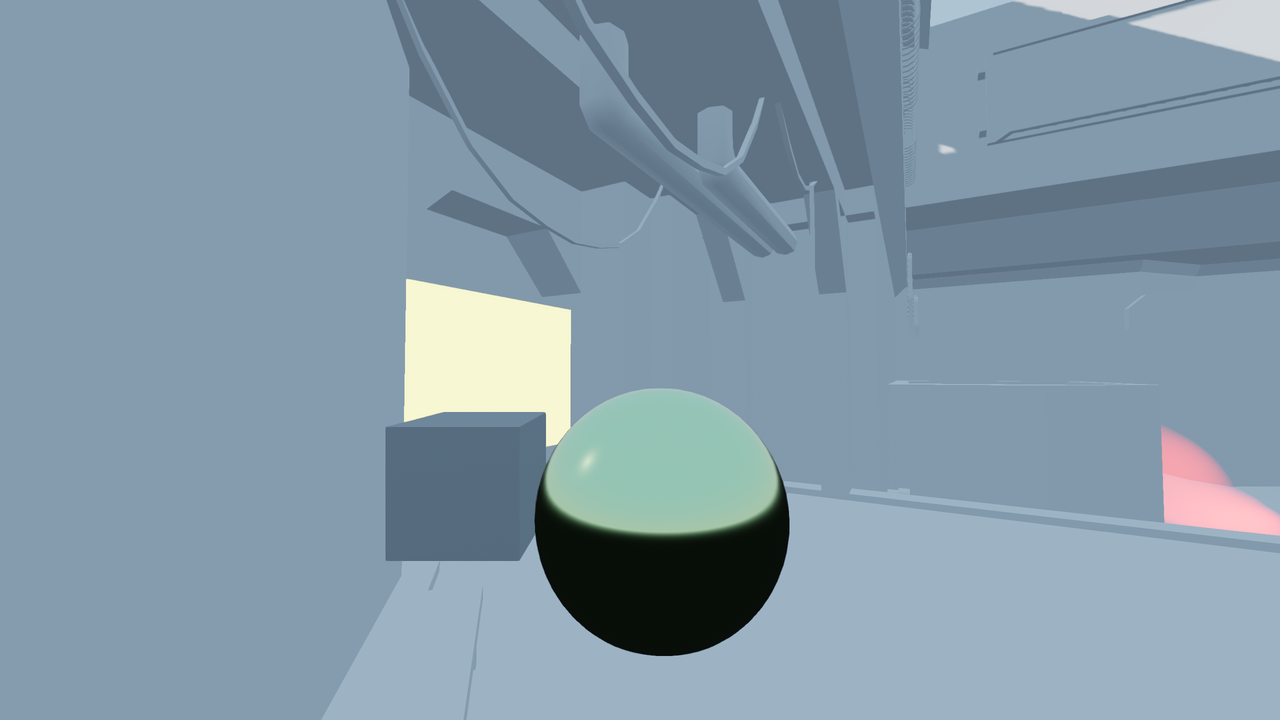
LightmapGI 已停用。
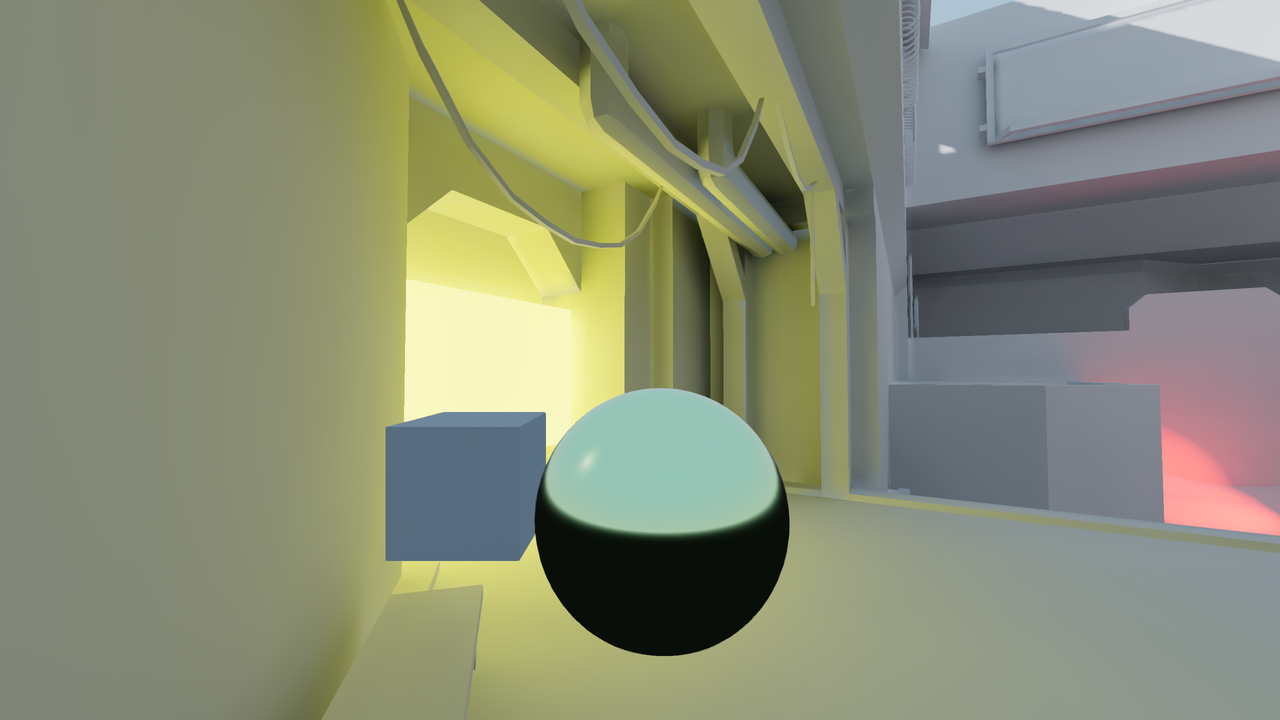
LightmapGI 啟用(僅使用間接光烘焙)。直射光仍然是即時的,允許在遊戲過程中發生微妙的變化。
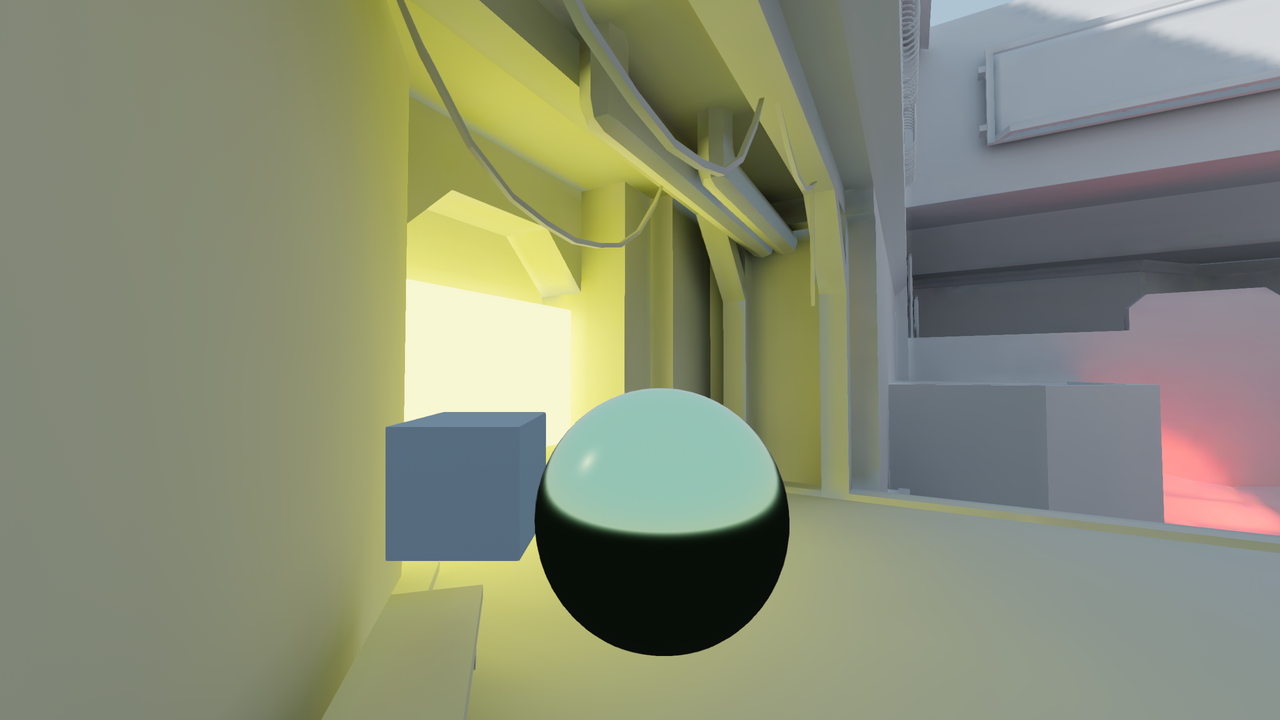
LightmapGI 已啟用(直接和間接光照烘焙)。最佳性能,但視覺品質較低。請注意右上角較模糊的太陽陰影。
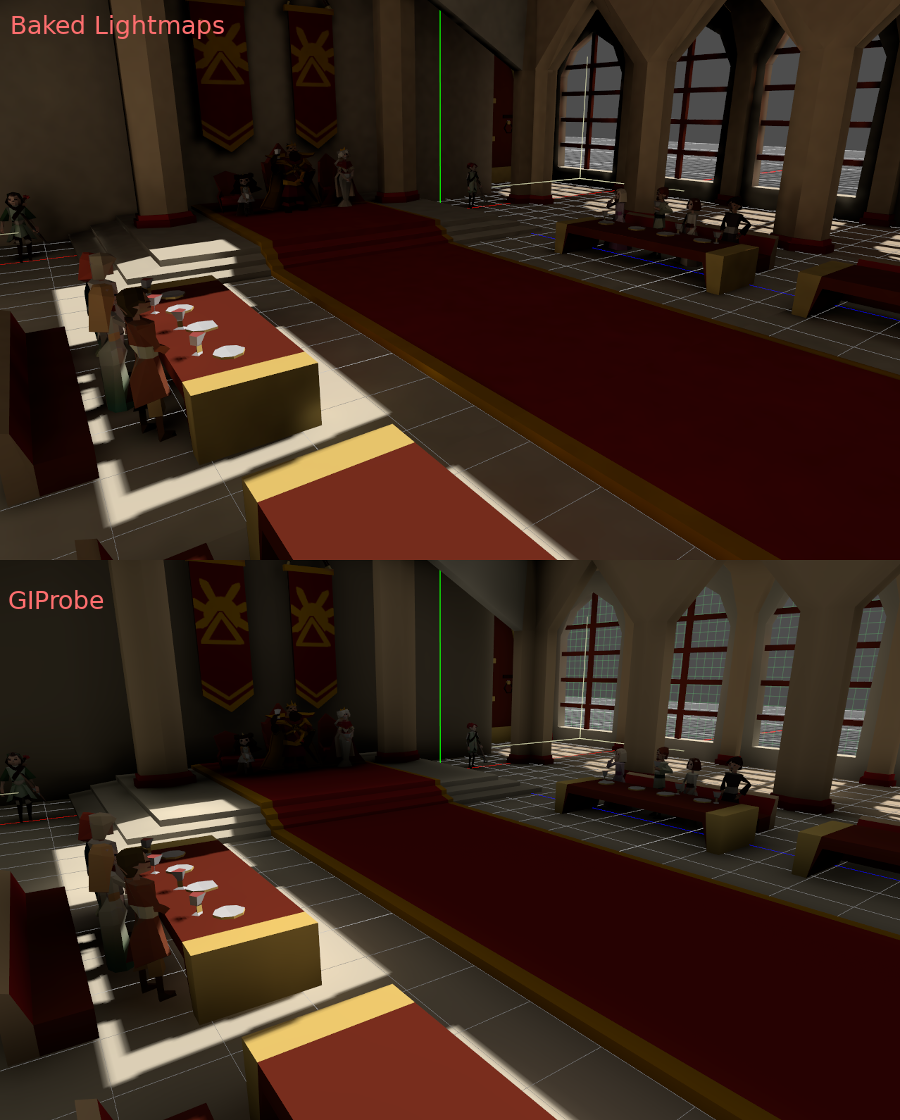
以下是 BakedLightmap 和 GIProbe 的一些顯示效果比較。可以看到光照貼圖更精確,但由於使用的是展開後的紋理,所以過渡以及解析度可能就沒有那麼理想。GIProbe 看上去沒有那麼精確(因為是近似估算),但總體上更平滑。
與 LightmapGI 相比,SDFGI 的準確度也較低。然而,SDFGI 可以支援大型開放世界,而不需要任何烘焙。
設定
警告
由於圖形 API 限制,網頁版編輯器不支援烘焙光照貼圖。在網頁平台上,只支援 顯示 於其他平台烘焙好的光照貼圖。
備註
LightmapGI 節點只會烘焙與自身同一層級(兄弟)或作為其子節點的物件。這讓你能以多個 LightmapGI 節點分開烘焙場景的不同區塊,各自獨立互不影響。
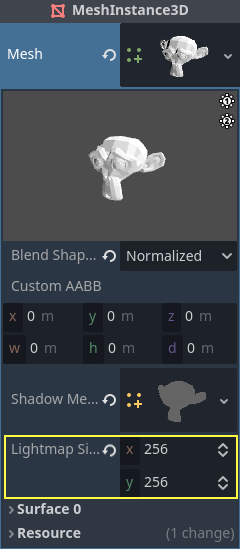
首先,進行光照貼圖前,所有要被烘焙的物件都必須有 UV2 圖層與設定紋理大小。UV2 圖層是一組次要紋理座標,能確保每個面的頂點都在 UV 貼圖上有獨立區塊,不能有多個面共用同一組貼圖像素。
這裡有幾種方法可以確保您的物件具有唯一的 UV2 層和紋理大小:
場景匯入時展開
總體來說,這可能是最好的方法。唯一的缺點是,在大型模型上,匯入時展開可能需要一段時間。不過Godot會在重新匯入時快取UV2,所以只會在需要時重新生成。
在檔案系統面板中選擇被匯入的場景,然後切換到**匯入**面板。這裡可以修改以下選項:
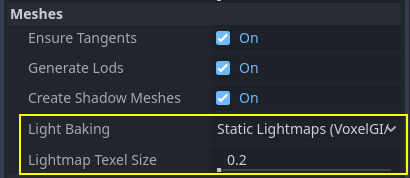
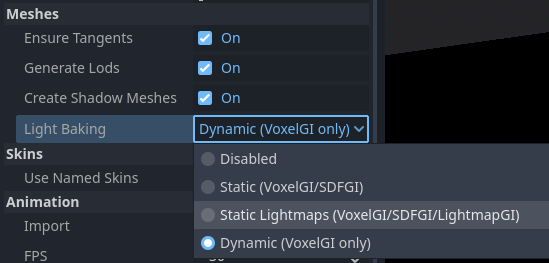
網格 > 光照烘焙**選項必須設定為 **靜態光照貼圖 (VoxelGI/SDFGI/LightmapGI):
匯入時展開時,您可以使用 網格 > 光照貼圖紋素大小 選項調整紋理大小。 較低的 值將產生更詳細的光照貼圖,可能會導致更高的視覺質量,但代價是更長的烘焙時間和更大的光照貼圖檔案大小。預設值 0.2 適用於小型/中型場景,但您可能需要將其增加到 0.5 ,甚至更大的場景。如果您僅烘焙間接光照,則尤其如此,因為間接光是低頻資料(這意味著它不需要準確表示高解析度紋理)。
設定此選項的效果是場景中的所有網格都將正確生成其UV2貼圖.
警告
如果在場景中複用了網格,請注意生成 UV 時只會使用第一個找到的實例。如果複用時使用了不同的縮放比例(並且相差很大,超過了一半或者兩倍),會導致生成低效的光照貼圖。如果你想用光照貼圖,就不要在複用原始網格時使用明顯不同的縮放比例。
另外,請*不要*在版本控制系統中忽略 *.unwrap_cache 檔,這些檔可以用來保證不同平臺、不同版本的引擎在重新匯入 UV2 時的一致性。
使用 Godot 進行展開
警告
如果在匯入的 3D 場景上使用此 Mesh 選單操作,則重新載入場景時產生的 UV2 將會遺失。
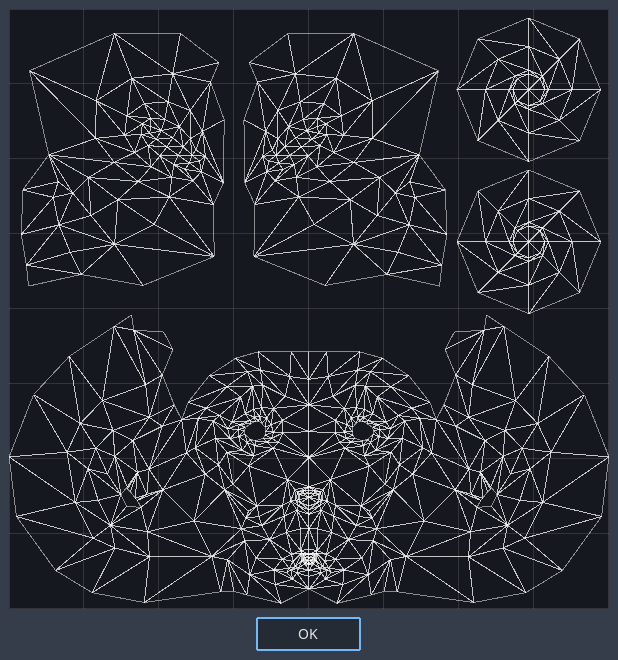
Godot可以選擇打開網格並視覺化UV通道. 它可以在Mesh功能表中找到:
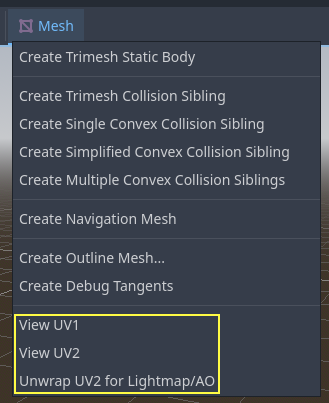
這將生成第二組UV2座標, 可用於烘焙, 並且還將自動設定紋理大小.
使用 3D DCC 展開
最後一種方法是在你喜歡的 3D 應用程式中進行操作。通常不推薦這種做法,但為了讓你知道它的存在,這裡還是解釋一下。這種做法的主要優勢在於,針對可能要經常重新匯入的複雜物件,在 Godot 中進行紋理生成的代價可能相當高,所以在匯入前展開可以提高速度。
只需在第二個UV2層上進行展開即可。
然後正常匯入 3D 場景。記得在匯入後為網格設定紋理大小。
如果在匯入時使用外部網格, 則將保留大小. 請注意,3D DCC中的大多數解包器都不是面向品質的, 因為它們可以快速工作. 您通常需要使用接縫或其他技術來建立更好的展開.
為基本網格產生 UV2
備註
此選項僅適用於基本網格體,例如 BoxMesh 、 CylinderMesh 、 PlaneMesh 等。
在原始網格體上啟用 UV2 可以使它們接收並貢獻烘焙光照。這可以用於某些照明設定。例如,您可以在烘焙光貼圖後隱藏具有發光材質的圓環,以建立遵循圓環形狀的區域光。
預設情況下,原始網格體不會產生 UV2 以節省資源(因為這些網格體可能在遊戲過程中建立)。您可以在屬性檢視器中編輯基本網格並啟用**新增 UV2** 以使引擎按程式為基本網格產生 UV2。預設的 UV2 填充 值經過調整以避免大多數光照貼圖滲色,而不會在邊緣上浪費太多空間。如果您發現光照貼圖僅在特定基元網格上滲色,則可能需要增加 UV2 填充。
光照貼圖大小提示 表示光照貼圖紋理上單一網格所佔據的大小,該大小會根據網格的大小屬性和 UV2 填充 值而變化。 光照貼圖大小提示 不應手動更改,因為重新載入場景時任何修改都會遺失。
為 CSG 節點產生 UV2
自 Godot 4.4 起,你可以 將 CSG 節點及其子節點轉換為 MeshInstance3D。這讓你可以依下列步驟,對 CSG 節點進行光照貼圖烘焙:
選擇最上層的 CSG 節點,然後在 3D 編輯器上方選擇 CSG > 烘焙網格實例。
手動將剛剛烘焙的 CSG 節點隱藏(系統不會自動隱藏)。
選取剛產生的 MeshInstance3D 節點,然後點選 Mesh > 為光照貼圖/環境光展開 UV2。
烘焙光照貼圖。
小訣竅
請記得保留原本的 CSG 節點於場景樹中,以便日後需要時能修改幾何形狀。若需變更幾何,將 MeshInstance3D 節點刪除,並將 CSG 節點重新顯示即可編輯。
檢查 UV2
在前面提到的網格功能表中, 可以顯示UV2紋理座標. 如果出現問題, 請確保檢查網格是否具有以下UV2座標:
設定場景
首先需要在場景中新增一個 BakedLightmap 節點。新增後,場景中的所有節點(和子節點)就都可以進行光照烘焙了,甚至產生實體的場景也可以。
烘焙器支援同一子場景存在多個實例,它們會有各自獨立的光照貼圖(前提是你得遵守之前提過的關於縮放的規則)。
設定網格
若要讓 MeshInstance3D 節點參與光照貼圖烘焙,必須將其烘焙模式設為 靜態。若烘焙模式為 停用 或 動態,該網格將不會被光照貼圖器處理。
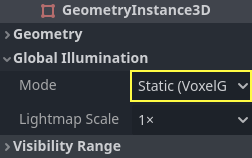
在場景匯入時自動生成光照貼圖時, 會自動啟用此功能.
設定燈光
預設情況下, 燈光採用間接燈光烘焙. 這意味著陰影貼圖和光照仍然是動態的並影響移動的物體, 但是光線反射的光將被烘焙.
燈可以禁用(不烘焙)或完全烘焙(直接和間接). 這可以通過燈光中的 烘焙模式 功能表進行控制:
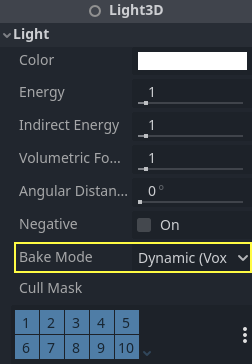
模式有:
已停用的專案
這個模式會在烘焙光照貼圖時忽略該燈光。通常用於動態燈光效果,如爆炸或武器特效。
警告
將燈光設為隱藏對光照貼圖烘焙結果毫無影響。這代表你必須用「停用」烘焙模式,而不是僅僅將燈光節點的 Visible 屬性關閉。
動態語言:
這是預設的模式,是性能與即時友好性的折衷。只會烘焙間接光照。直接燈光和陰影仍舊是即時的,與不使用 BakedLightmap 時一致。
這個模式可以在保持顯示效果相對正確的同時,允許進行燈光顏色、能量、以及位置的 微調 。例如,你可以借此實作靜態火把的閃爍,它的間接光照仍然是烘焙的。
依據 Shadowmask Mode 設定,你仍可以讓 DirectionalLight3D 生成遠處的烘焙陰影。如此一來,近距離的陰影仍為即時渲染,可投射動態物件陰影,而遠處的靜態物件則仍能保有烘焙陰影。
靜態語言:
間接和直接光照都會被烘焙。因為靜態表面可以完全跳過光照和陰影的計算,所以這個模式可以提供最佳的性能,並且實作不隨距離衰減的平滑的陰影。即時燈光不會再影響烘焙的表面,但仍然可以影響動態的物件。在光源上使用 All (全部)烘焙模式時,動態物件不會在烘焙表面上投射陰影,所以你需要使用別的方法,比如軟陰影。軟陰影既可以通過 Sprite3D + RayCast 實作,也可以通過把朝下的反 SpotLight 的烘焙模式設定成 禁用 實作。
遊戲過程中無法調整燈光。燈光的移動、變色、能量調整不會對靜態表面產生影響。
因為烘焙模式可以分光源調整,所以可以設定出混合的烘焙光照。一個比較流行的做法是使用即時 DirectionalLight 並把它的烘焙模式設定成 Indirect,然後把 OmniLight 和 SpotLight 的烘焙模式都設定成 All。這樣做的性能不錯,同時也允許動態物件在室外投射即時陰影。
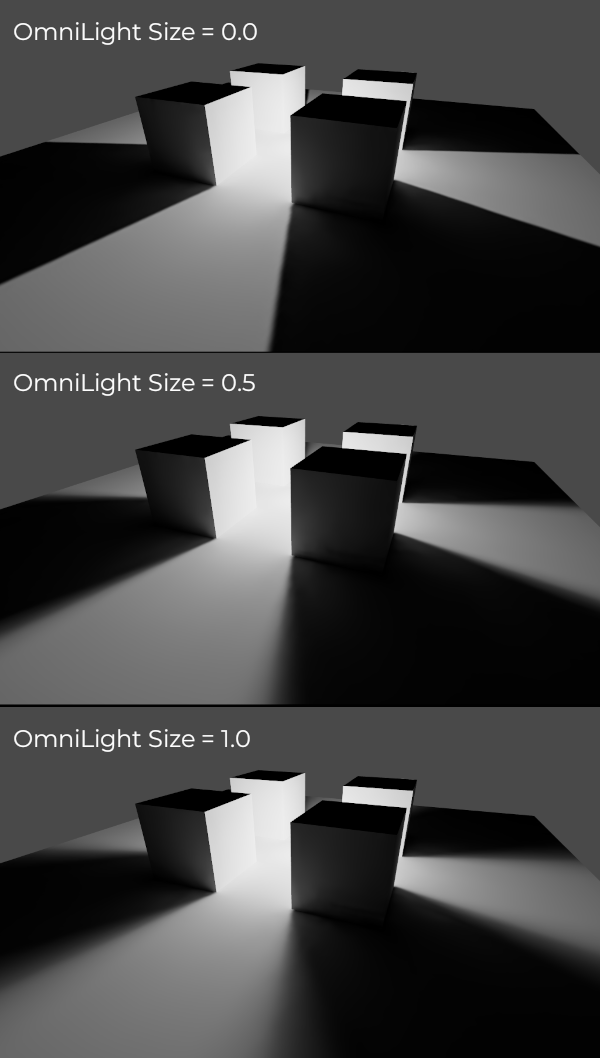
完全烘焙的燈光還可以利用燈光節點的**大小**(全向/聚光)或**角度距離**(方向)屬性。這允許陰影具有真實的半影,隨著施法者和陰影之間距離的增加,半影的尺寸也會增加。與即時 PCSS 陰影相比,這也具有較低的效能成本,因為只有動態物件才會在其上算繪即時陰影。
烘焙
開始烘焙只需在選中 BakedLightmap 節點後點擊上方的 烘焙光照貼圖 按鈕:

根據場景大小、所選烘焙方法以及品質的不同,其過程可能花費幾秒鐘到幾分鐘不等(也可能是幾小時)。
警告
烘焙光照貼圖是一個可能需要大量視訊記憶體的過程,尤其是當產生的紋理很大時。由於內部限制,如果生成的紋理尺寸太大(即使在具有大量視訊記憶體的系統上),引擎也可能當機。
為了避免當機,請確保匯入停靠列中的光照貼圖紋理像素大小設定為足夠高的值。
調整
Quality(品質):提供了四種烘焙品質:Low(低級)、Medium(中級)、High(高級)、Ultra(超級)。品質越高所需的時間越長,但最終光照貼圖的顯示效果越好、噪點也越少。針對發光材質或者幾乎沒有直接光照的地方,不同品質之間的區別尤為顯著。
超取樣: 先以更高解析度生成光照貼圖,再進行降採樣。可減少雜訊與漏光,並在小尺度細節上產生更好的陰影。不過,這會增加烘焙時間與烘焙期間的記憶體占用。超取樣係數 會改變降採樣前光照貼圖的算繪尺寸。
反彈次數: 控制間接光照的反射次數。預設值(
3)在烘焙速度與品質之間取得良好平衡。提高此數值會讓光線在消散前多次反射,使間接光更柔順(但也可能因材質與幾何結構而變得更亮)。間接光能量倍增器: 烘焙燈光的間接能量時所使用的全域乘數。這會將每個燈光的 間接能量 屬性一併乘上。設定為
1.0以外的值雖然不物理正確,但可用於創意演出。定向: 如果啟用,則儲存光照貼圖的方向資訊。這改善了烘焙表面的法線貼圖材質的外觀,尤其是在完全烘焙的燈光下(因為它們也有直接光線烘焙)。缺點是定向光照貼圖的算繪成本稍高。它們還需要更多的時間來烘烤並導致檔案大小更大。
陰影遮罩模式: 若非設為 None,則場景中第一個設為 Dynamic 全域照明模式的 DirectionalLight3D,會將其靜態陰影烘焙到獨立的 shadowmask 紋理中。這讓遠距靜態物件無論與鏡頭距離多遠,仍可相互投影。詳細說明請參見 shadowmasking 章節。
內部: 若啟用,將不會取得環境照明。將其用於純室內場景以避免漏光。
反彈用紋理: 啟用時,會產生包含光照資訊的紋理來加速間接光計算,但會犧牲部分精度。若使用低解析度光照貼圖或 UV 展開過度拉長,可能會有額外滲光偽影。不確定時建議保持啟用。
使用降噪器: 啟用時,將以降噪演算法顯著減少光照貼圖的雜訊。這會延長烘焙時間,有時可能出現偽影,但通常值得啟用。詳見 降噪。
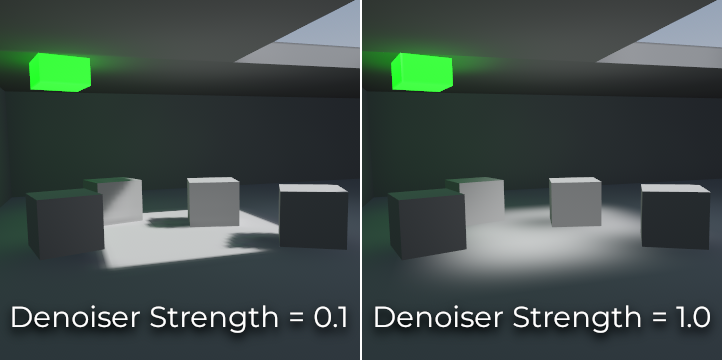
降噪強度: 控制套用於光照貼圖的降噪處理強度。數值越高,雜訊去除效果越顯著,但靜態陰影細節可能損失。僅在啟用降噪器且使用 JNLM 時有效,OIDN 沒有降噪強度選項。
Bias(偏置) :陰影的偏移量,使用 3D 單位。除非你遇到了光線滲透問題或者光照貼圖在烘焙後存在暗區,否則通常情況下不需要修改這個值。該選項不會影響投射在烘焙表面上的即時陰影。
最大紋理尺寸: 產生的紋理合集的最大紋理尺寸。較高的值將導致產生的切片較少,但由於硬體對紋理大小的限制,可能無法在所有硬體上工作。如果不確定,請將其保留為預設值“16384”。
環境 > 模式: 控制烘焙光照貼圖時環境光照的來源方式。 場景 的預設值適用於具有可見外部元件的關卡。對於純室內場景,將其設定為**停用**以避免漏光並加快烘烤速度。也可以設定為 自訂天空 或 自訂顏色 以使用與實際場景的環境天空不同的環境照明。
產生探查 > 細分: 請參閱 動態物件。
資料 > 光資料: 請參閱 光照貼圖資料。
遠距方向性陰影的遮罩(Shadowmask)應用
當使用 DirectionalLight3D 時,其即時陰影的最大距離會受到 Shadow Max Distance 屬性的限制。在大型場景中,遠處的物件可能就無法顯示方向光的陰影。雖然可以將 DirectionalLight3D 的全域照明模式設為 靜態 來解決,但這麼做有幾個缺點:
由於直接光和間接光都已烘焙,動態物件無法在靜態表面投射陰影,無法達到真實效果。Godot 為避免出現「雙重光照」偽影,在這種情況下會完全略過陰影取樣。
近距離的靜態陰影細節會不足,因為只依賴光照貼圖,沒有即時陰影級聯的支援。
我們可以透過 shadowmasking (陰影遮罩)來避免這些缺點,同時又能享有遠距離陰影帶來的效果。雖然動態物件無法從遮罩獲得陰影,但大多數場景以靜態物件為主,因此整體視覺品質會明顯提升。
由於光照貼圖本身不包含陰影資訊,我們可以將陰影資料烘焙到另一張稱為 shadowmask (陰影遮罩)的紋理中。
陰影遮罩僅對場景中第一個設定為 動態 全域照明模式的 DirectionalLight3D 有效(依樹狀結構順序決定)。靜態 全域照明模式無法使用陰影遮罩,因為該模式會完全略過靜態物件的陰影取樣,這是因為靜態模式同時烘焙直接與間接光。
目前有三種陰影遮罩模式:
無(預設): 不烘焙陰影遮罩紋理。超出 DirectionalLight3D 的 Shadow Max Distance 設定範圍外,將無法看到方向光的陰影。
取代: 烘焙陰影遮罩紋理,並在超出 DirectionalLight3D 的 Shadow Max Distance 範圍時顯示方向光陰影。範圍內的陰影仍然為即時運算。這個選項適合大多數場景,特別是靜態物件可能有細微移動(例如樹葉陰影)時。
疊加: 烘焙陰影遮罩紋理,不論與相機距離遠近都會顯示方向光陰影。在 DirectionalLight3D 的 Shadow Max Distance 範圍內,會將即時陰影與遮罩陰影疊加。這能讓即時與烘焙陰影切換時不那麼突兀,但靜態物件的陰影可能因像素密度不足而產生「模糊」效果。此外,這個模式不適合有細微移動的靜態物件(如樹葉),因為烘焙陰影無法隨時間變化。然而,若場景鏡頭移動很快,這選項有時比 取代 更實用。
以下為各種陰影遮罩模式的視覺比較(為了對照,Shadow Max Distance 設定得相當低)。藍色方塊代表動態物件,其餘皆為靜態物件。場景中僅有一個 DirectionalLight3D,且設為動態全域照明模式:
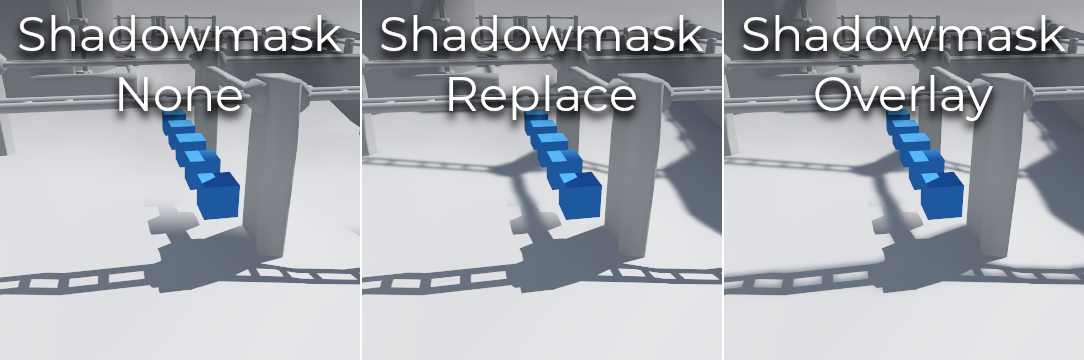
陰影遮罩模式之比較
備註
你可以在 取代 與 疊加 模式間切換,而無需重新烘焙光照貼圖。
平衡烘焙時間和品質
因為高品質的烘焙可能花費非常長的時間(大型複雜場景可能需要若干小時),推薦首先設定成較低品質,將場景中的燈光佈置成滿意的效果後再改成較高的品質,在匯出專案前進行“終極”烘焙。
透過增加匯入的 3D 場景上的 光照貼圖紋理尺寸 來降低光照貼圖解析度也會顯著加快烘焙速度。但是,這將要求您重新匯入所有光照貼圖 3D 場景,然後才能再次烘焙光照貼圖。
降噪
由於光照貼圖烘焙依賴於光線追蹤,『原始』烘焙出來的光照貼圖總會有明顯的雜訊。特別是在光線難以間接照射到的地方(如有小窗戶的室內),雜訊會更明顯。提升烘焙品質可減少雜訊,但同時會大幅增加烘焙時間。
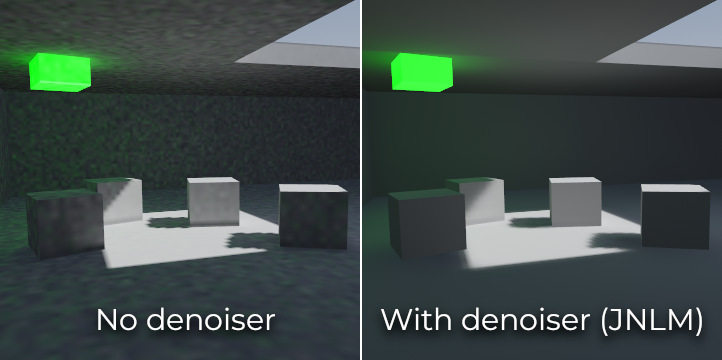
降噪關閉與開啟時(使用預設 JNLM 降噪器)的比較。
為了在不大幅延長烘焙時間的前提下減少雜訊,可以使用降噪器。降噪器是一種運作於最終烘焙光照貼圖上的演算法,會尋找雜訊並試圖在保留細節的前提下將其柔化。Godot 提供兩種降噪演算法:
JNLM(非區域性均值降噪,含聯合濾波)
JNLM is the default denoising method and is included in Godot. It uses a simple but efficient denoising algorithm known as non-local means. JNLM runs on the GPU using a compute shader, and is compatible with any GPU that can run Godot 4's RenderingDevice-based renderers. No additional setup is required.
啟用 使用降噪器 時,降噪強度 屬性可用來調整 JNLM 降噪效果。數值越高,雜訊去除越徹底,但靜態陰影細節也會損失。
不同 JNLM 降噪強度的比較。強度越高,細節損失越明顯。
OIDN(Open Image Denoise)
OIDN 與 JNLM 不同,採用機器學習方式進行光照貼圖降噪。其模型為光照貼圖去雜訊而特別訓練,較之 JNLM 能更好地保留大部分場景的陰影細節。
如果已設定硬體加速,OIDN 可於 GPU 上運作。現代高階顯示卡下,GPU 降噪速度可達 CPU 的 50 倍以上:
若用 AMD 顯示卡,必須安裝並設定 HIP。
若用 NVIDIA 顯示卡,必須安裝並設定 CUDA。NVIDIA 安裝程式通常會自動處理,但在 Linux 下預設可能未安裝 CUDA 函式庫,請確認你的發行版已安裝相關 CUDA 套件。
若用 Intel 顯示卡,必須安裝並設定 SYCL。
如果無法使用硬體加速,OIDN 會自動切換為多執行緒 CPU 降噪。想確認 GPU 降噪是否有效,可在烘焙光照貼圖時用顯示卡監控工具檢查降噪階段的 GPU 使用率與 VRAM 占用。NVIDIA 用戶可用 nvidia-smi 指令檢查。
由於檔案較大,Godot 未內建 OIDN。你可以從其[官方網站](https://www.openimagedenoise.org/downloads.html)下載預編譯二進位包,解壓縮後,於編輯器設定(FileSystem > Tools > OIDN > OIDN Denoise Path)中指定 oidnDenoise 執行檔路徑。該執行檔位於你解壓縮資料夾裡的 bin 子資料夾中。
於專案設定將降噪方法改為 OIDN**(**Rendering > Lightmapping > Denoiser),即可在本專案所有光照貼圖烘焙時啟用 OIDN。
備註
降噪方法設於專案設定(非編輯器設定),這樣同一專案的不同成員可以確保結果一致,都使用同樣的降噪方式。
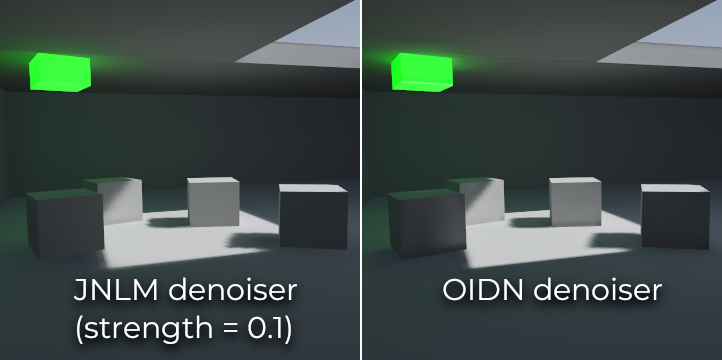
JNLM 與 OIDN 降噪效果比較。你會發現 OIDN 能更好保留細節,並減少不同物件之間的接縫。
動態物件
與 VoxelGI 和 SDFGI 不同,動態物件接收間接光照的方式與靜態物件不同。這是因為光照貼圖僅在靜態物件上執行。
為了顯示動態物件上的間接照明,使用了 3D 探查系統,其中光探查遍布整個場景。烘焙光照貼圖時,光照貼圖器將計算探頭接收到的*間接*光量。直射光不會儲存在光探查中,即使對於將烘焙模式設定為**靜態**的光源(因為動態物件繼續即時點亮)。
有兩種方法可以為伺服器匯出專案:
自動: 將 Gen Probes > Subdiv 設定為 Disabled 以外的值,然後烘焙光照貼圖。預設值為“8”,但您可以選擇更大的值來提高精確度,但代價是烘焙時間更長且輸出檔案大小更大。
手動: 除了自動產生探查之外或作為自動產生探查的替代方案,您可以透過向場景新增 LightmapProbe 節點來手動新增光照探查。這可用於改善動態物體經常經過的區域的照明細節。在場景中放置 LightmapProbe 節點後,必須再次烘焙光照貼圖才能使其生效。
備註
烘焙光照貼圖後,您會注意到 3D 場景中的白色球體代表烘焙光照將如何影響動態物件。這些球體**不會**出現在正在運作的專案中。
如果要在編輯器中隱藏這些球體,請在 3D 編輯器頂部切換 View > Gizmos > LightmapGI (「閉眼」圖示表示 Gizmo 已隱藏)。
光照貼圖資料
Light Data(光照資料) :烘焙後包含光照烘焙資料。紋理會被保存到磁片上,但這裡還會包含動態物件的捕獲資料,資料量可能非常大。如果你使用的是 .tscn 格式的場景,應該將此資源保存成外部的二進位 .lmbake 檔,否則 .tscn 場景可能因為使用 Base64 編碼二進位資料而變得巨大。
小訣竅
如果有後期處理的需要,可以使用圖像編輯器查看並編輯所生成的 EXR 檔。不過請注意,重新烘焙貼圖會覆蓋你對 EXR 檔的修改。
減少 LightmapGI 偽影
如果你發現隨著鏡頭移動,LightmapGI 節點會忽隱忽現,這很可能是因為同時可顯示的 LightmapGI 實例數量超過上限。Godot 最多同時渲染 8 個 LightmapGI 節點,若畫面中超過 8 個實例,部分就會開始閃爍。