Attention: Here be dragons
This is the latest
(unstable) version of this documentation, which may document features
not available in or compatible with released stable versions of Godot.
Checking the stable version of the documentation...
解析度縮放
為什麼要使用解析度縮放?
隨著現代遊戲的算繪複雜性不斷增加,以原生解析度進行算繪在低階的顯示卡上已經不太實際。
解析度縮放是影響場景 GPU 要求的最直接方法之一。在 GPU(而不是 CPU)成為瓶頸的場景中,降低解析度比例可以顯著提高效能。解析度縮放對於效能和功耗預算有限的行動 GPU 尤其重要。
雖然解析度縮放是一個重要的工具,但請記住,解析度縮放並不是要取代低階硬體上降低圖形設定的方法。考慮在遊戲選單中公開解析度比例和圖形設定。
也參考
你可以使用 3D 抗鋸齒展示專案 來實際比較不同解析度縮放模式與縮放係數的效果。
備註
解析度縮放目前不適用於 2D 算繪,但可以使用 viewport 拉伸模式進行模擬。請參閱 多重解析度 以了解更多資訊。
解析度縮放選項
在進階專案設定的 算繪 > 縮放 3D 部分中,您可以找到用於 3D 解析度縮放的多個選項:
縮放模式
Bilinear: 標準雙線性過濾(預設)。當目前算繪器不支援 FSR 1.0 或 FSR 2.2 時作為後備選項。所有算繪器皆可用。
FSR 1.0: AMD FidelityFX Super Resolution 1.0。相較雙線性縮放較慢,但畫質更高。在非常慢的 GPU 上,其成本可能過高,不見得值得取代雙線性縮放。僅在 Forward+ 算繪器可用。
FSR 2.2: AMD FidelityFX Super Resolution 2.2(自 Godot 4.2 起)。速度最慢,但相較 FSR1 與雙線性縮放畫質更高。在較慢的 GPU 上,其成本可能過高,不見得值得取代雙線性縮放或 FSR1。若要讓 FSR2 的效能接近 FSR1,需要使用更低的解析度縮放係數。僅在 Forward+ 算繪器可用。
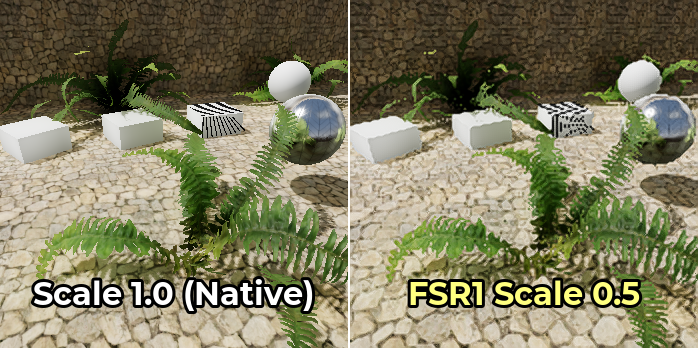
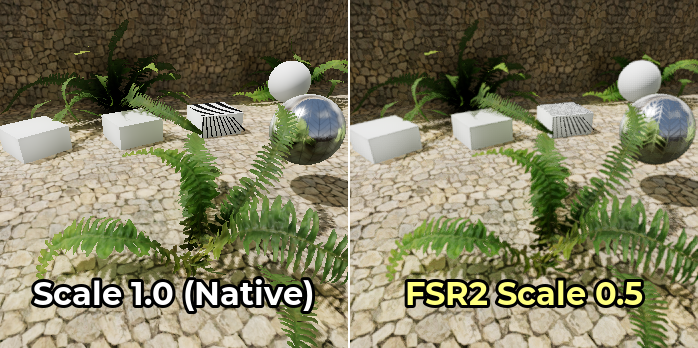
以下是原生解析度、50% 解析度下的雙線性縮放、FSR1 以及 FSR2 縮放(同樣 50% 解析度)之間的比較圖:

FSR1 放大與另一種形式的消除鋸齒結合使用時效果最佳。在這種情況下,應優先使用時間性消除鋸齒 (TAA) 或多重取樣消除鋸齒 (MSAA),因為 FXAA 沒有增加時間性資訊並使影像更模糊。
另一方面,FSR2 本身就有內建時間性抗鋸齒(TAA)。這代表你不需要另外啟用其他抗鋸齒方法,影像就能平滑顯示。當 FSR2 被選為 3D 縮放方式時,Use TAA 專案設定會被忽略,因為 FSR2 的時間性抗鋸齒會自動優先生效。
以下是相同的比較,但在所有影像上啟用了 4× MSAA:
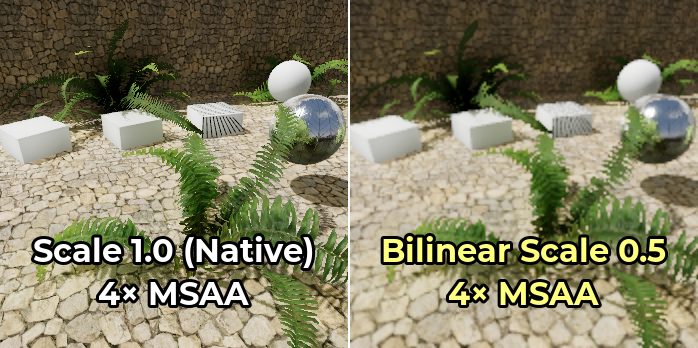
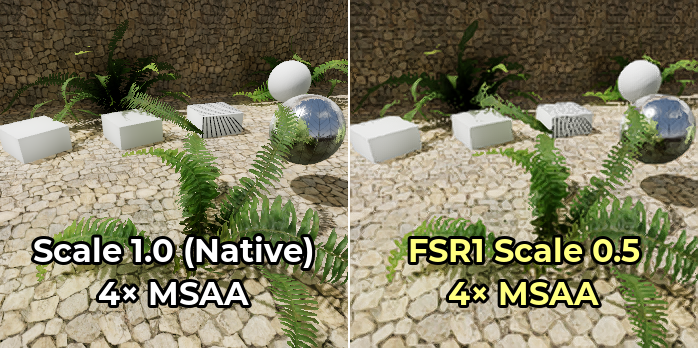
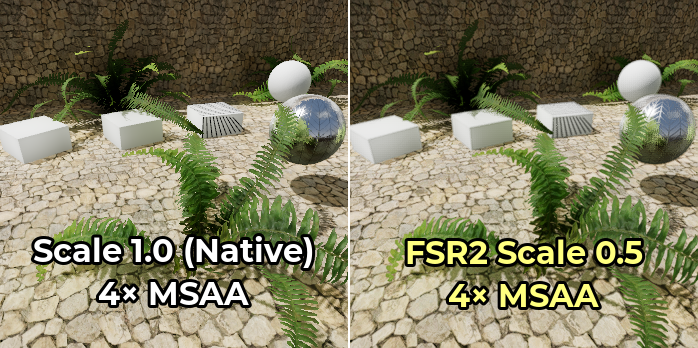
請注意,啟用 4× MSAA 後,FSR1 的邊緣放大效果會更加自然。而 FSR2 因為本身已做時間性抗鋸齒,啟用 MSAA 效果提升有限。
算繪縮放比例
算繪 > 縮放 3D > 比例 設定可調整解析度比例。 「1.0」表示全解析度比例,3D 算繪解析度與 2D 算繪解析度相符。解析度比例*低於*“1.0”可用於加速算繪,但代價是最終影像更模糊和更多鋸齒。
可以在執行時透過修改 Viewport 節點上的 scaling_3d_scale 屬性來調整算繪比例。
高於 1.0 的解析度縮放比例可用於超級取樣反鋸齒 (SSAA)。這將提供反鋸齒,但效能消耗*非常*大,且對於大多數使用情況來說,不建議 使用。詳見 3D 抗鋸齒。
下表列出了常見的螢幕解析度、最終的 3D 算繪解析度以及根據算繪比例選項每個畫面需要算繪的百萬像素數。每個表中的行按從最快到最慢的順序排序。
備註
分辨率比例是在**每軸**的基礎上定義的。例如,這意味著將解析度比例因子減半將使每影格算繪的百萬像素數減少4 倍,而不是2 倍。因此,非常低或非常高的解析度比例因子可能會對效能產生比預期更大的影響。
1920×1080(全高清)
解析度縮放係數 |
著色器語言限制 |
算繪前一影格的時間 |
|---|---|---|
|
960×540 |
0.52 像素 |
|
1286×723 |
0.93 像素 |
|
1440×810 |
1.17 MPix |
|
1632×918 |
1.50 MPix |
|
1920×1080 |
2.07 MPix |
|
2553×1436 |
3.67 MPix |
|
2880×1620 |
4.67 MPix |
|
3840×2160 |
8.29 MPix |
2560×1440(QHD)
解析度縮放係數 |
著色器語言限制 |
算繪前一影格的時間 |
|---|---|---|
|
1280×720 |
0.92 像素 |
|
1715×964 |
1.65 像素 |
|
1920×1080 |
2.07 MPix |
|
2176×1224 |
2.66 像素 |
|
2560×1440 |
3.69 MPix |
|
3404×1915 |
6.52 像素 |
|
3840×2160 |
8.29 MPix |
|
5120×2880 |
14.75 像素 |
3840×2160(Ultra HD「4K」)
解析度縮放係數 |
著色器語言限制 |
算繪前一影格的時間 |
|---|---|---|
|
1920×1080 |
2.07 MPix |
|
2572×1447 |
3.72 MPix |
|
2880×1620 |
4.67 MPix |
|
3264×1836 |
5.99 像素 |
|
3840×2160 |
8.29 MPix |
|
5107×2872 |
14.67 像素 |
|
5760×3240 |
18.66 像素 |
|
7680×4320 |
33.18 MPix |
FSR 銳度
這僅適用於 Forward+ 算繪器,不適用於 Mobile 或 Compatibility 算繪器。
當使用 FSR1 或 FSR2 縮放模式時,銳利度可以使用 算繪 > 3D 縮放 > FSR 銳利度 這個進階專案設定來調整。
與大多數其他銳利度滑桿相比,強度是相反的:「較低」值將導致最終影像更銳利,而「較高」值將「減少」銳利化濾鏡的影響。 0.0 是最銳利的,而``2.0`` 是最不銳利的。預設值「0.2」在保留原始影像的清晰度和避免因過度銳化而產生額外鋸齒之間提供了平衡。
備註
如果你希望在原生解析度算繪時使用銳化,Godot 目前不允許獨立使用 FSR1 的銳化組件 (RCAS),必須與其放大組件 (EASU) 一起使用。
作為一個替代方案,您可以將 3D 算繪縮放設定為 0.99,將縮放模式設定為 FSR 1.0,然後依照需求調整 FSR 銳利度。這樣可以在接近原生解析度算繪的同時使用 FSR 1.0。
或者,如果你的顯示卡效能足夠,也可以將縮放模式設為 FSR 2.2,並將 3D 算繪比例設為 1.0。這樣同時可取得高品質的時間性抗鋸齒效果。此時 FSR 銳利度 設定依然有效。
Mipmap
這僅適用於 Forward+ 以及 Mobile 算繪器,不適用於相容性算繪器。
當 3D 解析度比例設定為低於「1.0」時,Godot 會自動使用負紋理 mipmap 偏差。這樣可以更好地保留紋理細節,但代價是詳細紋理上出現顆粒狀外觀。
目前,紋理 LOD 偏差會同時影響 2D 與 3D 算繪。但請注意,它只會影響有啟用 mipmap 的紋理。2D 使用的紋理預設沒有啟用 mipmap,這代表只有 3D 算繪會受到影響,除非你在匯入面板將 2D 紋理的 mipmap 打開。
用來決定紋理 mipmap 偏差的公式為:log2f(min(scaling_3d_scale, 1.0)) + custom_texture_mipmap_bias
為了抵消某些抗鋸齒方法增加的模糊度,Godot 還在啟用 FXAA 時新增了「-0.25」偏移量,在啟用 TAA 時新增了「-0.5」偏移量。如果同時啟用兩者,則使用“-0.75”偏移量。此 mipmap 偏移偏移在解析度縮放偏移之前應用,因此它不會根據解析度縮放而變化。
貼圖 LOD 偏移可以透過調整 渲染 > 貼圖 > 預設過濾器 > 貼圖 Mipmap 偏移 進階專案設定手動變更。它也可以在執行時透過調整 視埠 上的 texture_mipmap_bias 屬性來變更。
警告
手動調整 mipmap LOD 偏差在某些情況下可能很有用,但應小心執行,以防止最終影像在運動中看起來有顆粒感。
負 mipmap LOD 偏差也會降低效能,因為必須在更遠的距離取樣更高解析度的 mip。手動偏移的建議值在“-0.5”和“0.0”之間。
正 mipmap LOD 偏差將使 mipmap 紋理看起來比預期更模糊。這可能會稍微提高性能,但不建議這樣做,因為視覺品質的損失通常不值得性能的提升。
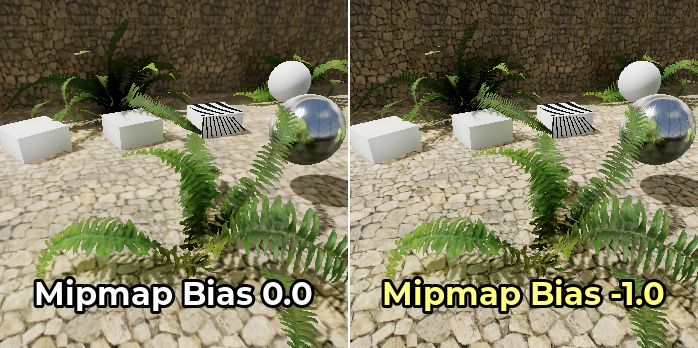
以下範例展示一個極端情況:mipmap LOD 偏差設為 -1.0,並關閉各向異性過濾,讓效果差異更加明顯:
疑難排解
降低解析度比例時效能不會增加太多
如果將解析度比例降低到「0.5」之類的值時效能沒有增加太多,則可能表示效能瓶頸在場景的其他地方。例如,您的場景可能有太多繪製呼叫,導致出現 CPU 瓶頸。同樣,您可能啟用了太多圖形效果供 GPU 處理(例如 SDFGI、SSAO 或 SSR)。
更多資訊請參考 效能 教學。