Attention: Here be dragons
This is the latest
(unstable) version of this documentation, which may document features
not available in or compatible with released stable versions of Godot.
Checking the stable version of the documentation...
2D 運動概述
前言
每個初學者都曾遇過同樣的情況:「我要怎麼控制我的角色?」根據你想做的遊戲風格,你可能會有特殊的需求。但普遍來說,大部分2D遊戲的操控是以少數幾種設計為基礎的。
這裡我們用 CharacterBody2D 當作範例,不過其他型別的節點(Area2D、RigidBody2D)也適用相同原則。
設定
Each example below uses the same scene setup. Start with a CharacterBody2D with two
children: Sprite2D and CollisionShape2D. You can use the Godot icon (icon.svg)
for the Sprite2D's texture or use any other 2D image you have.
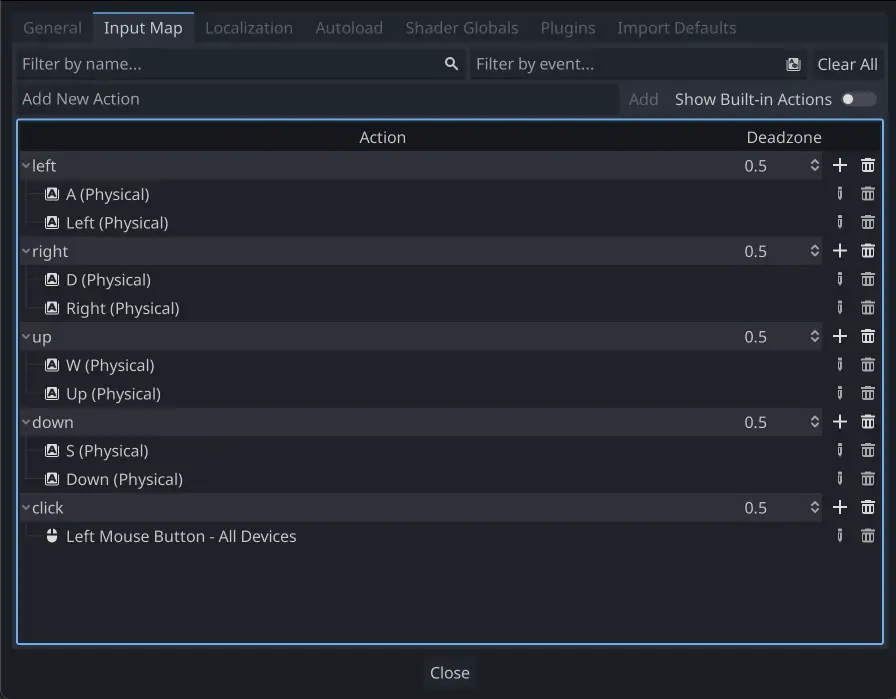
開啟「專案 -> 專案設定」,切換到「輸入對應」分頁。新增下列輸入動作(詳情請參考 InputEvent):
八向移動
在這個情境中,你希望玩家可以按上下左右(或 W/A/S/D)來移動角色。所謂的「八向移動」,就是因為玩家可以同時按下兩個方向鍵,讓角色斜向移動。
在角色節點新增腳本,填入下列程式碼:
extends CharacterBody2D

@export var speed = 400

func get_input():
    var input_direction = Input.get_vector("left", "right", "up", "down")
    velocity = input_direction * speed

func _physics_process(delta):
    get_input()
    move_and_slide()
using Godot;

public partial class Movement : CharacterBody2D
{
    [Export]
    public int Speed { get; set; } = 400;

    public void GetInput()
    {

        Vector2 inputDirection = Input.GetVector("left", "right", "up", "down");
        Velocity = inputDirection * Speed;
    }

    public override void _PhysicsProcess(double delta)
    {
        GetInput();
        MoveAndSlide();
    }
}
在 get_input() 函式中,我們用 Input 的 get_vector() 來檢查四個方向鍵,回傳一個方向向量。
然後我們可以將這個長度為 1 的方向向量乘上我們想要的速度,來設定速度。
小訣竅
如果你沒學過向量數學或需要複習,可以參考 向量數學 了解 Godot 裡的向量用法。
備註
如果你按下按鍵時上述程式碼沒反應,請再次確認你是否按照本教學 設定 的說明正確設定了輸入動作。
旋轉+移動
這種移動方式有時被稱為「Asteroids 風格」,因為這很像經典街機遊戲 Asteroids 的移動方式。按左右鍵讓角色旋轉,按上下鍵則讓角色往面對的方向前進或後退。
extends CharacterBody2D

@export var speed = 400
@export var rotation_speed = 1.5

var rotation_direction = 0

func get_input():
    rotation_direction = Input.get_axis("left", "right")
    velocity = transform.x * Input.get_axis("down", "up") * speed

func _physics_process(delta):
    get_input()
    rotation += rotation_direction * rotation_speed * delta
    move_and_slide()
using Godot;

public partial class Movement : CharacterBody2D
{
    [Export]
    public int Speed { get; set; } = 400;

    [Export]
    public float RotationSpeed { get; set; } = 1.5f;

    private float _rotationDirection;

    public void GetInput()
    {
        _rotationDirection = Input.GetAxis("left", "right");
        Velocity = Transform.X * Input.GetAxis("down", "up") * Speed;
    }

    public override void _PhysicsProcess(double delta)
    {
        GetInput();
        Rotation += _rotationDirection * RotationSpeed * (float)delta;
        MoveAndSlide();
    }
}
在這裡我們新增了兩個變數來記錄旋轉方向和速度。旋轉會直接套用到角色的 rotation 屬性上。
要設定速度,我們利用角色本身的 transform.x,這是指向角色「前方」的向量,然後乘上速度。
旋轉+移動(滑鼠)
這種移動方式是前面 Asteroids 式的變體。這次方向是由滑鼠位置決定,角色會一直「朝向」滑鼠游標。前進/後退的操作則不變。
extends CharacterBody2D

@export var speed = 400

func get_input():
    look_at(get_global_mouse_position())
    velocity = transform.x * Input.get_axis("down", "up") * speed

func _physics_process(delta):
    get_input()
    move_and_slide()
using Godot;

public partial class Movement : CharacterBody2D
{
    [Export]
    public int Speed { get; set; } = 400;

    public void GetInput()
    {
        LookAt(GetGlobalMousePosition());
        Velocity = Transform.X * Input.GetAxis("down", "up") * Speed;
    }

    public override void _PhysicsProcess(double delta)
    {
        GetInput();
        MoveAndSlide();
    }
}
這裡我們用 Node2D 的 look_at() 方法讓角色朝向滑鼠游標。如果不用這個方法,也可以直接這樣設定角度:
rotation = get_global_mouse_position().angle_to_point(position)
var rotation = GetGlobalMousePosition().AngleToPoint(Position);
點擊並移動
最後這個範例完全用滑鼠來控制角色。點擊畫面就會讓角色移動到指定位置。
extends CharacterBody2D

@export var speed = 400

var target = position

func _input(event):
    # Use is_action_pressed to only accept single taps as input instead of mouse drags.
    if event.is_action_pressed(&"click"):
        target = get_global_mouse_position()

func _physics_process(delta):
    velocity = position.direction_to(target) * speed
    # look_at(target)
    if position.distance_to(target) > 10:
        move_and_slide()
using Godot;

public partial class Movement : CharacterBody2D
{
    [Export]
    public int Speed { get; set; } = 400;

    private Vector2 _target;

    public override void _Input(InputEvent @event)
    {
        // Use IsActionPressed to only accept single taps as input instead of mouse drags.
        if (@event.IsActionPressed("click"))
        {
            _target = GetGlobalMousePosition();
        }
    }

    public override void _PhysicsProcess(double delta)
    {
        Velocity = Position.DirectionTo(_target) * Speed;
        // LookAt(_target);
        if (Position.DistanceTo(_target) > 10)
        {
            MoveAndSlide();
        }
    }
}
請注意我們在移動前加上的 distance_to() 檢查。若沒有這一判斷,角色抵達目標時會因為超過目標又回頭,造成一直來回「抖動」。
如果你想讓角色朝運動方向轉向,可以把 look_at() 那一行取消註解。
小訣竅
這個技巧也可以當作「跟隨」角色的基礎,target 目標位置可以是你想追蹤的任何物件。
總結
這些範例程式碼非常適合當作你自己專案的起點,歡迎自由使用或改造。
您可以在此處下載這個範例專案:2d_movement_starter.zip