Attention: Here be dragons
This is the latest
(unstable) version of this documentation, which may document features
not available in or compatible with released stable versions of Godot.
Checking the stable version of the documentation...
XR 房間規模
XR 專案的一大特色是能夠在大空間中自由走動。這個空間通常受限於玩家實際所在的房間,並在房間內設置追蹤感測器。然而,隨著「內向外」追蹤技術的出現,遊戲空間可以大幅擴展。
對開發者來說,這帶來了許多有趣的挑戰。本文件將探討你可能遇到的各種挑戰並概述一些解決方案。針對坐式 XR 遊戲的相關議題,會在另一份文件中說明。
備註
開發遊戲初期,開發者通常坐在桌前進行基礎開發。這種情況下,房間規模的相關問題往往到了較晚階段才顯現。因此建議盡早站起來走動測試,確保基礎功能穩固後,再選擇舒適地坐著開發。
在傳統第一人稱遊戲中,玩家通常由 CharacterBody3D 節點表示。這個節點透過控制器、滑鼠或鍵盤輸入來移動,相機則安裝在該節點上、約略對應玩家的頭部位置。
將這種模型套用到 XR 設定時,我們會在角色本體下新增 XROrigin3D 節點作為子節點,再在原點節點下新增 XRCamera3D 作為其子節點。表面上這看起來可行,但實際上這個模型並未考慮到 XR 裡有兩種移動方式:一種是控制器輸入造成的移動,另一種是玩家在現實空間中的實體移動。
因此,原點節點並不代表玩家的位置,而是代表追蹤空間的中心或起點,也就是玩家可實際移動的範圍。當玩家在房間內移動時,這些移動會透過頭戴裝置的追蹤反映在遊戲中,並相應更新相機節點的位置。就實作層面來說,我們追蹤的其實是一顆脫離身體的頭。除非有身體追蹤功能,否則我們無法得知玩家身體的位置與朝向。
這會導致第一個很明顯的問題:當玩家透過控制器移動時,我們雖然用跟普通遊戲一樣的方式讓玩家角色向前移動,但其實玩家實際在空間中的位置早就偏離預期,導致碰撞檢查會判斷錯誤的位置。
第二個問題在於玩家離開追蹤空間中心、並用控制器轉動時會出現。如果我們旋轉角色本體,玩家會以圓周方式在房間內移動。
即使我們解決了上述問題,還會遇到第三個問題:當虛擬世界中玩家路徑被擋住時,玩家在現實中還是可以繼續往前走。
我們將用兩種不同的解法處理前兩個問題,再討論第三個問題的應對方式。
以原點為中心的解決方案
首先我們介紹結構調整的解法,這也是 XR Tools 目前採用的方法。
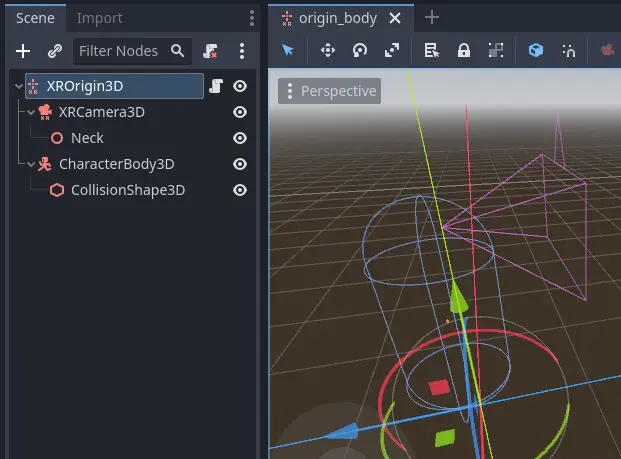
在這種架構下,將角色本體標記為頂層,讓它不會隨原點一起移動。
此外,我們會加入一個輔助節點,用於標示脖子關節相對於相機的位置,藉此推算身體中心點。
角色移動現在分為三個步驟處理。
備註
以原點為中心的移動範例 提供了下述技術更詳細的實作範例。
步驟 1
第一步是處理玩家的實體移動。我們會偵測玩家目前所在位置,並嘗試讓角色本體移動到該處。
func _process_on_physical_movement(delta):
  # Remember our current velocity, we'll apply that later
  var current_velocity = $CharacterBody3D.velocity

  # Remember where our player body currently is
  var org_player_body: Vector3 = $CharacterBody3D.global_transform.origin

  # Determine where our player body should be
  var player_body_location: Vector3 = $XRCamera3D.transform * $XRCamera3D/Neck.transform.origin
  player_body_location.y = 0.0
  player_body_location = global_transform * player_body_location

  # Attempt to move our character
  $CharacterBody3D.velocity = (player_body_location - org_player_body) / delta
  $CharacterBody3D.move_and_slide()

  # Set back to our current value
  $CharacterBody3D.velocity = current_velocity

  # Check if we managed to move all the way, ignoring height change
  var movement_left = player_body_location - $CharacterBody3D.global_transform.origin
  movement_left.y = 0.0
  if (movement_left).length() > 0.01:
    # We'll talk more about what we'll do here later on
    return true
  else:
    return false

func _physics_process(delta):
  var is_colliding = _process_on_physical_movement(delta)
請注意,當我們無法讓玩家完全移動到目標位置時,_process_on_physical_movement 函式會回傳 true。
步驟 2
第二步是根據使用者輸入處理玩家的旋轉。
由於專案需求不同,輸入方式也會不同,因此我們單純呼叫 _get_rotational_input 函式。這個函式應該取得必要的輸入,並回傳每秒弧度的旋轉速度。
備註
在範例中,我們會以簡化方式示範,不會加入如「瞬間轉向」或「視角暈染」等舒適性設計。建議正式開發時務必加入這類舒適性功能。
func _get_rotational_input() -> float:
  # Implement this function to return rotation in radians per second.
  return 0.0

func _copy_player_rotation_to_character_body():
  # We only copy our forward direction to our character body, we ignore tilt
  var camera_forward: Vector3 = -$XRCamera3D.global_transform.basis.z
  var body_forward: Vector3 = Vector3(camera_forward.x, 0.0, camera_forward.z)

  $CharacterBody3D.global_transform.basis = Basis.looking_at(body_forward, Vector3.UP)

func _process_rotation_on_input(delta):
  var t1 := Transform3D()
  var t2 := Transform3D()
  var rot := Transform3D()

  # We are going to rotate the origin around the player
  var player_position = $CharacterBody3D.global_transform.origin - global_transform.origin

  t1.origin = -player_position
  t2.origin = player_position
  rot = rot.rotated(Vector3(0.0, 1.0, 0.0), _get_rotational_input() * delta)
  global_transform = (global_transform * t2 * rot * t1).orthonormalized()

  # Now ensure our player body is facing the correct way as well
  _copy_player_rotation_to_character_body()

func _physics_process(delta):
  var is_colliding = _process_on_physical_movement(delta)
  if !is_colliding:
    _process_rotation_on_input(delta)
備註
我們在物理流程中加入旋轉處理,但僅在玩家能完整移動時才執行。也就是說,若玩家移動到不該去的位置,我們就不再處理進一步移動。
步驟 3
第三步,也是最後一步,是根據玩家輸入讓角色前進、後退或側移。
和旋轉一樣,不同專案的移動輸入也會不同,因此我們只需呼叫 _get_movement_input 函式,讓它取得輸入,並傳回經速度縮放的方向向量。
備註
同樣地,這裡也只做簡單處理。實務上建議加上舒適性選項。
var gravity = ProjectSettings.get_setting("physics/3d/default_gravity")

func _get_movement_input() -> Vector2:
  # Implement this to return requested directional movement in meters per second.
  return Vector2()

func _process_movement_on_input(delta):
  # Remember where our player body currently is
  var org_player_body: Vector3 = $CharacterBody3D.global_transform.origin

  # We start with applying gravity
  $CharacterBody3D.velocity.y -= gravity * delta

  # Now we add in our movement
  var input: Vector2 = _get_movement_input()
  var movement: Vector3 = ($CharacterBody3D.global_transform.basis * Vector3(input.x, 0, input.y))
  $CharacterBody3D.velocity.x = movement.x
  $CharacterBody3D.velocity.z = movement.z

  # Attempt to move our player
  $CharacterBody3D.move_and_slide()

  # And now apply the actual movement to our origin
  global_transform.origin += $CharacterBody3D.global_transform.origin - org_player_body

func _physics_process(delta):
  var is_colliding = _process_on_physical_movement(delta)
  if !is_colliding:
    _process_rotation_on_input(delta)
    _process_movement_on_input(delta)
以角色本體為中心的解決方案
在這個架構下,我們將角色本體作為根節點,這樣更容易與傳統遊戲機制結合。
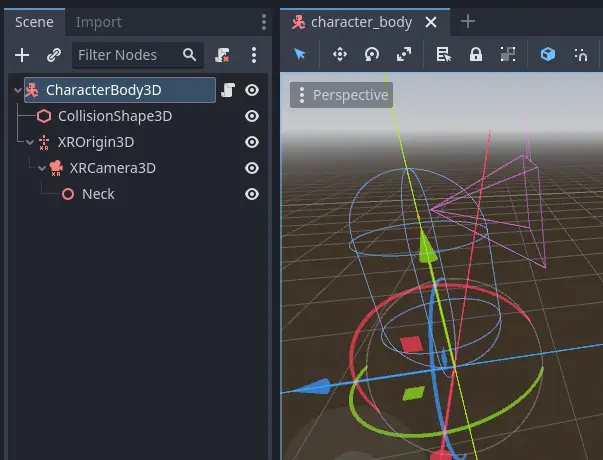
這裡我們有一個帶有碰撞形狀的標準角色本體,以及原點節點和相機作為普通子節點。還有脖子輔助節點。
角色移動同樣以三步驟處理,但實作細節略有不同。
備註
以角色本體為中心的移動範例 提供了下述技術更完整的範例。
步驟 1
這種方法的精髓就在步驟 1。我們會像前一個方法一樣,將物理移動套用到角色本體,但同時在原點節點上做反向抵消。
這樣能確保玩家的位置與角色本體始終保持同步。
# Helper variables to keep our code readable
@onready var origin_node = $XROrigin3D
@onready var camera_node = $XROrigin3D/XRCamera3D
@onready var neck_position_node = $XROrigin3D/XRCamera3D/Neck

func _process_on_physical_movement(delta) -> bool:
  # Remember our current velocity, we'll apply that later
  var current_velocity = velocity

  # Start by rotating the player to face the same way our real player is
  var camera_basis: Basis = origin_node.transform.basis * camera_node.transform.basis
  var forward: Vector2 = Vector2(camera_basis.z.x, camera_basis.z.z)
  var angle: float = forward.angle_to(Vector2(0.0, 1.0))

  # Rotate our character body
  transform.basis = transform.basis.rotated(Vector3.UP, angle)

  # Reverse this rotation our origin node
  origin_node.transform = Transform3D().rotated(Vector3.UP, -angle) * origin_node.transform

  # Now apply movement, first move our player body to the right location
  var org_player_body: Vector3 = global_transform.origin
  var player_body_location: Vector3 = origin_node.transform * camera_node.transform * neck_position_node.transform.origin
  player_body_location.y = 0.0
  player_body_location = global_transform * player_body_location

  velocity = (player_body_location - org_player_body) / delta
  move_and_slide()

  # Now move our XROrigin back
  var delta_movement = global_transform.origin - org_player_body
  origin_node.global_transform.origin -= delta_movement

  # Return our value
  velocity = current_velocity

  if (player_body_location - global_transform.origin).length() > 0.01:
    # We'll talk more about what we'll do here later on
    return true
  else:
    return false

func _physics_process(delta):
  var is_colliding = _process_on_physical_movement(delta)
本質上,這種寫法會讓角色本體移動到玩家當前位置,再將原點節點等量向後移動,使玩家始終位於角色本體上方的中心。
我們先處理旋轉。角色本體應該朝向玩家在前一幀看的方向,因此需先計算相機在角色本體空間中的朝向,再計算玩家頭部旋轉的角度。然後以相同角度旋轉角色本體,使其朝向與玩家一致,最後在原點節點上做反向旋轉,讓相機再次與玩家對齊。
移動也是同樣道理。角色本體應該出現在玩家前一幀所站位置,計算玩家從該處移動的距離後,再嘗試將角色本體移動到這個新位置。
由於玩家可能因碰撞體而被阻擋,我們只將原點節點往回移動角色本體實際移動的距離。這樣即使玩家偏離原預期位置,仍可正確反映在定位上。
如同前述解法,遇到這種情況時會回傳 true。
步驟 2
這一步中,會根據控制器輸入套用旋轉,基本寫法就跟一般第一人稱遊戲一樣。
由於專案需求不同,輸入方式也會不同,因此我們單純呼叫 _get_rotational_input 函式。這個函式應該取得必要的輸入,並回傳每秒弧度的旋轉速度。
func _get_rotational_input() -> float:
  # Implement this function to return rotation in radians per second.
  return 0.0

func _process_rotation_on_input(delta):
  rotation.y += _get_rotational_input() * delta

func _physics_process(delta):
  var is_colliding = _process_on_physical_movement(delta)
  if !is_colliding:
    _process_rotation_on_input(delta)
步驟 3
第三步同樣是根據控制器輸入執行移動,實作方式就和傳統第一人稱遊戲一樣。
和旋轉一樣,不同專案的移動輸入也會不同,因此我們只需呼叫 _get_movement_input 函式,讓它取得輸入,並傳回經速度縮放的方向向量。
func _get_movement_input() -> Vector2:
  # Implement this to return requested directional movement in meters per second.
  return Vector2()

func _process_movement_on_input(delta):
  var movement_input = _get_movement_input()
  var direction = global_transform.basis * Vector3(movement_input.x, 0, movement_input.y)
  if direction:
    velocity.x = direction.x
    velocity.z = direction.z
  else:
    velocity.x = move_toward(velocity.x, 0, delta)
    velocity.z = move_toward(velocity.z, 0, delta)

  move_and_slide()

func _physics_process(delta):
  var is_colliding = _process_on_physical_movement(delta)
  if !is_colliding:
    _process_rotation_on_input(delta)
    _process_movement_on_input(delta)
當玩家走到不該去的地方
想像玩家站在一間上鎖房間外面。你不希望玩家在門打開前就進房間,也不希望玩家看到房間內的內容。
透過控制器移動玩家時的邏輯能妥善阻止這種狀況。當玩家碰到靜態物件時,程式碼會阻止玩家進入房間。
但在 XR 中,現實裡沒什麼能阻止玩家踏出真正的一步。
上述兩種方法都會阻止角色本體移動到玩家不可進入的位置。但如果玩家在現實中真的走過去,相機還是會跑進房間裡。
理論上可以完全禁止這種移動,並調整 XR 原點的位置,讓玩家待在房間外。
但這麼做會讓物理移動無法在虛擬世界中如實反映,這可能導致玩家產生暈眩感。
許多 XR 遊戲的做法,是測量玩家實體位置與虛擬身體留在原地的距離。當這個距離拉大(通常到幾公分)時,畫面就會慢慢變黑。
上述解法可讓我們將這段判斷邏輯加入步驟 1 的程式碼最後。
進一步改進程式碼的建議:
只要這個距離尚小,仍允許控制器輸入動作,
即便停用控制器輸入,也要讓玩家繼續受到重力影響。
備註
我們的範例專案中有展示玩家走進限制區時畫面漸黑的實作範例。
更多改進建議
以上兩種方法都很適合作為開發房間規模 XR 遊戲的起點。
還有幾項實作上值得注意的建議:
可利用相機高度判斷玩家是站立、蹲下、跳躍還是躺下,並據此動態調整碰撞形狀的大小與朝向。若能針對頭部和身體各自設置更精確的碰撞形狀,效果會更好。
場景剛載入時,玩家可能離追蹤空間中心很遠,導致一開始就出現在不同房間。此時遊戲會嘗試讓角色本體從起始點移動到玩家實際所在處,但多半失敗。因此應設計重置功能,主動調整原點,讓玩家從正確的起始位置開始。
上述這些改進都假設玩家已經站好準備,但實際上玩家可能還在戴頭戴裝置,因此無法保證隨時生效。
許多遊戲(包含 XR Tools)會設計一個起始或載入畫面,讓玩家在準備好時按下按鈕。通常這個起始區是一個很大的空間,玩家站在哪裡對所見畫面影響不大。當玩家按下按鈕時,即記錄下相機的位置與高度。