Attention: Here be dragons
This is the latest
(unstable) version of this documentation, which may document features
not available in or compatible with released stable versions of Godot.
Checking the stable version of the documentation...
GDScript 匯出屬性
在 Godot 中可以匯出類別成員。這表示它們的值會和其所附加的資源(例如 場景)一起被儲存,並且在使用 RPC 時也會被同步傳遞。這些成員也會出現在屬性檢視器中供你編輯。要匯出成員,請使用 @export 標註。
@export var number: int = 5
在這個範例中,值 5 會被儲存,並可在屬性編輯器中看到。
匯出的變數必須初始化為常數運算式,或是在變數上指定型別。一些匯出標註具有特定型別,不需要明確指定型別(請參考下方「範例」章節)。
匯出成員變數的主要好處之一,是能讓它們在編輯器中顯示並編輯。這樣美術和遊戲設計師就可以直接調整影響程式執行的數值。為此,Godot 提供了專屬的匯出語法。此外,文件註釋 也可用於提示描述,滑鼠懸停時即可顯示。
備註
屬性也可以在其他語言(如 C#)中匯出,語法依語言而異。請參閱 C# 匯出屬性 以了解 C# 匯出的資訊。
基本用法
如果匯出值有指定常數或常數運算式,型別會自動推斷並於編輯器套用。
@export var number = 5
如果沒有預設值,可以直接在變數上標註型別。
@export var number: int
資源和節點也能被匯出。
@export var resource: Resource
@export var node: Node
即使腳本未在編輯器中執行,匯出的屬性仍然可以編輯。不過,getter 與 setter 只有在腳本處於 工具模式 時才會生效。
匯出屬性分組
可以用 @export_group 標註,在屬性檢視器中將匯出屬性分組。這個標註後的每個匯出屬性都會加進該分組。要開始新群組或結束分組,請用 @export_group("")。
@export_group("My Properties")
@export var number = 3
該標註的第二個參數可用來只將擁有特定前綴的屬性進行分組。
分組無法巢狀,如需在群組中建立子群組,請使用 @export_subgroup。
@export_subgroup("Extra Properties")
@export var string = ""
@export var flag = false
你也可以使用 @export_category 標註,更改主要類別名稱或在屬性列表新增其他類別。
@export_category("Main Category")
@export var number = 3
@export var string = ""

@export_category("Extra Category")
@export var flag = false
備註
屬性列表會依據類別繼承層級組織,新增類別會打破這個規則。請謹慎使用,特別是在製作公開專案時。
字串作為路徑
字串作為檔案路徑。請參閱 @export_file。
@export_file var f
字串作為資料夾路徑。請參閱 @export_dir。
@export_dir var f
字串作為檔案路徑,並以提示方式提供自訂過濾器。請參閱 @export_file。
@export_file("*.txt") var f
也可以使用全域檔案系統路徑,但僅限於工具模式腳本。
字串作為全域檔案系統中的 PNG 檔案路徑。請參閱 @export_global_file。
@export_global_file("*.png") var tool_image
字串作為全域檔案系統中的資料夾路徑。請參閱 @export_global_dir。
@export_global_dir var tool_dir
多行標註會讓編輯器顯示一個大型輸入框,以便編輯多行內容。請參閱 @export_multiline。
@export_multiline var text
Strings as input actions
String as an input action defined in the project's input map.
@export_custom(PROPERTY_HINT_INPUT_NAME) var my_input
String as an input action defined in the project's input map, plus default
built-in values such as ui_accept and ui_cancel.
@export_custom(PROPERTY_HINT_INPUT_NAME, "show_builtin") var my_input
String as an input action defined in the project's input map, plus arbitrary values that can manually be entered.
@export_custom(PROPERTY_HINT_INPUT_NAME, "loose_mode") var my_input
String as an input action defined in the project's input map, plus default
built-in values such as ui_accept and ui_cancel and arbitrary values
that can manually be entered.
@export_custom(PROPERTY_HINT_INPUT_NAME, "show_builtin,loose_mode") var my_input
限制編輯器輸入範圍
以下所有範例請參閱 @export_range。
允許 0 到 20 的整數值。
@export_range(0, 20) var i
允許 -10 到 20 的整數值。
@export_range(-10, 20) var j
允許 -10 到 20 的浮點數,並以 0.2 為單位對齊。
@export_range(-10, 20, 0.2) var k: float
如果加上提示 "or_less" 或 "or_greater",則限制只會影響滑桿。未使用滑桿時,使用者仍可輸入任何數值或用滑鼠拖曳,即使超出指定範圍。
@export_range(0, 100, 1, "or_less", "or_greater") var l: int
可以使用 "exp" 提示將滑桿變為指數刻度,而非線性。這代表拖曳滑桿時,越往右變動速度越快,適合同時需要調整非常小或非常大數值時使用,但操作上會比較不直觀。
@export_range(0, 100000, 0.01, "exp") var exponential: float
如果數值用於緩動因子,請改用 帶有緩動提示的浮點數。
"hide_slider" 提示可用來隱藏浮點數屬性下方的水平滑桿,或整數屬性旁的上下箭頭:
@export_range(0, 1000, 0.01, "hide_slider") var no_slider: float
On the other hand, the "prefer_slider" hint can be used to show a horizontal
bar below int properties instead of up/down arrows:
@export_range(0, 100, 1, "prefer_slider") var with_slider: int
新增單位後綴與角度/弧度處理
也可以定義後綴,讓屬性在屬性檢視器中更容易理解。例如若希望使用者設定單位為「公尺」(m) 的數值:
@export_range(0, 100, 1, "suffix:m") var m: int
若角度以弧度儲存但希望在檢視器中以度數顯示,請使用 "radians_as_degrees" 提示:
@export_range(0, 360, 0.1, "radians_as_degrees") var angle: float
這會自動在檢視器顯示或修改數值時進行單位轉換,並加上度數(°)後綴。Godot 編輯器中的 rotation 屬性也都是這樣處理的。
若角度本身就是以度為單位儲存,請使用 "degrees" 提示。這樣會顯示度數符號,但不會自動進行度/弧度轉換。
Linking vector values together
It is possible to link vector values together. When the user adjusts one of the vector's components, the other components are automatically adjusted proportionally. For example, this is useful to maintain the aspect ratio of a 2D sprite when adjusting its scale. This feature can be temporarily disabled by the user by clicking the link icon to the right of the property.
# Leave the hint string empty if you don't want to add a suffix.
@export_custom(PROPERTY_HINT_LINK, "suffix:px") var vector2_linked: Vector2 = Vector2(16, 16)
Results in:
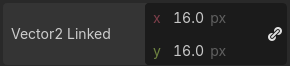
Linked Vector2i property with the "px" suffix
This hint is effective on Vector2, Vector2i, Vector3, Vector3i, Vector4, and Vector4i. It can be used at the same time as a property suffix, as seen in the example above.
帶有緩動提示的浮點數
編輯時會顯示 ease() 函式的視覺化圖示。請參閱 @export_exp_easing。
@export_exp_easing var transition_speed
顏色
以紅、綠、藍、Alpha 值指定的標準顏色。
@export var col: Color
以紅、綠、藍數值指定顏色(Alpha 永遠為 1)。請參閱 @export_color_no_alpha。
@export_color_no_alpha var col: Color
節點
Nodes can also be directly exported as properties in a script without having to use NodePaths:
# Allows any node.
@export var node: Node

# Allows any node that inherits from BaseButton.
# Custom classes declared with `class_name` can also be used.
@export var some_button: BaseButton
如有需要,仍可如 Godot 3.x 一樣匯出 NodePath:
@export var node_path: NodePath
var node = get_node(node_path)
若想限制 NodePath 只能指向特定型別的節點,可以用 @export_node_path 標註:
@export_node_path("Button", "TouchScreenButton") var some_button
資源
@export var resource: Resource
在屬性編輯器中,可以將資源檔從檔案總管拖拉到變數欄位。
不過,展開屬性檢視器下拉選單時,可能會有很多類別可選。因此若指定 Resource 的某個子類型,例如:
@export var resource: AnimationNode
下拉選單只會顯示 AnimationNode 及其所有子類別。
備註
Using @export variables for Resource objects
makes them a dependency of the instance, meaning that all the resources
referenced by @export variables are loaded when the scene
containing the script is loaded. If you want to reference a
Resource object but load it manually when you need
it (which, for example, is often the case for
PackedScenes containing a whole level), use
@export_file or @export_file_path instead.
匯出位元旗標
請參閱 @export_flags。
將整數作為位元旗標時, 可以在單一屬性中儲存多個 true/false (布林) 值。使用 @export_flags 標註即可在編輯器中設定:
# Set any of the given flags from the editor.
@export_flags("Fire", "Water", "Earth", "Wind") var spell_elements = 0
每個旗標都必須給定字串說明。這個例子中 Fire 為 1,Water 為 2,Earth 為 4,Wind 為 8。通常會另外定義常數(例如 const ELEMENT_WIND = 8 等)。
可用冒號明確指定值:
@export_flags("Self:4", "Allies:8", "Foes:16") var spell_targets = 0
只有 2 的冪次方值可作為有效的位元旗標選項。最低值為 1,因 0 表示未選擇。也可以新增組合多個旗標的選項:
@export_flags("Self:4", "Allies:8", "Self and Allies:12", "Foes:16")
var spell_targets = 0
專案設定中定義的物理、渲染與導覽層,也提供了對應的匯出標註:
@export_flags_2d_physics var layers_2d_physics
@export_flags_2d_render var layers_2d_render
@export_flags_2d_navigation var layers_2d_navigation
@export_flags_3d_physics var layers_3d_physics
@export_flags_3d_render var layers_3d_render
@export_flags_3d_navigation var layers_3d_navigation
使用位元旗標需要基本的位元運算知識。如不熟悉,請改用布林變數。
匯出列舉(Enum)
請參閱 @export_enum。
屬性可以用型別提示參照列舉,限制數值只能是列舉的項目。編輯器會在屬性檢視器建立選單,列出「Thing 1」、「Thing 2」、「Another Thing」等對應項目。選擇的值會以整數儲存。
enum NamedEnum {THING_1, THING_2, ANOTHER_THING = -1}
@export var x: NamedEnum
整數和字串屬性也可以用 @export_enum 標註,限制只能從指定清單中選擇。編輯器會在屬性檢視器建立選單,例如「戰士」、「魔法師」、「盜賊」等。儲存的數值是所選項目的索引(例如 0、1、2)。
@export_enum("Warrior", "Magician", "Thief") var character_class: int
可用冒號明確指定值:
@export_enum("Slow:30", "Average:60", "Very Fast:200") var character_speed: int
如果型別為字串,儲存時會直接以字串存入。
@export_enum("Rebecca", "Mary", "Leah") var character_name: String
若要指定初始值,必須明確給予:
@export_enum("Rebecca", "Mary", "Leah") var character_name: String = "Rebecca"
匯出陣列
匯出的陣列可以有初始值,但必須為常數運算式。
若匯出陣列指定了繼承自 Resource 的型別,可以在屬性檢視器拖拉多個檔案來一次設定。
預設值 必須 是常數運算式。
@export var a = [1, 2, 3]
匯出的陣列也可以指定型別(語法和前述相同)。
@export var ints: Array[int] = [1, 2, 3]

# Nested typed arrays such as `Array[Array[float]]` are not supported yet.
@export var two_dimensional: Array[Array] = [[1.0, 2.0], [3.0, 4.0]]
你可省略預設值,但未設定時變數會是 null。
@export var b: Array
@export var scenes: Array[PackedScene]
若指定為繼承自 Resource 的型別陣列,可從檔案系統面板拖拉多個檔案設定。
@export var textures: Array[Texture] = []
@export var scenes: Array[PackedScene] = []
Packed 型別陣列也適用,但只能初始化為空:
@export var vector3s = PackedVector3Array()
@export var strings = PackedStringArray()
匯出陣列時,也可搭配其他匯出語法使用:
@export_range(-360, 360, 0.001, "degrees") var laser_angles: Array[float] = []
@export_file("*.json") var skill_trees: Array[String] = []
@export_color_no_alpha var hair_colors = PackedColorArray()
@export_enum("Espresso", "Mocha", "Latte", "Capuccino") var barista_suggestions: Array[String] = []
@export_storage
請參閱 @export_storage。
預設情況下,匯出屬性有兩個效果:
讓該屬性儲存於場景/資源檔( PROPERTY_USAGE_STORAGE );
adds a field to the Inspector (PROPERTY_USAGE_EDITOR).
有時你可能只想讓屬性可序列化,但不想在編輯器顯示,以避免誤改或介面雜亂。
這時可以使用 @export_storage。這在 @tool 腳本中特別有用。此外,和未匯出的變數不同,這類屬性在呼叫 Resource.duplicate() 或 Node.duplicate() 時也會被複製。
var a # Not stored in the file, not displayed in the editor.
@export_storage var b # Stored in the file, not displayed in the editor.
@export var c: int # Stored in the file, displayed in the editor.
@export_custom
如果你需要更多自訂控制,超出內建 @export 標註的功能,可以用 @export_custom。這可以讓你自訂任何屬性提示、提示字串或使用標誌,語法與編輯器內建節點相似。
例如, 下列寫法會讓 altitude 屬性沒有範圍限制, 但加上 m (公尺) 後綴:
@export_custom(PROPERTY_HINT_NONE, "suffix:m") var altitude: float
這在標準 @export_range 語法下無法做到,因為 @export_range 一定要定義範圍。
參閱 class reference 以取得可用參數與數值說明。
警告
使用 @export_custom 時,GDScript 不會檢查語法是否合法。語法錯誤可能導致屬性檢視器出現不可預期的異常行為。
從 tool 腳本設定匯出變數
當你在 工具模式 模式下用腳本更改匯出變數時,屬性檢視器的值不會自動更新。若要強制更新,請在設定後呼叫 notify_property_list_changed()。
Reading an exported variable's value early on
If you read an exported variable's value in _init(), it will return the default value specified in the export annotation instead of the value that was set in the inspector. This is because assigning values from the saved scene/resource file occurs after object initialization; until then, the default value is used.
To get the value that was set in the inspector (and therefore saved in the scene/resource file),
you need to read it after the object is constructed, such as in
Node._ready(). You can also read the value
in a setter that's defined on the exported property, which is useful in
custom resources where _ready() is not available:
# Set this property to 3 in the inspector.
@export var exported_variable = 2:
    set(value):
        exported_variable = value
        print("Inspector-set value: ", exported_variable)

func _init():
    print("Initial value: ", exported_variable)
Results in:
Initial value: 2
Inspector-set value: 3
進階匯出
為避免語言設計過於複雜,並非所有匯出型別都能直接由語言層級提供。以下介紹一些常見但需使用低階 API 實現的匯出功能。
在進一步閱讀前,請先了解如何用 _set()、_get() 及 _get_property_list() 方法來自定義屬性。詳細說明請參閱 從物件中存取資料或邏輯。
也參考
如需在 C++ 中使用上述方法綁定屬性,請參閱 用 _set/_get/_get_property_list 綁定屬性。
警告
腳本必須設為 @tool 模式,才能在編輯器中運作上述方法。