Attention: Here be dragons
This is the latest
(unstable) version of this documentation, which may document features
not available in or compatible with released stable versions of Godot.
Checking the stable version of the documentation...
使用 CharacterBody2D/3D
前言
Godot 提供了多種碰撞物件來提供碰撞偵測和回應。試圖決定在你的專案中使用哪一個可能會讓你感到困惑。如果你瞭解它們中的每一個是如何工作的,以及它們的優點和缺點是什麼,你就可以避免問題並簡化開發。在本教學中,我們將查看 CharacterBody2D 節點,並展示一些如何使用它的例子.
備註
雖然本文件在其範例中使用 CharacterBody2D ,但相同的概念也適用於 3D。
什麼是角色體?
CharacterBody2D 用於實作通過程式碼控制的物體。Character bodies 在移動時可以偵測到與其他物體的碰撞,但不受引擎物理屬性(如重力、摩擦力等)的影響。雖然這意味著你必須編寫一些程式碼來建立它們的行為,但這也意味著你可以更精確地控制它們如何移動和反應。
Despite its name CharacterBody2D, it can also be used for other physics objects that require
precise manual movement logic and detailed collision information, such as moving
platforms or complex projectiles.
備註
本文假設你熟悉 Godot 中的各種物理體。否則請先閱讀 物理系統簡介 。
小訣竅
CharacterBody2D 可以受到重力和其他力的影響,但您必須在程式碼中計算它的運動。物理引擎不會移動 CharacterBody2D。
運動與碰撞
當移動一個 CharacterBody2D 時,你不應該直接設定它的 position 屬性,而應該使用 move_and_collide() 或 move_and_slide() 方法。這些方法沿著給定的向量移動物體,並且偵測碰撞。
警告
你應該在 _physics_process() 回呼函式中處理物理體的運動。
這兩種運動方法有不同的作用, 在後面的教學中, 你會看到它們如何工作的例子.
move_and_collide
這個方法需要一個 Vector2 參數以表示物體的相對運動。通常,這是速度向量乘以影格時間步長( delta )。如果引擎在沿著此向量方向的任何位置偵測到碰撞,則物體將立即停止移動。如果發生這種情況,該方法將返回一個 KinematicCollision2D 對象。
KinematicCollision2D 是一個包含碰撞和碰撞物件資料的物件. 使用這些資料, 你可以計算出你的碰撞回應.
當你只想移動物體並偵測碰撞,並且不需要任何自動碰撞回應時, move_and_collide 最有用。例如,如果你需要一顆從牆上彈開的子彈,你可以在偵測到碰撞時直接更改速度角度。請參閱下面的範例。
move_and_slide
move_and_slide() 方法旨在簡化常見情況下的碰撞回應, 即你希望一個物體沿著另一個物體滑動. 例如, 在平臺遊戲或自上而下的遊戲中, 它特別有用.
當呼叫 move_and_slide() 時,該函式使用許多節點屬性來計算其滑動行為。這些屬性可以在屬性檢視器中找到,或在程式碼中設定。
up_direction- 預設值:Vector2( 0, 0 )此屬性表示身體的速度向量(以每秒像素為單位)。
move_and_slide()會在碰撞時自動修改此值。max_slides- 預設值:4這個參數允許你定義哪些表面應該被引擎視為地板. 設定這個參數可以讓你使用
is_on_floor(),is_on_wall()和is_on_ceiling()方法來偵測物體接觸的表面型別. 預設值意味著所有的表面都被認為是牆壁.up_direction- 預設值:Vector2( 0, 0 )這個參數允許你定義哪些表面應該被引擎視為地板. 設定這個參數可以讓你使用
is_on_floor(),is_on_wall()和is_on_ceiling()方法來偵測物體接觸的表面型別. 預設值意味著所有的表面都被認為是牆壁.stop_on_slope- 預設值:false該參數可以防止物體站立不動時從斜坡上滑落.
floor_max_angle- 預設值:0.785398(以弧度表示, 相當於45度)這是當身體碰到斜坡時允許滑動的最小角度。
floor_max_angle- 預設值:0.785398(以弧度表示, 相當於45度)這是表面不再被視為 "地板" 之前的最大角度
還有許多其他屬性可用於於特定情況下調整角色行為。詳情請參閱 CharacterBody2D 文件。
偵測碰撞
當使用 move_and_collide() 時, 函式直接返回一個 KinematicCollision2D , 你可以在程式碼中使用這個.
當使用 move_and_slide() 時, 有可能發生多次碰撞, 因為滑動回應是計算出來的. 要處理這些碰撞, 使用 get_slide_count() 和 get_slide_collision():
# Using move_and_collide.
var collision = move_and_collide(velocity * delta)
if collision:
    print("I collided with ", collision.get_collider().name)

# Using move_and_slide.
move_and_slide()
for i in get_slide_collision_count():
    var collision = get_slide_collision(i)
    print("I collided with ", collision.get_collider().name)
// Using MoveAndCollide.
var collision = MoveAndCollide(Velocity * (float)delta);
if (collision != null)
{
    GD.Print("I collided with ", ((Node)collision.GetCollider()).Name);
}

// Using MoveAndSlide.
MoveAndSlide();
for (int i = 0; i < GetSlideCollisionCount(); i++)
{
    var collision = GetSlideCollision(i);
    GD.Print("I collided with ", ((Node)collision.GetCollider()).Name);
}
備註
get_slide_count() 只計算物體碰撞和改變方向的次數.
關於返回哪些碰撞資料, 請參見 KinematicCollision2D .
使用哪種運動方式?
Godot新使用者的一個常見問題是:"你如何決定使用哪個移動函式?" 通常, 回答是使用 move_and_slide() , 因為它 "更簡單" , 但情況不一定如此. 有一種思路是, move_and_slide() 是一種特殊情況, 而 move_and_collide() 更通用. 例如, 下面兩個程式碼片段的結果是相同的碰撞回應:
# using move_and_collide
var collision = move_and_collide(velocity * delta)
if collision:
    velocity = velocity.slide(collision.get_normal())

# using move_and_slide
move_and_slide()
// using MoveAndCollide
var collision = MoveAndCollide(Velocity * (float)delta);
if (collision != null)
{
    Velocity = Velocity.Slide(collision.GetNormal());
}

// using MoveAndSlide
MoveAndSlide();
您用 move_and_slide() 做的任何事情都可以用 move_and_collide() 來完成, 但它可能需要更多的程式碼. 但是, 正如我們在下面的範例中將看到的, 有些情況下 move_and_slide() 不能提供您想要的回應.
在上面的例子中, 我們將 move_and_slide() 返回的速度賦值給 velocity 變數. 這是因為當角色與環境發生碰撞時, 函式會在內部重新計算速度, 以反映減速的情況.
例如, 如果角色倒在地上, 不希望它因為重力的影響而積累垂直速度, 而希望它的垂直速度重設為零.
move_and_slide() 還可以在迴圈中多次重新計算運動體的速度, 為了產生一個平滑的運動, 它預設會移動角色, 並碰撞5次, 在這個過程結束時, 函式返回角色的新速度, 可以將其儲存在 velocity 變數中, 並在下一影格中使用.
範例
想看到這些範例實際運作,可以下載範例專案:character_body_2d_starter.zip
移動和牆壁
如果你已經下載了範例專案, 這個例子在 "BasicMovement.tscn" 中.
在這個例子中, 新增一個 KinematicBody2D , 有兩個子級: Sprite 和 CollisionShape2D . 使用Godot "icon.png" 作為Sprite的紋理, 將其從檔案系統欄拖到 Sprite 的 Texture 屬性. 在 CollisionShape2D 的 Shape 屬性中, 選擇 "New RectangleShape2D" , 並將矩形的大小調整到適合sprite圖像的大小.
備註
有關實作2D移動方案的範例, 請參閱 2D 運動概述 .
點擊 [場景] -> [新增場景],然後新增下列節點:
extends CharacterBody2D

var speed = 300

func get_input():
    var input_dir = Input.get_vector("ui_left", "ui_right", "ui_up", "ui_down")
    velocity = input_dir * speed

func _physics_process(delta):
    get_input()
    move_and_collide(velocity * delta)
using Godot;

public partial class MyCharacterBody2D : CharacterBody2D
{
    private int _speed = 300;

    public void GetInput()
    {
        Vector2 inputDir = Input.GetVector("ui_left", "ui_right", "ui_up", "ui_down");
        Velocity = inputDir * _speed;
    }

    public override void _PhysicsProcess(double delta)
    {
        GetInput();
        MoveAndCollide(Velocity * (float)delta);
    }
}
運作這個場景, 您會看到 move_and_collide() 按預期工作, 沿著速度向量方向移動物體. 現在讓我們看看當您新增一些障礙時會發生什麼. 新增一個具有矩形碰撞形狀的 StaticBody2D . 為了可見性, 您可以使用精靈,Polygon2D, 或從 "除錯" 選單中打開 "可見碰撞形狀".
再次運作場景並嘗試移動到障礙物中. 您會看到 KinematicBody2D 無法穿透障礙物. 但是, 嘗試以某個角度進入障礙物, 您會發現障礙物就像膠水一樣 - 感覺物體被卡住了.
發生這種情況是因為沒有 碰撞回應 . move_and_collide() 在碰撞發生時停止物體的運動. 我們需要編寫我們想要的碰撞響應.
嘗試將函式更改為 move_and_slide(velocity) 並再次運作. 請注意, 我們從速度計算中刪除了 "delta".
move_and_slide() 提供了一個沿碰撞物件滑動物體的預設碰撞響應. 這對於許多遊戲型別都很有用, 並且可能是獲得所需行為所需的全部內容.
彈跳/反射
如果您不想要滑動碰撞回應怎麼辦? 對於這個範例(範例專案中的 "BounceandCollide.tscn"), 我們有一個角色射擊子彈, 我們希望子彈從牆上反彈.
此範例使用三個場景. 主場景包含遊戲角色和牆壁. 子彈和牆是單獨的場景, 以便它們可以產生實體.
遊戲角色由 w 和 s 鍵控制前進和後退. 瞄準使用滑鼠指標. 這是遊戲角色的程式碼, 使用 move_and_slide() :
extends CharacterBody2D

var Bullet = preload("res://bullet.tscn")
var speed = 200

func get_input():
    # Add these actions in Project Settings -> Input Map.
    var input_dir = Input.get_axis("backward", "forward")
    velocity = transform.x * input_dir * speed
    if Input.is_action_just_pressed("shoot"):
        shoot()

func shoot():
    # "Muzzle" is a Marker2D placed at the barrel of the gun.
    var b = Bullet.instantiate()
    b.start($Muzzle.global_position, rotation)
    get_tree().root.add_child(b)

func _physics_process(delta):
    get_input()
    var dir = get_global_mouse_position() - global_position
    # Don't move if too close to the mouse pointer.
    if dir.length() > 5:
        rotation = dir.angle()
        move_and_slide()
using Godot;

public partial class MyCharacterBody2D : CharacterBody2D
{
    private PackedScene _bullet = GD.Load<PackedScene>("res://Bullet.tscn");
    private int _speed = 200;

    public void GetInput()
    {
        // Add these actions in Project Settings -> Input Map.
        float inputDir = Input.GetAxis("backward", "forward");
        Velocity = Transform.X * inputDir * _speed;
        if (Input.IsActionPressed("shoot"))
        {
            Shoot();
        }
    }

    public void Shoot()
    {
        // "Muzzle" is a Marker2D placed at the barrel of the gun.
        var b = (Bullet)_bullet.Instantiate();
        b.Start(GetNode<Node2D>("Muzzle").GlobalPosition, Rotation);
        GetTree().Root.AddChild(b);
    }

    public override void _PhysicsProcess(double delta)
    {
        GetInput();
        var dir = GetGlobalMousePosition() - GlobalPosition;
        // Don't move if too close to the mouse pointer.
        if (dir.Length() > 5)
        {
            Rotation = dir.Angle();
            MoveAndSlide();
        }
    }
}
子彈的程式碼:
extends CharacterBody2D

var speed = 750

func start(_position, _direction):
    rotation = _direction
    position = _position
    velocity = Vector2(speed, 0).rotated(rotation)

func _physics_process(delta):
    var collision = move_and_collide(velocity * delta)
    if collision:
        velocity = velocity.bounce(collision.get_normal())
        if collision.get_collider().has_method("hit"):
            collision.get_collider().hit()

func _on_VisibilityNotifier2D_screen_exited():
    # Deletes the bullet when it exits the screen.
    queue_free()
using Godot;

public partial class Bullet : CharacterBody2D
{
    public int _speed = 750;

    public void Start(Vector2 position, float direction)
    {
        Rotation = direction;
        Position = position;
        Velocity = new Vector2(speed, 0).Rotated(Rotation);
    }

    public override void _PhysicsProcess(double delta)
    {
        var collision = MoveAndCollide(Velocity * (float)delta);
        if (collision != null)
        {
            Velocity = Velocity.Bounce(collision.GetNormal());
            if (collision.GetCollider().HasMethod("Hit"))
            {
                collision.GetCollider().Call("Hit");
            }
        }
    }

    private void OnVisibilityNotifier2DScreenExited()
    {
        // Deletes the bullet when it exits the screen.
        QueueFree();
    }
}
動作發生在 _physics_process() 中. 在使用 move_and_collide() 後, 如果發生碰撞, 將返回一個 KinematicCollision2D 物件, 否則, 返回 Nil .
如果有一個返回的碰撞, 我們使用碰撞的 normal 來反映子彈的 velocity 和 Vector2.bounce() 方法.
如果碰撞物件( collider )有一個 hit 方法, 我們也呼叫它. 在範例專案中, 我們為牆壁新增了一個顏色閃爍效果來演示這一點.
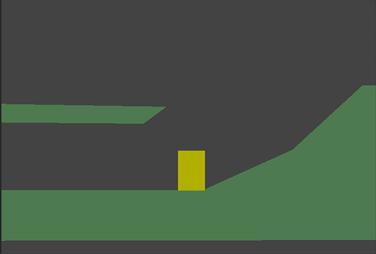
平臺運動
讓我們嘗試一個更流行的範例:2D平臺遊戲. move_and_slide() 非常適合快速啟動和運作功能字元控制器. 如果您已下載範例專案, 可以在 "Platformer.tscn" 中找到它.
對於這個範例, 我們假設您有一個由 StaticBody2D 物件構成的級別. 它們可以是任何形狀和大小. 在範例專案中, 我們使用 Polygon2D 來建立平臺形狀.
這是遊戲角色物體的程式碼:
extends CharacterBody2D

var speed = 300.0
var jump_speed = -400.0

func _physics_process(delta):
    # Add the gravity.
    velocity.y += get_gravity() * delta

    # Handle Jump.
    if Input.is_action_just_pressed("jump") and is_on_floor():
        velocity.y = jump_speed

    # Get the input direction.
    var direction = Input.get_axis("ui_left", "ui_right")
    velocity.x = direction * speed

    move_and_slide()
using Godot;

public partial class MyCharacterBody2D : CharacterBody2D
{
    private float _speed = 100.0f;
    private float _jumpSpeed = -400.0f;

    // Get the gravity from the project settings so you can sync with rigid body nodes.

    public override void _PhysicsProcess(double delta)
    {
        Vector2 velocity = Velocity;

        // Add the gravity.
        velocity.Y += GetGravity() * (float)delta;

        // Handle jump.
        if (Input.IsActionJustPressed("jump") && IsOnFloor())
        {
            velocity.Y = _jumpSpeed;
        }

        // Get the input direction.
        float direction = Input.GetAxis("ui_left", "ui_right");
        velocity.X = direction * _speed;

        Velocity = velocity;
        MoveAndSlide();
    }
}
在這段程式碼中,我們使用如上所述的“move_and_slide()” - 沿著其速度向量移動物體,沿著任何碰撞表面(例如地面或平台)滑動。我們也使用「is_on_floor()」來檢查是否允許跳躍。沒有這個,你就可以在半空中「跳躍」;如果您正在製作《Flappy Bird》,那麼這很好,但不適用於平台遊戲。
完整的平台遊戲角色還有很多東西:加速、二段跳、郊狼時間等等。上面的程式碼只是一個起點。您可以使用它作為基礎來擴充您自己的專案所需的任何運動行為。