Attention: Here be dragons
This is the latest
(unstable) version of this documentation, which may document features
not available in or compatible with released stable versions of Godot.
Checking the stable version of the documentation...
跳躍與壓扁怪物
在這一部分中,我們將新增跳躍、踩扁怪物的能力。在下一節課中,我們會讓怪物在地面上擊中玩家時讓玩家死亡。
首先,我們要調整幾個和物理互動有關的設定。請參考 物理分層。
建立內容
物理實體可以存取兩個互補的屬性:層和遮罩。層(Layer)定義的是該物件位於哪些實體層上。
遮罩(Mask)控制的是該實體會監聽並偵測的層,會影響碰撞偵測。希望兩個實體能夠發生互動時,你需要讓其中至少一個的遮罩與另一個(的層)相對應。
可能有點繞,但請別擔心,我們馬上就會看到三個例子。
重要的知識點是,你能夠使用層和遮罩來篩選物理互動、控制性能、讓程式碼中不需要再做額外的條件偵測。
預設情況下,所有物理體和區域的層和遮罩都被設成了 1。也就是說它們會互相碰撞。
實體層由數字表示,但我們也可以為它們命名,記錄什麼是什麼。
設定 SCons
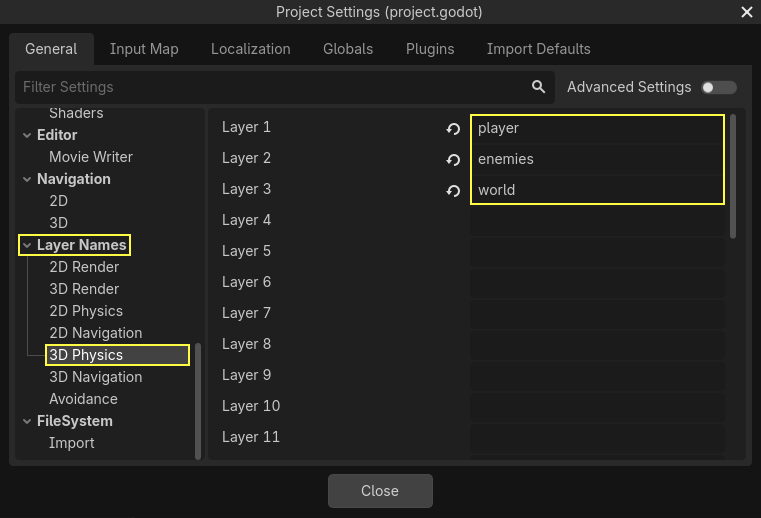
讓我們來為實體層命名。打開*專案 -> 專案設定*。

在左側選單中,向下找到 Layer Names -> 3D Physics。你會看到一個圖層列表,每個圖層的右邊都有一個欄位。你可以在那裡設定它們的名稱。將前三個圖層依序命名為 player、enemies 和 world。
現在,我們就可以將它們分配給我們的物理節點了。
層和遮罩的分配
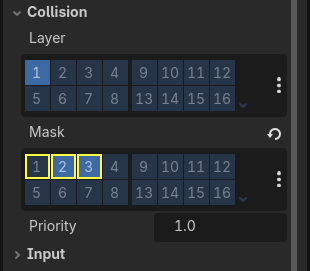
在 Main 場景中,選擇 Ground 節點。在 屬性檢視器 中,展開 碰撞 區塊。在那裡,你可以看到這個節點的圖層和遮罩,以網格按鈕的形式呈現。
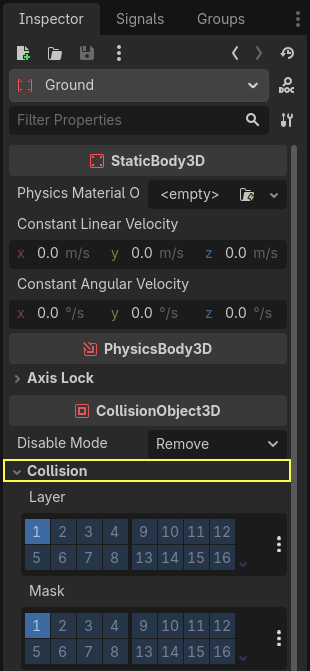
地面是世界的一部分,所以我們希望它屬於第三層。點擊 Layer 中的第一個點亮的按鈕將其**關閉**,打開**第三層。然後點擊**關閉 Mask。
上面說到過,Mask 屬性可以讓節點監聽與其他物理物件的互動,但它不是實作碰撞所必須的。Ground 不需要監聽任何東西;它存在的意義是防止生物下落。
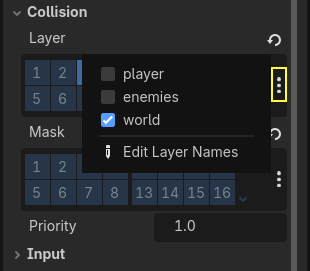
請注意,點擊右側的“...”按鈕會將該屬性以帶名稱的核取方塊的形式展示。
接下來就是 Player 和 Mob。在*檔案系統*面板中按兩下打開 player.tscn 檔案。
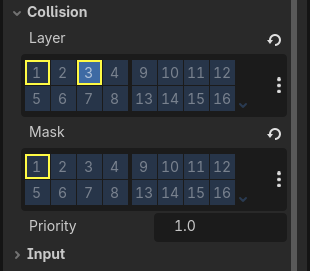
選中 Player 節點,將其 Collision -> Mask 設為“enemies”和“world”。Layer 屬性可以保持預設,因為第一個層就是“player”層。
然後按兩下 mob.tscn 打開 Mob 場景,選中 Mob 節點。
將其 Collision -> Layer 設為“enemies”,然後取消 Collision -> Mask 的設定,讓遮罩為空。
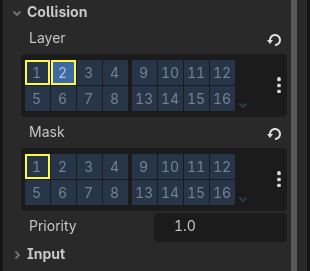
這些設定意味著怪物可以互相穿越。如果你希望怪物之間會發生碰撞和滑動,請**打開**“enemies”遮罩。
備註
小怪並不需要遮罩“world”層,因為它們只會沿著 XZ 平面移動。我們是故意不去為它們新增重力影響的。
跳躍
跳躍機制本身只需要兩行程式碼。打開 Player 腳本。我們需要一個值來控制跳躍的強度,並更新 _physics_process() 來對跳躍進行編碼。
在定義 fall_acceleration 這一行之後,在腳本的頂部,新增 jump_impulse。
#...
# Vertical impulse applied to the character upon jumping in meters per second.
@export var jump_impulse = 20
// Don't forget to rebuild the project so the editor knows about the new export variable.

// ...
// Vertical impulse applied to the character upon jumping in meters per second.
[Export]
public int JumpImpulse { get; set; } = 20;
在 _physics_process() 內,請在呼叫 move_and_slide() 那塊程式碼之前新增以下程式碼。
func _physics_process(delta):
    #...

    # Jumping.
    if is_on_floor() and Input.is_action_just_pressed("jump"):
        target_velocity.y = jump_impulse

    #...
public override void _PhysicsProcess(double delta)
{
    // ...

    // Jumping.
    if (IsOnFloor() && Input.IsActionJustPressed("jump"))
    {
        _targetVelocity.Y = JumpImpulse;
    }

    // ...
}
這就是跳躍所需的所有東西!
is_on_floor() 方法是來自 CharacterBody3D 類的工具。如果物體在這一影格中與地板發生碰撞返回 true。這就是為什麼我們要對 Player 施加重力的原因:這樣我們就會與地板相撞,而不是像怪物一樣漂浮在地板上。
如果角色在地板上並且玩家按下跳躍,立即給予角色較大的垂直速度,因為在遊戲中,玩家通常希望控制能得到回應,就像這樣提供的即時速度提升,雖然不切實際,但會令玩家感覺很好。
請注意,Y 軸的正方向是朝上的。這與 2D 有所不同, 2D的Y 軸的正方向是朝下的。
建立內容
接下來讓我們來新增踩扁機制。我們會讓玩家在怪物身上彈起,並同時消滅它們。
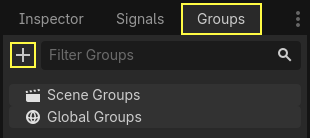
我們需要偵測與怪物的碰撞,並將其與地板的碰撞區分開來。為了做到這一點,我們可以利用 Godot 的 群組 標籤功能。
Open the scene mob.tscn again and select the Mob node. Go to the Groups
dock on the right to see a list of groups, which allows you to assign
tags to nodes. Click on the + button to open the Create new Group dialog.
在 Name 欄位輸入 "mob" ,然後點擊 Ok 。
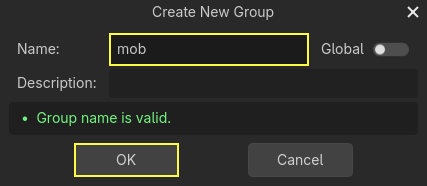
「mob」群組現在會顯示在 Scene Groups 區段下方。
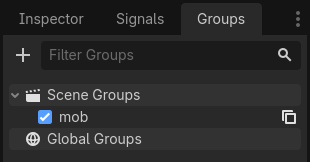
一個圖示會出現在「場景」停靠視窗中,表示該節點至少屬於一個群組。
![]()
我們現在就可以在程式碼中使用群組來區分與怪物的碰撞和與地板的碰撞了。
編寫踩扁機制
回到 Player 腳本來編寫踩扁和彈跳。
在腳本頂部,我們需要新增一個屬性 bounce_impulse。踩扁敵人時,我們不必讓角色彈得比跳躍一樣高。
# Vertical impulse applied to the character upon bouncing over a mob in
# meters per second.
@export var bounce_impulse = 16
// Don't forget to rebuild the project so the editor knows about the new export variable.

// Vertical impulse applied to the character upon bouncing over a mob in meters per second.
[Export]
public int BounceImpulse { get; set; } = 16;
接著,在我們上方於 _physics_process() 中加入的 跳躍 程式碼區塊之後,加入以下迴圈。使用 move_and_slide() 時,Godot 有時會讓物體連續移動多次,以平滑角色的動作。因此,我們必須遍歷所有可能發生的碰撞。
在迴圈的每次反覆運算中,我們會檢查是否落在了小怪身上。如果是的話,我們就消滅它並進行彈跳。
如果某一影格沒有發生碰撞,那麼這段程式碼中的迴圈就不會執行。
func _physics_process(delta):
    #...

    # Iterate through all collisions that occurred this frame
    for index in range(get_slide_collision_count()):
        # We get one of the collisions with the player
        var collision = get_slide_collision(index)

        # If there are duplicate collisions with a mob in a single frame
        # the mob will be deleted after the first collision, and a second call to
        # get_collider will return null, leading to a null pointer when calling
        # collision.get_collider().is_in_group("mob").
        # This block of code prevents processing duplicate collisions.
        if collision.get_collider() == null:
            continue

        # If the collider is with a mob
        if collision.get_collider().is_in_group("mob"):
            var mob = collision.get_collider()
            # we check that we are hitting it from above.
            if Vector3.UP.dot(collision.get_normal()) > 0.1:
                # If so, we squash it and bounce.
                mob.squash()
                target_velocity.y = bounce_impulse
                # Prevent further duplicate calls.
                break
public override void _PhysicsProcess(double delta)
{
    // ...

    // Iterate through all collisions that occurred this frame.
    for (int index = 0; index < GetSlideCollisionCount(); index++)
    {
        // We get one of the collisions with the player.
        KinematicCollision3D collision = GetSlideCollision(index);

        // If the collision is with a mob.
        // With C# we leverage typing and pattern-matching
        // instead of checking for the group we created.
        if (collision.GetCollider() is Mob mob)
        {
            // We check that we are hitting it from above.
            if (Vector3.Up.Dot(collision.GetNormal()) > 0.1f)
            {
                // If so, we squash it and bounce.
                mob.Squash();
                _targetVelocity.Y = BounceImpulse;
                // Prevent further duplicate calls.
                break;
            }
        }
    }
}
新函式很多。下面我們來進一步介紹一下。
函式 get_slide_collision_count() 和 get_slide_collision() 都來自 CharacterBody3D 類別,並與 move_and_slide() 有關。
get_slide_collision() 返回的是 KinematicCollision3D 物件,包含碰撞在哪裡發生、如何發生等資訊。例如,我們對它的 get_collider 屬性呼叫 is_in_group() 來檢查我們是否是和“mob”發生了碰撞:collision.collider.is_in_group("mob")。
備註
每一個 Node 都可以使用 is_in_group() 方法。
我們使用向量點積 Vector3.UP.dot(collision.get_normal()) > 0.1 來檢查我們是不是降落在怪物身上。碰撞法線(normal)是垂直於碰撞平面的 3D 向量。可以通過點積與上方向進行比較。
點積結果大於 0 時,兩個向量的夾角小於 90 度。大於 0.1 表示我們大概位於怪物上方。
處理完擠壓和彈跳的邏輯後,我們透過 break 敘述提早終止迴圈,以防止重複呼叫 mob.squash() ,否則可能會導致非預期的錯誤,例如一次擊殺計算多次分數。
我們呼叫了一個尚未定義的函式 mob.squash()。所以我們需要把它加入到 Mob 類中。
在 FileSystem 停靠區中雙擊 mob.gd 開啟這個腳本。在腳本的頂部,我們要定義一個名為 squashed 的新訊號。然後在底部,你可以加入 squash 函式,在這個函式中發射訊號並銷毀敵人。
# Emitted when the player jumped on the mob.
signal squashed

# ...


func squash():
    squashed.emit()
    queue_free()
// Don't forget to rebuild the project so the editor knows about the new signal.

// Emitted when the player jumped on the mob.
[Signal]
public delegate void SquashedEventHandler();

// ...

public void Squash()
{
    EmitSignal(SignalName.Squashed);
    QueueFree();
}
備註
使用 C# 時,Godot 會自動為所有以 EventHandler 結尾的訊號建立適當的事件處理常式,請參閱 C# 訊號。
下一節課中,我們會使用這個訊號來加分數。
好了,你應該可以跳在怪物身上把它們消滅了。你可以按 F5 試玩遊戲,並把 main.tscn 設成專案的主場景。
不過玩家現在還不會死。我們會在下一部分實作。