Attention: Here be dragons
This is the latest
(unstable) version of this documentation, which may document features
not available in or compatible with released stable versions of Godot.
Checking the stable version of the documentation...
射線投射
前言
遊戲開發中最常見的任務之一就是發射射線(或自訂形狀的物件)並檢查撞擊目標。這能實現複雜的行為、AI 等等。本教學將說明如何在 2D 與 3D 中執行這項操作。
Godot 將所有底層遊戲資訊儲存在伺服器中,場景僅作為前端。因此,射線投射通常屬於較底層的操作。對於簡單的射線投射,可以使用 RayCast3D 和 RayCast2D 節點,這些節點會在每個畫面更新時回傳射線投射的結果。
但許多情況下,射線投射需要更具互動性,因此必須能以程式碼進行操作。
空間
在物理系統中,Godot 將所有底層的碰撞與物理資訊儲存在 空間 中。目前的 2D 空間(用於 2D 物理)可透過 CanvasItem.get_world_2d().space 取得。3D 空間則可透過 Node3D.get_world_3d().space 取得。
取得的空間 RID 可以分別用於 3D 的 PhysicsServer3D 及 2D 的 PhysicsServer2D。
存取空間
Godot 的物理系統預設和遊戲邏輯運作於同一執行緒,但也可以設定於不同執行緒中以提升效能。因此,僅在 Node._physics_process() 回呼中存取空間是安全的。若在此函式之外存取,可能因空間被 鎖定 而導致錯誤。
要對物理空間進行查詢,必須使用 PhysicsDirectSpaceState2D 與 PhysicsDirectSpaceState3D。
在 2D 中使用以下程式碼:
func _physics_process(delta):
    var space_rid = get_world_2d().space
    var space_state = PhysicsServer2D.space_get_direct_state(space_rid)
public override void _PhysicsProcess(double delta)
{
    var spaceRid = GetWorld2D().Space;
    var spaceState = PhysicsServer2D.SpaceGetDirectState(spaceRid);
}
或更直接:
func _physics_process(delta):
    var space_state = get_world_2d().direct_space_state
public override void _PhysicsProcess(double delta)
{
    var spaceState = GetWorld2D().DirectSpaceState;
}
在 3D 中:
func _physics_process(delta):
    var space_state = get_world_3d().direct_space_state
public override void _PhysicsProcess(double delta)
{
    var spaceState = GetWorld3D().DirectSpaceState;
}
射線查詢
要執行 2D 射線查詢,可以使用 PhysicsDirectSpaceState2D.intersect_ray() 方法。例如:
func _physics_process(delta):
    var space_state = get_world_2d().direct_space_state
    # use global coordinates, not local to node
    var query = PhysicsRayQueryParameters2D.create(Vector2(0, 0), Vector2(50, 100))
    var result = space_state.intersect_ray(query)
public override void _PhysicsProcess(double delta)
{
    var spaceState = GetWorld2D().DirectSpaceState;
    // use global coordinates, not local to node
    var query = PhysicsRayQueryParameters2D.Create(Vector2.Zero, new Vector2(50, 100));
    var result = spaceState.IntersectRay(query);
}
結果會是一個字典。如果射線未撞擊任何物件,字典會是空的;如果有撞擊,則會包含碰撞相關資訊:
if result:
    print("Hit at point: ", result.position)
if (result.Count > 0)
{
    GD.Print("Hit at point: ", result["position"]);
}
碰撞發生時,result 字典會包含下列資料:
{
   position: Vector2 # point in world space for collision
   normal: Vector2 # normal in world space for collision
   collider: Object # Object collided or null (if unassociated)
   collider_id: ObjectID # Object it collided against
   rid: RID # RID it collided against
   shape: int # shape index of collider
   metadata: Variant() # metadata of collider
}
在 3D 空間中資料類似,僅座標型態為 Vector3。請注意,若要讓射線與 Area3D 發生碰撞,必須將布林參數 collide_with_areas 設為 true。
const RAY_LENGTH = 1000

func _physics_process(delta):
    var space_state = get_world_3d().direct_space_state
    var cam = $Camera3D
    var mousepos = get_viewport().get_mouse_position()

    var origin = cam.project_ray_origin(mousepos)
    var end = origin + cam.project_ray_normal(mousepos) * RAY_LENGTH
    var query = PhysicsRayQueryParameters3D.create(origin, end)
    query.collide_with_areas = true

    var result = space_state.intersect_ray(query)
private const int RayLength = 1000;

public override void _PhysicsProcess(double delta)
{
    var spaceState = GetWorld3D().DirectSpaceState;
    var cam = GetNode<Camera3D>("Camera3D");
    var mousePos = GetViewport().GetMousePosition();

    var origin = cam.ProjectRayOrigin(mousePos);
    var end = origin + cam.ProjectRayNormal(mousePos) * RayLength;
    var query = PhysicsRayQueryParameters3D.Create(origin, end);
    query.CollideWithAreas = true;

    var result = spaceState.IntersectRay(query);
}
碰撞例外
射線投射常用於讓角色偵測周圍世界。然而,角色本身通常有碰撞體,導致射線只偵測到自己的碰撞體,如下圖:
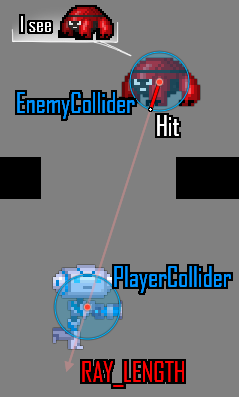
為避免自體相交,intersect_ray() 的參數物件可透過 exclude 屬性設定例外清單。以下是在 CharacterBody2D 或任意碰撞物件節點中使用的範例:
extends CharacterBody2D

func _physics_process(delta):
    var space_state = get_world_2d().direct_space_state
    var query = PhysicsRayQueryParameters2D.create(global_position, player_position)
    query.exclude = [self]
    var result = space_state.intersect_ray(query)
using Godot;

public partial class MyCharacterBody2D : CharacterBody2D
{
    public override void _PhysicsProcess(double delta)
    {
        var spaceState = GetWorld2D().DirectSpaceState;
        var query = PhysicsRayQueryParameters2D.Create(globalPosition, playerPosition);
        query.Exclude = [GetRid()];
        var result = spaceState.IntersectRay(query);
    }
}
例外清單陣列可包含物件或 RID。
碰撞遮罩
雖然例外清單適用於排除單一或少量物件,但若需要大量或動態排除,建議使用碰撞層/遮罩系統,效率更高。
intersect_ray() 的參數物件也可以設定碰撞遮罩。例如,若要與父物件使用同一遮罩,可指定 collision_mask 成員變數。排除清單則可作為最後一個參數傳入:
extends CharacterBody2D

func _physics_process(delta):
    var space_state = get_world_2d().direct_space_state
    var query = PhysicsRayQueryParameters2D.create(global_position, target_position,
        collision_mask, [self])
    var result = space_state.intersect_ray(query)
using Godot;

public partial class MyCharacterBody2D : CharacterBody2D
{
    public override void _PhysicsProcess(double delta)
    {
        var spaceState = GetWorld2D().DirectSpaceState;
        var query = PhysicsRayQueryParameters2D.Create(globalPosition, targetPosition,
            CollisionMask, [GetRid()]);
        var result = spaceState.IntersectRay(query);
    }
}
關於如何設定碰撞遮罩,請參閱 程式碼範例。
從螢幕進行 3D 射線投射
從螢幕向 3D 物理空間發射射線在物件選取上很有用。但通常不需這麼做,因 CollisionObject3D 已有 "input_event" 訊號可偵測點擊。若想手動實作,可依以下方式進行。
要從螢幕發射射線,需要一個 Camera3D 節點。Camera3D 支援兩種投影模式:透視與正交。因此必須同時取得射線的原點與方向,因為 origin 在正交模式下會變動,而 normal 會在透視模式下變動:
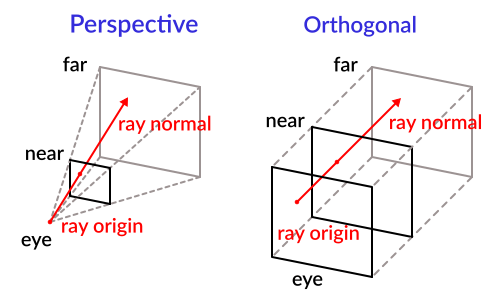
可透過相機使用以下程式碼取得:
const RAY_LENGTH = 1000.0

func _input(event):
    if event is InputEventMouseButton and event.pressed and event.button_index == 1:
        var camera3d = $Camera3D
        var from = camera3d.project_ray_origin(event.position)
        var to = from + camera3d.project_ray_normal(event.position) * RAY_LENGTH
private const float RayLength = 1000.0f;

public override void _Input(InputEvent @event)
{
    if (@event is InputEventMouseButton eventMouseButton && eventMouseButton.Pressed && eventMouseButton.ButtonIndex == MouseButton.Left)
    {
        var camera3D = GetNode<Camera3D>("Camera3D");
        var from = camera3D.ProjectRayOrigin(eventMouseButton.Position);
        var to = from + camera3D.ProjectRayNormal(eventMouseButton.Position) * RayLength;
    }
}
請注意,在 _input() 執行期間空間可能會被鎖定,因此實務上建議在 _physics_process() 內進行查詢。