Attention: Here be dragons
This is the latest
(unstable) version of this documentation, which may document features
not available in or compatible with released stable versions of Godot.
Checking the stable version of the documentation...
La escena principal del juego
Ahora es el momento de reunir todo lo que hicimos en una escena de juego jugable.
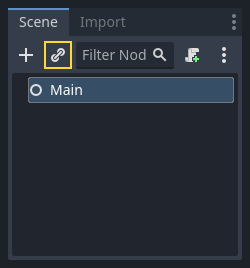
Crea una nueva escena y añade un Nodo llamado Main. (La razón por la que estamos usando Node en lugar de Node2D es porque este nodo será un contenedor para manejar la lógica del juego. No requiere funcionalidad 2D en sí mismo.)
Haz clic en el botón Instancia (representado por un icono de enlace de cadena) y selecciona su player.tscn guardado.
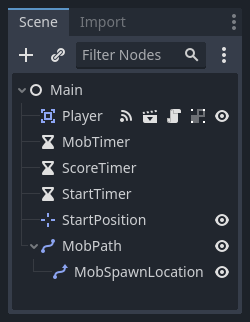
Ahora agrega los siguientes nodos como hijos de Main, y nómbralos como se muestra:
Timer (llamado
MobTimer) - para controlar cuán seguido aparecerán los enemigosTimer (llamado
ScoreTimer) - para incrementar el puntaje cada segundoTimer (llamado
StartTimer) - para crear una retardo antes de comenzarMarker2D (llamado
StartPosition) - para indicar la posición inicial del jugador
Establezca la propiedad Wait Time (tiempo de espera) de cada nodo Timer (temporizador) como se indica (los valores están en segundos):
MobTimer:0.5ScoreTimer:1StartTimer:2
Además, marca la propiedad One Shot (una vez) del nodo StartTimer como "Activado" y ajusta la propiedad Position del nodo StartPosition en (240,450).
Agregar enemigos
El nodo Main generará nuevos enemigos, y queremos que aparezcan en una ubicación aleatoria en el borde de la pantalla. Haz clic en el nodo Main en el panel Scene, luego añade un nodo hijo Path2D llamado MobPath. Cuando selecciones Path2D, verás algunos botones nuevos en la parte superior del editor:

Selecciona el botón del medio ("Añadir Punto") y dibuja el camino haciendo clic para agregar los puntos en las esquinas como se muestra. Para tener los puntos ajustados a la cuadrícula, asegúrate de tener marcado "Ajustar a cuadrícula" y "Usar ajuste inteligente". Estas opciones se encuentran a la izquierda del botón "Bloquear", que aparece como un imán junto a unos puntos y a líneas de intersección, respectivamente.

Importante
Dibuja la ruta en el sentido de las agujas del reloj ¡o tus enemigos apuntarán hacia afuera en lugar de hacia adentro!

Después de colocar el punto 4, haz clic en el botón "Cerrar Curva" y la curva se completará.
Ahora que el camino está definido, agrega un nodo PathFollow2D como hijo de MobPath y nómbralo MobSpawnLocation. Este nodo rotará automáticamente y seguirá el camino mientras se mueve, así podemos usarlo para seleccionar una posición al azar y una dirección a lo largo del camino.
Tu escena debería verse así:
Script Principal
Agrega un script a Main. Al principio del script usaremos @export var mob_scene: PackedScene para permitirnos elegir la escena de enemigos que queremos instanciar.
extends Node

@export var mob_scene: PackedScene
var score
using Godot;

public partial class Main : Node
{
    // Don't forget to rebuild the project so the editor knows about the new export variable.

    [Export]
    public PackedScene MobScene { get; set; }

    private int _score;
}
Haz clic en el nodo Main (tu nodo principal) y verás la propiedad Mob en el Inspector bajo "Script Variables".
Puedes asignar el valor de esta propiedad de dos maneras:
Arrastre
mob.tscndesde el dock "Sistema de archivos" y suéltelo en la propiedad Mob Scene.Haz clic en la flecha hacia abajo junto a "[vacío]" y elige "Cargar". Selecciona
mob.tscn.
Next, select the instance of the Player scene under Main node in the Scene dock,
and access the Signals dock on the sidebar.
Deberías ver una lista de señales para el nodo Player. Busca la señal hit en la lista y haz doble clic en esta (o clic derecho y selecciona "Conectar..."). Esto abrirá el diálogo de conexión. Haremos una nueva función llamada game_over, la que ejecutará lo que debe suceder cuando el juego termina. Escribe "game_over" en el campo "Método receptor" en la parte inferior de la ventana y haz clic en "Conectar". Lo que se busca con esto es lograr que la señal hit emitida desde Player sea manejada en el script Main. Agrega el siguiente código a la nueva función, así como una función new_game que configurará todo en un juego nuevo:
func game_over():
    $ScoreTimer.stop()
    $MobTimer.stop()

func new_game():
    score = 0
    $Player.start($StartPosition.position)
    $StartTimer.start()
public void GameOver()
{
    GetNode<Timer>("MobTimer").Stop();
    GetNode<Timer>("ScoreTimer").Stop();
}

public void NewGame()
{
    _score = 0;

    var player = GetNode<Player>("Player");
    var startPosition = GetNode<Marker2D>("StartPosition");
    player.Start(startPosition.Position);

    GetNode<Timer>("StartTimer").Start();
}
Ahora conectaremos la señal timeout() de cada nodo Timer (StartTimer, ScoreTimer y MobTimer) al script principal. Selecciona cada uno de los tres Timer en el panel Escena, abre la pestaña Señales del panel Nodo, y entonces haz doble-clic en la señal timeout(). Esto abrirá un nuevo diálogo de conexión de señales. La configuración por defecto de este diálogo debería estar bien, así que pulsa Conectar para conectar la nueva señal.
Una vez que los tres temporizadores tengan esto configurado, deberías poder ver que cada temporizador tiene una conexión de señal para su respectiva señal timeout(), mostrada en verde, dentro de sus respectivas pestañas de Señales:
(Para MobTimer):
_on_mob_timer_timeout()(Para ScoreTimer):
_on_score_timer_timeout()(Para StartTimer):
_on_start_timer_timeout()
Ahora definimos cómo funciona cada temporizador añadiendo el código de abajo. Fíjate que StartTimer activa a los otros dos, y que ScoreTimer aumenta el puntaje en 1.
func _on_score_timer_timeout():
    score += 1

func _on_start_timer_timeout():
    $MobTimer.start()
    $ScoreTimer.start()
// We also specified this function name in PascalCase in the editor's connection window.
private void OnScoreTimerTimeout()
{
    _score++;
}

// We also specified this function name in PascalCase in the editor's connection window.
private void OnStartTimerTimeout()
{
    GetNode<Timer>("MobTimer").Start();
    GetNode<Timer>("ScoreTimer").Start();
}
En _on_mob_timer_timeout(), crearemos una instancia de mob, elegiremos un punto de partida aleatorio a lo largo del Path2D, y pondremos al mob en movimiento. El nodo PathFollow2D girará automáticamente a medida que siga la ruta, así que lo utilizaremos para seleccionar la dirección y la posición de la mob. Cuando generemos un mob, elegiremos un valor aleatorio entre 150.0 y 250.0 para la velocidad a la que se moverá cada mob (sería aburrido si todos se movieran a la misma velocidad).
Observa que añadiremos la nueva instancia a la escena usando add_child().
func _on_mob_timer_timeout():
    # Create a new instance of the Mob scene.
    var mob = mob_scene.instantiate()

    # Choose a random location on Path2D.
    var mob_spawn_location = $MobPath/MobSpawnLocation
    mob_spawn_location.progress_ratio = randf()

    # Set the mob's position to the random location.
    mob.position = mob_spawn_location.position

    # Set the mob's direction perpendicular to the path direction.
    var direction = mob_spawn_location.rotation + PI / 2

    # Add some randomness to the direction.
    direction += randf_range(-PI / 4, PI / 4)
    mob.rotation = direction

    # Choose the velocity for the mob.
    var velocity = Vector2(randf_range(150.0, 250.0), 0.0)
    mob.linear_velocity = velocity.rotated(direction)

    # Spawn the mob by adding it to the Main scene.
    add_child(mob)
// We also specified this function name in PascalCase in the editor's connection window.
private void OnMobTimerTimeout()
{
    // Create a new instance of the Mob scene.
    Mob mob = MobScene.Instantiate<Mob>();

    // Choose a random location on Path2D.
    var mobSpawnLocation = GetNode<PathFollow2D>("MobPath/MobSpawnLocation");
    mobSpawnLocation.ProgressRatio = GD.Randf();

    // Set the mob's direction perpendicular to the path direction.
    float direction = mobSpawnLocation.Rotation + Mathf.Pi / 2;

    // Set the mob's position to a random location.
    mob.Position = mobSpawnLocation.Position;

    // Add some randomness to the direction.
    direction += (float)GD.RandRange(-Mathf.Pi / 4, Mathf.Pi / 4);
    mob.Rotation = direction;

    // Choose the velocity.
    var velocity = new Vector2((float)GD.RandRange(150.0, 250.0), 0);
    mob.LinearVelocity = velocity.Rotated(direction);

    // Spawn the mob by adding it to the Main scene.
    AddChild(mob);
}
Importante
¿Por qué PI? En las funciones que requieren ángulos, Godot utiliza radianes, no grados. Pi representa media vuelta en radianes, aproximadamente 3.1415 (también existe TAU que es igual a 2 * PI). Si te es más cómodo trabajar con grados, necesitarás usar las funciones deg_to_rad() y rad_to_deg() para convertir entre ambos.
Probar la escena
Vamos a probar la escena para asegurarnos de que todo funciona. Añade esta llamada new_game a _ready():
func _ready():
    new_game()
public override void _Ready()
{
    NewGame();
}
También asignemos Main como nuestra "Escena Principal", la que se ejecuta automáticamente cuando se lanza el juego. Presiona el botón "Play" y selecciona main.tscn cuando se te pida.
Truco
Si ya había establecido otra escena como "Escena Principal", puedes hacer clic derecho a main.tscn en el dock del Sistema de Archivos y seleccionar "Establecer Como Escena Principal".
Deberías poder mover al jugador alrededor, ver a los mobs creándose, y ver al jugador desaparecer cuando es golpeado por un mob.
Cuando estés seguro de que todo funciona correctamente, elimina la llamada a new_game() de ready() y reemplázala con pass.
¿Qué le falta a nuestro juego? Alguna interfaz de usuario. En la siguiente lección, agregaremos una pantalla de título y mostraremos la puntuación del jugador.