Attention: Here be dragons
This is the latest
(unstable) version of this documentation, which may document features
not available in or compatible with released stable versions of Godot.
Checking the stable version of the documentation...
Inspector Dock
El panel del Inspector lista todas las propiedades de un objeto, recurso, o nodo. Se actualizará conforme selecciones nodos diferentes dentro del panel de Árbol de Escena, o si usas el comando Abrir desde el menú contextual del Sistema de archivos.
Esta página explica en profundidad cómo funciona el panel Inspector. Aprenderás cómo editar propiedades, plegar y desplegar áreas, usar la barra de búsqueda y más.
Uso
If the inspector dock is visible, clicking on a node in the scene tree will automatically display its properties. If it is not visible, you can show it by navigating to Editor > Editor Docks > Inspector.
At the top of the dock are the file and navigation buttons.

From left to right:
Abre una nueva ventana para seleccionar y crear un recurso nuevo en la memoria y editarlo.
Abre un recurso desde el Sistema de Archivos para editarlo.
Saves the currently edited resource to disk.
Proporciona opciones para:
Editar Recurso desde el Clipboard pegando el recurso copiado.
Copy Resource to clipboard.
Mostrar en Sistema de Archivos si el recurso ya está guardado.
Make Resource Built-In to work in a built-in resource, not the one from the disk.
las flechas "<" y ">" te permiten navegar por tu historial de objetos editados.
El botón junto a estos abre la lista del historial para una navegación más rápida. si has creado múltiples recursos en la memoria, también los verás aquí.
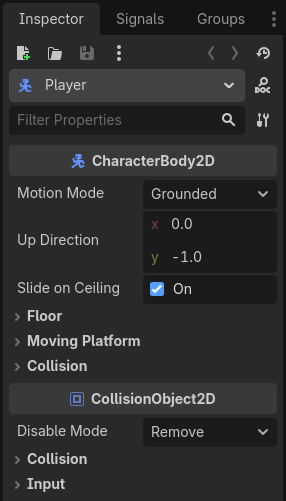
A continuación, encontrarás el icono del nodo seleccionado, su nombre y el botón rápido para abrir su documentación a la derecha. Al hacer clic en el nombre del nodo, se mostrarán sus subrecursos, si los hay.
A continuación, aparece la barra de búsqueda. Escribe cualquier cosa para filtrar las propiedades mostradas. Borra el texto para borrar la búsqueda. Esta búsqueda no distingue entre mayúsculas y minúsculas y busca letra por letra a medida que escribe. Por ejemplo, si escribes "vsb", uno de los resultados que verás será la propiedad Visibilidad, ya que esta contiene todas estas letras.
Antes de analizar el botón de herramientas que se encuentra al lado de la barra de filtro, vale la pena mencionar lo que realmente se ve debajo y cómo está estructurado.
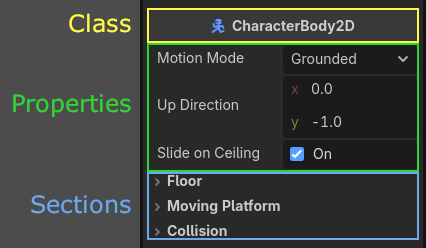
Properties are grouped inside their respective classes as sections. You can expand each section to view the related properties.
También puedes abrir la documentación de cada clase haciendo clic derecho en ella y seleccionando Abrir documentación. De igual forma, puedes hacer clic derecho en una propiedad y copiar o pegar su valor, copiar su ruta, guardarla en favoritos para que se muestre en la parte superior del inspector o abrir su página de documentación.
If you hover your mouse over a property, you will see the description of what it does as well as how it can be called inside the script.
You can directly change the values by clicking, typing, or selecting from the menu. If the property is a number or a slider, you can keep your left mouse button pressed and drag to change the values.
If a node's property is a sub-resource, you can click on the down arrow to pick a resource type, or load one using the Quick Load or Load options. Alternatively, a supported resource can be dragged from the FileSystem. Once you start dragging, the compatible property will be highlighted. Simply drop it on the appropriate property's value.
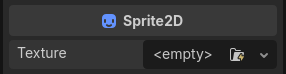
Después de cargar un subrecurso, puedes hacer clic en él para ver sus propiedades o ajustarlas.
The values with different values than their original values will have a revert icon ( ).
Clicking on this icon reverts the value to its original state.
If the values are linked with each other, they will have a chain icon and changing one
will change others as well. You can unchain them by clicking on this icon.
).
Clicking on this icon reverts the value to its original state.
If the values are linked with each other, they will have a chain icon and changing one
will change others as well. You can unchain them by clicking on this icon.
If you are changing a property a lot, you may consider favoriting it by right-clicking and choosing Favorite Property. This will show it at the top of the inspector for all objects of this class.
Now that we have a better understanding of the terms, we can proceed with the tool menu. If you click the tool menu icon next to the filter bar, a drop-down menu will offer various view and edit options.
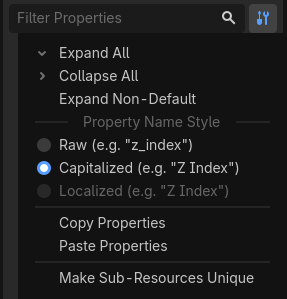
Expand All: Expands all sections showing all available properties.
Collapse All: Collapses all properties showing only classes and the sections.
Expand Non-Default: Only expands the sections where the original value is different than the current value (the properties with a revert icon (
)).Property Name Style: This section determines how the properties' text is displayed in the inspector.
Rawuses the property's own naming,Capitalizeduses title case by changing the initial letters of each word to uppercase and removing underscores,Localizeddisplays the translation of the properties if you are using the Editor in a language other than English.Copy Properties: Copies all properties of the current node with their current values.
Paste Properties: Pastes the copied properties from the clipboard. Useful to apply the common properties of one node to another.
Make Sub-Resources Unique: By default, a duplicated node shares the sub-resources of the original node. Changing one parameter of the sub-resource in one node, affects the other one. Clicking this option makes each sub-resource used in this node unique, separated from other nodes.
Truco
If a node has exported variables in its attached script, you will also see these in the inspector. The first image in this section has one for the Player node: Action Suffix. See Propiedades exportadas de GDScript for more on this topic.
Ver también
Refer to Personalizar la interfaz for dock customization options.