Attention: Here be dragons

This is the latest (unstable) version of this documentation, which may document features not available in or compatible with released stable versions of Godot.

Despliegue con un solo clic

¿Qué es la implementación con un clic?

El despliegue con un clic es una función que está disponible una vez que una plataforma está configurada correctamente y un dispositivo compatible está conectado a la computadora. Dado que las cosas pueden salir mal en muchos niveles (es posible que la plataforma no esté configurada correctamente, el SDK puede estar instalado incorrectamente, el dispositivo puede estar configurado incorrectamente, etc.), es bueno que el usuario sepa que existe.

Después de agregar un ajuste preestablecido de exportación de Android marcado como Ejecutable, Godot puede detectar cuándo un dispositivo USB está conectado a la computadora y ofrecer al usuario exportar, instalar y ejecutar automáticamente el proyecto (en modo de depuración) en el dispositivo. Esta característica se llama despliegue con un clic.

Nota

El despliegue con un clic sólo está disponible una vez que haya agregado una plantilla de exportación marcada como Ejecutable en el cuadro de diálogo Exportar. Puede marcar varios ajustes preestablecidos de exportación como ejecutables, pero sólo un ajuste preestablecido por plataforma puede marcarse como ejecutable. Si marca un segundo preset en una plataforma determinada como ejecutable, el otro preset ya no se marcará como ejecutable.

Plataformas compatibles

  • Android: Exporta el proyecto con la depuración activada y ejecútalo en el dispositivo conectado.

    • Asegúrate de seguir los pasos señalados en Exportación para Android. Si no, el botón de despliegue con un solo clic no aparecerá.

    • Si tienes más de un dispositivo conectado, Godot te preguntará a cuál de ellos quieres expotar el proyecto.

  • iOS: Exports the project with debugging enabled and runs it on the connected device or simulator.

    • Make sure to follow the steps described in Exportando para iOS. Otherwise, the one-click deploy button won't appear.

    • For each new bundle identifier, export the project, open it in the Xcode, and build at least once to create new provisioning profile or create a provisioning profile in the Apple Developer account dashboard.

    • Si tienes más de un dispositivo conectado, Godot te preguntará a cuál de ellos quieres expotar el proyecto.

  • Desktop platforms: Exports the project with debugging enabled and runs it on the remote computer via SSH.

  • Web: Starts a local web server and runs the exported project by opening the default web browser. This is only accessible on localhost by default. See Troubleshooting for making the exported project accessible on remote devices.

Despliegue con un sólo clic

  • Android:
    • Enable developer mode on your mobile device then enable USB debugging in the device's settings.

    • After enabling USB debugging, connect the device to your PC using a USB cable.

    • Para usuarios experimentados, también sería posible usar el ADB de manera inalámbrica.

  • iOS:
    • Install Xcode, accept Xcode license and login with your Apple Developer account.

    • If you are using Xcode 14 or earlier, install ios-deploy and set path to ios-deploy in the Editor Settings (see Export ⇾ iOS ⇾ iOS Deploy).

    • For running on device:
      • Pair your mobile device with a Mac.

      • Enable developer mode on your device.

      • Device can be connected via USB or local network.

      • Make sure the device is on the same local network and a correct network interface is selected in the editor settings (see Network ⇾ Debug ⇾ Remote Host). By default, the editor is listening for localhost connections only.

    • For running in simulator:
      • Install and start simulator from the Xcode.

    • Device screen should be unlocked.

  • Desktop platforms:
    • Enable SSH Remote Deploy and configure connection settings in the project export setting.

  • Make sure there is an export preset marked as Runnable for the target platform (Android, iOS or Web).

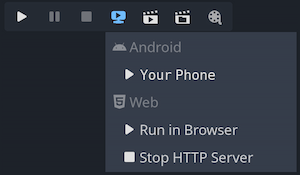
  • Si todo ha sido cofigurado correctamente y sin errores, se mostrarán los iconos de dichas plataformas en la esquina superior derecha del editor.

  • Clica en un icono para exportar a esa plataforma.
../../_images/remote_debug.webp

Solución De Problemas

Android

Si no puedes ver el dispositivo en la lista de dispositivos al ejecutar el comando adb devices en una terminal, tampoco será visible para Godot. Para resolver esto:

  • Verifica si la depuración USB está habilitada y autorizada en el dispositivo. Intenta desbloquear tu dispositivo y aceptar la solicitud de autorización si la ves. Si no puedes ver esta solicitud, ejecutar adb devices en tu PC debería hacer que aparezca la solicitud de autorización en el dispositivo.

  • Intenta revocar la autorización de depuración en la configuración de desarrollo del dispositivo, siguiendo los pasos descritos en esta guía: :ref:`revocar la autorización de depuración <https://stackoverflow.com/questions/23081263/adb-android-device-unauthorized>`__.

  • Prueba utilizando la depuración USB en lugar de la depuración inalámbrica, o viceversa. A veces, una de ellas puede funcionar mejor que la otra.

  • En Linux, es posible que te falten las reglas udev rules necesarias en tu dispositivo para que sea reconocido.

Web

By default, the web server started by the editor is only accessible from localhost. This means the web server can't be reached by other devices on the local network or the Internet (if port forwarding is set up on the router). This is done for security reasons, as you may not want other devices to be able to access the exported project while you're testing it. Binding to localhost also prevents a firewall popup from appearing when you use one-click deploy for the web platform.

To make the local web server accessible over the local network, you'll need to change the Export > Web > HTTP Host editor setting to 0.0.0.0. You will also need to enable Export > Web > Use TLS as SharedArrayBuffer requires the use of a secure connection to work, unless connecting to localhost. However, since other clients will be connecting to a remote device, the use of TLS is absolutely required here.

To make the local web server accessible over the Internet, you'll also need to forward the Export > Web > HTTP Port port specified in the Editor Settings (8060 by default) in TCP on your router. This is usually done by accessing your router's web interface then adding a NAT rule for the port in question. For IPv6 connections, you should allow the port in the router's IPv6 firewall instead. Like for local network devices, you will also need to enable Export > Web > Use TLS.

Nota

When Use TLS is enabled, you will get a warning from your web browser as Godot will use a temporary self-signed certificate. You can safely ignore it and bypass the warning by clicking Advanced and then Proceed to (address).

If you have an SSL/TLS certificate that is trusted by browsers, you can specify the paths to the key and certificate files in the Export > Web > TLS Key and Export > Web > TLS Certificate. This will only work if the project is accessed through a domain name that is part of the TLS certificate.