Attention: Here be dragons
This is the latest
(unstable) version of this documentation, which may document features
not available in or compatible with released stable versions of Godot.
Checking the stable version of the documentation...
Proceso de importación
Importing assets in Godot
To import assets in Godot, place your assets (image files, scenes, audio files, fonts, etc) directly in the project folder. There are 2 ways to achieve this:
For any file type: Copy files manually with your operating system's file manager.
For file types that can be imported by Godot: Drag-and-drop files from the operating system's file manager to the editor's FileSystem dock. This only works with resource file types (i.e. file types that Godot can import).
Godot will automatically import these files internally and keep the imported
resources hidden in a res://.godot/imported/ folder.
This means that when trying to access imported assets through code, you need to use the Resource Loader as it will automatically take into account where the internal files are saved. If you try and access an imported asset using the FileAccess class, it will work in the editor, but it will break in the exported project.
However, the Resource Loader cannot access non-imported files. Only the FileAccess class can.
Cambiar parámetros de importación
Nota
Import parameters are only present in non-native Godot resource types.
This means Godot's own scene and resource file formats (.tscn, .scn,
.tres, .res) don't have import options you can select in the Import
dock.
To change the import parameters of an asset in Godot, select the relevant resource in the FileSystem dock:

After adjusting the parameters, click Reimport. Be careful: if you select another file in the FileSystem dock before clicking Reimport, changes will be discarded. After clicking Reimport, the chosen parameters will only be used for this asset and on future reimports.
Changing the import parameters of several assets at the same time is also possible. Select all of them together in the FileSystem dock and the exposed parameters will apply to all of them when reimporting.
Reimportar múltiples assets
Mientras se trabaja en un proyecto, es posible que se encuentre con que varios recursos necesitan que se cambien los mismos parámetros, como la habilitación de mipmaps, pero sólo se desea que se cambien esos parámetros específicos. Para ello, selecciona cada activo que desee reimportar en el sistema de archivos. En la pestaña de importación habrá ahora una casilla de verificación a la izquierda de cada parámetro de importación.
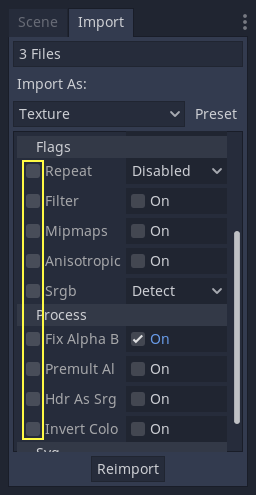
Selecciona la casilla de verificación de los parámetros que desea modificar en sus assets importados, y luego cambie los parámetros normalmente. Finalmente, haz clic en el botón de reimportación y cada asset seleccionado será reimportado con sólo esos parámetros cambiados.
Reimportación automática
Cuando el checksum MD5 de un recurso de origen cambia, Godot realizará una reimportación automática del mismo, aplicando el ajuste preestablecido configurado para ese recurso específico.
Ignorando carpetas específicas
Sometimes, you have files that you don't want to be imported by Godot, such as images used in a game's press kit or promotional materials. You can place those files in a folder that you instruct Godot to ignore. Ignoring a folder ensures it is not imported by Godot; this also hides the folder from the FileSystem dock. Ignoring a folder also results in its contents not being exported with the project, therefore reducing the exported PCK size.
See Ignorando carpetas específicas in the project organization tutorial for details.
Archivos generados
Al importar se agregará, junto al archivo original, un archivo adicional <asset>.import conteniendo la configuración de importación.
Make sure to commit these files to your version control system, as these files contain important metadata.
ls
example.png
example.png.import
project.godot
Additionally, extra assets will be present in the hidden
res://.godot/imported/ folder:
ls .godot/imported
example.png-218a8f2b3041327d8a5756f3a245f83b.ctex
example.png-218a8f2b3041327d8a5756f3a245f83b.md5
Si alguno de los archivos presentes en esta carpeta (o toda la carpeta) es borrado, el recurso o recursos se reimportarán automáticamente. Por ende, la agregar la carpeta .godot/ al sistema de control de versiones no es recomendable. Agregar esta carpeta ahorrar tiempo en la reimportación al realizar el proceso en otra computadora, pero ocupa mucho más espacio y y ancho de banda.
The default version control metadata that can be generated on project creation
will automatically ignore the .godot/ folder.
Cambiar el tipo de recurso importado
Some source assets can be imported as different types of resources. For this, select the relevant type of resource desired then click Reimport:

Select Keep File (exported as is) as resource type to skip file import, files
with this resource type will be preserved as is during project export.
Select Skip File (not exported) as resource type to skip file import and ignore
file during project export.
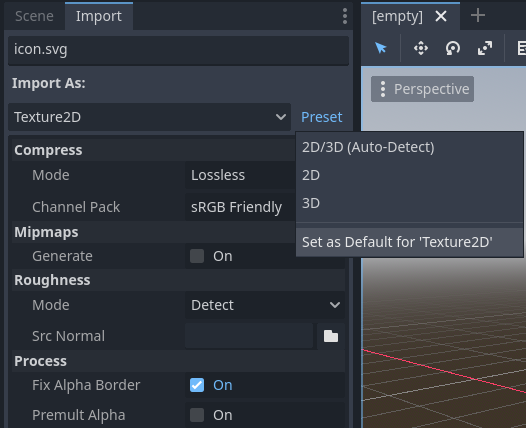
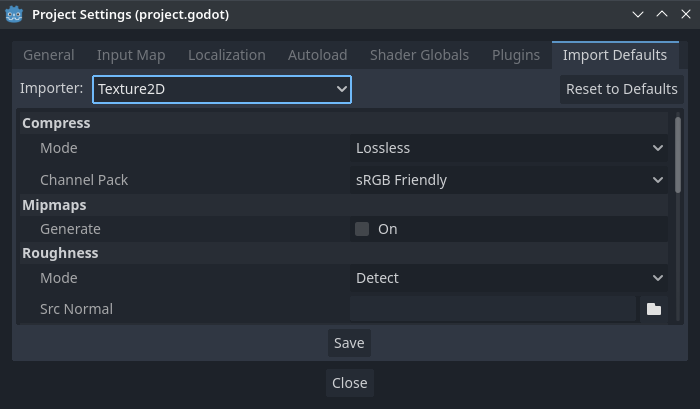
Cambiar los parámetros de importación por defecto
Different types of projects might require different defaults. Changing the import options to a predefined set of options can be achieved by using the Preset... Menu. Besides some resource types offering presets, the default settings can be saved and cleared too:
The default import parameters for a given resource type can be changed project-wide using the Import Defaults tab of the Project Settings dialog:
Further reading
This workflow takes a little time to get used to, but it enforces a more correct way to deal with resources.
Existen muchos tipos de recursos disponibles para importar.Continúa leyendo para entender cómo trabajar con todos ellos: