Attention: Here be dragons
This is the latest
(unstable) version of this documentation, which may document features
not available in or compatible with released stable versions of Godot.
Checking the stable version of the documentation...
Singletons (Autoload)
Introducción
El sistema de escena de Godot, potente y flexible, tiene una desventaja: no hay un método para almacenar información (por ejemplo, el puntaje del jugador o un inventario) que se necesite en más de una escena.
Es posible acceder a esto con una serie de soluciones provisionales, pero éstas traen sus propias limitaciones:
Puedes usar una escena "master" que cargue y descargue otras escenas como sus hijos. Sin embargo, eso significa que ya no puedas ejecutar esas escenas individualmente y esperar que funcionen correctamente.
Mientras que la información puede ser almacenada en el disco en `user://` y esta información puede ser cargada por escenas que lo requieran, guardar y cargar continuamente estos datos cuando se cambian escenas es engorroso y puede ser lento.
El Patrón Singleton(instancia única) es una herramienta útil para resolver el caso en el que necesita almacenar información persistente entre escenas. En nuestro caso es posible reutilizar la misma escena o clase para múltiples singletons mientras posean nombres distintos.
Usando este concepto, puedes crear objetos que:
Siempre están cargados, no importa qué escena esté en ejecución.
Puedes almacenar variables globales como la información del jugador.
Puedes manejar el cambio de escenas y las transiciones entre escenas.
Actúa como un singleton, ya que GDScript no soporta variables globales por diseño.
La carga automática (autoload) de nodos y scripts nos permite usar estas funcionalidades.
Nota
Godot won't make an Autoload a "true" singleton as per the singleton design pattern. It may still be instanced more than once by the user if desired.
Truco
Si estás creando un autoload como parte de un plugin del editor, considera registrarlo automáticamente en la Configuración del Proyecto cuando el plugin esté habilitado.
Autoload
You can create an Autoload to load a scene or a script that inherits from Node.
Nota
When autoloading a script, a Node will be created and the script will be attached to it. This node will be added to the root viewport before any other scenes are loaded.
To autoload a scene or script, start from the menu and navigate to Project > Project Settings > Globals > Autoload.
Aquí puedes agregar cualquier número de escenas o scripts. Cada entrada en la lista requiere un nombre, que se asigna como propiedad name del nodo. El orden de las entradas tal como se agregan al árbol de escena global se puede manipular usando las teclas de flecha arriba/abajo. Al igual que con las escenas regulares, el motor leerá estos nodos en orden de arriba hacia abajo.
If the Enable column is checked (which is the default), then the singleton can be accessed directly in GDScript:
PlayerVariables.health -= 10
The Enable column has no effect in C# code. However, if the singleton is a
C# script, a similar effect can be achieved by including a static property
called Instance and assigning it in _Ready():
public partial class PlayerVariables : Node
{
    public static PlayerVariables Instance { get; private set; }

    public int Health { get; set; }

    public override void _Ready()
    {
        Instance = this;
    }
}
This allows the singleton to be accessed from C# code without GetNode() and
without a typecast:
PlayerVariables.Instance.Health -= 10;
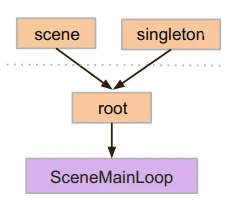
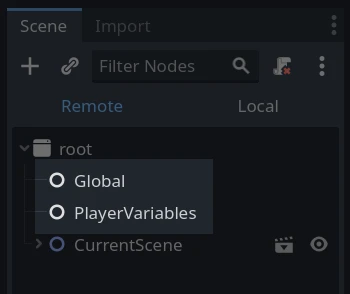
Note que los objetos de cargado automático (scripts y/o escenas) son accedidos como a cualquier otro nodo en el árbol de escena. De hecho, si mira el árbol de escena en ejecución, verá que los nodos de cargado automático aparecen:
Advertencia
Los autoguardados no deben eliminarse mediante free() o queue_free() en tiempo de ejecución, o el motor se bloqueará.
Conmutador de escenas personalizado
This tutorial will demonstrate building a scene switcher using autoloads. For basic scene switching, you can use the SceneTree.change_scene_to_file() method (see Usar el Árbol de Escenas for details). However, if you need more complex behavior when changing scenes, this method provides more functionality.
To begin, download the template from here: singleton_autoload_starter.zip and open it in Godot.
Puedes aparecer una ventana que le notifique que el proyecto se abrió por última vez en una versión anterior de Godot; no hay problema. Haz clic en Aceptar para abrir el proyecto.
The project contains two scenes: scene_1.tscn and scene_2.tscn. Each
scene contains a label displaying the scene name and a button with its
pressed() signal connected. When you run the project, it starts in
scene_1.tscn. However, pressing the button does nothing.
Crear el script
Open the Script window and create a new script called global.gd.
Make sure it inherits from Node:
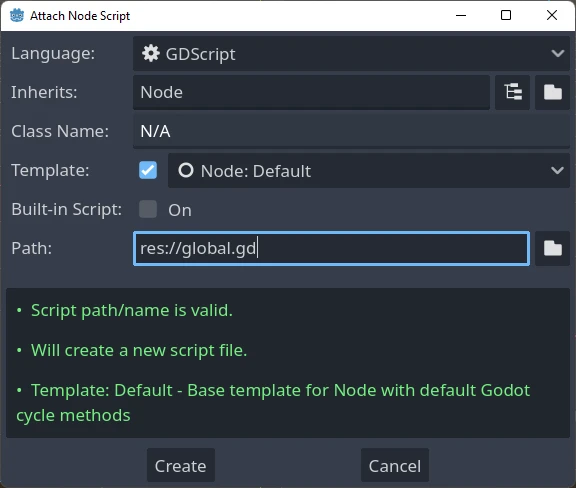
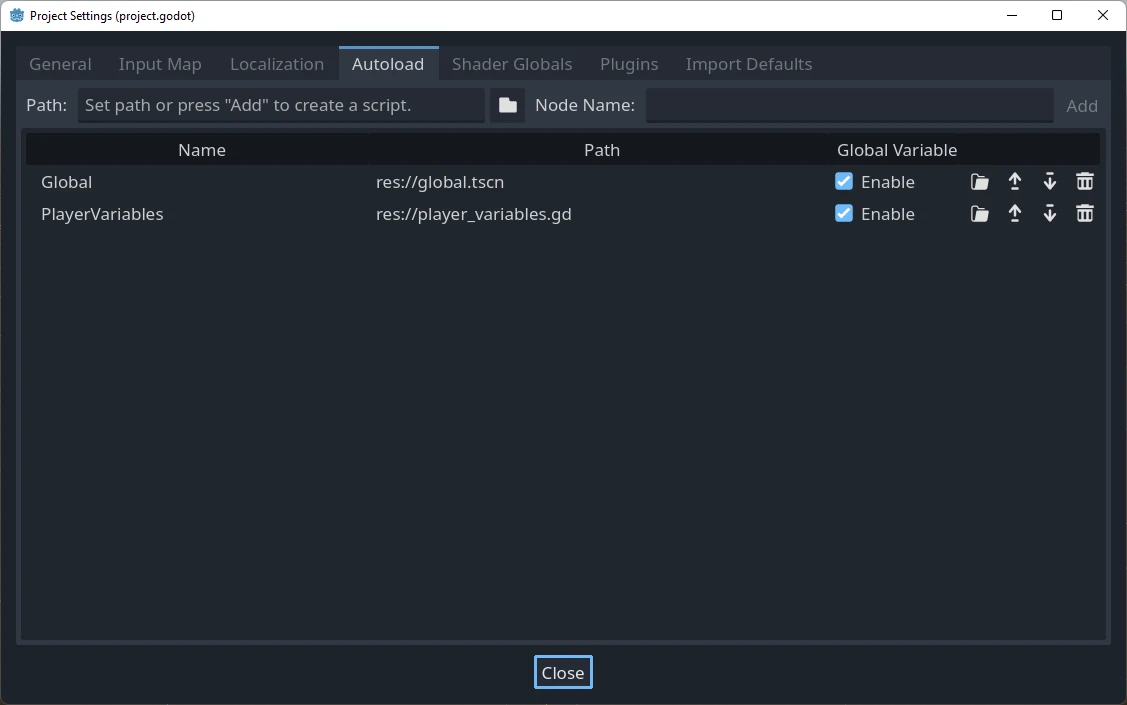
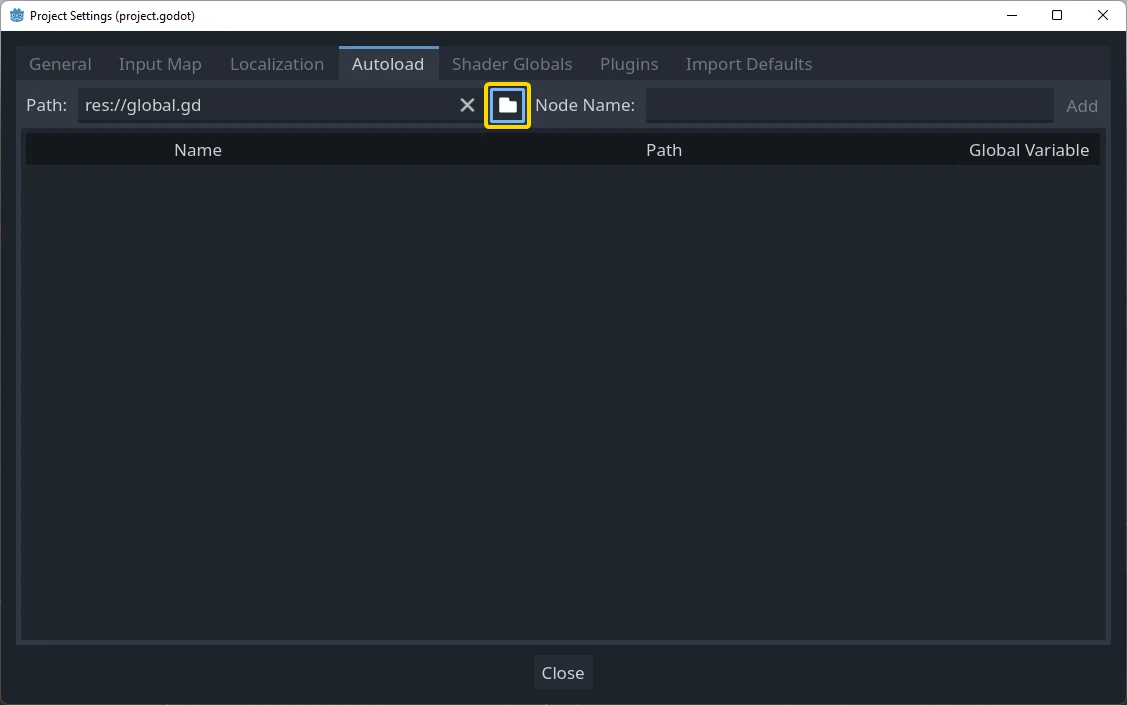
The next step is to add this script to the autoload list.
Starting from the menu, open
Project > Project Settings > Globals > Autoload and
select the script by clicking the browse button or typing its path:
res://global.gd. Press Add to add it to the autoload list
and name it "Global", which is required for scripts to access it
by the name "Global":
Ahora, cada vez que se ejecute cualquiera de las escenas en el proyecto, el script siempre estará cargado.
Returning to the script, it needs to fetch the current scene in the
_ready() function. Both the current scene (the one with the button) and
global.gd are children of root, but autoloaded nodes are always first. This
means that the last child of root is always the loaded scene.
extends Node

var current_scene = null

func _ready():
    var root = get_tree().root
    # Using a negative index counts from the end, so this gets the last child node of `root`.
    current_scene = root.get_child(-1)
using Godot;

public partial class Global : Node
{
    public Node CurrentScene { get; set; }

    public override void _Ready()
    {
        Viewport root = GetTree().Root;
        // Using a negative index counts from the end, so this gets the last child node of `root`.
        CurrentScene = root.GetChild(-1);
    }
}
Ahora necesitamos una función para cambiar la escena. Esta función necesita liberar la escena actual y reemplazarla con la solicitada.
func goto_scene(path):
    # This function will usually be called from a signal callback,
    # or some other function in the current scene.
    # Deleting the current scene at this point is
    # a bad idea, because it may still be executing code.
    # This will result in a crash or unexpected behavior.

    # The solution is to defer the load to a later time, when
    # we can be sure that no code from the current scene is running:

    _deferred_goto_scene.call_deferred(path)


func _deferred_goto_scene(path):
    # It is now safe to remove the current scene.
    current_scene.free()

    # Load the new scene.
    var s = ResourceLoader.load(path)

    # Instance the new scene.
    current_scene = s.instantiate()

    # Add it to the active scene, as child of root.
    get_tree().root.add_child(current_scene)

    # Optionally, to make it compatible with the SceneTree.change_scene_to_file() API.
    get_tree().current_scene = current_scene
public void GotoScene(string path)
{
    // This function will usually be called from a signal callback,
    // or some other function from the current scene.
    // Deleting the current scene at this point is
    // a bad idea, because it may still be executing code.
    // This will result in a crash or unexpected behavior.

    // The solution is to defer the load to a later time, when
    // we can be sure that no code from the current scene is running:

    CallDeferred(MethodName.DeferredGotoScene, path);
}

public void DeferredGotoScene(string path)
{
    // It is now safe to remove the current scene.
    CurrentScene.Free();

    // Load a new scene.
    var nextScene = GD.Load<PackedScene>(path);

    // Instance the new scene.
    CurrentScene = nextScene.Instantiate();

    // Add it to the active scene, as child of root.
    GetTree().Root.AddChild(CurrentScene);

    // Optionally, to make it compatible with the SceneTree.change_scene_to_file() API.
    GetTree().CurrentScene = CurrentScene;
}
Usando Object.call_deferred(), la segunda función se ejecutará una vez que todo el código de la escena actual se ha completado. De este modo, la escena actual no será removida mientras esté todavía en uso (por ejemplo, su código todavía esté ejecutándose).
Finalmente, necesitamos llenar el vació de las funciones llamadas en las dos escenas:
# Add to 'scene_1.gd'.

func _on_button_pressed():
    Global.goto_scene("res://scene_2.tscn")
// Add to 'Scene1.cs'.

private void OnButtonPressed()
{
    var global = GetNode<Global>("/root/Global");
    global.GotoScene("res://Scene2.tscn");
}
y
# Add to 'scene_2.gd'.

func _on_button_pressed():
    Global.goto_scene("res://scene_1.tscn")
// Add to 'Scene2.cs'.

private void OnButtonPressed()
{
    var global = GetNode<Global>("/root/Global");
    global.GotoScene("res://Scene1.tscn");
}
Ejecuta el proyecto y prueba que puedes cambiar entre escenas presionando el botón.
Nota
Cuando las escenas son pequeñas, la transición es instantánea. Sin embargo, si las escenas son más complejas, pueden tardar un tiempo considerable en aparecer. Para aprender a manejar esto, consulta el siguiente tutorial: Carga en segundo plano.
Alternativamente, si el tiempo de carga es relativamente corto (menos de 3 segundos más o menos), puedes mostrar una "placa de carga" mostrando algún tipo de elemento 2D justo antes de cambiar la escena. Entonces puedes ocultarlo justo después de cambiar la escena. Esto puede ser usado para indicar al jugador que una escena está siendo cargada.