Attention: Here be dragons
This is the latest
(unstable) version of this documentation, which may document features
not available in or compatible with released stable versions of Godot.
Checking the stable version of the documentation...
Usar ArrayMesh
Este tutorial presentará los fundamentos del uso de un ArrayMesh.
Para ello, utilizaremos la función add_surface_from_arrays(), que toma hasta cinco parámetros. Los dos primeros son obligatorios, mientras que los últimos tres son opcionales.
El primer parámetro es el PrimitiveType, un concepto de OpenGL que instruye a la GPU cómo organizar el primitivo basado en los vértices proporcionados, es decir, si representan triángulos, líneas, puntos, etc. Véase Mesh.PrimitiveType para ver las opciones disponibles.
The second parameter, arrays, is the actual Array that stores the mesh information. The array is a normal Godot array that
is constructed with empty brackets []. It stores a Packed**Array (e.g. PackedVector3Array,
PackedInt32Array, etc.) for each type of information that will be used to build the surface.
Los posibles elementos de los arrays se enumeran a continuación, junto con la posición que deben tener dentro de arrays. Véase Mesh.ArrayType para obtener una lista completa.
Index |
Mesh.ArrayType Enum |
Tipo de array |
|---|---|---|
0 |
|
|
1 |
|
|
2 |
|
PackedFloat32Array or PackedFloat64Array of groups of 4 floats. The first 3 floats determine the tangent, and the last float the binormal direction as -1 or 1. |
3 |
|
|
4 |
|
|
5 |
|
|
10 |
|
PackedFloat32Array of groups of 4 floats or PackedInt32Array of groups of 4 ints. Each group lists indexes of 4 bones that affects a given vertex. |
11 |
|
PackedFloat32Array or PackedFloat64Array of groups of 4 floats. Each float lists the amount of weight the corresponding bone in |
12 |
|
En la mayoría de casos, al crear un mesh, lo definimos pro las posiciones de sus vertices. Por lo tanto, generalmente se requiere el arreglo de indices (en el indice 0) mientras que el arreglo de índices (en el índice 12) es opcional y solo se utilizará si se incluye. También es posible crear una mesh solo con el arreglo de índices y sin el arreglo de vértices, pero eso está más allá del alcance de este tutorial.
All the other arrays carry information about the vertices. They are optional and will only be used if included. Some of these arrays (e.g. ARRAY_COLOR)
use one entry per vertex to provide extra information about vertices. They must have the same size as the vertex array. Other arrays (e.g. ARRAY_TANGENT) use
four entries to describe a single vertex. These must be exactly four times larger than the vertex array.
For normal usage, the last three parameters in add_surface_from_arrays() are typically left empty.
Setting up the ArrayMesh
In the editor, create a MeshInstance3D and add an ArrayMesh to it in the Inspector. Normally, adding an ArrayMesh in the editor is not useful, but in this case it allows us to access the ArrayMesh from code without creating one.
Next, add a script to the MeshInstance3D.
Dentro de _ready(), crea un nuevo Array.
var surface_array = []
Godot.Collections.Array surfaceArray = [];
Este será el arreglo en el que guardaremos la información de la superficie; contendrá todos los arrays de datos que la superficie necesita. Godot espera que tenga un tamaño de Mesh.ARRAY_MAX, así que redimensiona el arreglo en consecuencia.
var surface_array = []
surface_array.resize(Mesh.ARRAY_MAX)
Godot.Collections.Array surfaceArray = [];
surfaceArray.Resize((int)Mesh.ArrayType.Max);
A continuación, crea los arreglos para cada tipo de datos que utilizarás.
var verts = PackedVector3Array()
var uvs = PackedVector2Array()
var normals = PackedVector3Array()
var indices = PackedInt32Array()
List<Vector3> verts = [];
List<Vector2> uvs = [];
List<Vector3> normals = [];
List<int> indices = [];
Una vez que hayas llenado tus arreglos de datos con tu geometría, puedes crear una malla agregando cada arreglo a surface_array y luego comprometiéndolo a la malla.
surface_array[Mesh.ARRAY_VERTEX] = verts
surface_array[Mesh.ARRAY_TEX_UV] = uvs
surface_array[Mesh.ARRAY_NORMAL] = normals
surface_array[Mesh.ARRAY_INDEX] = indices

# No blendshapes, lods, or compression used.
mesh.add_surface_from_arrays(Mesh.PRIMITIVE_TRIANGLES, surface_array)
surfaceArray[(int)Mesh.ArrayType.Vertex] = verts.ToArray();
surfaceArray[(int)Mesh.ArrayType.TexUV] = uvs.ToArray();
surfaceArray[(int)Mesh.ArrayType.Normal] = normals.ToArray();
surfaceArray[(int)Mesh.ArrayType.Index] = indices.ToArray();

var arrMesh = Mesh as ArrayMesh;
if (arrMesh != null)
{
    // No blendshapes, lods, or compression used.
    arrMesh.AddSurfaceFromArrays(Mesh.PrimitiveType.Triangles, surfaceArray);
}
Nota
En este ejemplo, utilizamos Mesh.PRIMITIVE_TRIANGLES, pero puedes utilizar cualquier tipo de primitiva disponible en la malla.
A continuación se muestra el código completo:
extends MeshInstance3D

func _ready():
    var surface_array = []
    surface_array.resize(Mesh.ARRAY_MAX)

    # PackedVector**Arrays for mesh construction.
    var verts = PackedVector3Array()
    var uvs = PackedVector2Array()
    var normals = PackedVector3Array()
    var indices = PackedInt32Array()

    #######################################
    ## Insert code here to generate mesh ##
    #######################################

    # Assign arrays to surface array.
    surface_array[Mesh.ARRAY_VERTEX] = verts
    surface_array[Mesh.ARRAY_TEX_UV] = uvs
    surface_array[Mesh.ARRAY_NORMAL] = normals
    surface_array[Mesh.ARRAY_INDEX] = indices

    # Create mesh surface from mesh array.
    # No blendshapes, lods, or compression used.
    mesh.add_surface_from_arrays(Mesh.PRIMITIVE_TRIANGLES, surface_array)
public partial class MyMeshInstance3D : MeshInstance3D
{
    public override void _Ready()
    {
        Godot.Collections.Array surfaceArray = [];
        surfaceArray.Resize((int)Mesh.ArrayType.Max);

        // C# arrays cannot be resized or expanded, so use Lists to create geometry.
        List<Vector3> verts = [];
        List<Vector2> uvs = [];
        List<Vector3> normals = [];
        List<int> indices = [];

        /***********************************
        * Insert code here to generate mesh.
        * *********************************/

        // Convert Lists to arrays and assign to surface array
        surfaceArray[(int)Mesh.ArrayType.Vertex] = verts.ToArray();
        surfaceArray[(int)Mesh.ArrayType.TexUV] = uvs.ToArray();
        surfaceArray[(int)Mesh.ArrayType.Normal] = normals.ToArray();
        surfaceArray[(int)Mesh.ArrayType.Index] = indices.ToArray();

        var arrMesh = Mesh as ArrayMesh;
        if (arrMesh != null)
        {
            // Create mesh surface from mesh array
            // No blendshapes, lods, or compression used.
            arrMesh.AddSurfaceFromArrays(Mesh.PrimitiveType.Triangles, surfaceArray);
        }
    }
}
The code that goes in the middle can be whatever you want. Below we will present some example code for generating shapes, starting with a rectangle.
Generar un rectángulo
Como estamos utilizando Mesh.PRIMITIVE_TRIANGLES para renderizar, construiremos un rectángulo con triángulos.
Un rectángulo se forma con dos triángulos que comparten cuatro vértices. En nuestro ejemplo, crearemos un rectángulo con su punto superior izquierdo en (0, 0, 0) y con un ancho y una longitud de uno, como se muestra a continuación:
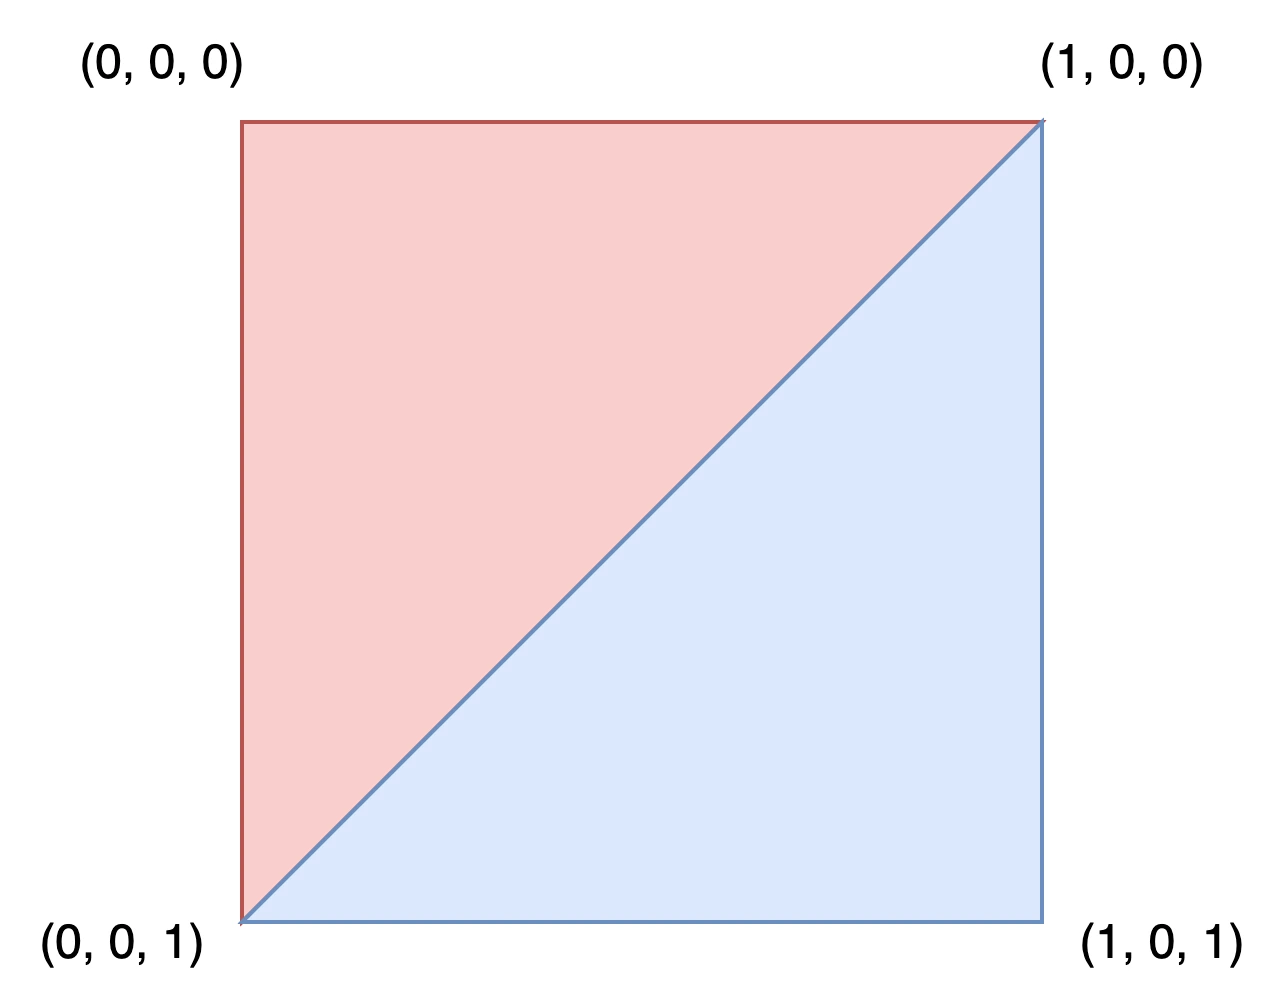
Para dibujar este rectángulo, define las coordenadas de cada vértice en el arreglo verts.
verts = PackedVector3Array([
        Vector3(0, 0, 0),
        Vector3(0, 0, 1),
        Vector3(1, 0, 0),
        Vector3(1, 0, 1),
    ])
verts.AddRange(new Vector3[]
{
    new Vector3(0, 0, 0),
    new Vector3(0, 0, 1),
    new Vector3(1, 0, 0),
    new Vector3(1, 0, 1),
});
El array uvs ayuda a describir en qué parte de la malla deben colocarse las distintas secciones de una textura. Los valores varían de 0 a 1. Dependiendo de tu textura, es posible que quieras cambiar estos valores.
uvs = PackedVector2Array([
        Vector2(0, 0),
        Vector2(1, 0),
        Vector2(0, 1),
        Vector2(1, 1),
    ])
uvs.AddRange(new Vector2[]
{
    new Vector2(0, 0),
    new Vector2(1, 0),
    new Vector2(0, 1),
    new Vector2(1, 1),
});
El array normals se utiliza para describir la dirección hacia la que apuntan los vértices y se emplea en los cálculos de iluminación. Para este ejemplo, utilizaremos por defecto la dirección Vector3.UP.
normals = PackedVector3Array([
        Vector3.UP,
        Vector3.UP,
        Vector3.UP,
        Vector3.UP,
    ])
normals.AddRange(new Vector3[]
{
    Vector3.Up,
    Vector3.Up,
    Vector3.Up,
    Vector3.Up,
});
El array indices define el orden en el que se dibujan los vértices. Godot renderiza en sentido horario (clockwise), lo que significa que debemos especificar los vértices de un triángulo que queramos dibujar siguiendo ese orden.
Por ejemplo, para dibujar el primer triángulo, querremos dibujar los vértices (0, 0, 0), (1, 0, 0) y (0, 0, 1) en ese orden. Esto equivale a dibujar vert[0], vert[2] y vert[1], es decir, los índices 0, 2 y 1, del array verts. Estos valores de índice son lo que define el array indices.
Index |
|
|
|
|---|---|---|---|
0 |
(0, 0, 0) |
(0, 0) |
Vector3.UP |
1 |
(0, 0, 1) |
(1, 0) |
Vector3.UP |
2 |
(1, 0, 0) |
(0, 1) |
Vector3.UP |
3 |
(1, 0, 1) |
(1, 1) |
Vector3.UP |
indices = PackedInt32Array([
        0, 2, 1, # Draw the first triangle.
        2, 3, 1, # Draw the second triangle.
    ])
indices.AddRange(new int[]
{
    0, 2, 1, // Draw the first triangle.
    2, 3, 1, // Draw the second triangle.
});
Put together, the rectangle generation code looks like:
extends MeshInstance3D

func _ready():

  # Insert setting up the PackedVector**Arrays here.

  verts = PackedVector3Array([
          Vector3(0, 0, 0),
          Vector3(0, 0, 1),
          Vector3(1, 0, 0),
          Vector3(1, 0, 1),
      ])

  uvs = PackedVector2Array([
          Vector2(0, 0),
          Vector2(1, 0),
          Vector2(0, 1),
          Vector2(1, 1),
      ])

  normals = PackedVector3Array([
          Vector3.UP,
          Vector3.UP,
          Vector3.UP,
          Vector3.UP,
      ])

  indices = PackedInt32Array([
          0, 2, 1,
          2, 3, 1,
      ])

  # Insert committing to the ArrayMesh here.
using System.Collections.Generic;

public partial class MeshInstance3d : MeshInstance3D
{
  public override void _Ready()
  {
      // Insert setting up the surface array and lists here.

      verts.AddRange(new Vector3[]
      {
          new Vector3(0, 0, 0),
          new Vector3(0, 0, 1),
          new Vector3(1, 0, 0),
          new Vector3(1, 0, 1),
      });

      uvs.AddRange(new Vector2[]
      {
          new Vector2(0, 0),
          new Vector2(1, 0),
          new Vector2(0, 1),
          new Vector2(1, 1),
      });

      normals.AddRange(new Vector3[]
      {
          Vector3.Up,
          Vector3.Up,
          Vector3.Up,
          Vector3.Up,
      });

      indices.AddRange(new int[]
      {
          0, 2, 1,
          2, 3, 1,
      });

      // Insert committing to the ArrayMesh here.
  }
}
Para un ejemplo más complejo, consulta la sección de generación de esferas a continuación.
Generar una esfera
Aquí tienes un ejemplo de código para generar una esfera. Aunque el código está presentado en GDScript, no hay nada específico de Godot en el enfoque para generarlo. Esta implementación no tiene nada en particular que ver con ArrayMeshes y es simplemente un enfoque genérico para generar una esfera. Si tienes dificultades para entenderlo o quieres aprender más sobre geometría procedural en general, puedes utilizar cualquier tutorial que encuentres en línea.
extends MeshInstance3D

var rings = 50
var radial_segments = 50
var radius = 1

func _ready():

    # Insert setting up the PackedVector**Arrays here.

    # Vertex indices.
    var thisrow = 0
    var prevrow = 0
    var point = 0

    # Loop over rings.
    for i in range(rings + 1):
        var v = float(i) / rings
        var w = sin(PI * v)
        var y = cos(PI * v)

        # Loop over segments in ring.
        for j in range(radial_segments + 1):
            var u = float(j) / radial_segments
            var x = sin(u * PI * 2.0)
            var z = cos(u * PI * 2.0)
            var vert = Vector3(x * radius * w, y * radius, z * radius * w)
            verts.append(vert)
            normals.append(vert.normalized())
            uvs.append(Vector2(u, v))
            point += 1

            # Create triangles in ring using indices.
            if i > 0 and j > 0:
                indices.append(prevrow + j - 1)
                indices.append(prevrow + j)
                indices.append(thisrow + j - 1)

                indices.append(prevrow + j)
                indices.append(thisrow + j)
                indices.append(thisrow + j - 1)

        prevrow = thisrow
        thisrow = point

  # Insert committing to the ArrayMesh here.
public partial class MyMeshInstance3D : MeshInstance3D
{
    private int _rings = 50;
    private int _radialSegments = 50;
    private float _radius = 1;

    public override void _Ready()
    {
        // Insert setting up the surface array and lists here.

        // Vertex indices.
        var thisRow = 0;
        var prevRow = 0;
        var point = 0;

        // Loop over rings.
        for (var i = 0; i < _rings + 1; i++)
        {
            var v = ((float)i) / _rings;
            var w = Mathf.Sin(Mathf.Pi * v);
            var y = Mathf.Cos(Mathf.Pi * v);

            // Loop over segments in ring.
            for (var j = 0; j < _radialSegments + 1; j++)
            {
                var u = ((float)j) / _radialSegments;
                var x = Mathf.Sin(u * Mathf.Pi * 2);
                var z = Mathf.Cos(u * Mathf.Pi * 2);
                var vert = new Vector3(x * _radius * w, y * _radius, z * _radius * w);
                verts.Add(vert);
                normals.Add(vert.Normalized());
                uvs.Add(new Vector2(u, v));
                point += 1;

                // Create triangles in ring using indices.
                if (i > 0 && j > 0)
                {
                    indices.Add(prevRow + j - 1);
                    indices.Add(prevRow + j);
                    indices.Add(thisRow + j - 1);

                    indices.Add(prevRow + j);
                    indices.Add(thisRow + j);
                    indices.Add(thisRow + j - 1);
                }
            }

            prevRow = thisRow;
            thisRow = point;
        }

        // Insert committing to the ArrayMesh here.
    }
}
Guardar
Finalmente, podemos utilizar la clase ResourceSaver para guardar la ArrayMesh. Esto es útil cuando queremos generar una malla y luego utilizarla posteriormente sin tener que volver a generarla.
# Saves mesh to a .tres file with compression enabled.
ResourceSaver.save(mesh, "res://sphere.tres", ResourceSaver.FLAG_COMPRESS)
// Saves mesh to a .tres file with compression enabled.
ResourceSaver.Save(Mesh, "res://sphere.tres", ResourceSaver.SaverFlags.Compress);