Attention: Here be dragons
This is the latest
(unstable) version of this documentation, which may document features
not available in or compatible with released stable versions of Godot.
Checking the stable version of the documentation...
Pantalla frontal
La pieza final que necesita nuestro juego es una interfaz de usuario (IU) para mostrar elementos como la puntuación, un mensaje de "game over" y un botón de reinicio.
Crea una nueva escena, has click en "Otro Nodo" y agrega un nodo CanvasLayer llamado HUD. "HUD", que son las siglas de "heads-up display", una pantalla informativa que aparece superpuesta a la vista del juego.
El nodo CanvasLayer nos permitirá colocar elementos de nuestra UI en una capa por encima del juego, así la información que mostrará no estará cubierta por ningún elemento como el jugador o los enemigos.
El HUD necesitará mostrar la siguiente información:
Puntuación, cambiado por
ScoreTimer.Un mensaje como "Game Over" o "Get Ready!"
Un botón "Start" para comenzar el juego.
El nodo básico para elementos de UI es Control. Para crear nuestra UI, usaremos dos tipos de nodos Control: Label y Button.
Cree los siguientes hijos del nodo HUD:
Label llamado
ScoreLabel.Label llamado
Message.Button llamado
StartButton.Timer llamado
MessageTimer.
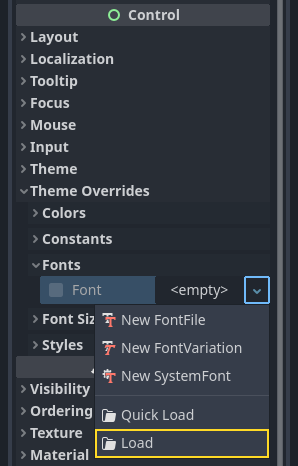
Haz clic en ScoreLabel y escribe un número en el campo Text del inspector. La fuente por defecto para los nodos Control es pequeña y no escala bien. En los recursos del juego se incluye una fuente llamada "Xolonium-Regular.ttf". Para usar esta fuente, haz lo siguiente:
Dentro de "Theme Overrides > Fonts", elige "Load" y selecciona el archivo "Xolonium-Regular.ttf".
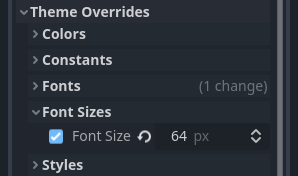
El tamaño de la fuente aun es demasiado pequeño, increméntalo a 64 en "Theme Overrides > Font Sizes". Una vez lo hayas hecho con ScoreLabel, hazlo también para Message y StartButton.
Nota
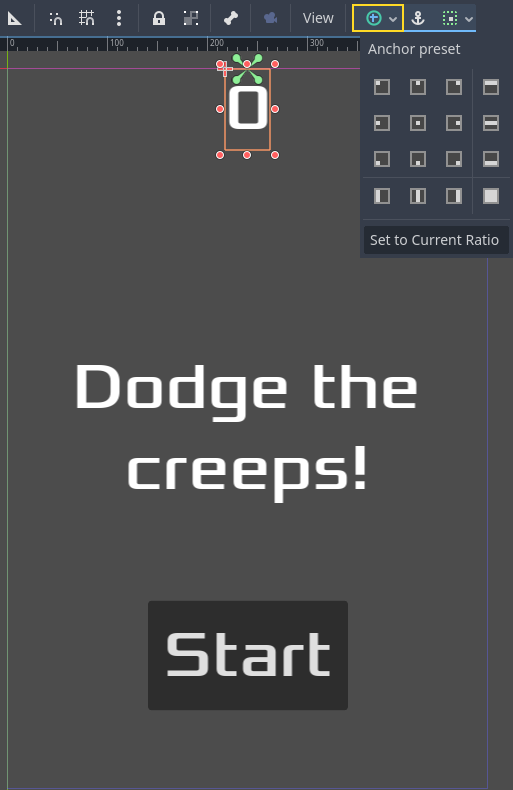
Anclas: Los nodos Control tienen posición y tamaño, pero también tienen anclas (anchor). Las anclas definen el origen - El punto de referencia para los bordes del nodo.
Acomoda los nodos como se muestra debajo. Puedes arrastrar y ubicarlos manualmente o, para un modo más preciso, utiliza "Anchor Presets".
ScoreLabel
Añade el texto
0.Ajuste la "Alineación horizontal" y la "Alineación vertical" a
Center.Selecciona el "Anchor Preset"
Center Top.
Message
Agrega el texto
Dodge the Creeps!.Ajuste la "Alineación horizontal" y la "Alineación vertical" a
Center.Cambia el "Autowrap Mode" a
Word, de otro modo el texto se mantendrá en una sola línea.Dentro de "Control - Layout/Transform" coloca "Size X" en
480para usar todo el ancho de la pantalla.Elige el "Anchor Preset"
Center.
Conectar HUD a Main
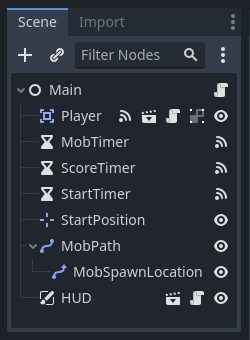
Ahora que hemos terminado de crear la escena del HUD, regresa a Main. Instancia la escena HUD en Main como hiciste con la escena de Player. El árbol de escenas debe verse así, asegúrate que no te olvidaste de nada:
Ahora conectaremos la funcionalidad de HUD a nuestro script Main. Esto requiere unas pocas adiciones a la escena Main:
In the Signals tab, connect the HUD's start_game signal to the new_game()
function of the Main node by clicking the "Pick" button in the "Connect a Signal"
window and selecting the new_game() method or type "new_game" below "Receiver Method"
in the window. Verify that the green connection icon now appears next to
func new_game() in the script.
En``new_game()``, actualiza la puntuación y muestra el mensaje "Get Ready":
$HUD.update_score(score)
$HUD.show_message("Get Ready")
var hud = GetNode<HUD>("HUD");
hud.UpdateScore(_score);
hud.ShowMessage("Get Ready!");
En game_over() necesitaremos llamar la función correspondiente en HUD:
$HUD.show_game_over()
GetNode<HUD>("HUD").ShowGameOver();
Finalmente, agrega esto a _on_ScoreTimer_timeout() para mantener la interfaz en sincronía al cambiar la puntuación:
$HUD.update_score(score)
GetNode<HUD>("HUD").UpdateScore(_score);
Advertencia
Cuando estés seguro de que todo funciona, quita la llamada a new_game() de ready() si no lo haz hecho todavía, de otro modo el juego iniciará automáticamente.
¡Ahora está listo para jugar! Haz clic en el botón "Reproducir el proyecto".
Remover los viejos "creeps"
Si juegas hasta el "Game Over" y comienzas un juego nuevo, los "creeps" del juego previo estarán todavía en pantalla. Sería mejor si todos desaparecen al comienzo del juego nuevo. Sólo necesitamos decirle a todos los enemigos que se remuevan solos. Podemos hacer esto con la característica de "grupos".
En la escena Mob, selecciona el nodo raíz y haz clic en la pestaña Groups junto a la pestaña Signals y en el botón "+" para abrir el cuadro de dialogo "Crear Nuevo Grupo".

Nombra el grupo “mobs” y haz clic en “ok” para agregar un nuevo grupo de escena.

Ahora todos los mobs estarán en el grupo "mobs".

Podemos entonces agregar la siguiente línea a la función new_game() en Main:
get_tree().call_group("mobs", "queue_free")
// Note that for calling Godot-provided methods with strings,
// we have to use the original Godot snake_case name.
GetTree().CallGroup("mobs", Node.MethodName.QueueFree);
La función call_group() llama a la función nombrada en cada nodo de un grupo - en este caso le estamos diciendo a cada grupo que se elimine a sí mismo.
El juego está casi terminado en este punto. En la siguiente y última parte, lo puliremos un poco agregando un fondo, música en bucle y algunos atajos de teclado.