Attention: Here be dragons
This is the latest
(unstable) version of this documentation, which may document features
not available in or compatible with released stable versions of Godot.
Checking the stable version of the documentation...
Saltar y aplastar monstruos
En esta parte, agregaremos la capacidad de saltar y aplastar a los monstruos. En la siguiente lección, haremos que el jugador muera cuando un monstruo lo golpee en el suelo.
Primero, tenemos que cambiar algunas configuraciones relacionadas con las interacciones físicas. Ingresa al mundo de las capas de física.
Controlar las interacciones fisicas
Los cuerpos físicos tienen acceso a dos propiedades complementarias: capas y máscaras. Las capas definen en qué capa(s) física(s) se encuentra un objeto.
Las máscaras controlan las capas que un cuerpo escuchará y detectará. Esto afecta a la detección de colisiones. Cuando quieras que dos cuerpos interactúen, necesitas que al menos uno tenga una máscara correspondiente al otro.
Si estés confundido, no preocupe, exploraramos tres ejemplos en uno momento.
El punto más importante es que pueda usar capas y mascarillas para filtrar interacciones de fisicas, controlar rendimiento, y eliminar requisitos por condiciones adicionales en su código.
Por defecto, todos los cuerpos físicos y áreas están configurados tanto a capa como a máscara 1. Esto significa que todos ellos colisionan entre sí.
Las capas físicas se representan mediante números, pero podemos darles nombres para llevar un registro de qué es qué.
Ajustar el nombre de las capas
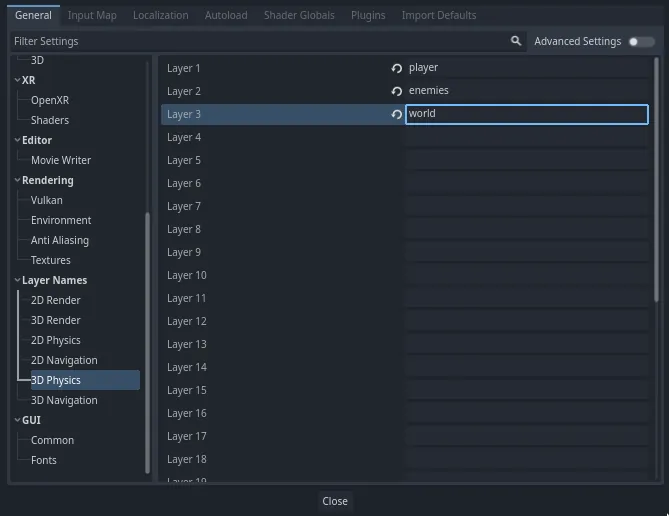
Vamos a darle nombre a nuestras capas físicas. Ve a Proyecto -> Configuración del Proyecto.

En el menú de la izquierda, ve hacia abajo hasta Nombres de Capas -> Física 3D. Verás una lista de capas con un campo junto a cada una de ellas a la derecha. Puedes establecer sus nombres allí. Nombra las primeras tres capas como player, enemies y world, respectivamente.
Ahora podemos asignarles estas capas a nuestros nodos físicos.
Asignar capas y máscaras
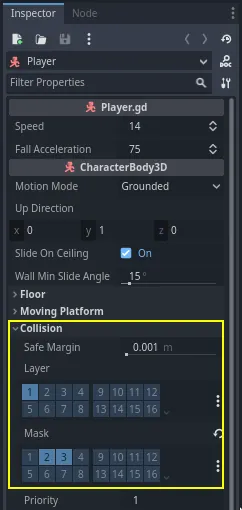
En la escena Main, selecciona el nodo Ground. En el Inspector, expande la sección Collision. Allí podrás ver las capas y máscaras del nodo como una cuadrícula de botones.
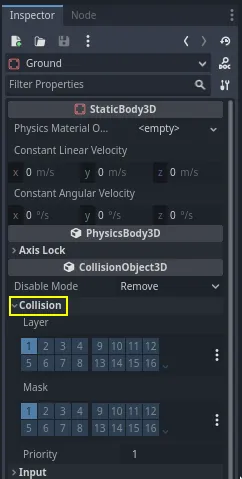
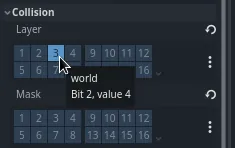
El suelo forma parte del mundo, así que queremos que sea parte de la tercera capa. Haz clic en el botón iluminado para desactivar la primera Capa y activa la tercera. Luego, desactiva la Máscara haciendo clic en ella.
Como se mencionó anteriormente, la propiedad Mask permite que un nodo escuche las interacciones con otros objetos físicos, pero no necesitamos que tenga colisiones. Ground no necesita escuchar nada; solo está ahí para evitar que las criaturas caigan.
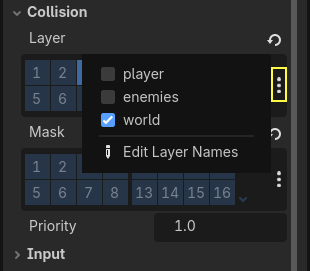
Ten en cuenta que puedes hacer clic en el botón "..." en el lado derecho de las propiedades para ver una lista de casillas de verificación con nombres.
A continuación, están Player y Mob. Abre player.tscn haciendo doble clic en el archivo en el panel Sistema de Archivos.
Selecciona el nodo Player y establece su propiedad Collision -> Mask tanto a "enemies" como a "world". Puedes dejar la propiedad Layer por defecto, ya que la primera capa es la capa "player".
Luego, abre la escena del Mob haciendo doble clic en mob.tscn y selecciona el nodo Mob.
Establece su propiedad Colisión -> Capa en "enemies" y desactiva su propiedad Colisión -> Máscara, dejando la máscara vacía.
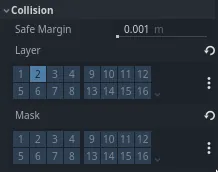
Estas configuraciones significan que los monstruos se moverán a través de los demás. Si deseas que los monstruos colisionen y se deslicen entre sí, activa la máscara "enemies".
Nota
Los enemigos no necesitan tener en cuenta la capa "world" porque solo se mueven en el plano XZ. No les aplicamos gravedad a propósito.
Saltar
La mecánica de salto en sí misma solo requiere dos líneas de código. Abre el script Player. Necesitamos un valor para controlar la fuerza del salto y actualiza _physics_process() para codificar el salto.
Después de la línea que define fall_acceleration, en la parte superior del script, agrega el jump_impulse.
#...
# Vertical impulse applied to the character upon jumping in meters per second.
@export var jump_impulse = 20
// Don't forget to rebuild the project so the editor knows about the new export variable.

// ...
// Vertical impulse applied to the character upon jumping in meters per second.
[Export]
public int JumpImpulse { get; set; } = 20;
Dentro de _physics_process(), agrega el siguiente código antes de la línea donde llamamos a move_and_slide().
func _physics_process(delta):
    #...

    # Jumping.
    if is_on_floor() and Input.is_action_just_pressed("jump"):
        target_velocity.y = jump_impulse

    #...
public override void _PhysicsProcess(double delta)
{
    // ...

    // Jumping.
    if (IsOnFloor() && Input.IsActionJustPressed("jump"))
    {
        _targetVelocity.Y = JumpImpulse;
    }

    // ...
}
¡Eso es todo lo que necesitas para saltar!
El método is_on_floor() es una herramienta de la clase CharacterBody3D. Devuelve true si el cuerpo colisionó con el suelo en este fotograma. Por eso aplicamos gravedad al Player: para que colisionemos con el suelo en lugar de flotar sobre él como los monstruos.
Si el personaje está en el suelo y el jugador presiona "saltar", instantáneamente le damos una gran velocidad vertical. En los juegos, realmente quieres que los controles sean receptivos y dar aumentos de velocidad instantáneos como estos, aunque sean poco realistas, se sienten geniales.
Observa que el eje Y es positivo hacia arriba. Esto es diferente a los gráficos en 2D, donde el eje Y es positivo hacia abajo.
Aplastar monstruos
A continuación, agreguemos la mecánica de aplastamiento. Vamos a hacer que el personaje rebote sobre los monstruos y los mate al mismo tiempo.
Necesitamos detectar las colisiones con un monstruo y diferenciarlas de las colisiones con el suelo. Para hacerlo, podemos usar la función de etiquetado de group de Godot.
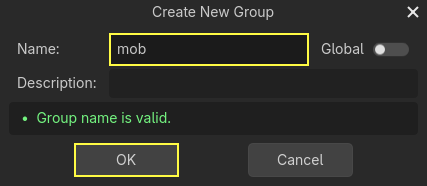
Open the scene mob.tscn again and select the Mob node. Go to the Groups
dock on the right to see a list of groups, which allows you to assign
tags to nodes. Click on the + button to open the Create new Group dialog.

Introduce "mob" en el campo Nombre y haz clic en el botón Aceptar.
The "mob" group is now shown under the Scene Groups section.
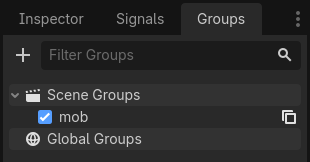
Aparece un icono en el panel de escenas para indicar que el nodo forma parte de al menos un grupo.
![]()
Ahora podemos usar el grupo desde el código para distinguir las colisiones con los monstruos de las colisiones con el suelo.
Codificando la mecánica de aplastar
Regresa al script Player para programar el aplastamiento y el rebote.
En la parte superior del script, necesitamos otra propiedad llamada bounce_impulse. Al aplastar a un enemigo, no queremos necesariamente que el personaje se eleve tan alto como cuando salta.
# Vertical impulse applied to the character upon bouncing over a mob in
# meters per second.
@export var bounce_impulse = 16
// Don't forget to rebuild the project so the editor knows about the new export variable.

// Vertical impulse applied to the character upon bouncing over a mob in meters per second.
[Export]
public int BounceImpulse { get; set; } = 16;
Luego, después del bloque de código Jumping en que agregamos en la parte superior de _physics_process(), agrega el siguiente bucle. Con move_and_slide(), Godot hace que el cuerpo se mueva multiples veces seguidas para suavizar el movimiento del personaje. Por lo tanto, debemos recorrer todas las colisiones que hayan podido ocurrir.
En cada iteración del bucle, comprobamos si hemos aterrizado sobre un enemigo. Si es así, lo eliminamos y rebotamos.
Con este código, si no ocurren colisiones en un fotograma determinado, el bucle no se ejecutará.
func _physics_process(delta):
    #...

    # Iterate through all collisions that occurred this frame
    for index in range(get_slide_collision_count()):
        # We get one of the collisions with the player
        var collision = get_slide_collision(index)

        # If there are duplicate collisions with a mob in a single frame
        # the mob will be deleted after the first collision, and a second call to
        # get_collider will return null, leading to a null pointer when calling
        # collision.get_collider().is_in_group("mob").
        # This block of code prevents processing duplicate collisions.
        if collision.get_collider() == null:
            continue

        # If the collider is with a mob
        if collision.get_collider().is_in_group("mob"):
            var mob = collision.get_collider()
            # we check that we are hitting it from above.
            if Vector3.UP.dot(collision.get_normal()) > 0.1:
                # If so, we squash it and bounce.
                mob.squash()
                target_velocity.y = bounce_impulse
                # Prevent further duplicate calls.
                break
public override void _PhysicsProcess(double delta)
{
    // ...

    // Iterate through all collisions that occurred this frame.
    for (int index = 0; index < GetSlideCollisionCount(); index++)
    {
        // We get one of the collisions with the player.
        KinematicCollision3D collision = GetSlideCollision(index);

        // If the collision is with a mob.
        // With C# we leverage typing and pattern-matching
        // instead of checking for the group we created.
        if (collision.GetCollider() is Mob mob)
        {
            // We check that we are hitting it from above.
            if (Vector3.Up.Dot(collision.GetNormal()) > 0.1f)
            {
                // If so, we squash it and bounce.
                mob.Squash();
                _targetVelocity.Y = BounceImpulse;
                // Prevent further duplicate calls.
                break;
            }
        }
    }
}
Eso es un montón de nuevas funciones. Aquí tienes más información sobre ellas.
Las funciones get_slide_collision_count() y get_slide_collision() provienen de la clase CharacterBody3D y están relacionadas con move_and_slide().
get_slide_collision() devuelve un objeto KinematicCollision3D que contiene información sobre dónde y cómo ocurrió la colisión. Por ejemplo, utilizamos su función get_collider() para verificar si hemos colisionado con un "mob" llamando a is_in_group() en él: collision.get_collider().is_in_group("mob").
Nota
El método is_in_group() está disponible en cada Node.
Para verificar que estamos aterrizando sobre el monstruo, usamos el producto punto de vectores: Vector3.UP.dot(collision.get_normal()) > 0.1. La normal de colisión es un vector 3D que es perpendicular al plano donde ocurrió la colisión. El producto escalar nos permite compararlo con la dirección hacia arriba.
Con los productos escalares, cuando el resultado es mayor que 0, los dos vectores están en un ángulo menor a 90 grados. Un valor mayor a 0.1 nos indica que estamos aproximadamente encima del monstruo.
Después de completar la lógica de aplastado y rebote, terminaremos el bucle de manera temprana con la sentencia break para prevenir llamadas duplicadas a mob.squash(), que de otro modo puede resultar en bugs inintencionales como contar el puntaje muchas veces por cada muerte.
Estamos llamando a una función indefinida, mob.squash(). Tenemos que agregarla a la clase Mob.
Abre el script Mob.gd haciendo doble clic en él en el panel Sistema de Archivos. En la parte superior del script, queremos definir una nueva señal llamada squashed. Y en la parte inferior, puedes agregar la función squash (aplastar), donde emitimos la señal y destruimos el enemigo.
# Emitted when the player jumped on the mob.
signal squashed

# ...


func squash():
    squashed.emit()
    queue_free()
// Don't forget to rebuild the project so the editor knows about the new signal.

// Emitted when the player jumped on the mob.
[Signal]
public delegate void SquashedEventHandler();

// ...

public void Squash()
{
    EmitSignal(SignalName.Squashed);
    QueueFree();
}
Nota
Cuando se utiliza C#, Godot deberá crear eventos apropiados autimáticamente para todas las Signals terminadas con EventHandler, véase C# Signals.
Utilizaremos la señal para agregar puntos a la puntuación en la siguiente lección.
Con eso, deberías poder eliminar monstruos saltando sobre ellos. Puedes presionar F5 para probar el juego y establecer main.tscn como la escena principal de tu proyecto.
Sin embargo, el jugador aún no morirá. Trabajaremos en eso en la próxima parte.