Attention: Here be dragons
This is the latest
(unstable) version of this documentation, which may document features
not available in or compatible with released stable versions of Godot.
Checking the stable version of the documentation...
建立內容
專案設定到位後,我們可以開始處理玩家控制的角色。
第一個場景,我們要來定義 Player 物件。把玩家做成獨立一個 Player 場景的好處是:就算遊戲其他部分還沒做好,也可以獨立測試單一場景。
節點結構
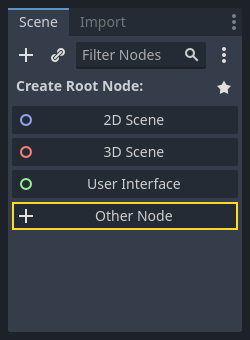
首先,我們需要為玩家物件選擇一個根節點。一般來說,場景的根節點應該反映物件期望的功能——也就是這個物件 是什麼 。在左上角的「場景」頁籤中,點擊「其他節點」按鈕,並新增一個 Area2D 節點到場景中。
備註
Godot also provides the CharacterBody2D node, specifically designed for 2D characters, which includes built-in support for some of the processes explained in this tutorial. In many real world projects, CharacterBody2D would be a better choice for players and enemies. However, this tutorial focuses on core concepts that apply to a wider range of nodes and use cases.
當您加入 Area2D 節點後,Godot 會在場景樹中其旁邊顯示下列 警告圖示 :

這個警告訊息告訴我們, Area2D 節點需要一個形狀才能偵測碰撞或重疊。我們可以 暫時忽略這個警告 ,因為我們將先設定玩家的視覺效果(使用動畫精靈)。一旦視覺效果準備就緒,我們將新增一個碰撞形狀作為子節點。這樣可以讓我們根據精靈的外觀精確地調整形狀的大小和位置。
有了 Area2D 節點,我們就能偵測跑到了玩家範圍內物件。我們先點兩下節點,把節點名稱改成 Player 。現在,場景根節點已經設定好了,接著來設定更多節點,新增更多功能。
在將任何子節點加入 Player 節點之前,我們要確保不會因為點擊到子節點而意外移動或調整它們的大小。選取該節點,然後點擊鎖頭右邊的圖示。它的工具提示說明:「將選取的節點及其子節點群組化。這樣一來,當在 2D 和 3D 視圖中點擊任何子節點時,都會改為選取父節點。」

將場景儲存為 player.tscn 。點擊 場景 > 儲存 ,或按下在 Windows/Linux 上是 Ctrl + S,在 macOS 上是 Cmd + S。
備註
在這個專案中,我們會遵守 Godot 的命名慣例。
GDScript :類別 (節點) 使用大駝峰法 (PascalCase),變數與函式名稱使用蛇形法 (snake_case),常數則使用全大寫 (ALL_CAPS) (詳細請參考 GDScript 風格指南)。
C# :類別與匯出的變數與方法使用大駝峰法 (PascalCase),Private 欄位使用底線加小駝峰 (_camelCase),區域變數與參數使用小駝峰法 (camelCase) (請參考 C# 風格指南 )。在連接訊號的時候請特別注意不要打錯方法名稱。
Sprite 動畫
點擊 Player 節點,然後新增一個子節點 AnimatedSprite2D (在 Windows/Linux 上按 Ctrl + A,macOS 上按 Cmd + A)。 AnimatedSprite2D 將負責我們玩家的外觀和動畫。請注意節點旁邊有一個警告符號。 AnimatedSprite2D 需要一個 SpriteFrames 資源,其中包含它可以顯示的動畫列表。請確保已選取 AnimatedSprite2D ,然後在 Inspector(屬性檢視器)的 Animation (動畫)區塊下找到 SpriteFrames (Sprite 影格)屬性,點擊 "[empty]" -> "New SpriteFrames"(新增 Sprite 影格):
點擊您剛建立的 SpriteFrames 以開啟「SpriteFrames」面板:
左邊是動畫列表。點擊 default 這個動畫,然後將它 重新命名 為 walk 。接著點擊 新增動畫 按鈕來建立第二個名為 up 的動畫。
在檔案系統停靠視窗中找到玩家圖片 – 它們位於您先前解壓縮的 art 資料夾中。將每個動畫的兩個圖片拖曳到對應動畫面板的 動畫影格 側邊:
playerGrey_walk1和playerGrey_walk2用於walk動畫playerGrey_up1和playerGrey_up2用於up動畫
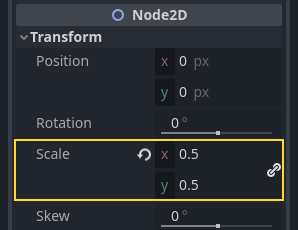
對於遊戲視窗來說,這些玩家圖片看起來有點大,所以我們需要把圖片縮小。點擊 AnimatedSprite 節點,然後把 Scale (縮放) 屬性設為 (0.5, 0.5) 。這個屬性位在屬性檢視器中 Node2D 標題底下。
最後,在 Player 節點下新增一個 CollisionShape2D 子節點。這個節點是用來判斷玩家的「碰撞區域 (Hitbox 或 Collision Area)」。在這個角色上很適合使用 CapsuleShape2D 節點,所以我們可以到屬性檢視器中的 [Shape] (形狀),點擊 [空] -> [新增 CapsuleShape2D]。使用兩個控制尺寸的圓點來把大小調整至覆蓋 Sprite:

完成之後, Player 看起來應該會像這樣:

完成後, Area2D 節點上的警告就會消失,因為它現在已指定了形狀,可以與其他物件互動了。
修改完畢後記得保存場景。
在下一部分中,我們將向玩家節點新增一個腳本,以移動它並為其新增動畫效果。然後,我們將設定碰撞偵測,以瞭解玩家何時被某些東西擊中。