Attention: Here be dragons
This is the latest
(unstable) version of this documentation, which may document features
not available in or compatible with released stable versions of Godot.
Checking the stable version of the documentation...
屬性檢查器外掛
屬性檢查器面板允許你透過外掛建立自訂小工具來編輯屬性。這在處理自訂資料型別與資源時特別有用,但你也可以利用這個功能修改內建型別的屬性檢查器小工具。你可以為特定屬性、整個物件,甚至特定資料型別設計專屬的自訂控制項。
本指南說明如何使用 EditorInspectorPlugin 與 EditorProperty 類別,為整數型別建立自訂介面,將預設的編輯行為替換為一個能產生 0 到 99 隨機值的按鈕。
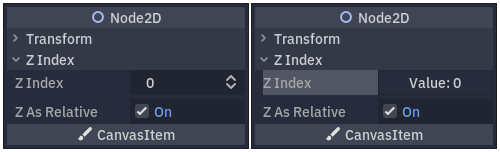
左側為預設行為,右側為最終效果。
設定你的外掛
先建立一個全新的空白外掛。
也參考
請參閱 製作外掛程式 指南,來設定你的新外掛。
假設你的外掛資料夾命名為 my_inspector_plugin,你應該會有一個 addons/my_inspector_plugin 資料夾,裡面包含兩個檔案:plugin.cfg 及 plugin.gd。
和以往一樣,plugin.gd 是一個繼承自 EditorPlugin 的腳本,你需要在 _enter_tree 與 _exit_tree 方法中新增程式碼。若要註冊你的屬性檢查器外掛,必須載入其腳本,然後使用 add_inspector_plugin() 來建立並新增實例。若外掛被停用時,應以 remove_inspector_plugin() 移除你新增的實例。
備註
這裡你載入的是腳本而非已封裝場景,因此應使用 new(),而不是 instantiate()。
# plugin.gd
@tool
extends EditorPlugin

var plugin


func _enter_tree():
    plugin = preload("res://addons/my_inspector_plugin/my_inspector_plugin.gd").new()
    add_inspector_plugin(plugin)


func _exit_tree():
    remove_inspector_plugin(plugin)
// Plugin.cs
#if TOOLS
using Godot;

[Tool]
public partial class Plugin : EditorPlugin
{
    private MyInspectorPlugin _plugin;

    public override void _EnterTree()
    {
        _plugin = new MyInspectorPlugin();
        AddInspectorPlugin(_plugin);
    }

    public override void _ExitTree()
    {
        RemoveInspectorPlugin(_plugin);
    }
}
#endif
與屬性檢查器互動
要與屬性檢查器面板互動,你的 my_inspector_plugin.gd 腳本必須繼承 EditorInspectorPlugin 類別。這個類別提供多個虛擬方法,能影響屬性檢查器如何處理屬性。
要讓腳本生效,必須實作 _can_handle() 方法。這個方法會針對每個被編輯的 Object 進行呼叫,若此外掛應處理該物件或其屬性,則需回傳 true。
備註
這也包含附加在物件上的任何 Resource。
你可以另外實作四個方法,在屬性檢查器的特定位置新增控制項。_parse_begin() 和 _parse_end() 會分別在解析每個物件的開頭和結尾時僅呼叫一次。這兩個方法可透過 add_custom_control() 在屬性檢查器的上方或下方新增控制項。
編輯器解析物件時,會呼叫 _parse_category() 和 _parse_property() 方法。在這兩個方法中,除了 add_custom_control(),你還可以呼叫 add_property_editor() 及 add_property_editor_for_multiple_properties()。這兩個方法是專門用來新增基於 EditorProperty 的控制項。
# my_inspector_plugin.gd
extends EditorInspectorPlugin

var RandomIntEditor = preload("res://addons/my_inspector_plugin/random_int_editor.gd")


func _can_handle(object):
    # We support all objects in this example.
    return true


func _parse_property(object, type, name, hint_type, hint_string, usage_flags, wide):
    # We handle properties of type integer.
    if type == TYPE_INT:
        # Create an instance of the custom property editor and register
        # it to a specific property path.
        add_property_editor(name, RandomIntEditor.new())
        # Inform the editor to remove the default property editor for
        # this property type.
        return true
    else:
        return false
// MyInspectorPlugin.cs
#if TOOLS
using Godot;

public partial class MyInspectorPlugin : EditorInspectorPlugin
{
    public override bool _CanHandle(GodotObject @object)
    {
        // We support all objects in this example.
        return true;
    }

    public override bool _ParseProperty(GodotObject @object, Variant.Type type,
        string name, PropertyHint hintType, string hintString,
        PropertyUsageFlags usageFlags, bool wide)
    {
        // We handle properties of type integer.
        if (type == Variant.Type.Int)
        {
            // Create an instance of the custom property editor and register
            // it to a specific property path.
            AddPropertyEditor(name, new RandomIntEditor());
            // Inform the editor to remove the default property editor for
            // this property type.
            return true;
        }

        return false;
    }
}
#endif
新增屬性編輯介面
EditorProperty 類別是一種特殊的 Control,可與屬性檢查器面板所編輯的物件互動。它本身不會顯示任何內容,但可以容納其他控制項節點,甚至是複雜的場景。
擴充 EditorProperty 的腳本有三個主要部分:
你必須定義
_init()方法,來設定控制項節點結構。你應該實作
_update_property()來處理外部對資料的更動。必須在某個時機以
emit_changed發出訊號,通知屬性檢查器該控制項已變更屬性。
你可以用兩種方式顯示你的自訂小工具。只用預設的 add_child() 方法,會將它顯示在屬性名稱右側;若在 add_child() 後呼叫 set_bottom_editor(),則會將它顯示在名稱下方。
# random_int_editor.gd
extends EditorProperty


# The main control for editing the property.
var property_control = Button.new()
# An internal value of the property.
var current_value = 0
# A guard against internal changes when the property is updated.
var updating = false


func _init():
    # Add the control as a direct child of EditorProperty node.
    add_child(property_control)
    # Make sure the control is able to retain the focus.
    add_focusable(property_control)
    # Setup the initial state and connect to the signal to track changes.
    refresh_control_text()
    property_control.pressed.connect(_on_button_pressed)


func _on_button_pressed():
    # Ignore the signal if the property is currently being updated.
    if (updating):
        return

    # Generate a new random integer between 0 and 99.
    current_value = randi() % 100
    refresh_control_text()
    emit_changed(get_edited_property(), current_value)


func _update_property():
    # Read the current value from the property.
    var new_value = get_edited_object()[get_edited_property()]
    if (new_value == current_value):
        return

    # Update the control with the new value.
    updating = true
    current_value = new_value
    refresh_control_text()
    updating = false

func refresh_control_text():
    property_control.text = "Value: " + str(current_value)
// RandomIntEditor.cs
#if TOOLS
using Godot;

public partial class RandomIntEditor : EditorProperty
{
    // The main control for editing the property.
    private Button _propertyControl = new Button();
    // An internal value of the property.
    private int _currentValue = 0;
    // A guard against internal changes when the property is updated.
    private bool _updating = false;

    public RandomIntEditor()
    {
        // Add the control as a direct child of EditorProperty node.
        AddChild(_propertyControl);
        // Make sure the control is able to retain the focus.
        AddFocusable(_propertyControl);
        // Setup the initial state and connect to the signal to track changes.
        RefreshControlText();
        _propertyControl.Pressed += OnButtonPressed;
    }

    private void OnButtonPressed()
    {
        // Ignore the signal if the property is currently being updated.
        if (_updating)
        {
            return;
        }

        // Generate a new random integer between 0 and 99.
        _currentValue = (int)GD.Randi() % 100;
        RefreshControlText();
        EmitChanged(GetEditedProperty(), _currentValue);
    }

    public override void _UpdateProperty()
    {
        // Read the current value from the property.
        var newValue = (int)GetEditedObject().Get(GetEditedProperty());
        if (newValue == _currentValue)
        {
            return;
        }

        // Update the control with the new value.
        _updating = true;
        _currentValue = newValue;
        RefreshControlText();
        _updating = false;
    }

    private void RefreshControlText()
    {
        _propertyControl.Text = $"Value: {_currentValue}";
    }
}
#endif
使用上述範例程式碼,你應該可以製作一個自訂小工具,將整數屬性預設的 SpinBox 控制項替換為一個能產生隨機值的 Button。