Attention: Here be dragons
This is the latest
(unstable) version of this documentation, which may document features
not available in or compatible with released stable versions of Godot.
Checking the stable version of the documentation...
3D 導覽總覽
Godot 提供多種物件、類別及伺服器,協助 2D 與 3D 遊戲進行基於格狀(Grid)或網格(Mesh)的導覽與尋路。以下將簡介 Godot 於 3D 場景中所有可用的導覽相關物件及其主要用途。
Godot 提供以下物件與類別來支援 3D 導覽功能:
- Astar3D
Astar3D物件可用於在帶權重的**節點**圖(Graph)中尋找最短路徑。AStar3D 類別最適合用於格狀(Cell-based)的 3D 遊戲玩法,不要求角色可到任意位置,只需移動至預設的特定位置。
- NavigationServer3D
NavigationServer3D提供強大的伺服器 API,可在由導覽網格定義的區域內搜尋兩點間的最短路徑。NavigationServer 最適合需要角色到達導覽網格區域內任意位置的 3D 即時遊戲。基於網格的導覽可有效擴展至大型遊戲世界,因為一大片區域通常只需一個多邊形即可定義,而格狀尋路則需大量格子。
NavigationServer 會管理多個導覽地圖,每張地圖由數個包含導覽網格資料的區域組成。代理可被放置於地圖上進行避障計算。與伺服器溝通時,會以 RID 來引用內部地圖、區域與代理。
- 可用的 NavigationServer RID 型別如下。
- 導覽地圖 RID
引用特定的導覽地圖,地圖中包含區域與代理。地圖會根據區域間距離自動合併導覽網格,並於每個物理影格同步區域與代理。
- 導覽區域 RID
引用特定導覽區域,該區域可存放導覽網格資料。可啟用或停用區域,並可用導覽層(navigation layer)位元遮罩限制其用途。
- 導覽連結 RID
引用特定導覽連結,可連接導覽網格上兩個任意距離的位置。
- 導覽代理 RID
引用特定的避障代理,避障行為由半徑值定義。
- 導覽障礙 RID
引用特定避障障礙,可用來影響及限制代理的避障速度。
下列場景樹節點可做為輔助,協助操作 NavigationServer3D API。
- NavigationRegion3D 節點
存放導覽網格資源的節點,該資源定義 NavigationServer3D 的導覽網格。
區域可設為啟用或停用。
可透過
navigation_layers位元遮罩進一步限制其在尋路時的用途。NavigationServer3D 會依鄰近原則將區域的導覽網格合併為一個綜合導覽網格。
- NavigationLink3D 節點
此節點可連接導覽網格上兩個任意距離的位置,供尋路使用。
連結可設為啟用或停用。
連結可設為單向或雙向。
可透過
navigation_layers位元遮罩進一步限制其在尋路時的用途。
連結會告知尋路系統有此連接,並指定其消耗。實際的代理控制與移動需於自訂腳本處理。
- NavigationAgent3D 節點
輔助節點,可簡化常用的 NavigationServer3D API 呼叫(如尋路與避障),建議搭配繼承 Node3D 的父節點使用。
- NavigationObstacle3D 節點
此節點可用來影響及限制啟用避障功能的代理的避障速度。注意:此節點**不會**影響代理的尋路,若要改變尋路必須修改導覽網格。
3D 導覽網格由下列資源所定義:
- NavigationMesh 資源
存放 3D 導覽網格資料的資源,並提供 3D 幾何烘焙選項,讓你可在編輯器內或執行時定義導覽區域。
NavigationRegion3D 節點使用此資源定義導覽區域。
NavigationServer3D 會使用此資源來更新各區域的導覽網格。
GridMap 編輯器會在每個格子有指定導覽網格時使用此資源。
也參考
你可以透過 3D Navigation 範例專案 來實際觀察 3D 導覽的運作方式。
3D 場景設定
以下步驟展示如何建立最基本的 3D 導覽功能,將會使用 NavigationServer3D 與 NavigationAgent3D 來進行路徑移動。
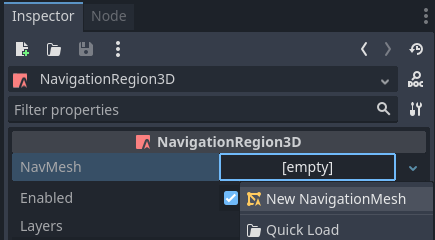
在場景中新增一個 NavigationRegion3D 節點。
點選區域節點,並新增一個 NavigationMesh 資源到該區域節點。
在區域節點下新增一個 MeshInstance3D 子節點。
選擇 MeshInstance3D 節點,新增一個 PlaneMesh,並將 xy 大小設為 10。
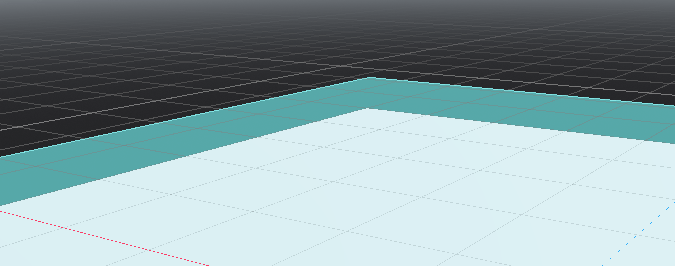
再選擇區域節點,並點擊上方工具列的「烘焙導覽網格」按鈕。

現在會出現一個透明導覽網格,懸浮於 PlaneMesh 上方一段距離。
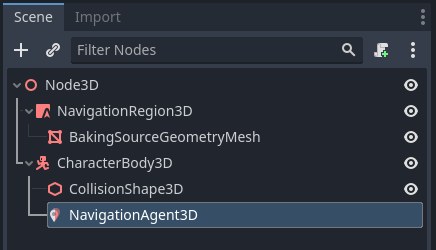
在場景中新增一個 CharacterBody3D 節點,並加上基本的碰撞形狀及一些網格作為視覺效果。
在角色節點下新增一個 NavigationAgent3D 子節點。
將以下腳本加到 CharacterBody3D 節點。請確保在場景完全載入且 NavigationServer 完成同步後才設定移動目標。此外,也可加入 Camera3D、燈光及環境,方便觀察效果。
extends CharacterBody3D

var movement_speed: float = 2.0
var movement_target_position: Vector3 = Vector3(-3.0,0.0,2.0)

@onready var navigation_agent: NavigationAgent3D = $NavigationAgent3D

func _ready():
    # These values need to be adjusted for the actor's speed
    # and the navigation layout.
    navigation_agent.path_desired_distance = 0.5
    navigation_agent.target_desired_distance = 0.5

    # Make sure to not await during _ready.
    actor_setup.call_deferred()

func actor_setup():
    # Wait for the first physics frame so the NavigationServer can sync.
    await get_tree().physics_frame

    # Now that the navigation map is no longer empty, set the movement target.
    set_movement_target(movement_target_position)

func set_movement_target(movement_target: Vector3):
    navigation_agent.set_target_position(movement_target)

func _physics_process(delta):
    if navigation_agent.is_navigation_finished():
        return

    var current_agent_position: Vector3 = global_position
    var next_path_position: Vector3 = navigation_agent.get_next_path_position()

    velocity = current_agent_position.direction_to(next_path_position) * movement_speed
    move_and_slide()
using Godot;

public partial class MyCharacterBody3D : CharacterBody3D
{
    private NavigationAgent3D _navigationAgent;

    private float _movementSpeed = 2.0f;
    private Vector3 _movementTargetPosition = new Vector3(-3.0f, 0.0f, 2.0f);

    public Vector3 MovementTarget
    {
        get { return _navigationAgent.TargetPosition; }
        set { _navigationAgent.TargetPosition = value; }
    }

    public override void _Ready()
    {
        base._Ready();

        _navigationAgent = GetNode<NavigationAgent3D>("NavigationAgent3D");

        // These values need to be adjusted for the actor's speed
        // and the navigation layout.
        _navigationAgent.PathDesiredDistance = 0.5f;
        _navigationAgent.TargetDesiredDistance = 0.5f;

        // Make sure to not await during _Ready.
        Callable.From(ActorSetup).CallDeferred();
    }

    public override void _PhysicsProcess(double delta)
    {
        base._PhysicsProcess(delta);

        if (_navigationAgent.IsNavigationFinished())
        {
            return;
        }

        Vector3 currentAgentPosition = GlobalTransform.Origin;
        Vector3 nextPathPosition = _navigationAgent.GetNextPathPosition();

        Velocity = currentAgentPosition.DirectionTo(nextPathPosition) * _movementSpeed;
        MoveAndSlide();
    }

    private async void ActorSetup()
    {
        // Wait for the first physics frame so the NavigationServer can sync.
        await ToSignal(GetTree(), SceneTree.SignalName.PhysicsFrame);

        // Now that the navigation map is no longer empty, set the movement target.
        MovementTarget = _movementTargetPosition;
    }
}
備註
在第一幀時,NavigationServer 的地圖尚未同步區域資料,此時任何路徑查詢都會回傳空結果。請於腳本中等待一幀,讓 NavigationServer 完成同步。