Attention: Here be dragons
This is the latest
(unstable) version of this documentation, which may document features
not available in or compatible with released stable versions of Godot.
Checking the stable version of the documentation...
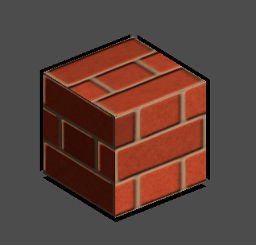
標準 3D 材質與 ORM 3D 材質
前言
StandardMaterial3D 與 ORMMaterial3D (遮蔽、粗糙度、金屬度)是 Godot 預設的 3D 材質,設計目標是讓美術人員在不必編寫著色器程式碼的情況下,也能擁有多數常用功能。如有進階需求,這些材質仍可轉換成自訂著色器。
本教學說明這兩種材質的所有參數設定。
將 SpatialMaterial 新增到物件有 4 種方法。可以在網格的 Material (材質)屬性中新增。可以在使用該網格的節點(比如 MeshInstance 節點)的 Material 屬性中新增,可以使用該網格的節點的 Material Override (材質覆蓋)屬性中新增,也可以是 Material Overlay (材質覆蓋層)屬性。
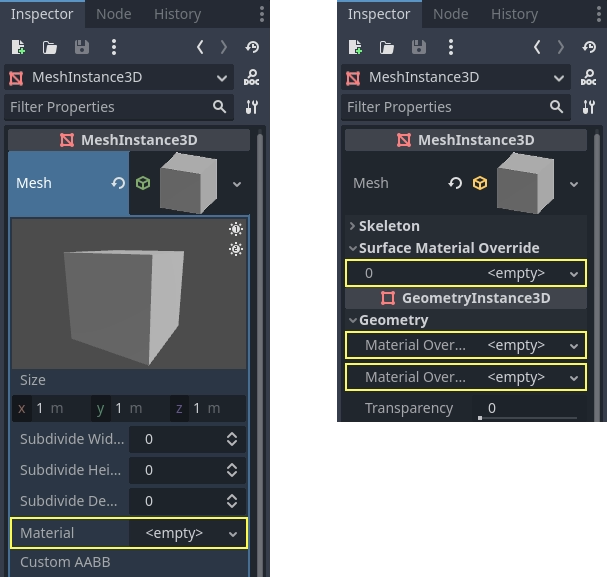
如果你把材質加到網格本身上, 每次那個網格被使用的時候都會有那個材質. 如果你用網格向一個節點新增材質, 那個材質僅會被那個節點使用, 也會覆蓋網格的材質屬性. 如果材質被新增到了節點的 Material Override(材質覆蓋) 屬性上, 它僅會被那個節點使用, 它也會覆蓋那個節點的常規材質屬性和網格的材質屬性.
Material Overlay (材質覆蓋層)屬性會在該網格所使用的目前材質**上方**再算繪一個材質。例如,可以用來在網格上放置半透明護盾效果。
BaseMaterial 3D 設定
StandardMaterial3D 有許多決定材質外觀的設定。所有這些都屬於 BaseMaterial3D 類別

ORM 材料幾乎完全相同,只有一處不同。沒有單獨的遮蔽、粗糙度和金屬設定和紋理,而是單一 ORM 紋理。此紋理的不同顏色通道用於每個參數。 Substance Painter 和 Armor Paint 等程式將為您提供以此格式匯出的選項,對於這兩個程式,它具有虛幻引擎的匯出預設,該引擎也使用 ORM 紋理。
透明
Godot 的材質預設為不透明,這樣可以加快算繪速度。但即使你在 反照率 > 紋理 屬性使用了透明貼圖(或將 反照率 > 顏色 設成透明色),也無法做到透視效果。
若要讓材質可被看穿,必須將其設為*透明*。Godot 提供了數種透明度模式:
Disabled: 材質為不透明。這是算繪最快、支援所有算繪特性的預設模式。
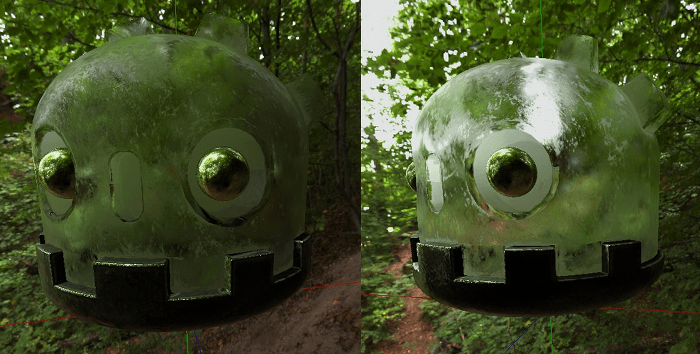
Alpha: 材質為透明。半透明區域會用混合方式算繪。這種模式較慢,但可呈現局部透明(半透明)效果。使用 Alpha 混合的材質無法投射陰影,且在螢幕空間反射中不可見。
Alpha 模式適合用於粒子特效與視覺特效(VFX)。
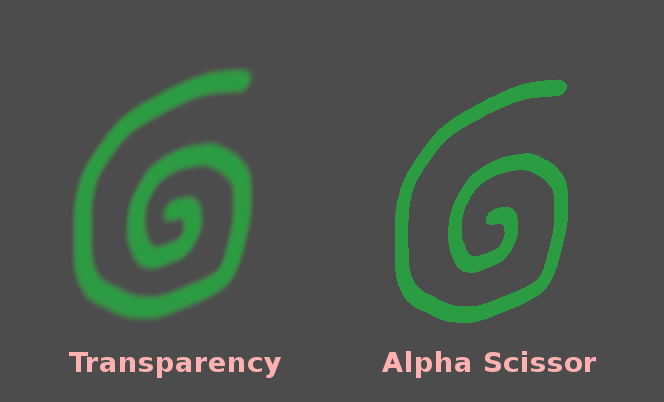
Alpha Scissor: 材質為透明。半透明區域若其透明度低於 Alpha Scissor 閾值 就不會被算繪(高於則以不透明算繪)。這比 Alpha 模式算繪快,且不會有透明排序問題,但僅能實現「全不透明或全透明」的效果,無法有漸層。使用此模式的材質可以投射陰影。
Alpha Scissor 非常適合用於植被、柵欄等需要硬邊緣且透明排序必須正確的場合。
Alpha Hash: 材質為透明。半透明區域以抖動方式算繪,同樣是「全透明或全不透明」,但抖動可讓部分透明效果根據畫面解析度以有限精度顯示。使用此模式的材質也可投射陰影。
Alpha Hash 適合寫實風格的頭髮材質,如果是卡通風格頭髮則建議用 Alpha Scissor 效果會更好。
Depth Pre-Pass: 先把物件的不透明像素用不透明管線算繪,再用 Alpha 混合算繪剩下的部分。這能讓透明度排序「大致」正確(但部分半透明區域還是可能有順序錯誤)。此模式下材質可以投射陰影。
備註
只要滿足下列任一條件,Godot 就會自動將材質切換為 Alpha 混合的透明模式:
將透明度模式設為 Alpha (如上所述)。
將混合模式設為預設值 Mix 以外的選項
啟用 Refraction、Proximity Fade 或 Distance Fade。
Alpha 混合(左)和 Alpha Scissor(右)透明度效果比較:
警告
Alpha 混合透明有幾個 限制:
Alpha 混合材質算繪速度顯著較慢,特別是多層重疊時。
Alpha 混合材質在多個透明表面重疊時可能出現排序錯誤,也就是遠方表面會顯示在近處表面上方。
Alpha 混合材質無法投射陰影,但可以接收陰影。
Alpha 混合材質不會出現在任何反射效果中(反射探針除外)。
螢幕空間反射與銳利的 SDFGI 反射不會作用在 Alpha 混合材質上。若啟用 SDFGI,則無論材質粗糙度為何,皆將使用模糊反射作為備援。
在採用 Alpha 透明模式之前,請評估是否有更適合你需求的其他透明模式。
Alpha 抗鋸齒
備註
此屬性僅在透明度模式為 Alpha Scissor 或 Alpha Hash 時可見。
Alpha Scissor 與 Alpha Hash 材質雖然比 Alpha 混合算繪更快,但在不透明與透明區域之間會有明顯硬邊。雖然可以用如 FXAA、TAA 這類後處理型 抗鋸齒技術,但通常會使畫面變模糊或產生重影。
有三種 Alpha 抗鋸齒模式可用:
Disabled: 不使用 Alpha 抗鋸齒。除非有額外抗鋸齒後處理,否則透明材質邊緣會有鋸齒。
Alpha Edge Blend: 讓透明與不透明區域之間可平滑過渡,也稱「Alpha to Coverage」。
Alpha Edge Clip: 讓透明與不透明區域邊緣保有銳利感,但具備抗鋸齒。也稱「Alpha to Coverage + Alpha to One」。
當 Alpha 抗鋸齒模式設為 Alpha Edge Blend 或 Alpha Edge Clip 時,會多出 Alpha Antialiasing Edge 屬性。這個屬性決定哪些像素會變透明。雖然在 Alpha Scissor 模式下你已設有「剪裁閾值」,但這個新閾值額外提供一段平滑過渡區段。Alpha Antialiasing Edge 必須*永遠*比 Alpha Scissor 閾值低,預設 0.3 配合剪裁閾值 0.5 是常用組合,但兩者數值有調整時請務必同步調整。
若你覺得抗鋸齒效果不明顯,可以提高 Alpha Antialiasing Edge 數值(但需小於 Alpha Scissor Threshold,若使用 Alpha Scissor)。反之,若發現攝影機靠近時紋理外觀變化明顯,則可降低 Alpha Antialiasing Edge 的數值。
重要
若要獲得最佳效果,專案設定中的 MSAA 3D 請設至少 2×,因 Alpha 抗鋸齒功能依賴於 MSAA 提供的 Alpha to Coverage。
若未啟用 MSAA,則僅會在材質邊緣套用固定抖動樣式,這對平滑邊緣效果有限(但多少還是有點幫助)。
混合模式
控制材質的混合模式。請記住,Mix 以外的任何模式都會強制物件通過透明管道。
Mix: (混合)預設混合模式,Alpha 控制物件可見的程度。
Add: (新增)對象會進行新增性的混合,非常適合耀斑或類似火焰的效果。
Subtract: The final color of the object is subtracted from the color of the screen.
Multiply: The final color of the object is multiplied with the color of the screen.
預乘 Alpha: 物件的顏色預期已經先與 alpha 相乘。當 alpha 為
0.0(完全透明) 時行為如同 Add,當 alpha 為1.0(不透明) 時行為如同 Mix。
剔除模式
確定算繪背面時不繪製對象的哪一側:
Back: 當不可見時, 物件的背面被剔除(預設).
Front: 當不可見時, 物體的正面被剔除.
Disabled: 用於雙面對象(不進行剔除).
備註
預設情況下,Blender 在材質上禁用背面剔除,匯出材質時配對其在 Blender 中的算繪方式。這意味著 Godot 中的材質會將其剔除模式設定為 Disabled。這會降低性能,因為背面將被算繪,即使它們不可見。要解決此問題,請在 Blender 的材質分頁中啟用 Backface Culling ,然後再次將場景匯出為 glTF。
深度繪製模式
指定何時必須進行深度算繪.
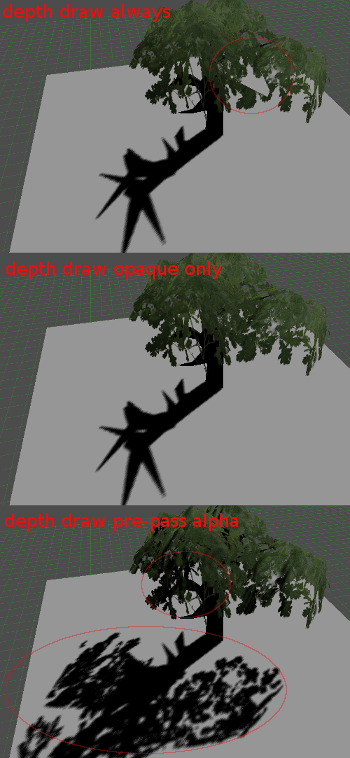
Opaque Only(僅限不透明, 預設): 僅為不透明對象繪製深度.
Always(始終): 為不透明和透明對象深度繪製.
Never(從不): 不進行深度抽取(不要將其與上面的No Depth Test(無深度測試)選項混淆).
Depth Pre-Pass(深度預通過): 對於透明物體, 首先使用不透明部分進行不透明的通過, 然後在上方繪製透明度. 將此選項與透明草或樹葉一起使用.
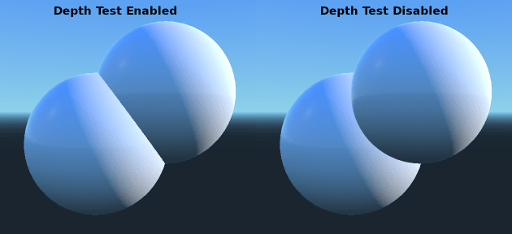
無深度測試
為了使近距離物體出現在遠處的物體上, 進行深度測試. 禁用它會導致物件出現在其他所有內容之上(或之下).
禁用此選項對於在世界空間中繪製指標最有意義, 並且與Material的 Render Priority 屬性一起效果很好(請參閱本頁底部).
Depth Test
This can be used to invert the standard depth test. When set to Inverted, the object will only appear when occluded, and will be hidden otherwise.
This has no effect if No Depth Test is enabled.

著色
著色器
材質支援三種著色模式: 逐像素 (Per-Pixel)、 逐頂點 (Per-Vertex)以及 無光照 (Unshaded)。

逐像素 模式會對每個像素計算光照,適用於大多數情境。但若有效能考量,也可選用其他模式。
逐頂點 (Per-Vertex)著色又稱「頂點光照」,只對每個頂點做一次光照計算,再在像素間內插。
在低階或行動裝置上,使用逐頂點光照能大幅提升效能。多層透明物件(如粒子系統)算繪時,採用逐頂點著色可提升效能,尤其攝影機靠近粒子時更明顯。
你也可以用逐頂點光照來營造懷舊低多邊形風格。

無光照**(Unshaded)模式完全不計算光照,僅直接輸出 **反照率 顏色。不會受場景燈光影響,且通常會比有光照的材質亮許多。
無光照算繪適合某些特殊視覺效果;如需極致效能,也很適合用於粒子系統或低階/行動裝置。
漫反射模式
指定當光線打到物件時,計算漫反射用的演算法。預設為 Burley,也可選用其他模式:
Burley: 預設模式,原始的 Disney Principled PBS 漫反射演算法。
Lambert: 不受粗糙度的影響。
Lambert Wrap: 當粗糙度增加時,將 Lambert 拓展至覆蓋 90 度以上。適用於頭髮和模擬廉價的次表面散射。這種實作是節能的。
Toon: 為照明提供硬邊緣, 光滑度受粗糙度的影響. 建議您從環境的環境光設定中禁用sky contribution(天空補償), 或禁用空間材質中的環境光以獲得更好的效果.

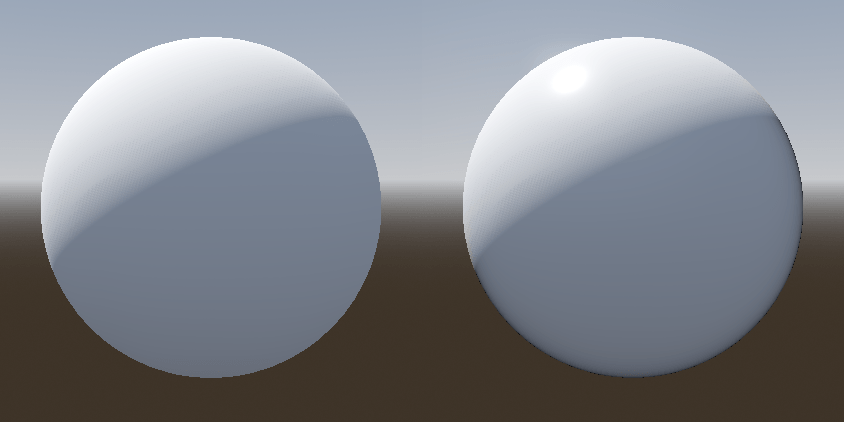
鏡面反射模式
指定鏡面反射斑點的呈現方式。鏡面反射斑點是在對象中反射的光源的形狀。
** ShlickGGX:** 現在PBR 3D引擎使用的最常見的blob.
Toon: 建立一個toon blob, 根據粗糙度改變大小.
禁用: 有時候blob很煩人. 消失吧!

停用環境光
使物體不會接收任何會照亮它的環境光。
停用霧
使物體不受基於深度或體積霧的影響。這對於粒子或其他新增混合的材質很有用,否則它們會顯示網格的形狀(即使在沒有霧的情況下看不見的地方)。
停用鏡面遮蔽
使物件在原本會被遮蔽的區域中,其反射不再被削減。
頂點顏色
這個設定允許選擇預設要如何處理來自您的 3D 建模應用程式的頂點顏色。預設情況下,它們會被忽略。

用作反照率
選擇此選項意味著用頂點顏色作為反射顏色.
是 sRGB
大多數3D DCC可能會將頂點顏色匯出為sRGB, 因此切換此選項將有助於它們看起來正確.
反照率
Albedo 是材質的基色, 所有其他設定都在其上運作. 設定為 Unshaded 時, 這是唯一可見的顏色. 在以前版本的Godot中, 這個通道被命名為 Diffuse . 名稱的改變主要是因為在PBR(Physically Based Rendering, 基於物理算繪)中, 這種顏色影響的計算遠不止漫射光照路徑.
反照率顏色(Albedo Color)可以和紋理一起使用,因為它們會被相乘。
反照率顏色和紋理的 Alpha通道 也用於物件透明度. 如果你使用帶 alpha通道 的顏色或紋理, 請確保啟用透明度或 alpha scissoring 以使其正常工作.
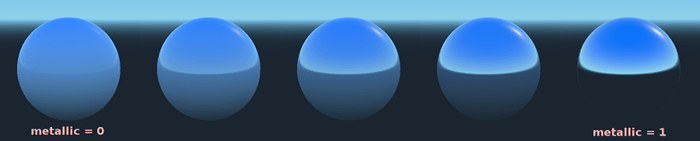
金屬度
由於其簡單性,Godot使用金屬模型而不是別的模型. 此參數定義材質的反射程度. 反射越多, 漫射/環境光的影響越小, 反射的光越多. 這種模型被稱為 "能量守恆(energy-conserving)".
Specular 參數是反射率的一般數量(與 Metallic 不同,能量不守恆,因此請將其保留為 0.5 並且除非你需要,否則不要碰它)。
最小的內部反射率是 0.04,因此不可能使材質完全不產生反射,就像在現實生活中一樣。
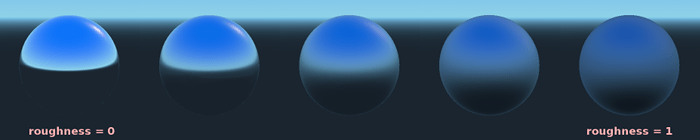
粗糙度
粗糙度 會影響反射的發生方式. 值 0 使其成為完美的鏡子, 而 1 的值完全模糊了反射(模擬自然微表面). 最常見的材質型別可以通過 Metallic 和 Roughness 的正確組合來實作.
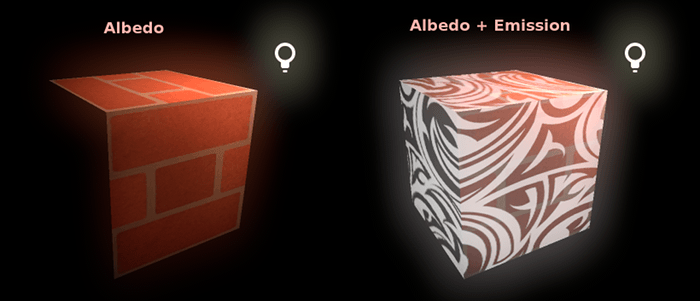
自發光
自發光 指定材質會發出多少光 (請注意,這不包含周圍幾何體的燈光,除非使用 VoxelGI 或 SDFGI)。這個值會被加到最終結果影像中,且不受場景中其他燈光影響。
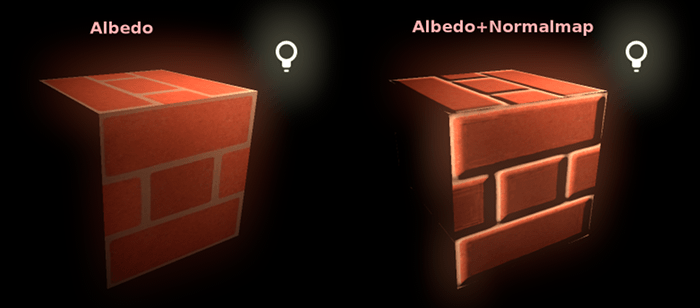
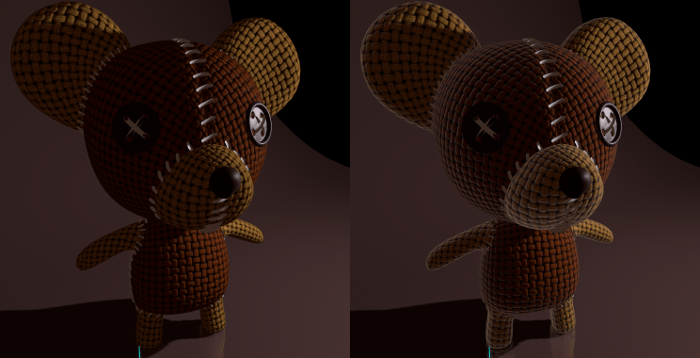
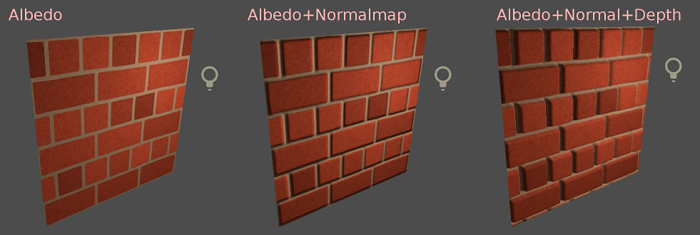
法線貼圖
法線貼圖允許你設定一個代表更精細形狀細節的紋理, 這不會修改幾何體, 只會修改光的入射角. 在Godot中, 為了更好的壓縮和更廣泛的相容性, 只使用了法線貼圖的紅色和綠色通道.
備註
Godot 中的法線對應必須使用 X+, Y- 與 Z+ 座標。換句話說,若匯入使用於其他引擎的素材,則必須將其 Y 軸翻轉過來,否則,法線對應方向的 Y 軸可能會顯示為相反。
有關更多法線對應的資訊 (包含各種常見引擎的座標順序表),請參考 此處 (英文) 。
彎折法線貼圖
彎折法線貼圖描述環境光的平均方向。與一般法線貼圖不同,它用於改善材質對光照的反應,而不是用來增加表面細節。
可透過以下兩種方式達成:
讓間接散射光更貼近全域光照的結果。
若啟用鏡面遮蔽,則會使用彎折法線與環境遮蔽來計算,而不是只從環境光計算。這包括螢幕空間環境遮蔽(SSAO)與其他來源的環境遮蔽。

為了更好的壓縮與更廣的相容性,Godot 只使用彎折法線貼圖的紅色與綠色通道。
在建立彎折法線貼圖時,為了在 Godot 中正確運作,需要滿足以下三點:
在烘焙時必須使用 餘弦分佈 的射線。
貼圖必須建立於 切線空間 中。
彎折法線貼圖需要使用 X+、Y+、Z+ 的座標,亦即 OpenGL 風格。若你匯入的是為其他引擎製作的素材,可能是 DirectX 風格,這種情況下需要將彎折法線貼圖轉換為 Y 軸翻轉。可在匯入面板的 Channel Remap 區段將綠色通道設定為 Inverted Green 來達成。
備註
彎折法線貼圖與一般法線貼圖不同,兩者不可互換。
邊緣
一些織物具有小的微毛, 導致光在其周圍散射. Godot使用 Rim 參數模擬它. 與僅使用發射通道的其他邊緣照明實施方式不同, 這實際上考慮了光(沒有光意味著沒有邊緣). 這使得效果顯著地更加可信.
邊緣大小取決於粗糙度, 並且有一個特殊參數來指定它必須如何著色. 如果 Tint 為 0, 則燈光的顏色用於邊緣. 如果 Tint 是 1, 則使用材質的反照率. 使用中間的值通常效果最佳.
清漆
Clearcoat 參數用於為材質新增輔助的透明塗層。這在汽車油漆和玩具中很常見。在實踐中,它是在現有材質之上新增的較小的鏡面反射斑點。
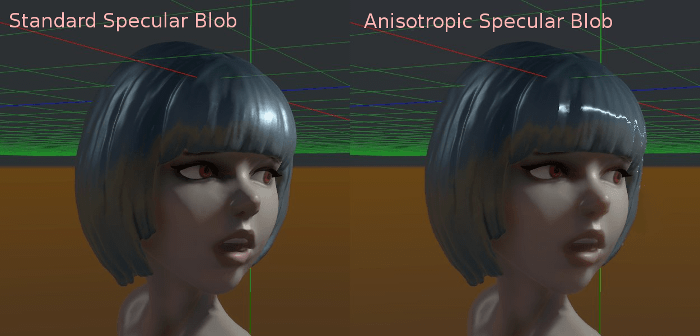
各向異性
這會更改鏡面反射斑點的形狀並將其與切線空間對齊。各向異性通常與頭髮一起使用,或使諸如拉絲鋁之類的材質更加逼真。與流向貼圖結合使用時效果特別好。
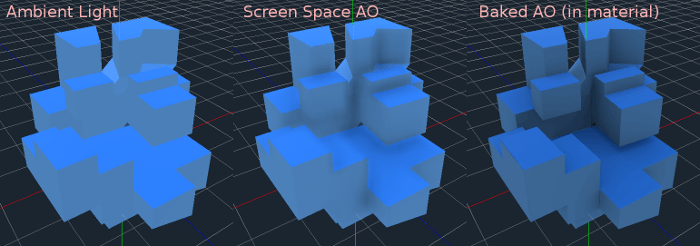
環境光遮蔽
可以指定烘焙的環境遮擋貼圖. 此貼圖會影響有多少環境光到達物體每個表面(預設情況下它不會影響直接光). 雖然可以使用螢幕空間環境遮擋(Screen-Space Ambient Occlusion, SSAO)來生成環境遮擋, 但沒有什麼能比良好烘焙的AO貼圖的品質更好. 建議盡可能烘焙環境遮擋.
光照
在材質上設定高度圖會產生光線步進搜尋,以模擬沿著視角方向的凹陷適當位移。這僅會創造深度的錯覺,且不會新增實際的幾何體——至於用於物理碰撞的高度圖形狀 (例如地形),請參閱 HeightMapShape3D。它可能不適用於複雜的物件,但它會為貼圖產生逼真的深度效果。為了達到最佳效果,高度 應該與法線貼圖一起使用。
次表面散射
這僅適用於 Forward+ 算繪器,不適用於 Mobile 或 Compatibility 算繪器。
此效果類比穿透物體表面, 散射然後散出的光. 創造逼真的皮膚, 大理石, 有色液體等有用.
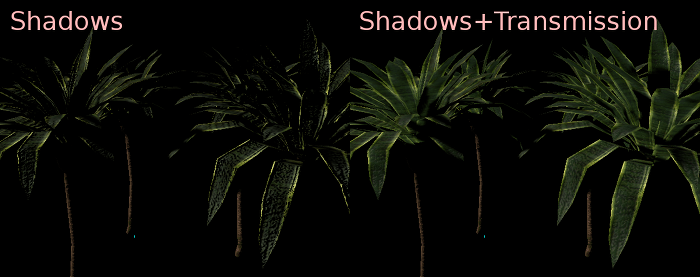
背部照明
這可以控制有多少光從被點亮的一側(正對燈光)傳輸到暗側(背對燈光). 這適用於植物葉子, 草, 人耳等薄物體.
折射
啟用折射時,Godot 會嘗試從正在算繪的物件後方獲取資訊。這能以類似現實生活中折射的方式來扭曲透明度。
請記住使用透明反照率紋理(或減少反照率顏色的 Alpha 通道)以使折射可見,因為折射依賴透明度來產生可見效果。
折射也會將材質粗糙度考慮在內。較高的粗糙度值將會讓折射後方的物件看起來更模糊,這模擬了真實世界的行為。如果您在啟用折射且反照率透明度降低時無法看到物件後方,請降低材質的 粗糙度 值。
可以選擇在 折射紋理 屬性中指定法線貼圖,以允許在每個像素的基礎上扭曲折射方向。
備註
折射作為螢幕空間效果實作,並強製材質透明。這使得效果相對較快,但這會導致一些限制:
透明度排序 可能會出現問題。
折射材料不能折射到自身或其他透明材料。另一種透明材料後面的折射材料將是看不見的。
螢幕外的物體不能出現在折射中。這在高折射強度值時最為明顯。
折射材料前面的不透明材料將看起來具有“折射”邊緣,即使它們不應該如此。
細節
Godot允許使用輔助反射和法線貼圖生成細節紋理, 可以通過多種方式進行混合. 通過將其與二級UV或三平面模式相結合, 可以實作許多有趣的紋理.
有幾種設定可以控制細節的使用方式.
Mask(遮罩): 細節遮罩是一個黑白圖像, 用來控制紋理的混合位置. 白色為細節紋理, 黑色為常規材質紋理, 不同深淺的灰色用於材質紋理和細節紋理的部分混合.
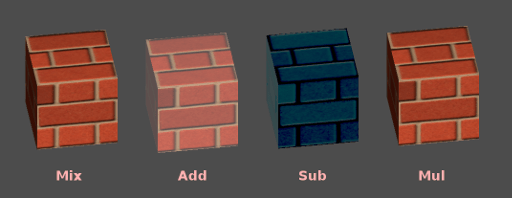
混合模式: 有四種模式控制紋理的混合方式.
融合: 合併兩個紋理的像素值. 黑色時, 僅顯示材質紋理;白色時, 僅顯示細節紋理. 灰色的值在兩者之間建立一個平滑的混合.
相加: 將一個紋理與另一個紋理的像素值相加. 與融合模式不同的是, 兩個紋理在蒙板的白色部分而不是灰色部分完全混合. 原始紋理在黑色部分基本沒有變化
相減: 將一個紋理的像素值與另一個紋理的像素值相減. 第二種紋理在蒙版的白色部分被完全減去, 在黑色部分只被減去一點, 灰色部分根據具體實際紋理減去不同的程度.
相乘: 將上方紋理中每個像素的 RGB 通道數與下方紋理中相應像素的值相乘.
Albedo: 在此處放置要混合的反射紋理. 如果此插槽中沒有任何內容, 則預設情況下將其解釋為純白.
法線: 在此處放置需要混合的法線紋理. 如果這個槽中沒有任何東西, 它將被解釋為一個平坦的法線貼圖. 即使材質未啟用法線貼圖也可以使用這個槽.
UV1和UV2
Godot每種材質支援兩個UV通道. 二級UV通常可用於環境遮擋或發射(烘焙的光照). UV可以縮放和偏移, 這在使用重複紋理時很有用.
Triplanar Mapping(三平面對應)
UV1和UV2都支援三平面對應. 這是獲得紋理座標的另一種方法, 有時稱為 "自動紋理". 紋理在X,Y和Z中取樣, 並由法線混合. 可以在世界空間或物件空間中執行三平面對應.
在下圖中,你可以看到所有像素如何與世界三平面共用相同的材質,因此磚紋理在它們之間平滑地繼續。
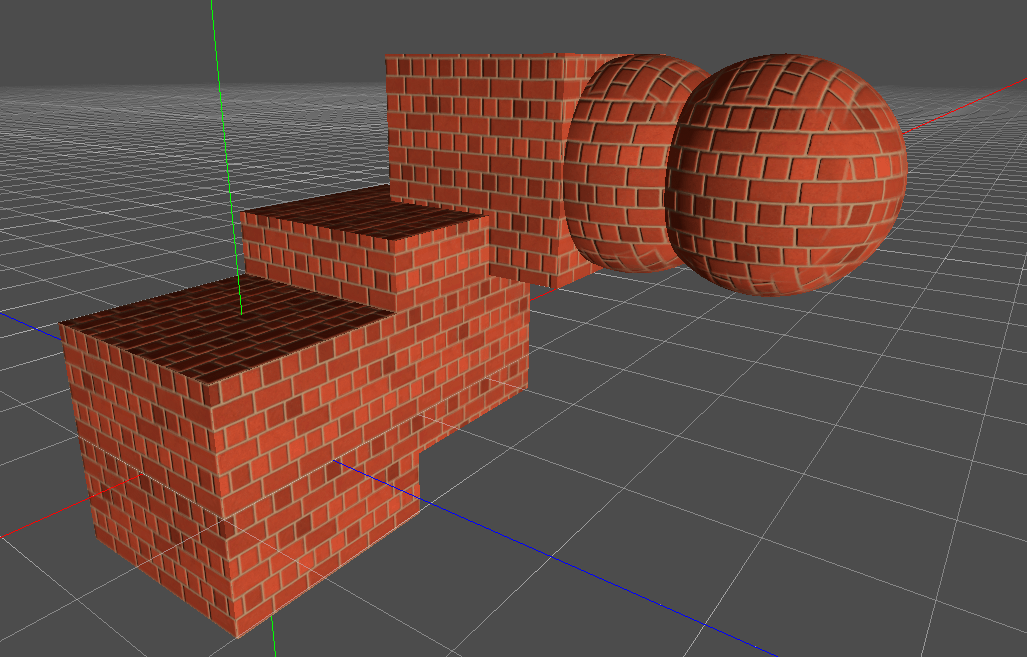
世界三平面
使用三平面對應時(見下文, 在UV1和UV2設定中), 在物件局部空間中計算三平面. 此選項使triplanar在世界空間中工作.
重新取樣
篩選
用於材質所使用的貼圖的過濾方法。請參閱 這個頁面 以獲取所有選項及其說明的完整列表。
重覆
如果材質使用的貼圖是否重複,以及它們如何重複。請參閱 本頁面 以取得完整的選項列表及其描述。
陰影
Disable Receive Shadows
使物件不會接收任何可能會被投射到其上的陰影.
Shadow to Opacity
光照會調整 Alpha,使陰影區域不透明、無陰影區域透明。適合用於 AR 場景將陰影融合在相機畫面上。
佈告欄
Billboard Mode(看板模式)
為繪圖材質啟用看板模式. 這會控制物體面向攝像頭的方式:
Disabled: 禁用看板模式.
啟用: 公告牌模式已啟用。物件的 -Z 軸將總是面向攝影機的視平面。
Y 軸布告板: 物件的 X 軸將總是會對齊攝影機的視角平面。
粒子公告牌: 最適合用於粒子系統,因為它允許指定 翻頁動畫。

僅在公告牌模式為 粒子公告牌 時, 粒子動畫 區段才可見。
Billboard Keep Scale(看板保持縮放)
啟用在看板模式下縮放網格.
生長
沿法線指向的方向增長對象頂點:
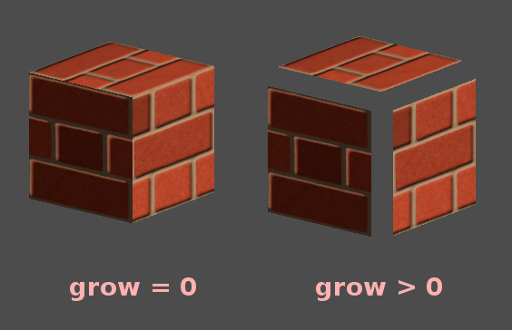
這通常用於建立廉價的輪廓. 新增第二個material pass, 使其變為黑色, 無陰影(unshaded), 反向剔除(Cull Front), 並新增一些增長:
備註
為了讓 Grow 如預期般運作,網格必須具有連接的面與共用頂點,也就是「平滑著色」。如果網格具有不連接的面與獨立頂點,也就是「平面著色」,使用 Grow 時網格將會出現縫隙。
Note that in Godot 4.5 onwards, stencil buffer-based outlines are available using the Outline stencil mode. This can be used as an alternative to Grow for outlines.
變換
固定大小
這使得無論距離如何, 物件都以相同的大小呈現. 這主要用於指示物(無深度測試和高算繪優先順序)和某些型別的看板.
使用點大小
此選項僅在算繪的幾何體由點組成時有效(通常從3D DCC匯入時由三角形組成). 如果是這樣, 那麼這些點可以被調整大小(見下文).
點大小
繪製點時,指定點的大小,單位為像素。
使用粒子拖尾
這僅適用於 Forward+ 以及 Mobile 算繪器,不適用於相容性算繪器。
若為 true,將啟用 GPUParticles3D 拖尾所需的著色器部分。這同時需要使用具有適當骨架綁定的網格,例如 RibbonTrailMesh 或 TubeTrailMesh。若在非 GPUParticles3D 的網格材質上啟用此功能,會導致材質算繪出錯。
使用 Z 裁切縮放
將被算繪的物件朝向相機縮放以避免與牆面等產生裁切。此功能用於與相機相對固定的物件,例如玩家手臂、工具等。調整此設定時,光照與陰影仍可正常運作,但像 SSAO、SSR 等螢幕空間效果在較低縮放時可能會出問題。因此請盡量將此設定維持接近 1.0。
使用 FOV 覆寫
覆寫 Camera3D 的視角角度(單位為度)。
備註
行為等同於在 Camera3D 上設定視角,且 Camera3D.keep_aspect 設為 Camera3D.KEEP_HEIGHT。另外,在非透視相機上(忽略視角設定)可能顯示不正確。
Proximity and distance fade(接近和距離漸隱)
Godot 支援材質因彼此靠近或與攝影機距離不同而自動淡出。接近漸隱效果適合用於軟粒子、或讓大面積水體與岸邊自然融合。
距離漸隱適合用於光束效果或需在特定距離後才出現的指示物等應用。
請注意,若以 Pixel Alpha 模式啟用鄰近漸隱或距離漸隱,會強制採用 Alpha 混合。Alpha 混合較吃 GPU,可能造成透明排序問題,也會停用許多材質功能(如陰影投射)。
備註
如欲讓角色靠近攝影機時自動消失,建議使用 Pixel Dither ,或更推薦 Object Dither (速度更快)。
Pixel Alpha 模式:物件每個像素的透明度會隨與攝影機距離而改變。這是最直接的效果,但會強制進入透明材質管線(例如不能投射陰影)。
Pixel Dither 模式:利用只顯示部分像素的方式來近似透明度。
Object Dither 模式:與上面類似,但整個物件表面會應用相同的透明計算,速度更快。

Stencil
Since Godot 4.5, Godot allows materials to make use of the stencil buffer. This feature is commonly used to create outlines and X-ray effects, which can be useful to highlight objects, especially behind walls.
The Outline and X-Ray modes assign a preconfigured stencil material in the material's Next Pass property. The Custom mode can be used for advanced effects.

Materials that write to the stencil buffer are always drawn in the transparent pass, so they are subject to the usual transparency limitations.
備註
Like with the Grow property, for the stencil outline to work as expected, the mesh must have connected faces with shared vertices, or "smooth shading". If the mesh has disconnected faces with unique vertices, or "flat shading", the mesh will appear to have gaps when using a stencil outline.
Stencil outlines render similarly to the Grow property, but won't look identical in every scenario, especially when intersections with opaque surfaces are involved.
材質
Render priority(算繪優先順序)
可以更改物件的算繪順序, 儘管這對於透明物件有用(或執行深度繪製但沒有顏色繪製的不透明物件, 例如地板上的裂縫).
物件會先根據不透明/透明隊列排序,再依 render_priority 設定。數值較高者後算繪。透明物件還會依深度進一步排序。
深度測試優先於算繪優先順序設定。僅調整優先順序無法強制不透明物件互相覆蓋。
下一階段
於材質上設定 next_pass 會讓物件再以該材質多算繪一次。
材質會依不透明/透明隊列排序,再根據 render_priority 設定,高優先順序者最後算繪。

除非有使用 Grow 或其他頂點變形設定,否則兩個材質間的深度測試結果會相同。多層透明 pass 請務必搭配 render_priority 以確保正確順序。