Attention: Here be dragons
This is the latest
(unstable) version of this documentation, which may document features
not available in or compatible with released stable versions of Godot.
Checking the stable version of the documentation...
移動玩家
在這一課中,我們將新增玩家的動作、動畫,並將其設定為偵測碰撞。
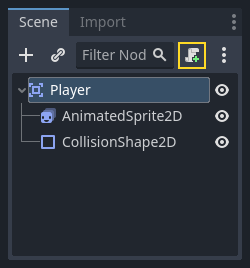
現在我們需要一個內建節點沒有提供的功能,所以需要自己寫腳本了。點擊 Player 節點,然後點擊 [附加腳本] 按鈕:
腳本設定視窗內的設定可以保持預設值。直接點擊 [建立] 就好:
備註
如果要建立 C# 腳本或其他語言的腳本,在點擊建立前記得在 [語言] 下拉選單內選擇語言。

備註
如果這是你第一次接觸 GDScript,請在繼續之前閱讀 為場景編寫腳本 。
首先我們先宣告這個物件所需要的成員變數:
extends Area2D

@export var speed = 400 # How fast the player will move (pixels/sec).
var screen_size # Size of the game window.
using Godot;

public partial class Player : Area2D
{
    [Export]
    public int Speed { get; set; } = 400; // How fast the player will move (pixels/sec).

    public Vector2 ScreenSize; // Size of the game window.
}
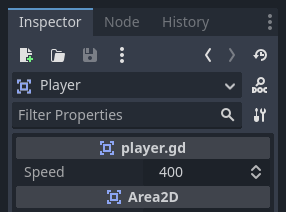
Using the export keyword on the first variable speed allows us to set
its value in the Inspector. This can be handy for values that you want to be
able to adjust just like a node's built-in properties. Click on the Player
node and you'll see the property now appears in the Inspector in a new section
with the name of the script. Remember, if you change the value here, it will
override the default value specified in the script (the script won't be modified).
警告
如果你使用 C#,每當你想看到新的匯出變數或訊號時,你需要(重新)建置專案組件。這個建置可以透過點擊編輯器右上角的 建置 按鈕手動觸發。

你的 player.gd 腳本應該已經包含 _ready() 和 _process() 函式。如果你沒有選擇上方顯示的預設範本,請在遵循課程的同時建立這些函式。
_ready() 函式是當節點進入場景樹後會呼叫的函式,這裡正是取得遊戲視窗大小的好時機:
func _ready():
    screen_size = get_viewport_rect().size
public override void _Ready()
{
    ScreenSize = GetViewportRect().Size;
}
接著我們可以使用 _process() 函式來定義玩家要做的事。 _process() 在每一影格都會被呼叫,所以我們會用 _process() 來更新遊戲內需要常常變化的元素。而對於 Player,我們需要做這些事:
檢查輸入。
沿指定方向移動。
播放適當的動畫。
首先,我們需要檢查輸入——玩家有按按鍵嗎?在這個遊戲中,我們需要檢查四個方向的輸入。輸入操作是在專案設定中的 [輸入對應] 裡設定的。可以在輸入對應中定義自定事件,並給事件指定不同的按鍵、滑鼠事件或其他輸入。在這個示範遊戲中,我們會使用預設事件,這些事件是被分配到鍵盤上的方向鍵。
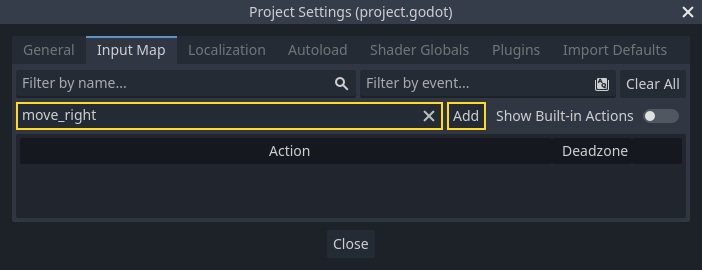
點擊 專案 -> 專案設定 打開專案設定視窗,然後按一下頂部的 輸入對應 分頁。在頂部欄中鍵入“move_right”,然後按一下“新增”按鈕以新增該 move_right 動作。
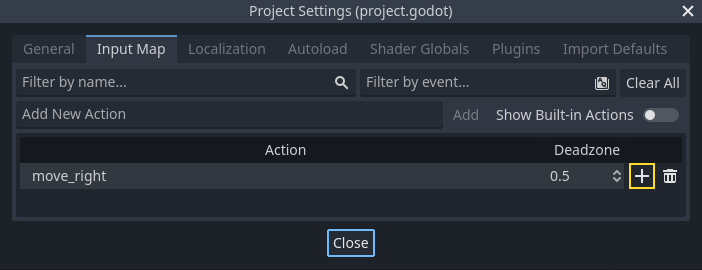
我們需要為這個操作分配一個按鍵。按一下右側的“+”圖示,打開事件管理器視窗。
會自動選中“偵聽輸入中...”區域。按下鍵盤上的“右方向”鍵,選單應該像這樣。
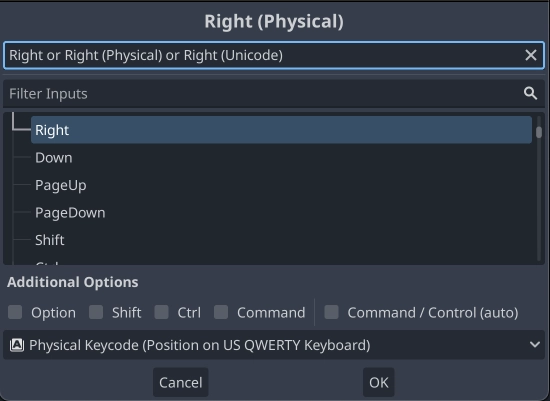
選擇“確定”按鈕。現在“右方向”鍵與 move_right 動作關聯了。
重複這些步驟以再新增三個對應:
move_left對應到左方向鍵。move_up對應到向上方向鍵。move_down對應到向下方向鍵。
現在場景看起來會這樣:
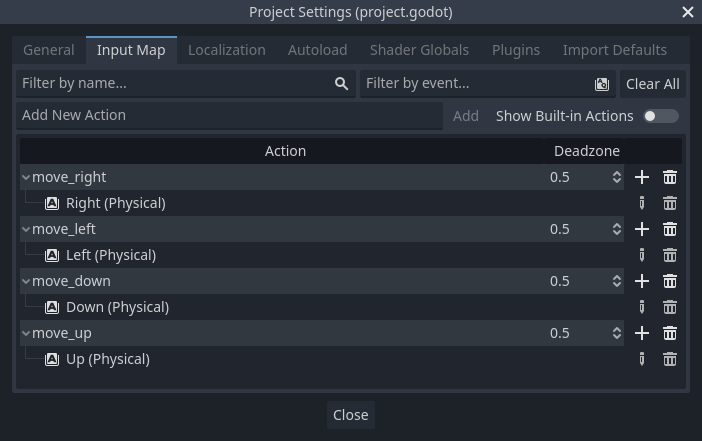
按一下“關閉”按鈕關閉專案設定。
備註
我們只將一個鍵對應到每個輸入動作,但你可以將多個鍵、操縱桿按鈕或滑鼠按鈕對應到同一個輸入動作。
可以用 Input.is_action_pressed() 來偵測按鍵是否被按下。這個函式會在按鍵被按下時回傳 true ,若沒按下則會回傳 false 。
func _process(delta):
    var velocity = Vector2.ZERO # The player's movement vector.
    if Input.is_action_pressed("move_right"):
        velocity.x += 1
    if Input.is_action_pressed("move_left"):
        velocity.x -= 1
    if Input.is_action_pressed("move_down"):
        velocity.y += 1
    if Input.is_action_pressed("move_up"):
        velocity.y -= 1

    if velocity.length() > 0:
        velocity = velocity.normalized() * speed
        $AnimatedSprite2D.play()
    else:
        $AnimatedSprite2D.stop()
public override void _Process(double delta)
{
    var velocity = Vector2.Zero; // The player's movement vector.

    if (Input.IsActionPressed("move_right"))
    {
        velocity.X += 1;
    }

    if (Input.IsActionPressed("move_left"))
    {
        velocity.X -= 1;
    }

    if (Input.IsActionPressed("move_down"))
    {
        velocity.Y += 1;
    }

    if (Input.IsActionPressed("move_up"))
    {
        velocity.Y -= 1;
    }

    var animatedSprite2D = GetNode<AnimatedSprite2D>("AnimatedSprite2D");

    if (velocity.Length() > 0)
    {
        velocity = velocity.Normalized() * Speed;
        animatedSprite2D.Play();
    }
    else
    {
        animatedSprite2D.Stop();
    }
}
我們先從設定 velocity (速率) 開始,設定成 (0, 0) ——這表示在預設情況下,玩家應該不會移動。接著依據不同的輸入來增加/減少 velocity 來往不同方向移動。例如,如果同時按住 右 與 下 方向鍵,最終的 velocity 向量值應該是 (1, 1) 。因為這個情況下我們同時增加了水平與垂直方向的移動距離,所以玩家的移動速度應該比只在水平方向上移動 還要快 。
我們可以通過 正規化 (Normalize) 速率來防止這種情況,也就是要把移動的 距離 設定為 1 ,接著乘以需要的速度。這表示在對角線上移動不會比水平移動還要快了。
小訣竅
如果你從來沒學習過向量數學運算或是需要複習的話,可以參考這篇 向量數學 瞭解 Godot 中是如何使用向量的。雖然對於這篇本篇教學剩下的部分來說不必要,但若能瞭解 Godot 中的向量是最好不過的了。
同時也需要檢查玩家有沒有在移動,這樣才能呼叫 AnimatedSprite 上的 play() 跟 stop() 。
小訣竅
$ 是 get_node() 的簡寫。所以上面的程式碼中 $AnimatedSprite.play() 等同於 get_node("AnimatedSprite").play() 。
在 GDScript 中, $ 會回傳與目前節點相對路徑上的節點,若找不到則會回傳 null 。由於 AnimatedSprite 是目前節點的子節點,所以可以寫成 $AnimatedSprite 。
現在玩家會面向不同方向了,可以接著來更新玩家的位置。還可以使用 clamp() (箝制) 來防止 Player 物件跑出畫面外。箝制 一個值,就代表把值限制在一個給定的範圍內。將下列程式碼放到 _process 函式的末尾 (記得確定不要放到 else 縮排下了):
position += velocity * delta
position = position.clamp(Vector2.ZERO, screen_size)
Position += velocity * (float)delta;
Position = new Vector2(
    x: Mathf.Clamp(Position.X, 0, ScreenSize.X),
    y: Mathf.Clamp(Position.Y, 0, ScreenSize.Y)
);
小訣竅
_process() 函式的 delta 參數代表了 影格時長 ——即是自從上一個影格到現在這個影格所花費的時間。通過這個數值可以確保即使影格率發生變化,移動的距離也能保持不變。
點擊「執行目前場景」(F6,macOS 上為 Cmd + R) 並確認您可以朝所有方向在螢幕上移動玩家。
警告
若「除錯工具」中出現了這樣的錯誤
Attempt to call function 'play' in base 'null instance' on a null instance (嘗試在基礎型別為「null 實體」的 null 實體上呼叫「play」函式)
通常這代表程式中的 AnimatedSprite 節點名稱拼錯了。節點名稱有區分大小寫,而且 $NodeName 這種語法中的名稱必須與場景樹裡能看到的節點名稱一致。
選擇動畫
現在玩家可以移動了,現在讓我們來根據移動的方向改變播放的 AnimatedSprite。「walk」動畫會讓玩家看起來朝右邊行走,朝左邊行走時使用 flip_h 屬性來水平翻轉動畫。另一個動畫是「up」,朝下行走時使用 flip_v 來垂直翻轉。來把程式碼放到 _process() 函式的尾端:
if velocity.x != 0:
    $AnimatedSprite2D.animation = "walk"
    $AnimatedSprite2D.flip_v = false
    # See the note below about the following boolean assignment.
    $AnimatedSprite2D.flip_h = velocity.x < 0
elif velocity.y != 0:
    $AnimatedSprite2D.animation = "up"
    $AnimatedSprite2D.flip_v = velocity.y > 0
if (velocity.X != 0)
{
    animatedSprite2D.Animation = "walk";
    animatedSprite2D.FlipV = false;
    // See the note below about the following boolean assignment.
    animatedSprite2D.FlipH = velocity.X < 0;
}
else if (velocity.Y != 0)
{
    animatedSprite2D.Animation = "up";
    animatedSprite2D.FlipV = velocity.Y > 0;
}
備註
在這段程式碼中的布林賦值是程式設計師常用的一種簡寫方式。因為做了數值比較 (會得到布林值) 後也需要將這個布林值 賦值 到變數上,所以我們可以把這兩件事合在一起做。可以比較看看下面這段程式碼跟上方範例中單行布林賦值的程式:
if velocity.x < 0:
    $AnimatedSprite2D.flip_h = true
else:
    $AnimatedSprite2D.flip_h = false
if (velocity.X < 0)
{
    animatedSprite2D.FlipH = true;
}
else
{
    animatedSprite2D.FlipH = false;
}
再執行一次場景來看看各個方向的動畫是否正確。
小訣竅
很多人會在這裡打錯動畫名稱。SpriteFrames 面板上的動畫名稱必須與程式碼中輸入的名稱一致。如果動畫名稱為 「Walk」 ,則程式碼中也必須使用大寫的「W」。
確保能正常移動後,來把下面這行程式碼加到 _ready() 裡。如此一來在遊戲開始的時候玩家會隱藏起來:
hide()
Hide();
準備碰撞
我們希望 Player 被敵人撞到時能偵測到,但我們還沒做好敵人!沒關係,因為我們會用 Godot 的 訊號 來做這個功能。
在腳本頂部新增以下內容。如果你使用的是 GDScript,請將其新增到 extends Area2D 之後。如果你使用 C#,請將其新增到 public partial class Player : Area2D 之後:
signal hit
// Don't forget to rebuild the project so the editor knows about the new signal.

[Signal]
public delegate void HitEventHandler();
This defines a custom signal called "hit" that we will have our player emit
(send out) when it collides with an enemy. We will use Area2D to detect the
collision. Select the Player node and click the Signals tab next to the
Inspector tab to see the list of signals the player can emit:
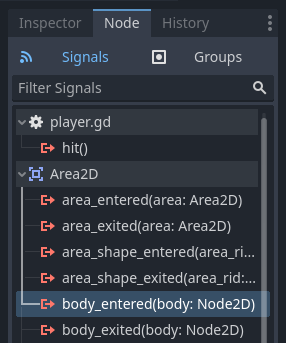
請注意我們自訂的 "hit" 訊號也在那裡!由於我們的敵人將會是 RigidBody2D 節點,我們需要 body_entered(body: Node2D) 訊號。當一個物理物件接觸到玩家時,這個訊號就會發射。點擊「連接...」,接著會出現「連接訊號」視窗。
Godot 會直接在你的腳本中建立一個完全相同的函數名稱。你現在不需要更改預設設定。
警告
如果你使用外部文字編輯器(例如 Visual Studio Code),目前有個錯誤會導致 Godot 無法正確運作。你會被導向你的外部編輯器,但新的函式不會在那裡。
在這種情況下,你需要自己將這個函式寫進「玩家」的腳本檔案中。

請注意綠色圖示,它表示訊號已連接到此函數;這並不代表該函數存在,只是訊號將會嘗試連接到一個具有該名稱的函數,因此請務必仔細檢查函數名稱的拼寫是否完全一致!
接下來新增這段程式到函式中:
func _on_body_entered(_body):
    hide() # Player disappears after being hit.
    hit.emit()
    # Must be deferred as we can't change physics properties on a physics callback.
    $CollisionShape2D.set_deferred("disabled", true)
// We also specified this function name in PascalCase in the editor's connection window.
private void OnBodyEntered(Node2D body)
{
    Hide(); // Player disappears after being hit.
    EmitSignal(SignalName.Hit);
    // Must be deferred as we can't change physics properties on a physics callback.
    GetNode<CollisionShape2D>("CollisionShape2D").SetDeferred(CollisionShape2D.PropertyName.Disabled, true);
}
每當敵人碰撞到玩家後都會送出這個訊號。這時我們需要關閉玩家的碰撞偵測,這樣才不會觸發超過一次的 hit 訊號。
備註
如果在引擎處理碰撞過程中間禁用碰撞區域可能會發生錯誤。所以我們需要使用 set_deferred() 來讓 Godot 等到能安全禁用碰撞區域後再禁用。
最後我們要做的,就是新增一個函式,用來在開始新遊戲時重設玩家。
func start(pos):
    position = pos
    show()
    $CollisionShape2D.disabled = false
public void Start(Vector2 position)
{
    Position = position;
    Show();
    GetNode<CollisionShape2D>("CollisionShape2D").Disabled = false;
}
在玩家部分的工作完成後,我們將在下一課中研究敵人。