Attention: Here be dragons
This is the latest
(unstable) version of this documentation, which may document features
not available in or compatible with released stable versions of Godot.
Checking the stable version of the documentation...
編輯實體
備註
This tutorial refers to instantiating scenes in the editor. To learn how to instantiate scenes from code, see 節點與場景實體.
Godot's approach to instantiation described below should not be confused with hardware instancing that can be used to render large amounts of similar objects quickly. See 使用 MultiMesh 進行優化 instead.
上一部分中,我們瞭解到場景是一系列組織成樹狀結構的節點,其中只有一個節點是根節點。你可以將專案拆分成任意數量的場景。這一功能可以幫你將遊戲拆解成不同的元件,並進行組織。
你可以建立任意數量的場景並將他們保存成副檔名為 .tscn (“text scene” 文字場景)的檔。上節課的 label.tscn 檔就是一個例子。我們把這些檔叫作“打包的場景”(Packed Scene),因為它們將場景的內容資訊進行了打包。
這有一個小球的例子。它由以下內容組成:一個叫“Ball”的 RigidBody2D 節點是根節點,可以讓小球下落、在撞牆後反彈;一個 Sprite2D 節點以及一個 CollisionShape2D 。

Once you have saved a scene, it works as a blueprint: you can reproduce it in other scenes as many times as you'd like. Replicating an object from a template like this is called instantiation.

As we mentioned in the previous part, instantiated scenes behave like a node: the editor hides their content by default. When you instantiate the Ball, you only see the Ball node. Notice also how each duplicate has a unique name.
Ball 場景的實例最開始都和 ball.tscn 有相同的結構和屬性。不過你也可以單獨修改各個實例,比如修改反彈的方式、重量等源場景所暴露的屬性。
最佳實踐
Let's use instantiation in practice to see how it works in Godot. We invite you to download the ball's sample project we prepared for you: instancing_starter.zip.
將壓縮檔解壓縮到你的電腦。要匯入它,你需要使用專案管理器。開啟 Godot 即可進入專案管理器;若已開啟 Godot,請點選 (Ctrl + Shift + Q ,macOS 為 Ctrl + Option + Cmd + Q )
In the Project Manager, click the button.

In the file dialog that appears, navigate to the folder you extracted.
Double-click the project.godot file to select it.

Finally, click the button to import the project.

A window notifying you that the project was last opened in an older Godot version may appear. That's not an issue. Click to open the project.
The project contains two packed scenes: main.tscn, containing walls against
which the ball collides, and ball.tscn. The main scene should open
automatically. If you're seeing an empty 3D scene instead of the main scene, click the 2D button at the top of the screen.


讓我們為 Main 節點新增一個小球作為子節點。在“場景”面板中,選擇 Main 節點。然後點擊場景面板頂部的連結圖示。這個按鈕的作用是為目前選中節點新增另一個場景的實例作為子節點。

Double-click the ball scene to instantiate it.

Logo 會顯示在螢幕的最上方。

點擊「新增合集」然後拖移並選擇整個圖塊表。

按 Ctrl + F (或 macOS 上 Cmd + F) 可以搜尋列表。
Now, we want to create more instances of the Ball node. With the ball still selected, press Ctrl + D (Cmd + D on macOS) to duplicate it. Click and drag the new ball to a different location.

你可以重複這個過程,直到你已經放幾個在場景上。

再次運作遊戲。現在你應該看到每個小球都各自下落。這就是實例的作用。每一個都是範本場景的獨立副本。
編輯實體
實例還有很多用法。使用這個功能,你可以:
使用 Inspector 修改其中一顆球的屬性,而不影響其他實例。
打開
ball.tscn場景修改 Ball 節點,從而修改所有 Ball 的預設屬性。在保存時,專案中所有 Ball 的實例都會更新其屬性值。
備註
修改實例上的屬性總是會覆蓋對應打包場景中的值。
我們來試試看。在檔案系統中雙擊 ball.tscn 以開啟它。

在左側的 Scene 面板選取 Ball 節點,接著在右側的 Inspector 中點擊展開 PhysicsMaterial 屬性。
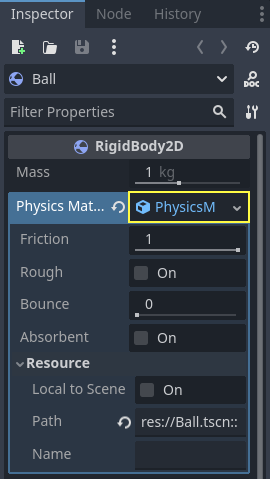
將其 Bounce(彈力)屬性設為 0.5 ,只要點擊對應的數字欄位、輸入 0.5 、然後按 Enter 就可以了。

按下 F5 (macOS 上是 Cmd + B) 來遊玩遊戲,並注意現在所有球體的彈跳幅度都變大了。由於「Ball 場景」是所有實例的範本,修改並儲存它會導致所有實例同步更新。
Let's now adjust an individual instance. Head back to the main scene by clicking on the corresponding tab above the viewport.

Select one of the instantiated Ball nodes and, in the Inspector, set its
Gravity Scale value to 10.

A gray "revert" button appears next to the adjusted property.

可以注意到在已經調整的屬性旁邊會出現一個灰色的 [還原] 按鈕。如果出現了這個按鈕就代表修改了實體化的場景,而且這個節點的數值覆蓋了原始場景的值。就算再次修改原本的場景,這裡自定的數值還是會保留。點擊 [還原] 按鈕就能把屬性還原成原始場景的值。
重新運作遊戲,請注意這個小球會比其他小球落得快得多。
備註
你可能會注意到無法更改球體的 PhysicsMaterial 數值。這是因為 PhysicsMaterial 是 資源 ,在連結到原始場景的情況下,必須先將其設為唯一才能編輯。要讓資源在某個實例中成為唯一,請在 Inspector 中對 Physics Material 屬性點擊右鍵,並在選單中選擇 。
資源也是 Godot 遊戲的關鍵元件,我們會在後續課程中介紹。
作為設計語言的場景實例
Godot中的實例和場景提供了一種優秀的設計語言,使該引擎與其他引擎不同。我們從一開始就圍繞這個概念設計Godot。
我們建議在使用 Godot 製作遊戲時忽略架構程式碼模式,例如模型-視圖-控制器 (MVC) 或實體關係圖。相反,你可以從想像玩家將在遊戲中看到的元素開始,並圍繞它們建構程式碼。
例如,可以這樣想像簡單的射擊遊戲:
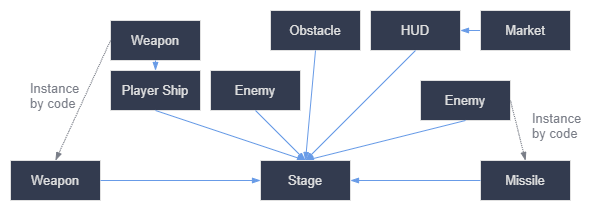
幾乎任何類型的遊戲都能畫出類似的示意圖。每個矩形代表玩家視角中可見的實體,箭頭則指向各場景的實例化者。
Once you have a diagram, we recommend creating a scene for each element listed in it to develop your game. You'll use instantiation, either by code or directly in the editor, to build your tree of scenes.
開發遊戲 (或是一般軟體) 時,我們總會花費許多時間來設計架構,然後再花時間把遊戲的元素都套用到這個架構上。以場景為基礎來設計就取代了這個過程,讓開發變得更快速而且更直觀,也讓你能直接專注於實作遊戲本身的邏輯。由於大多數的遊戲元件都可以直接對應到場景上,使用使用以場景實體化為基礎的設計也就能在架構上花費較少的程式碼。
再來看看另一個某方面來說更複雜的例子。這個例子是開放世界型別的遊戲,有很多素材以及巢狀的元素:
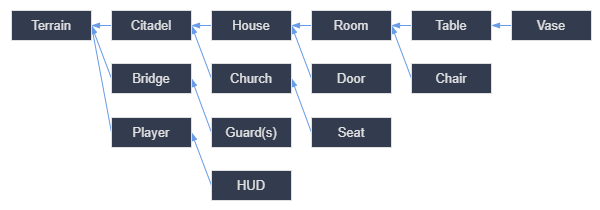
Imagine we started by creating the room. We could make a couple of different room scenes, with unique arrangements of furniture in them. Later, we could make a house scene that uses multiple room instances for the interior. We would create a citadel out of many instantiated houses and a large terrain on which we would place the citadel. Each of these would be a scene instantiating one or more sub-scenes.
接下來我們可以建立一些代表守衛 (以及其他 NPC) 的場景,然後也把這些場景都加進城堡裡。這樣一來,這些 NPC 就間接地進到了整個遊戲世界裡了。
在 Godot 裡,很容易就可以通過這種方式來迭代出遊戲,需要做的就只是建立場景、實體化場景然後建立更多場景再實體化更多場景。而且,不管是對於程式設計師或非程式設計師來說,Godot 的編輯器 UI 很友善。一般標準的團隊開發流程還會有 2D 與 3D 設計師、關卡設計師、遊戲設計師以及動畫家的參與,大家都會使用 Godot 編輯器界面來進行作業。
總結
Instantiation, the process of producing an object from a blueprint, has many handy uses. With scenes, it gives you:
能讓你的遊戲拆分成可充分利用的元件。
一個建構和封裝複雜系統的工具。
一種以自然方式思考遊戲專案結構的語言。