Attention: Here be dragons
This is the latest
(unstable) version of this documentation, which may document features
not available in or compatible with released stable versions of Godot.
Checking the stable version of the documentation...
WebRTC
HTML5、WebSocket、WebRTC
Godot 最大特色之一是可匯出 HTML5/WebAssembly 平台,讓你的遊戲直接在瀏覽器上執行。
這對於展示版與正式遊戲都是好機會,但過去網路功能有限。瀏覽器以前只支援 HTTPRequests,直到 WebSocket、WebRTC 先後成為標準。
WebSocket
WebSocket 協定於 2011 年 12 月標準化,讓瀏覽器能穩定雙向連線伺服器。這個協定很適合推播通知,也常用於聊天、回合遊戲等。
不過 WebSocket 仍然基於 TCP,傳輸可靠但延遲高,不適合 VoIP 或即時遊戲。
WebRTC
因此,Google 從 2010 年開始開發 WebRTC,並於 2017 年成為 W3C 候選標準。WebRTC 相當複雜,需結合多種技術(如 ICE、DTLS、SDP),可讓兩個節點間高速、即時又安全地通訊。
核心理念是找出兩個節點間最快的通路,盡量直接連線,避免經過中繼伺服器。
但這也有交換條件:通訊前必須先交換媒體資訊(SDP 格式),這通常透過所謂的 WebRTC 訊號伺服器來完成。
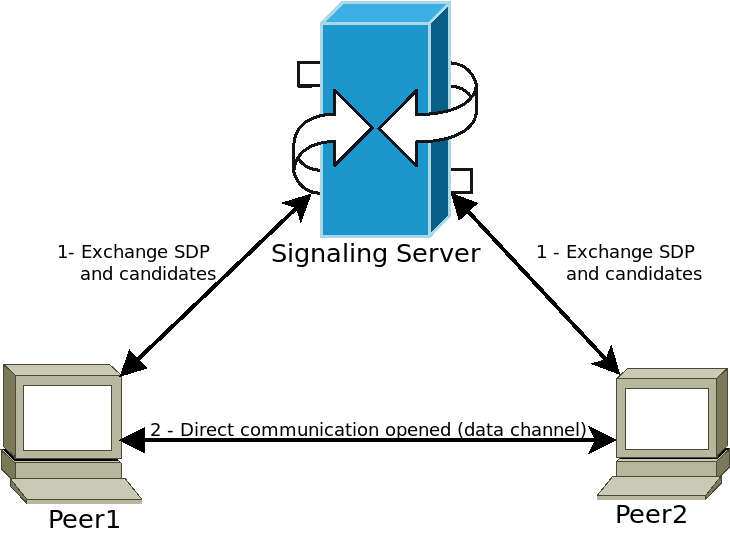
節點會先連到訊號伺服器(如 WebSocket 伺服器)交換媒體資訊,伺服器將這些資訊轉發給其他節點,讓彼此建立直接連線。交換完成後即可斷開訊號伺服器,維持 P2P 連線。
在 Godot 中使用 WebRTC
Godot 的 WebRTC 由兩個主要類別 WebRTCPeerConnection、WebRTCDataChannel 和多人 API WebRTCMultiplayerPeer 組成。更多細節請見 高階多人連線。
備註
這些類別在 HTML5 平台自動可用,但**原生(非 HTML5)平台需安裝額外 GDExtension 外掛**。詳情與最新版下載請見 <https://github.com/godotengine/webrtc-native>。
警告
匯出到 Android 時,請在匯出專案或一鍵部署前,於 Android 匯出設定啟用 INTERNET 權限,否則所有網路連線都會被 Android 阻擋。
基本連線範例
下例示範如何在同一應用程式內建立兩個 peer 的 WebRTC 連線。雖非實務應用,但能幫助你了解 WebRTC 連線的設定流程。
extends Node

# Create the two peers
var p1 = WebRTCPeerConnection.new()
var p2 = WebRTCPeerConnection.new()
# And a negotiated channel for each each peer
var ch1 = p1.create_data_channel("chat", {"id": 1, "negotiated": true})
var ch2 = p2.create_data_channel("chat", {"id": 1, "negotiated": true})

func _ready():
    # Connect P1 session created to itself to set local description.
    p1.session_description_created.connect(p1.set_local_description)
    # Connect P1 session and ICE created to p2 set remote description and candidates.
    p1.session_description_created.connect(p2.set_remote_description)
    p1.ice_candidate_created.connect(p2.add_ice_candidate)

    # Same for P2
    p2.session_description_created.connect(p2.set_local_description)
    p2.session_description_created.connect(p1.set_remote_description)
    p2.ice_candidate_created.connect(p1.add_ice_candidate)

    # Let P1 create the offer
    p1.create_offer()

    # Wait a second and send message from P1.
    await get_tree().create_timer(1).timeout
    ch1.put_packet("Hi from P1".to_utf8_buffer())

    # Wait a second and send message from P2.
    await get_tree().create_timer(1).timeout
    ch2.put_packet("Hi from P2".to_utf8_buffer())

func _process(_delta):
    # Poll connections
    p1.poll()
    p2.poll()

    # Check for messages
    if ch1.get_ready_state() == ch1.STATE_OPEN and ch1.get_available_packet_count() > 0:
        print("P1 received: ", ch1.get_packet().get_string_from_utf8())
    if ch2.get_ready_state() == ch2.STATE_OPEN and ch2.get_available_packet_count() > 0:
        print("P2 received: ", ch2.get_packet().get_string_from_utf8())
這將印出:
P1 received: Hi from P1
P2 received: Hi from P2
本地訊號範例
本例擴充前述範例,將兩個 peer 拆到不同場景,並用 singleton 做訊號伺服器。
extends Node
# An example p2p chat client.

var peer = WebRTCPeerConnection.new()

# Create negotiated data channel.
var channel = peer.create_data_channel("chat", {"negotiated": true, "id": 1})

func _ready():
    # Connect all functions.
    peer.ice_candidate_created.connect(self._on_ice_candidate)
    peer.session_description_created.connect(self._on_session)

    # Register to the local signaling server (see below for the implementation).
    Signaling.register(String(get_path()))


func _on_ice_candidate(mid, index, sdp):
    # Send the ICE candidate to the other peer via signaling server.
    Signaling.send_candidate(String(get_path()), mid, index, sdp)


func _on_session(type, sdp):
    # Send the session to other peer via signaling server.
    Signaling.send_session(String(get_path()), type, sdp)
    # Set generated description as local.
    peer.set_local_description(type, sdp)


func _process(delta):
    # Always poll the connection frequently.
    peer.poll()
    if channel.get_ready_state() == WebRTCDataChannel.STATE_OPEN:
        while channel.get_available_packet_count() > 0:
            print(String(get_path()), " received: ", channel.get_packet().get_string_from_utf8())


func send_message(message):
    channel.put_packet(message.to_utf8_buffer())
本地訊號伺服器如下:
備註
這個本地訊號伺服器設計為 singleton,用來連結同場景下的兩個 peer。
# A local signaling server. Add this to autoloads with name "Signaling" (/root/Signaling)
extends Node

# We will store the two peers here
var peers = []

func register(path):
    assert(peers.size() < 2)
    peers.append(path)
    if peers.size() == 2:
        get_node(peers[0]).peer.create_offer()


func _find_other(path):
    # Find the other registered peer.
    for p in peers:
        if p != path:
            return p
    return ""


func send_session(path, type, sdp):
    var other = _find_other(path)
    assert(other != "")
    get_node(other).peer.set_remote_description(type, sdp)


func send_candidate(path, mid, index, sdp):
    var other = _find_other(path)
    assert(other != "")
    get_node(other).peer.add_ice_candidate(mid, index, sdp)
接著可以這樣使用:
# Main scene (main.gd)
extends Node

const Chat = preload("res://chat.gd")

func _ready():
    var p1 = Chat.new()
    var p2 = Chat.new()
    add_child(p1)
    add_child(p2)

    # Wait a second and send message from P1
    await get_tree().create_timer(1).timeout
    p1.send_message("Hi from %s" % String(p1.get_path()))

    # Wait a second and send message from P2
    await get_tree().create_timer(1).timeout
    p2.send_message("Hi from %s" % String(p2.get_path()))
這將印出類似以下內容:
/root/main/@@3 received: Hi from /root/main/@@2
/root/main/@@2 received: Hi from /root/main/@@3
用 WebSocket 遠端訊號傳遞
一個使用 WebSocket 訊號通知對等端及 WebRTC 多人遊戲對等端 的更進階展示專案,可在 godot 展示專案 中的 networking/webrtc_signaling 下取得。